Improve
Updates for Rock 18.1
No updates made.Updates for Rock 1.0
No updates made.Updates for Rock 2.0
No updates made.Updates for Rock 3.0
No updates made.Updates for Rock 4.0
Below is a summary of the updates for this version.
- Added some notes about the transaction date used when scanning checks.
- New recommendation on using the latest Ranger driver with Canon check readers.
- Added a few updates to the check scanning software section.
- Updated details on the batch blocks and the new batch audit log.
- New chapter on the Giving Analytics block.
- Updated the transaction screens with several small changed. Also
noted that in Rock v4.0 all transactons must be in a batch.
- New chapter on Benevolence.
- Added description of the new Pledge Analytics page.
- Documented the new Transaction Source option for the scanning application.
- Added documentation for the new Saved Payment Accounts page.
- Documented the new dataview filter on the statement generator.
- The Pledge List block has a new Last Modified column and plenty of new block settings
to make the block a powerful tool for your external website..
- Added a new section on how to refund a transaction.
- Added information on additions to the transaction list.
Updates for Rock 5.0
Below is a summary of the updates for this version.
- Added information on the new NMI gateway.
Updates for Rock 6.0
Below is a summary of the updates for this version.
- Documented the new features of the benevolence request system.
- Added information on the new contribution statement list on the
person profile page.
- Added information about how to create new custom financial account attributes.
- Added additional security actions to Security for Finance chapter.
- Added Transactions Created Using Teller Import section to Batches chapter.
- Removed PDS from Payment Gateway options in Payment Gateways chapter.
- Added block names in Online Contribution Statements section of Contribution Statements chapter for clarification.
- Corrected callouts on Account Detail screen in Accounts chapter.
Updates for Rock 7.0
Below is a summary of the updates for this version.
- Added details on how to handle transferring to new payment gateway.
- Updated Account Detail screenshots and noted hierarchical navigation structure.
- Updated Giving Analytics screenshots to show Advanced Options and updated callout information.
- Added Payment Reversal Notification Workflow documentation to Payment Gateways and NMI Gateway sections.
- Added Giving Envelopes chapter.
- Added screenshot and callouts for Business Contributions Detail Page and added information about setting up scheduled transactions for businesses.
- Updated Scheduled Transactions screenshot and callouts.
- Updated Downloading Transactions configuration options in the Payment Gateways chapter.
- Added Financial Batch Attributes information to the Batches chapter.
- Added Advanced Transaction Entry Block Settings chapter.
- Updated Statement Generator screenshots and documentation to include Save Settings in the Contribution Statements chapter.
- Added additional security actions to Security for Finance chapter.
- Added Transactions Created Using Teller Import section in Batches chapter.
- Added Automated Batch documentation and screen shot to Batches chapter.
- Updated Statement Generator steps and screenshots in Contribution Statements chapter.
- Removed PDS from Payment Gateway options in Payment Gateways chapter.
- Added block names in Online Contribution Statements section of Contribution Statements chapter for clarification.
- Updated Statement Generator screenshots and information.
Updates for Rock 8.0
Below is a summary of the updates for this version.
- Updated Statement Generator screenshots and information.
- Added Converting a Person to a Business section to Businesses chapter.
Updates for Rock 9.0
Below is a summary of the updates for this version.
- Added support for Image Safe Magtek check scanner
- New check-scanner UI and added features
Updates for Rock 10.0
Below is a summary of the updates for this version.
- Added details to describe single-campus behavior.
Updates for Rock 11.0
Below is a summary of the updates for this version.
- The credit card expiration notice job can optionally delete expired cards
- Businesses can now be merged in the same way as person records
Updates for Rock 12.0
Below is a summary of the updates for this version.
- The Rock Statement Generator has a new look and new features
Updates for Rock 13.0
Below is a summary of the updates for this version.
- The Business Detail page has been updated with a new look and new features
- The new Giving Overview features provide detailed analysis of a person's giving and innovative alerts when an individual’s giving patterns change
- Benevolence Requests have new features and options as well as a redesigned look
- The Statement Generator software now allows you to save your configuration for future runs, provides additional run details, and lets you save the run information to a file
Updates for Rock 14.0
Below is a summary of the updates for this version.
- Text Giving allows people to donate from their phone by sending a simple text message
Updates for Rock 15.0
Below is a summary of the updates for this version.
-
Businesses can now have Actions like the existing
Actions on the Person Profile (e.g., launch Photo
Request workflow)
-
The new Utility Payment Entry block is the Swiss
Army Knife of transaction entry features
Updates for Rock 16.0
Below is a summary of the updates for this version.
- Businesses can optionally be stored in attributes of type Person
- Text Giving has configurable responses for failed transactions
- Pledge History tracks changes to pledges for transparency and accountability
Updates for Rock 17.0
Below is a summary of the updates for this version.
- New reports include the Volunteer Generosity Report, Tithing Overview and Transaction Fee Report
Welcome
Rock is developed on a clear set of objectives. These objectives cover the
craftsmanship we want to bring to the product as well as the flexibility we
want to achieve through open-source freedom. They also define what the product
will do, which by default, defines what it won't do. Here’s what Rock is all
about: we seek to improve relationships through quality software and processes.
This means that if a tool or process makes a difference to your organization's
guest, then we want to work hard to help you achieve success. However, this
also means that, while there are a great many important back-office needs for
your organization, they won't fit squarely into our charter, at least not at
this time.
Sounds complicated, but here’s the bottom line: while a full back-office
accounting system is important to every organization, it's not something that
fits into our stated mission. Keep in mind that we’re a small team of
developers pouring our time and effort into creating a crafted Relationship
Management System. In the famous, albeit translated words of Michael Porter,
"We can’t be all products to all people." We do work with a number of sponsors
who offer tools you can use to build your accounting system. Some of the tools work with Rock. Some replace Rock.
When using these tools, it's important to work with the vendor to create a finance structure that
works for your organization.
So, if you're wondering, "Will Rock replace my accounting system?" the
answer is no. That said, Rock does have some key features that organizational
accounting teams will love. These features center around donor management
since this is a major touch point with your guests. Let’s take a look at
what's possible.
It Goes Beyond Gifts
While we describe many of Rock's financial tools in terms of
giving
or donations,
keep in mind they are simply financial transactions. If your organization
works around the concept of
dues
or payments,
you can use these same tools. We've worked hard to make these tools be as
reusable and multi-purpose as possible.
Financial Components
Before diving into the tools, let's look at the basic financial components of
Rock. To do this, we'll step through the components, starting with the person.
Again, it's important to note that while we use a scenario of
donations,
these transactions could just as easily be
dues or
other forms of payments.
Transactions
Like everything in Rock, it all starts with people. People make financial
transactions with your organization through gifts, donations, subscriptions
or dues. These transactions can be simple (like money given to a single
purpose) or they can be more complex (perhaps a single transaction covers
multiple purposes). To be able to handle multiple purposes, transactions
have one or more detail records to hold the information for each purpose.
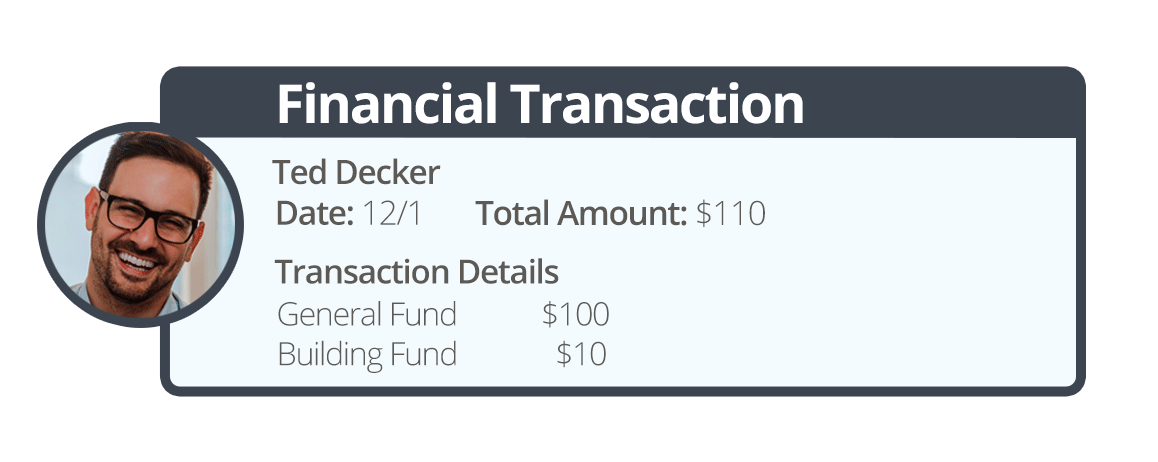
In our example below, Ted has given $110 dollars to Rock Solid Church. One
hundred of these dollars are designated for the General Fund account with
the remaining ten dollars going to the Building Fund account.
Transactions
Batches
Transactions that occur in a similar date range are grouped together into
batches. These batches help organize the transactions. They also play a
key role in integrating to your General Ledger account system. Instead of
re-entering every transaction into your General Ledger, you can enter the
batch totals knowing that Rock will keep the historical details for you to
reference later if you need them.
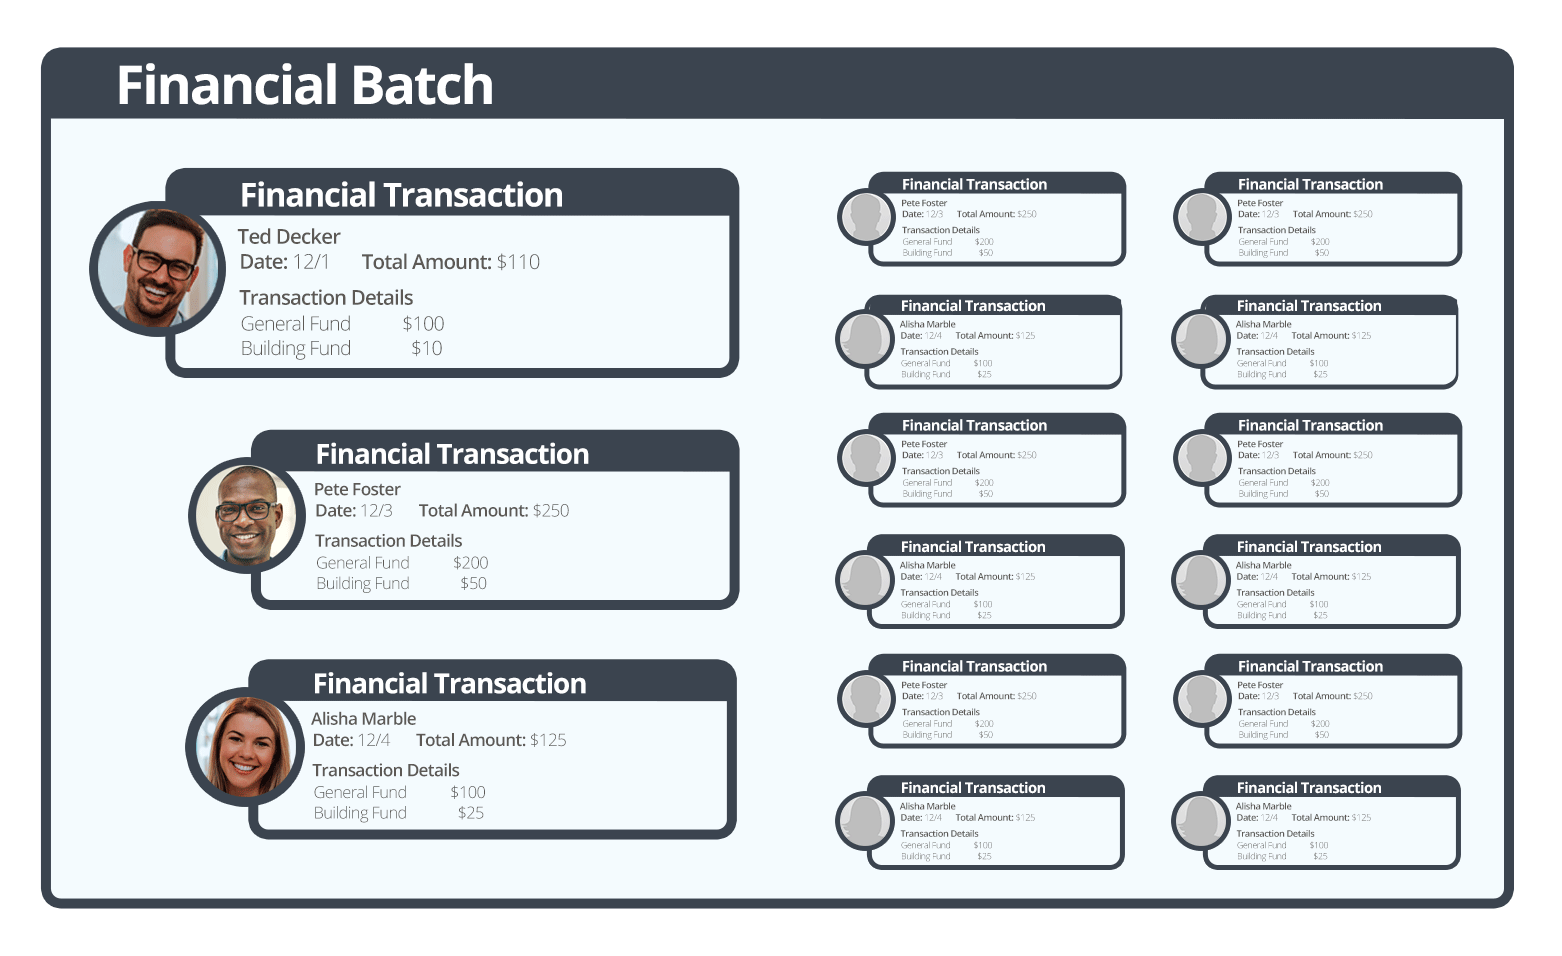
In our example below a batch has been created for the weekly gifts for the
Rock Solid Church.
Batches
Accounts
Accounts determine what a transaction is for. In our examples above, both
the General Fund
and the Building Fund
are accounts. These accounts usually correspond with accounts you create in your accounting system.
Pledges
While most of Rock's financial tools are designed to be multi-purpose, the
concept of pledges is closely tied to the nonprofit world of donations.
Pledges allow your members and guests to commit to an amount that they
will be giving over a stated period of time.
Batches
As we mentioned earlier, batches are a way of grouping financial transactions.
Grouping transactions allows you to better integrate with your General Ledger
software. You will only need to move over the batch totals instead of each
financial transaction.
Characteristics of Batches
Before we dive into looking at the screens that make up batches let's
first review the characteristics of batches.
| Item |
Description |
| Name |
The name is used as a basic descriptor of the batch. You
can come up with any naming convention you want. |
| Transaction Total |
The sum amount of all the transactions in the batch. |
| Control Item Count |
This helps in the scanning process to ensure that no items are missed. |
| Control Amount |
When dealing with manually entered transactions, it's
common to first add up the transaction amounts by
hand. This number is then entered into the
Control Amount
column to be used as a double-check since transactions are
individually entered into the system. When you're done entering
your transactions, the batch's
Transaction Total
should equal the
Control Amount. |
| Status |
Batches can have one of three different statuses:
-
Open: This means that the
batch is editable. The details of the batch can be
changed, and transactions can be modified.
-
Closed: The batch is done and
should not be edited. Once you close the batch
you should then move its total into your
general ledger.
-
Pending: This is a special
status used by the check-scanning software.
When a batch is in a state of
Pending,
it means that transactions are still being scanned
into the batch.
|
| Start / End Dates |
These dates provide a date range for the transactions that
they contain. |
| Accounting Code |
When you enter the batch total into your General Ledger
there will more than likely be a transaction ID generated by
that system. This field allows you to enter that identifier. |
Working With Batches
Batches can be viewed under Finance > Batches.
Below is a figure showing the batch list screen with the various filters
that are available.
Batches
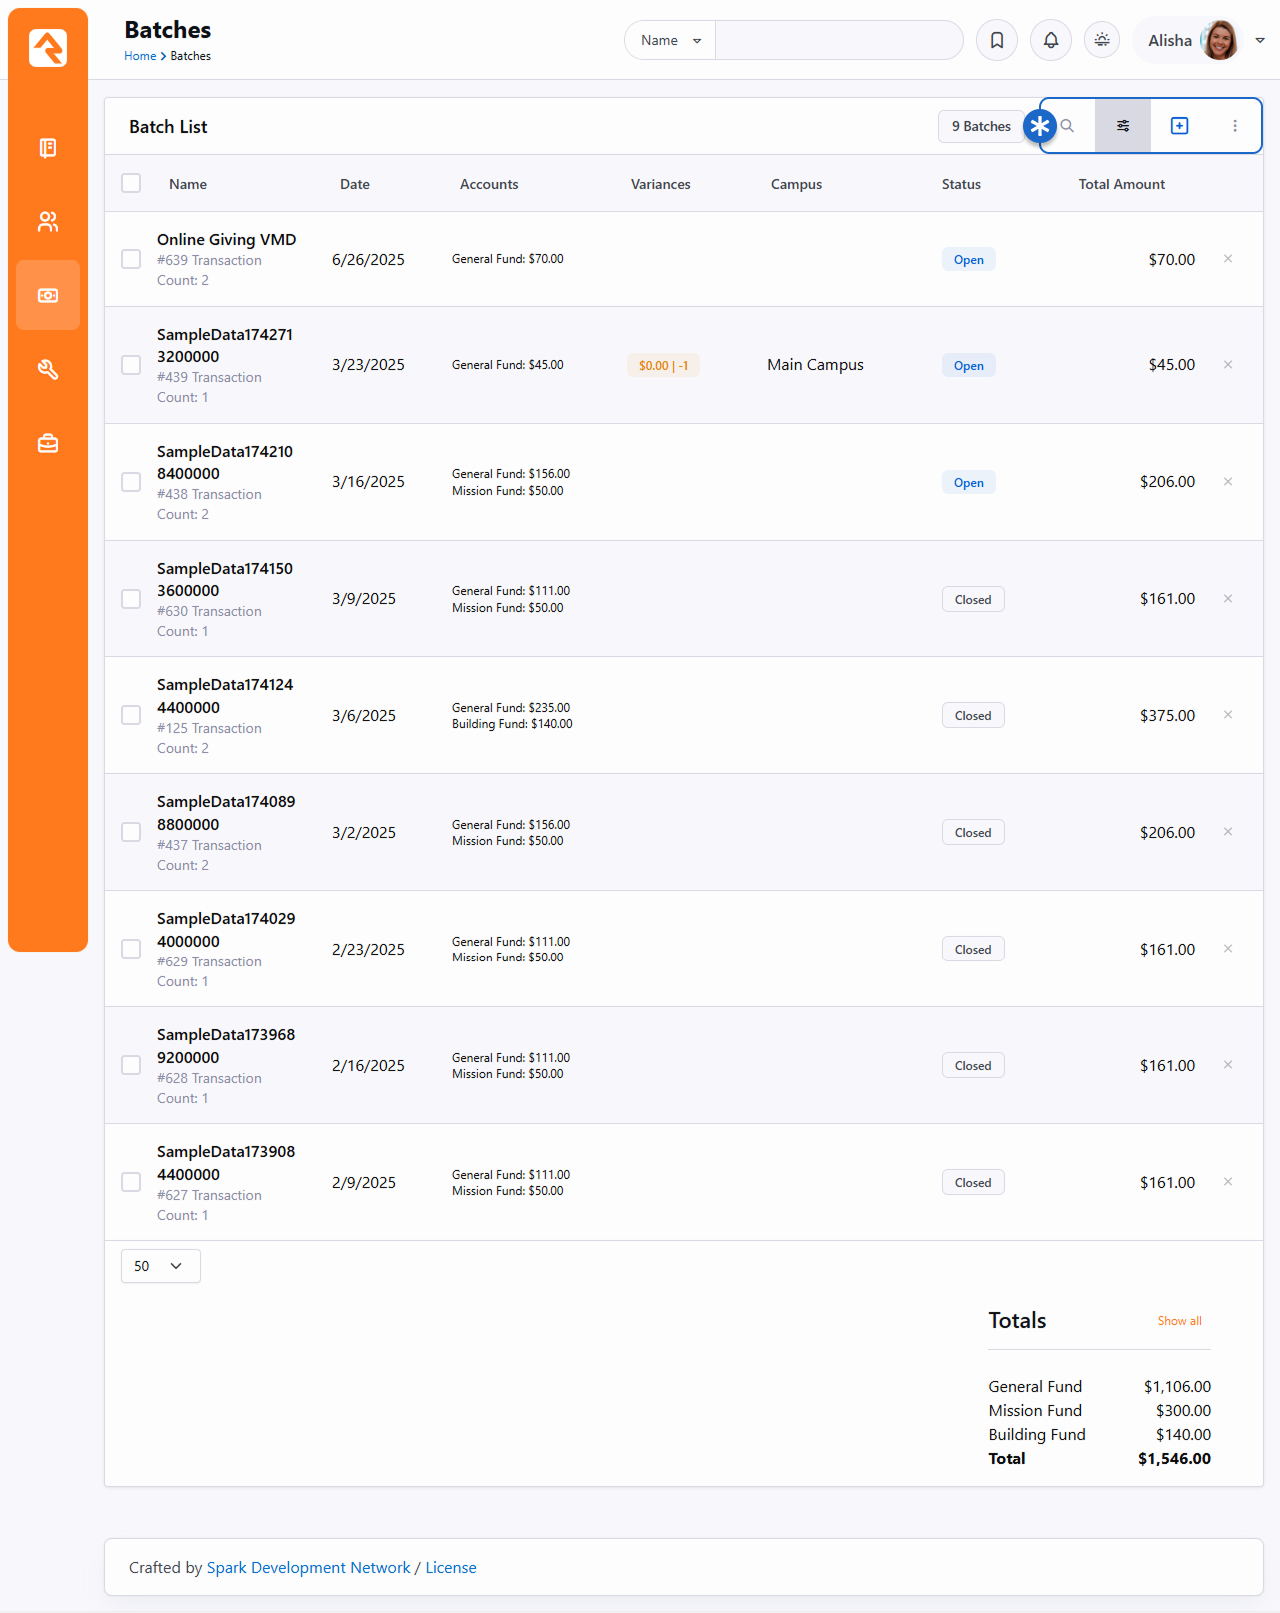
To manage your batches:
- Tap to search through your batches.
- Select to filter your batches.
- Press to add a batch.
- Click to perform actions to batches such as Open Selected Batches, Launch Workflow or Merge Template.
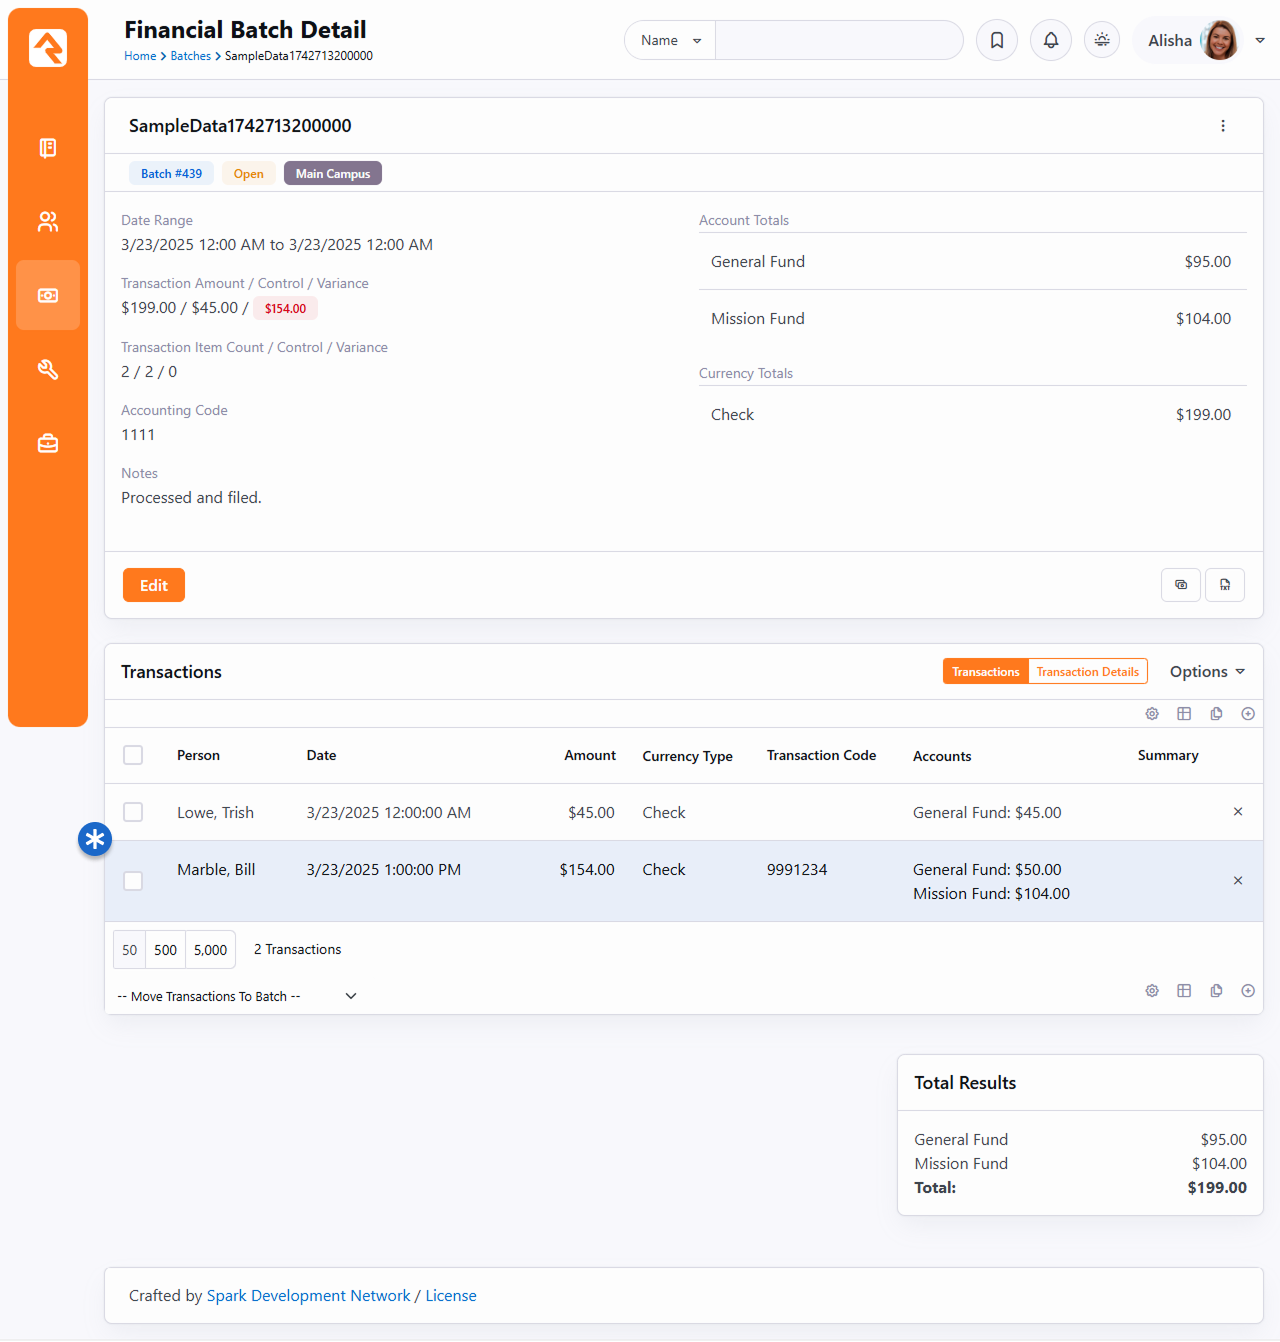
Clicking on a batch from the list pictured above will bring you to the
Financial Batch Detail
screen pictured below. From here you can see all the details of a batch.
Financial Batch Detail
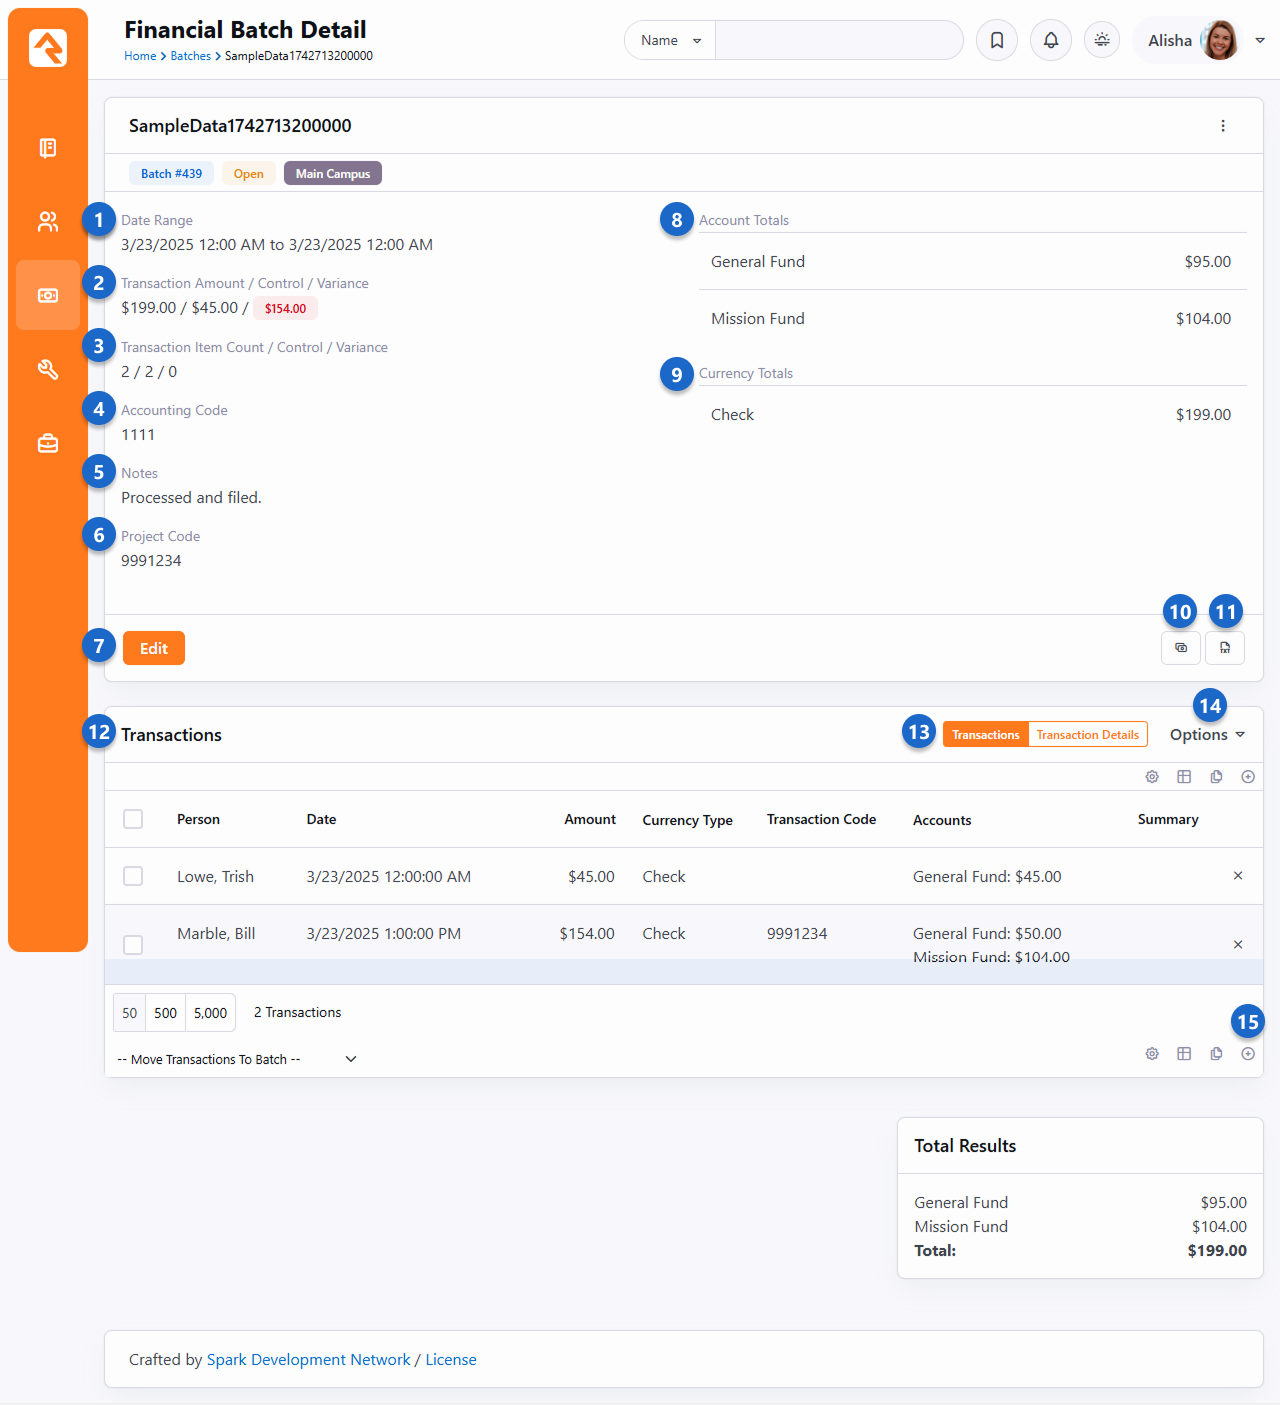
- 1 Date Range
- The date range of the batch.
- 2 Transaction Amounts
- The transaction total, control amount and the variance between the two.
- 3 Transaction Items
- The count of transactions, control count and the variance between the two.
- 4 Accounting Code
- This is used to store an optional reference number to the organization's primary accounting system.
- 5 Notes
- Batch notes, if any have been added, will be displayed here.
- 6 Batch Attribute
- Any additional batch attributes you create will be displayed here if they are set to show in the grid. For more information,
see the Financial Batch Attributes note below.
- 7 Edit
- Access the Edit screen to open or close the batch or to adjust other settings as shown in the example pictured below.
- 8 Account Totals
- This list shows account totals for the accounts that the transactions are tied to.
- 9 Currency Totals
- This list shows account totals for each currency type.
- 10 Match Transactions
- Batches that have been created by the transaction scanner need
to have each transaction linked to an individual. This button takes
you to the screen that assists with this process.
- 11 Audit Log
- This button will take you to an audit screen that shows each change made to a batch or transaction in a batch.
- 12 Transaction List
- A list of the transactions contained in the batch.
Clicking on one of these transactions will take you to the details
screen for the transaction.
- 13 Transactions / Transaction Details
- If a single transaction goes to separate Accounts, selecting "Transaction Details" will provide separate rows
in the grid for each Account.
- 14 Options
- Use the Options drop-down to set whether images (e.g., scanned checks) should be shown in the grid.
- 15 Add Transaction
- Assuming the batch is not closed, you can add new transactions to the batch by clicking the
icon.
Financial Batch Attributes
Say you want to assign batches specific project codes, accounting codes, or another specific value. You can easily do this by creating an entity attribute with a
Financial Batch entity type. Attributes are created in the Entity Attributes
screen, located at
Admin Tools > Settings > Entity Attributes. When you choose the
Show in Grid option, the attribute values
will be displayed in the Batch Detail screen. To learn more about
Entity Attributes, see the
System Settings chapter of the
Admin Hero Guide.
There may be times when a closed batch needs to be reopened in order to make changes. Because reopening a
batch can cause hiccups between your system and your financial clearing house, you only want people with a
certain level of security to be able to perform this action. This security role is added and modified at the
Entity level.
Adding Security to Reopen Batches

To give a person the ability to reopen closed batches, follow these steps:
- Go to Admin Tools > Settings > Entity Administration.
- In the Entity List, locate "Rock.Model.FinancialBatch".
- Click to open the Financial Batch Security window.
- Click the Reopen Batch button.
- Add roles and users to the Item Permissions, selecting whether to allow or deny each the ability to perform the action.
- Click Done.
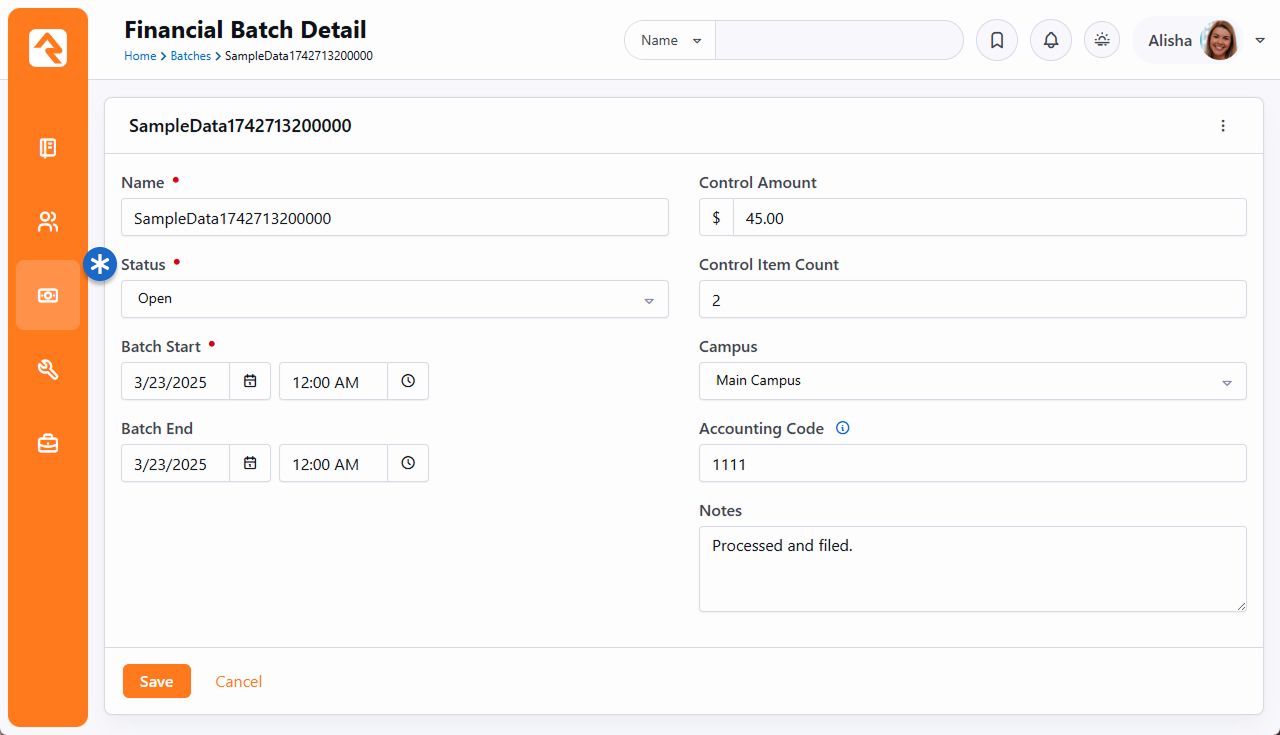
Once the security permission is set, you can reopen a batch simply by selecting the batch you want to reopen, clicking the
Edit
button to open the Edit Financial Batch screen, and choosing "Open" from the
Status dropdown menu. Click
Save when you’re done.
Edit Financial Batch
Batch statuses serve a critical function in providing accountability for your accounting processes.
Each status in the lifecycle of a batch has been developed to ensure accurate record keeping.
Below, we will guide you through each status in the lifecycle of a batch, explaining
how it should be used.
- Pending: When created using the check scanning app, batches start with a
'Pending' status, indicating that the scanning process is still ongoing.
- Open: When a batch is in the 'Open' status, it means that the scanning
process is complete, but additional matching or audits are still being performed. It also
indicates that the batch has not yet been entered into the general ledger.
- Closed: When a batch is in a 'Closed' state, it indicates that its amounts
have been entered into the general ledger. To maintain the integrity of your accounting
processes, Rock Security prevents closed batches from being re-opened without elevated
permissions.
Automated Batches
There are times where you may be using a third-party system to create a batch and Rock is not in
control of the process. For example, you may be using an outside giving service that downloads
transactions into a batch. In this instance, while the batch is being created Rock will restrict
the ability to edit or delete until the third-party software is done with its work. Third party
systems can create automated batches using the Automated feature. These batches have an additional
"Automated" label. While the transactions of an automated batch are downloading, the batch will have
a "Pending" status. To prevent processing errors, this status cannot be changed until the download
is complete. Depending on the system, these batches might be temporary or permanent. Once all of the
transactions are downloaded, the status will automatically change to "Open" and the batch can be processed.
Automated Batch

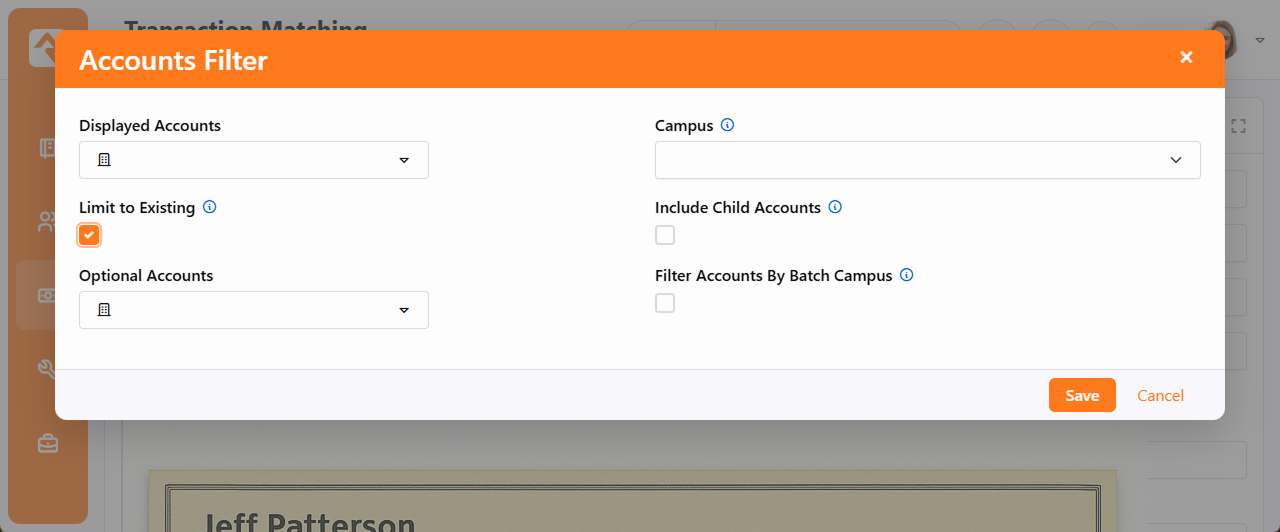
Transactions Created Using Teller Import
Transactions created using Teller Import have contribution amounts and associated accounts but no contributor name. Obviously,
this can make matching transactions with givers difficult when processing batches. Selecting the "Limit to Existing" option in the
Transaction Matching Accounts Filter screen allows you to display
only accounts associated with that particular
Teller Import file. To access the Accounts Filter screen, click the
button in the Transaction Matching screen.
Accounts Filter - Limit to Existing
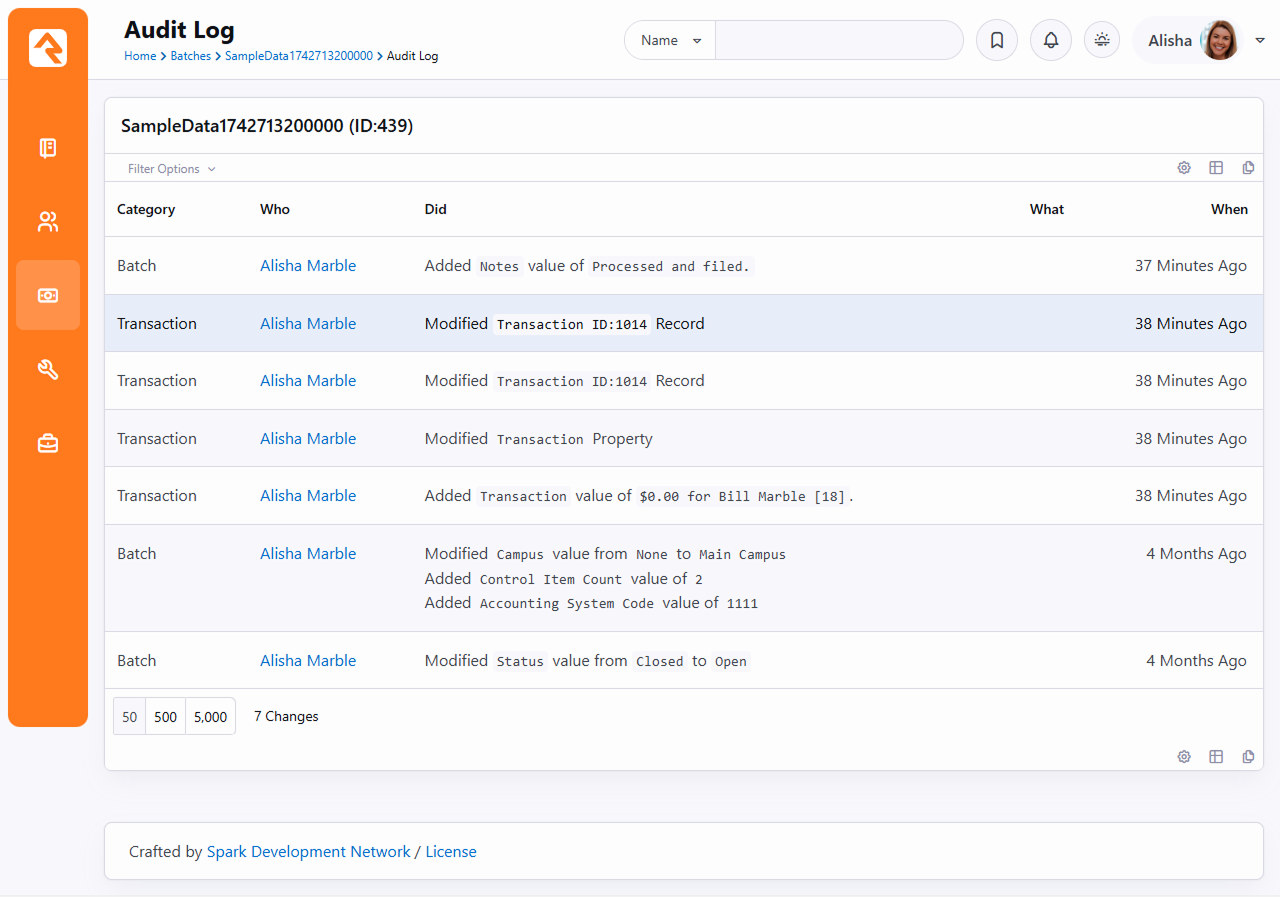
It's important that all modifications to financial transactions are audited. Below is the audit log screen for a batch.
It shows all changes to a batch and the transactions in the batch.
Batch Audit Log
Transactions
Transactions represent the actual exchange of currencies for activities like
donations, event registrations, or other financial events. Each transaction is
made up of one or more detail (or sub) transactions. This allows for giving to
more than one account in a single transaction.
Viewing Transactions in Batches
Where you view transactions in Rock will depend on what you're trying to do.
If you're interested in transactions in the context of a specific batch, you
can view them on the Batch Detail
screen by selecting a batch from the Batch List.
Batch Details
Clicking on one of these transactions will then display the
Transaction Detail page.
Transaction Detail
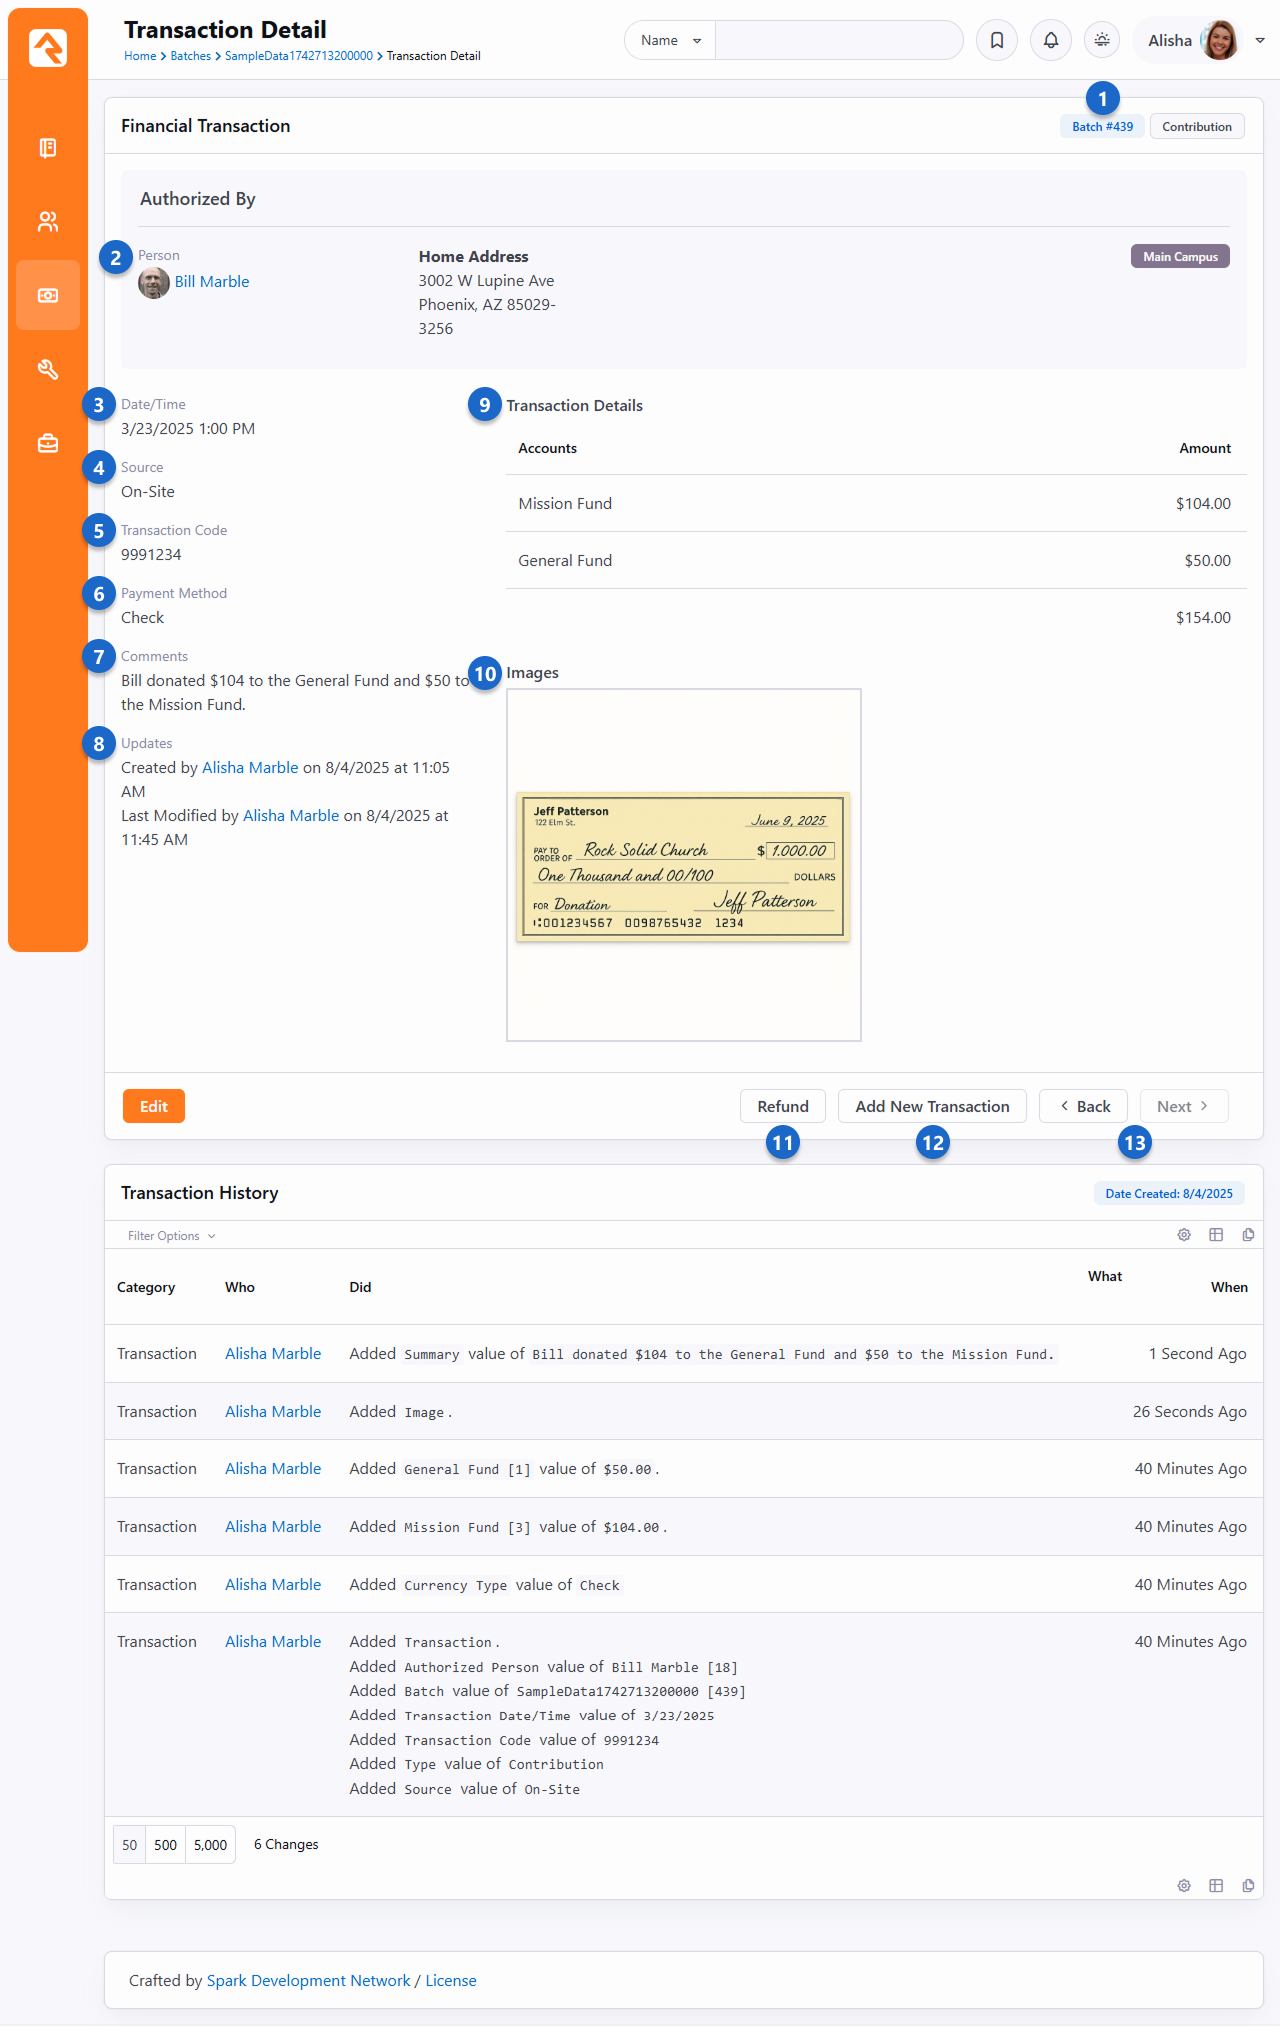
- 1 Batch
- Link to the batch that the transaction belongs to.
- 2 Person
- Link to the person who initiated and authorized the transaction.
- 3 Date/Time
- This is the date and time that the transaction occurred.
- 4 Source
- Where the transaction originated.
- 5 Transaction Code
- This is the transaction code for the item. Most often this transaction code will be generated by
an external service like the credit card gateway.
- 6 Currency Type
- The form of payment that was used for the transaction. These don’t have to be traditional
forms of payment like cash or checks. For instance, if
Non-Cash Asset is chosen
when adding the transaction, you can select an
Asset Type of property,
stock or vehicles. You can add your own non-cash asset types by adding to the
Non-Cash Asset Types defined
type.
- 7 Summary
- Any notes related to the transaction.
- 8 Updates
- Information about who last updated and processed the transaction.
- 9 Accounts
- This is the account split for the transaction that shows the details for each
account that was included on the transaction.
- 10 Images
- Any images that are associated with the transaction (e.g., check images).
- 11 Refund
- Selecting the 'Refund' button allows you to reverse the transaction. More details on
the refund process are provided below.
- 12 Add Transaction
- If the batch is still open, you can add a new transaction. This allows you to quickly enter
new transactions without having to go back to the batch detail page.
- 13 Back / Next
- The 'Back' and 'Next' buttons allow you to cycle through the transactions in a batch.
The transaction list on the Batch Detail
page has a few extra options.
Transaction List Options
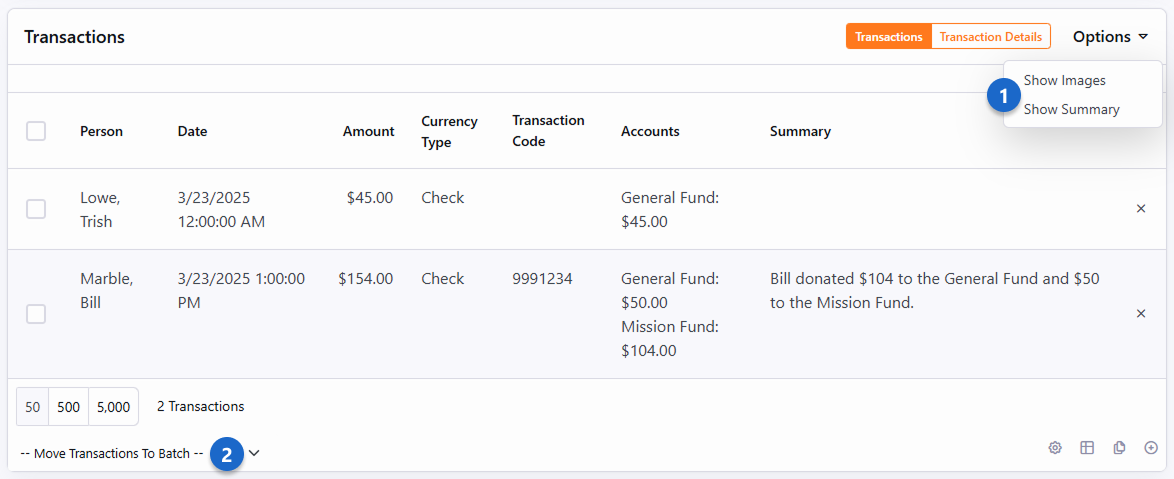
- 1 Options Dropdown
- The upper right corner of the list allows you to show the transaction summary or the transaction images.
- 2 Move Transaction
- If the batch is open, you can also move the transaction to a different batch. The batch you're moving to must also be open.
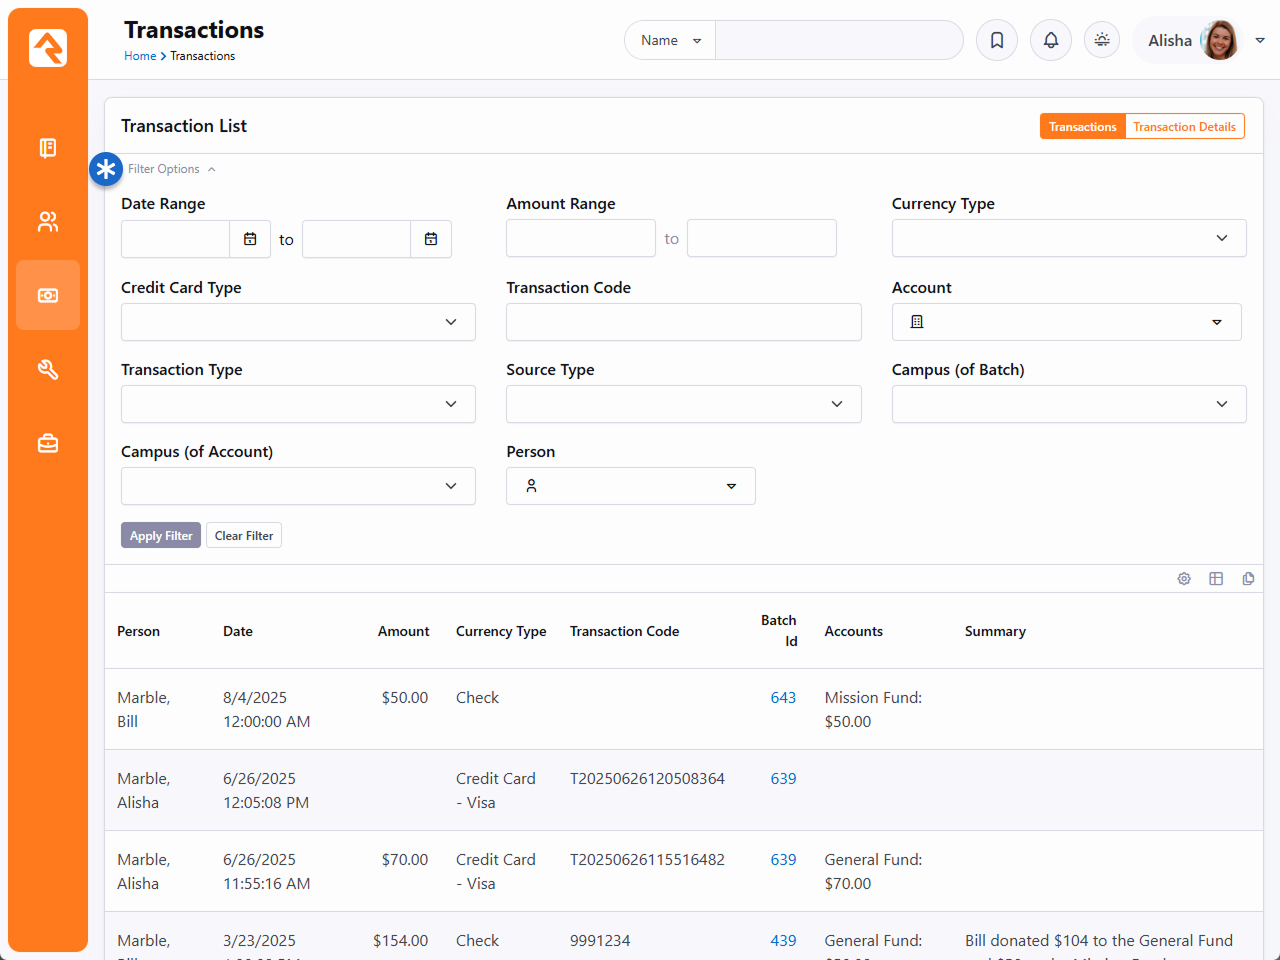
Searching For Transactions
When you're searching for a specific transaction, it's often easier to use the
transaction filtering capabilities found under Finance > Transactions.
This screen allows you to provide a set of search options and list transactions
that match.
Transactions
Adding a Transaction
While there are other entry points for transactions (e.g., check scanning, giving on the public
website) you can manually add transactions to a batch. You can also edit existing transactions.
In either case you'll be brought to the page pictured below.
Transaction List Options
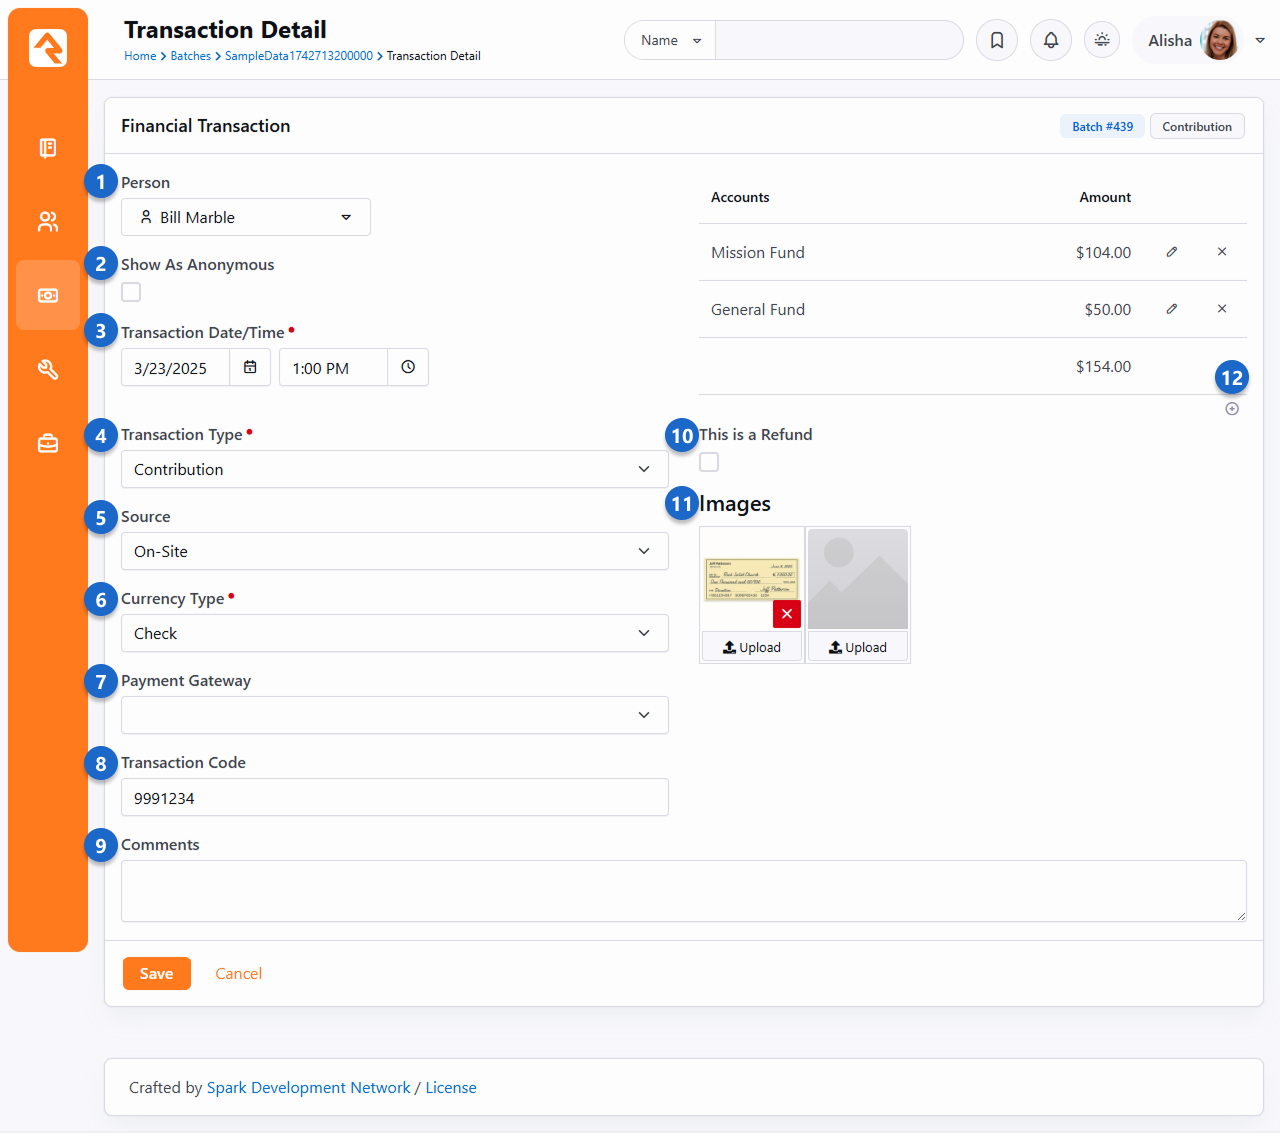
- 1 Person
- This is where you'll pick the person that the transaction is for. For instance, this is the person who made the contribution that's being entered.
- 2 Show As Anonymous
- Select this option to have the transaction appear as anonymous rather than associated with the person selected above.
- 3 Transaction Date/Time
- This is the date and time that the transaction occurred. You don't need to select a time if it doesn't make sense to do so.
- 4 Transaction Type
-
Rock ships with two values for this field,
Contribution and
Event Registration.
In most cases you'll probably be adding a
Contribution.
- 5 Source
-
The Source indicates where the transaction originated.
If you're manually adding transactions, it's likely you'll be entering them from on-site collections,
but you can choose other values from the list.
- 6 Currency Type
-
The form of payment that was used for the transaction. These don’t have to be traditional forms of payment like cash or checks.
For instance, if Non-Cash Asset is chosen when adding the transaction,
you can select an Asset Type of property, stock or vehicles.
You can add your own non-cash asset types by adding to the
Non-Cash Asset Types defined type.
- 7 Payment Gateway
-
Select what Payment Gateway to process this transaction with.
For more on configuring this see the
Payment Gateways chapter.
- 8 Transaction Code
-
This is the transaction code for the item. Typically, the transaction code will be generated by an external service (e.g., credit card gateway)
but when adding transactions manually you can use any code you wish.
- 9 Comments
-
These are simply notes that you might want to make about the transaction. These will be visible when viewing the
Transaction Detail page described above.
- 10 Account/Amount
-
This is where you'll select the account that should be used for the transaction, and the amount of the transaction.
You can have multiple accounts and amounts listed for a single transaction, if needed, but you must have at least one.
- 11 This is a Refund
- If the transaction is a refund, then it will be processed as such.
- 12 Images
-
You can add one or more images associated with the transaction. Typically, these are images of a check from a check scanner,
but you can manually upload any image you wish.
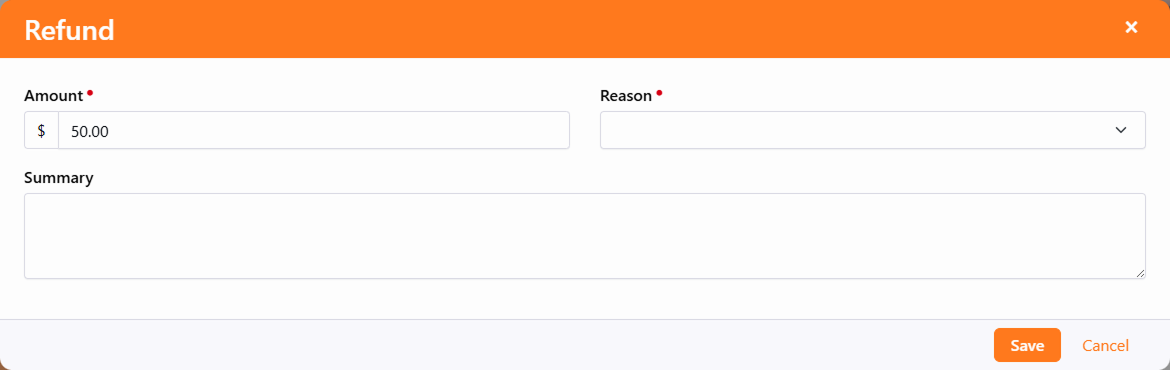
Refunding A Transaction
Sometimes you need to rollback a transaction. Selecting the Refund
button from the Transaction Detail page will allow you to reverse the payment using the modal shown below.
Refunding A Transaction
On-Site Collection
While the number of online transactions is skyrocketing, we shouldn't neglect to mention
the tools that support the traditional on-site collection of cash, checks or even credit
cards. Below we'll walk through how we process these transactions in the context of weekly
giving.
Processing Cash Transactions
Cash transactions come in two formats: anonymous gifts and gifts given by a known
person. Let's look at how we tackle each one.
Anonymous Gifts
Typically, you'll enter an anonymous user into your database and link all anonymous
gifts to this person. When you count up all of the anonymous cash for the weekend,
you can add one transaction for this total amount and select the individual
Anonymous.
Known Gifts
There are a couple of options when processing gifts from known individuals:
-
Manually create transactions for these gifts entering in all the transaction details.
-
If your organization uses a giving envelope, you could also use Rock's
check scanner software to scan in the envelopes. Then, you'd use the
Match Transaction
feature discussed below to process the remainder of the transaction information.
Credit Cards
You can add credit card transactions manually by going to the Contributions
tab on a person's profile page. Either enter a one-time transaction by clicking the Add One-time Gift
button, or you can create a recurring scheduled transaction by clicking the
button under
Scheduled Transactions.
Checks
Checks can be scanned using Rock's check scanning software. More information about
setting up and using this software can be found in the
Scanning Checks chapter below.
Once the checks are all scanned, they must be matched to individuals and their
amounts entered into the correct accounts. We'll discuss that next in the
Matching Transactions
section below.
Matching Transactions
When you've used the check scanning software to add checks or scanned images of
envelopes to a batch you must match them to individuals before you can close the
batch. To start this process, open the batch you want to work on under
Finance > Batches
and then click the Match Transactions button.
This will launch a screen to walk you through each check (or envelope) and allow you
to tie them to an individual and enter the amounts into the proper accounts.
Transaction Matching
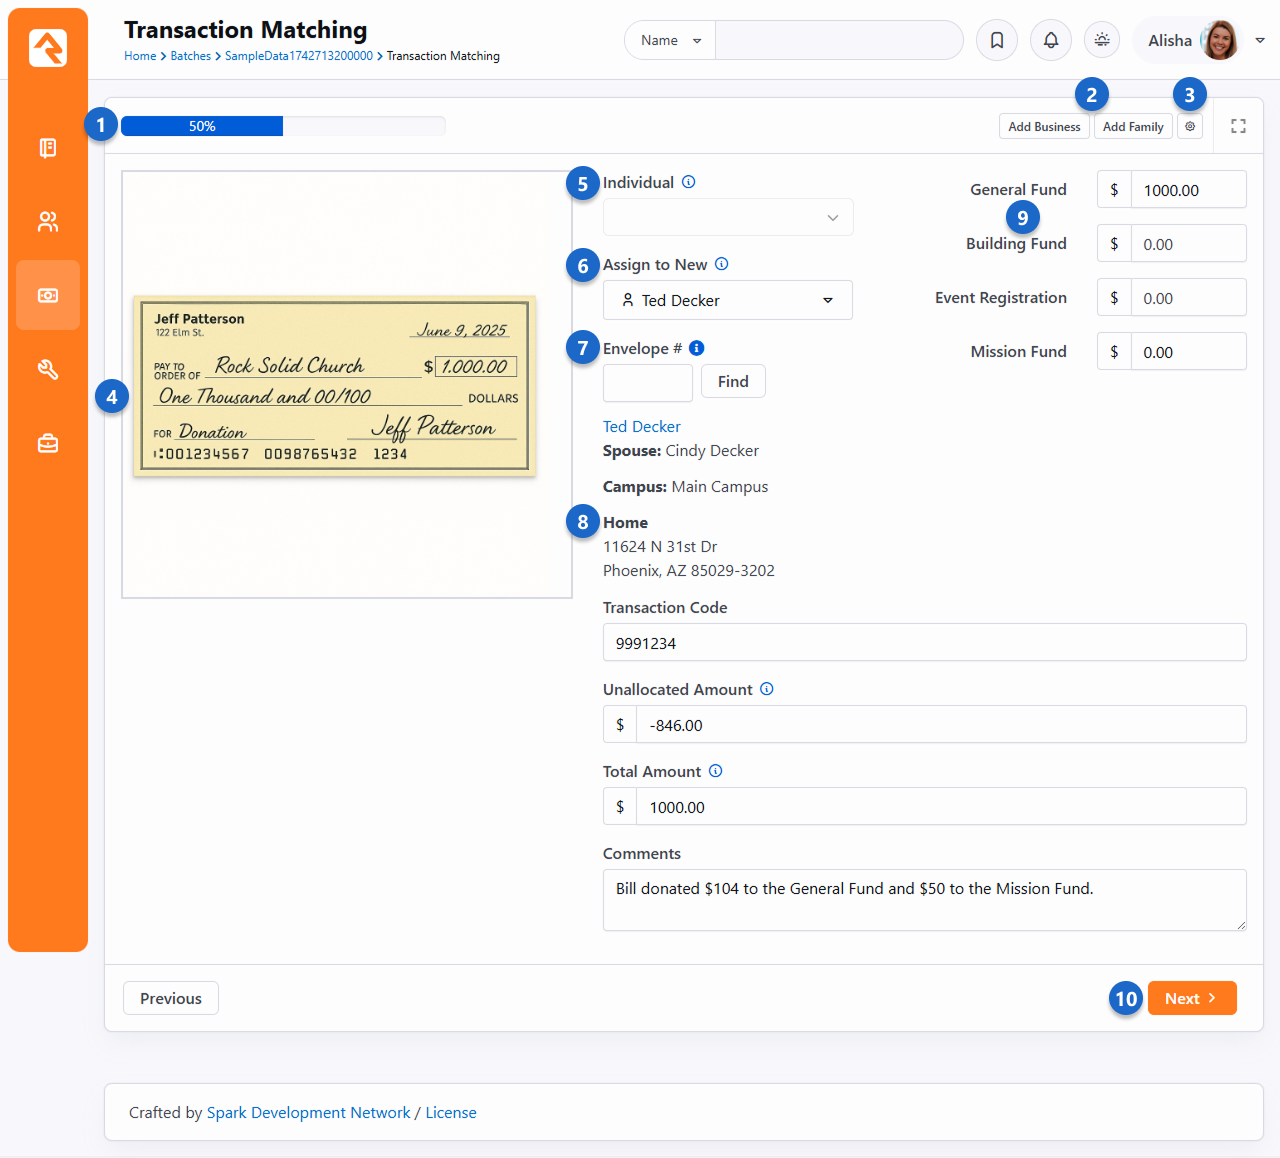
- 1 Progress Indicator
- This lets you know how far along you are in the process of matching all the scanned checks to
people.
- 2 Add Family/Business
- You may find that the transaction is for someone who is not currently in the
system. Using these buttons will pop up a new window where you can add them.
- 3 Settings
- Allows you to select which accounts you are entering amounts for.
- 4 Check Images
- The images of the scanned checks are shown here.
- 5 Individual
- Rock can match a person to the account and routing number of their checking
account. If a person already matches the check's account information, you can
pick them from the list.
- 6 Assign to New
- Assigns a new individual to the check’s account number.
- 7 Envelope #
- Allows you to search for an individual by their giving envelope number. This
requires that the
Enable Giving Envelope Number
Global Attribute is enabled. See the
Giving Envelopes chapter below for details.
- 8 Person Details
- The screen will present the currently matched person's address and contact
information. This is a great way to not only ensure that you have matched to the
current individual but also that their contact information has not changed.
- 9 Account Split
- Accounts are shown to allow you to split the check's total across multiple
accounts based on notes in the memo field of the check or outside of the
envelope.
- 10 Navigation Buttons
- Buttons at the bottom of the screen allow you to go to the next record or
re-visit a previously completed record.
Saved Check Matching
Once a person is matched to a check via the check's MICR information their name will be displayed in the 'Individual' dropdown
shown in item #5 above.
Multiple People Matching at the Same Time
With large batches you might want multiple people to work on matching at the
same time. Rock allows this by making sure that each person gets a different
record to work on.
Giving Envelopes
Does your church use envelopes for giving? You can use Rock to generate envelope numbers,
search for members by envelope number, and use envelope numbers to help with matching transactions.
Let’s look at how to set up Rock to do this.
Enabling the Envelope Number Global Attribute
Envelope Number Global Attribute
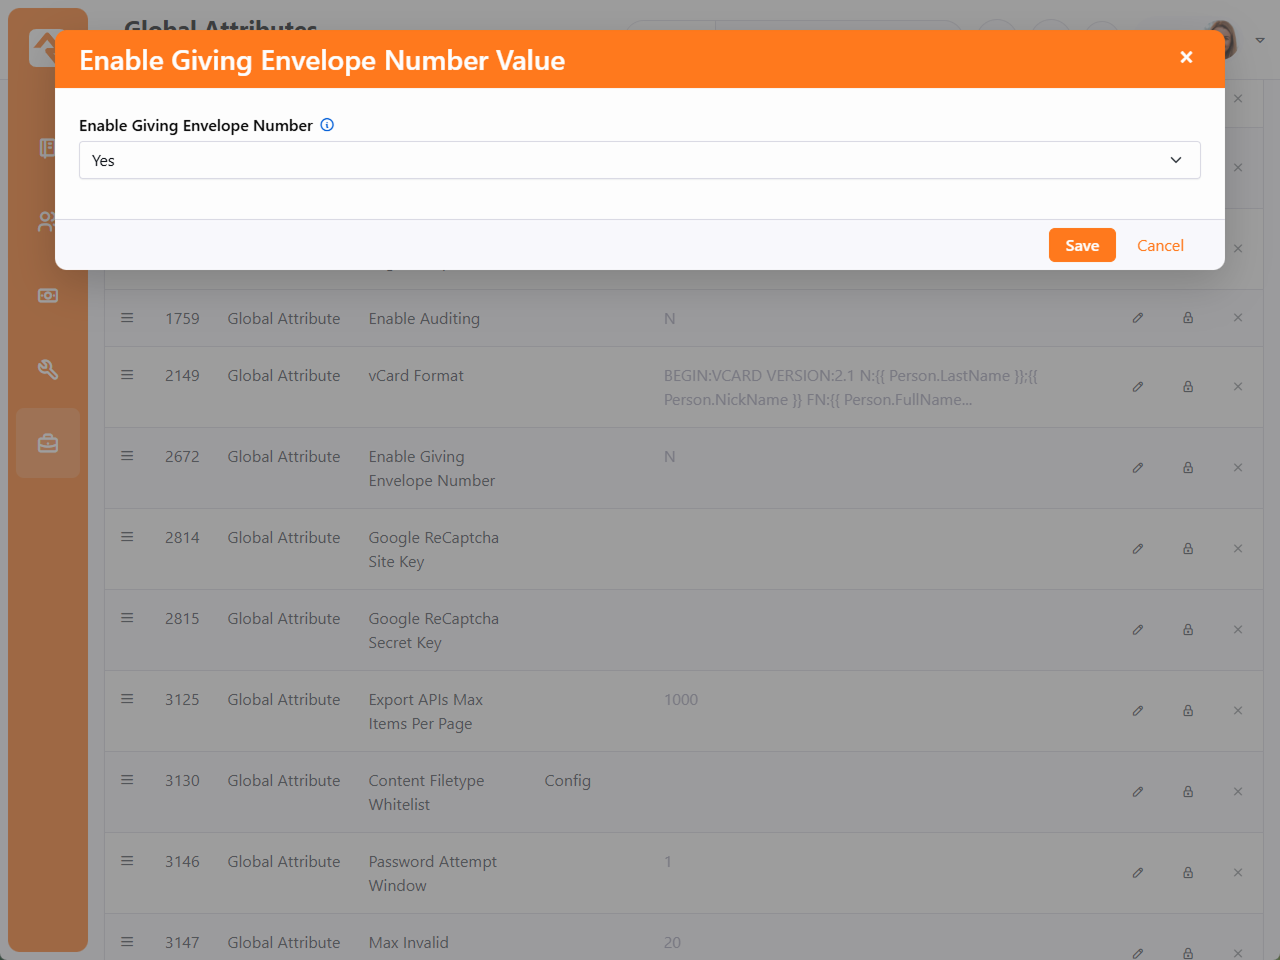
Envelope numbers are a global attribute in Rock, which means switching them on in one place
makes them available across the system. To turn the envelope numbers option on, go to
Admin Tools > Settings > Global Attributes.
Select
Enable Giving Envelope Number
from the attributes list and choose 'Yes' from the dropdown menu.
Click Save.
Rock is now set to display giving envelope options.
Assigning Envelope Numbers to Members
Envelope numbers are assigned in the Edit Person screen,
accessed from the Person Profile. Simply go to a person’s profile
and click the button in the bio block.
Envelope Number Field on Person Profile Screen
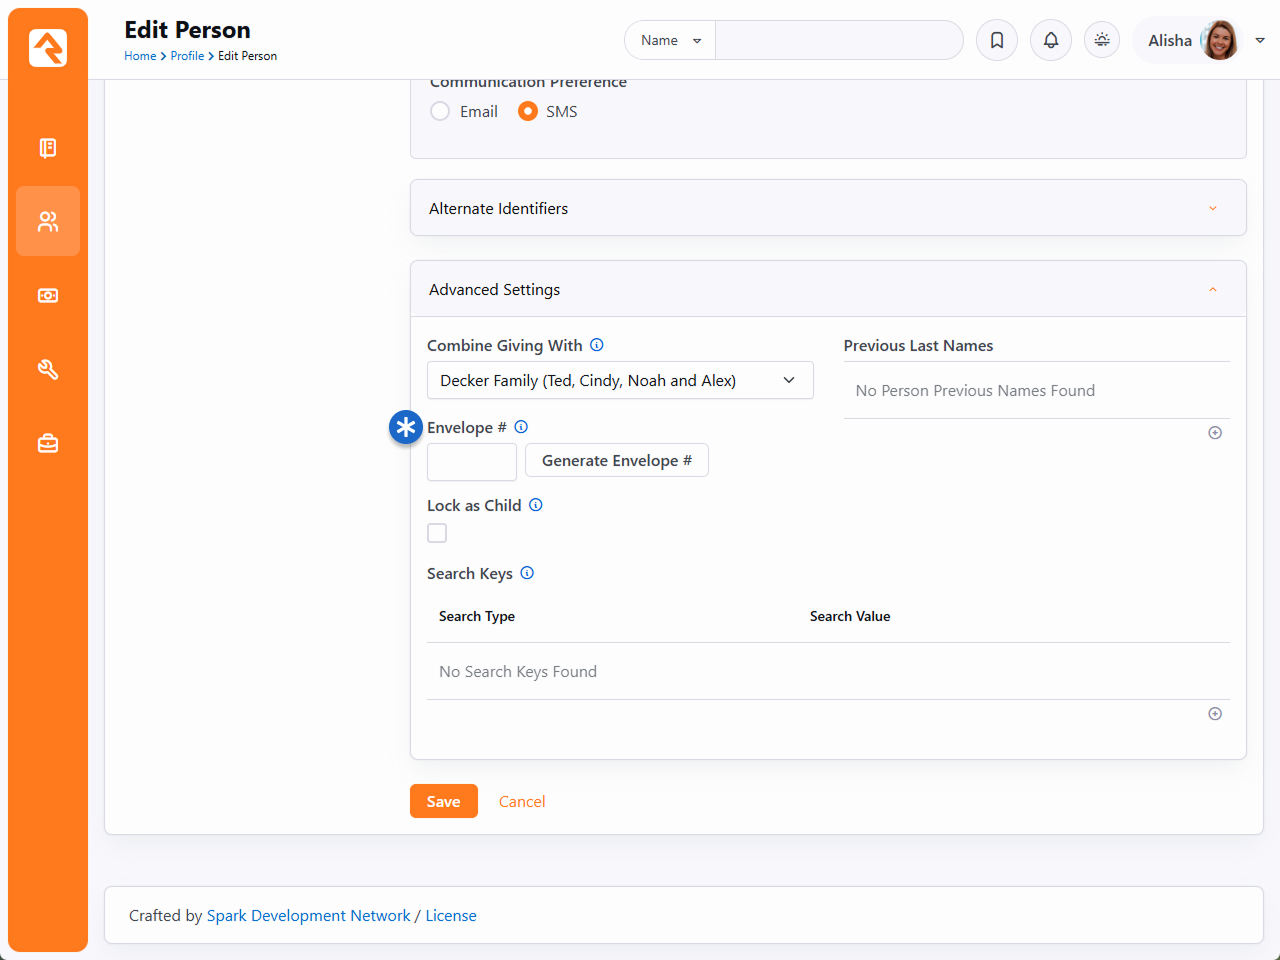
The envelope number field is located in the Advanced Settings section at the bottom of
the Edit Person screen. You can enter a person’s existing envelope number into the
Envelope # field, or you can allow Rock to assign a new envelope number by clicking
the Generate Envelope # button.
When finished, click Save. The envelope number
is now associated with that person.
Envelope Number Alert
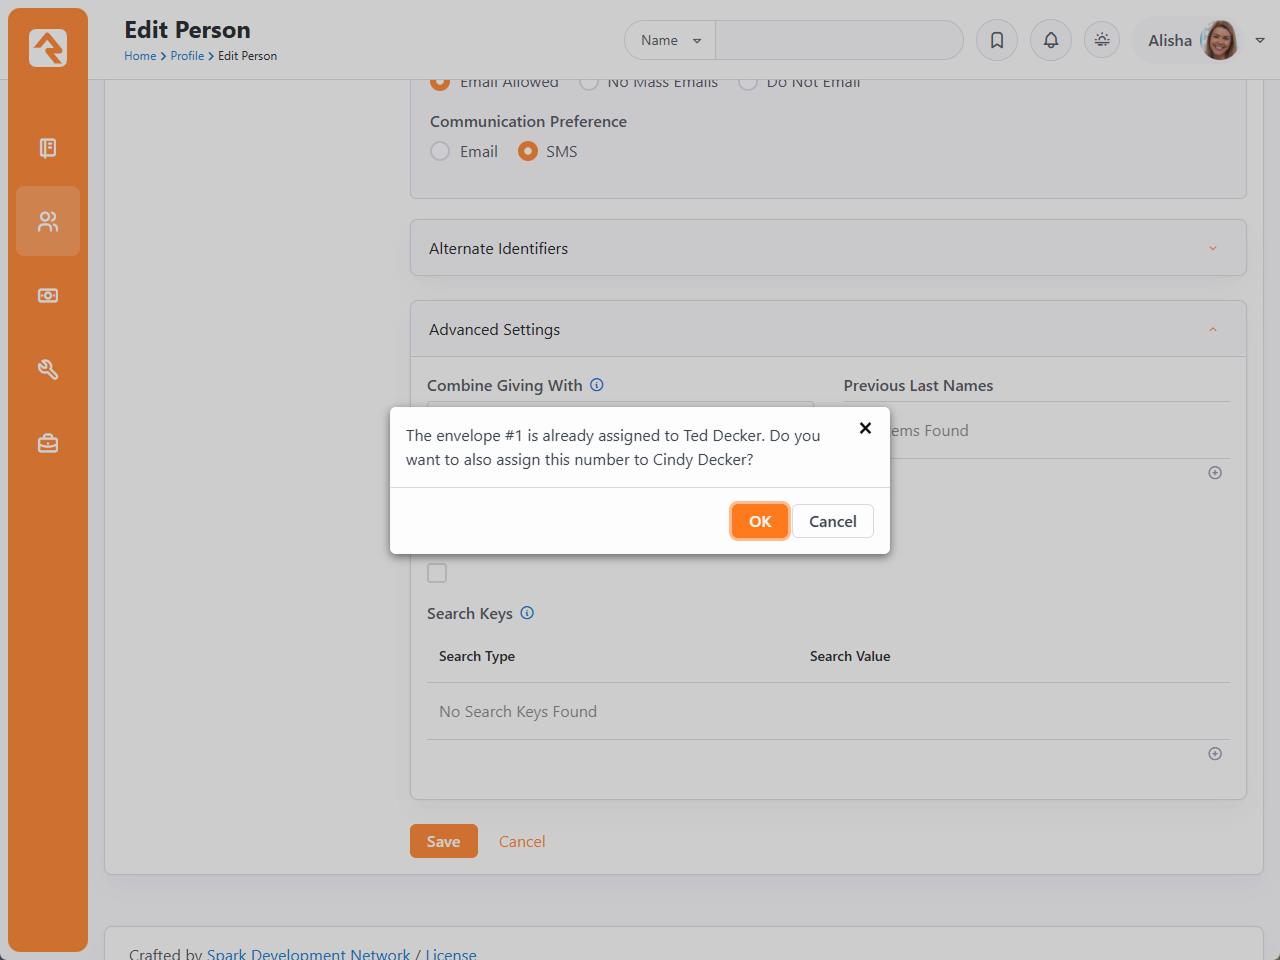
If you enter a number that is already assigned to someone else, Rock will display
an alert asking if you want to proceed. There may be times when you’ll want
two or more people to have the same number, such as when assigning numbers to multiple members of the same
family. Click OK to continue.
Searching for Envelope Numbers
Once envelope numbers have been assigned to members, you can quickly
view them using the Directory search function (People > Directory).
To do this, you first need to enable envelope numbers in the Person Directory block settings.
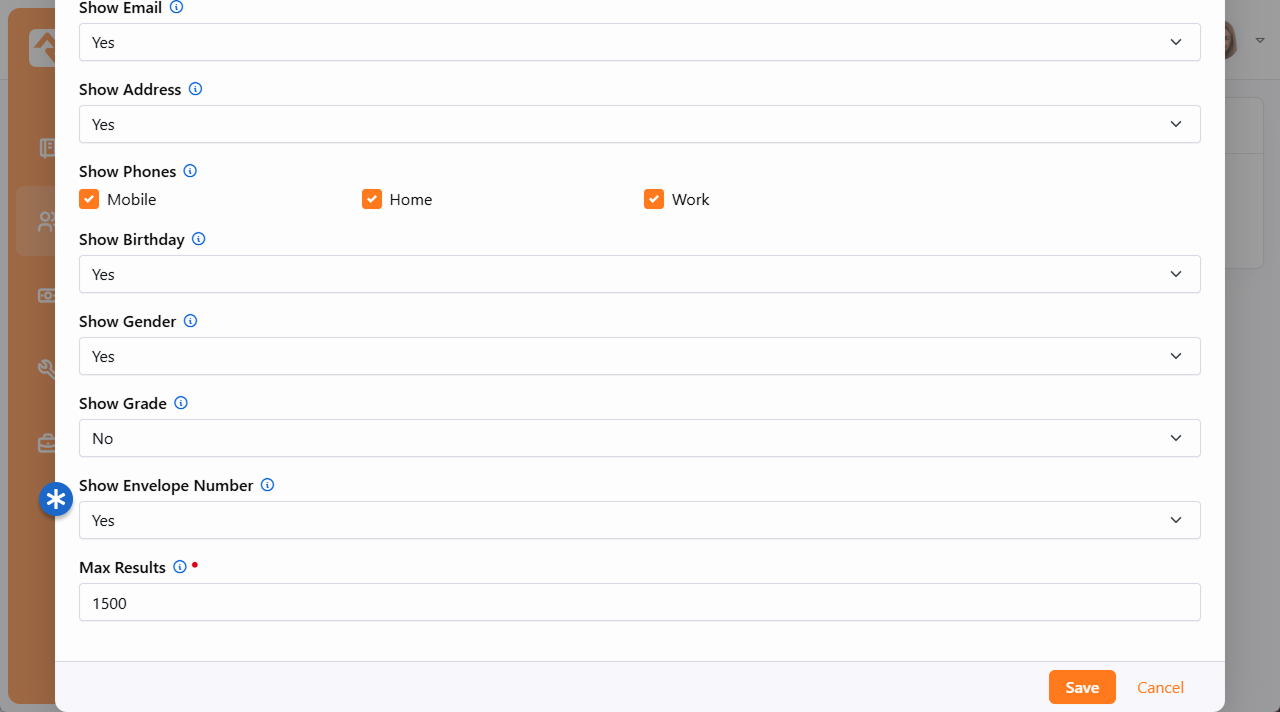
Person Directory Block Settings
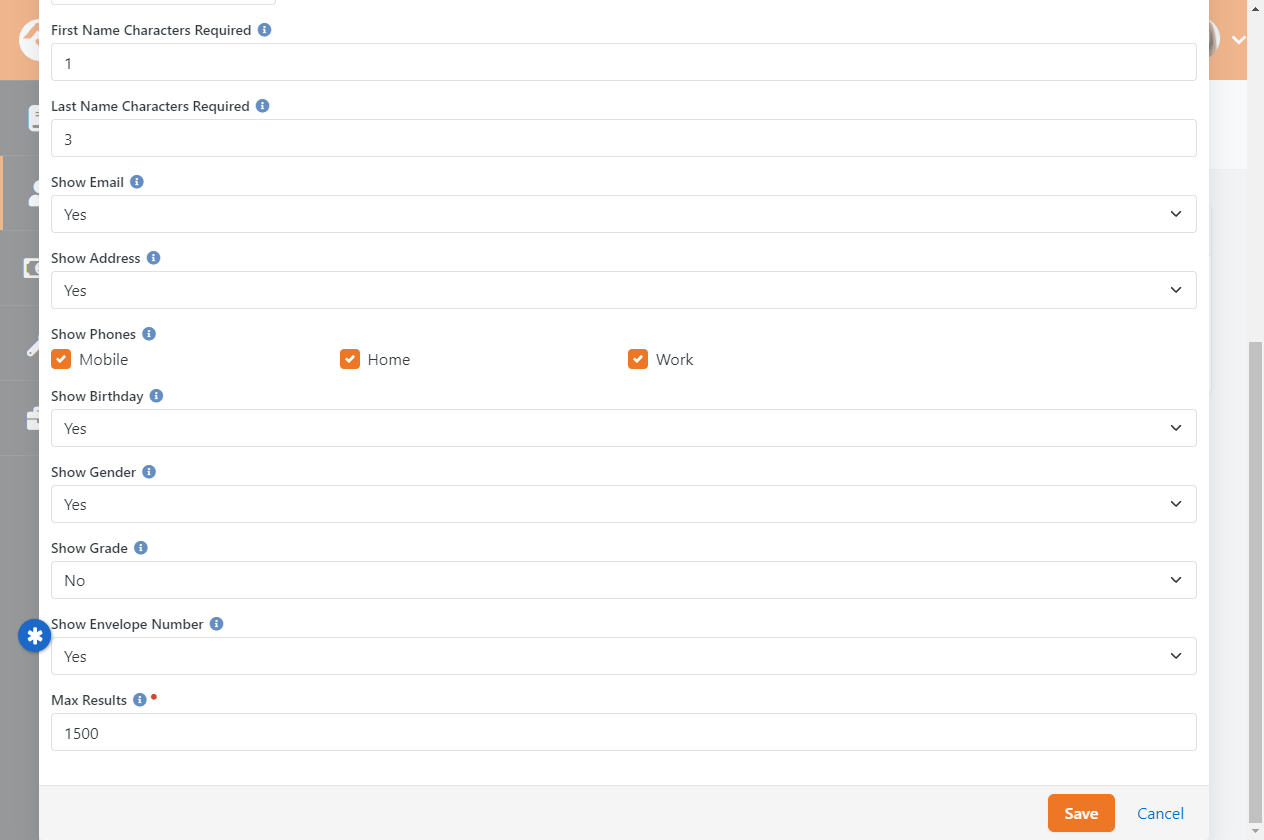
Locate the Show Envelope Number field in the Person Directory block settings and select 'Yes' from the dropdown menu.
Click Save. Now envelope numbers will be included in the information
returned for directory searches.
Directory Search with Envelope Number Displayed
Keeping this functionality in one search screen, rather than accessing individual
profile pages, can save you or your volunteers a lot of time.
Now that you have envelope numbers set up, let’s look at how they can be helpful
when matching transactions.
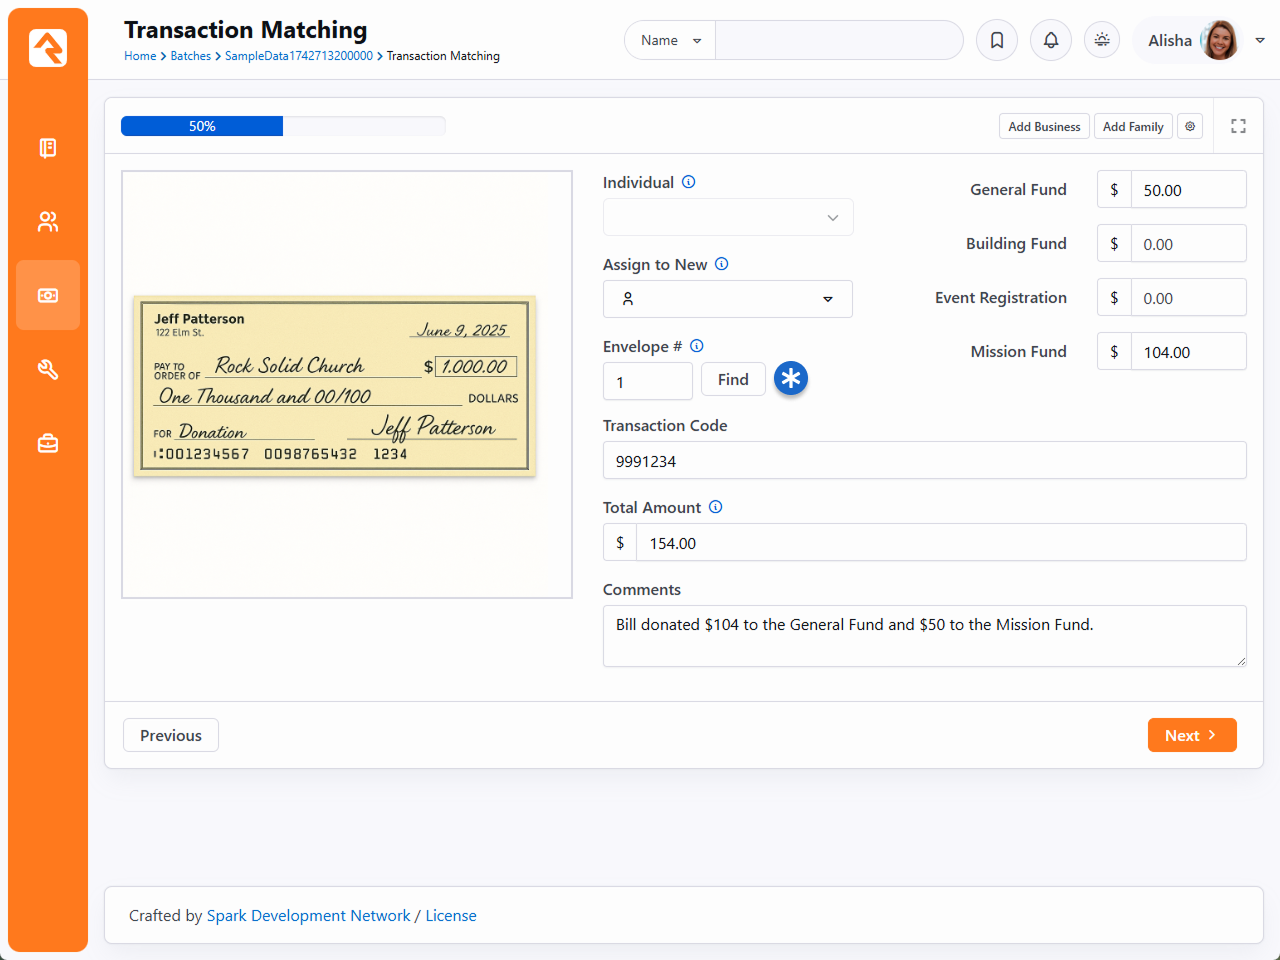
Transaction Matching by Envelope Number
When matching transactions, you can search for members by their
assigned envelope numbers. Simply enter the envelope number into
the Envelope # field and click Find. The name and
information of the individual
associated with that number will be displayed.
Matching Transactions with Envelope Numbers
If the number entered isn’t found, Rock will display an alert. If more than one
person has been assigned that number, you’ll be prompted to choose which person
you wish to associate with the transaction.
Multiple Envelope Numbers Alert Message

Scanning Checks
Rock provides special tools to help automate the scanning of large amounts of checks. Let's
take a look at what's available.
Supported Operating Systems
Rock's check scanning software should work with anything greater than Windows 7. It will NOT
work with Windows XP.
Supported Scanners
Rock supports three types of scanners with its scanning tools.
Scanners that Support the Ranger Interface
Rock has integrated with the Ranger Interface API toolset from Silver Bullet Technologies.
Technically any check scanner that works with the Ranger API should work with Rock.
That said, in the process of developing Rock and testing, we have exclusively used the
Canon CR-series of check scanners (specifically the CR-L1). While other makes and models
should also work, we haven't tested them. Ranger provides a list of supported scanners
on their
website.
Use the Latest Ranger Driver
In our testing, we've noticed that the latest Ranger drivers work better at reading the check's MICR information.
Be sure to download the latest driver from your scanner manufacturer. For those using the Canon CR-L1 try
this link.
MagTek MICRImage
Because of the large number of these legacy scanners available, we have also
integrated and tested with the MagTek MICRImage check scanners. To use the MagTek
MICRImage, please install the drivers from MICRImage.
Once on the "software" page scroll down to the OCX title and download the MICRImage OCX - PN99510045 - v112.
Additionally, as part of the MagTek family, we support the Image Safe USB check scanner.
Download and install the drivers for this scanner here: Image Safe.
Installing Image Safe drivers
When you reach the MagTek website to download the driver for the Image Safe scanner, the download contains several files.
Once the download is complete unzip the download and follow the instructions on where the files are located. Once you reach the ExcellaSTXImageSafeInstall folder you'll choose the 'setup' application to install.
If purchasing a new scanner
If you're in the market for new scanners, we highly recommend using the Canon
CR-series.
Rock Check Scanning Software
Rock's check scanning software allows you to quickly and easily add checks to
transactions in Rock. Let's walk through the process of scanning checks using this
software.
Installing the Rock Check Scanning Software
Installing the check scanning software is easy. It requires a Windows machine
running Windows 7 or later to run. To install, follow these steps:
-
First, install the drivers for the scanner you'll be using. If you're using the Canon CR-series,
that will be the Ranger software that came with your scanner. In either case, these are simple installs.
-
Download the setup application under
Admin Tools > Settings > External Applications > Rock Check Scanner.
-
Run the setup. The check scanning setup is a breeze with just three quick screens.
Using Rock Check Scanning Software
Once everything is installed, start by launching the Rock check scanning software and logging in.
Users must be a member of one of the security groups below to log in using this software:
-
RSR - Finance Administration
-
RSR - Finance Worker
-
RSR - Rock Administration
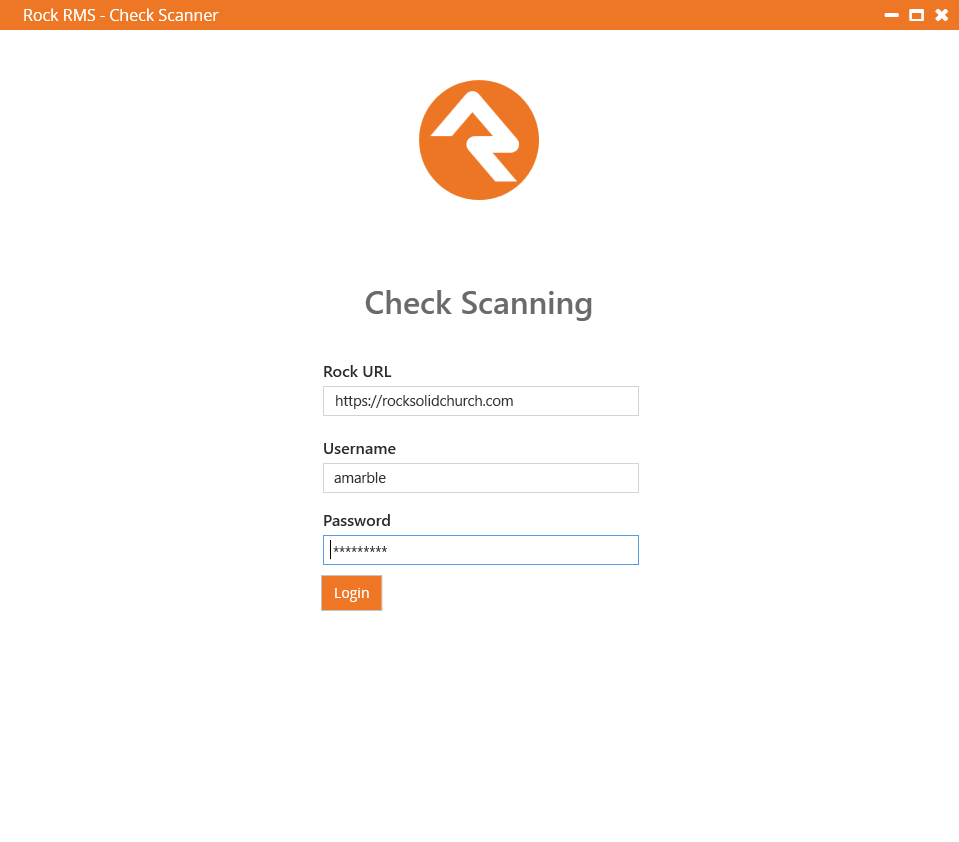
If this is your first time logging in, you'll also be asked for the web address of
your Rock server. This is the address that the scanning software will upload
checks to.
Login Screen
Software Options
First off, we'll show you where the software settings are so you can configure them to meet your needs.
To do this, select the icon located on the bottom right of the check scanner window.
You can always come back to this page to make any adjustments at any time.
Capture Amount on Scan
Before we dive too deep into the settings, we want to highlight one setting in particular.
As noted below, you have the option to
Capture Amount on Scan
while scanning checks. When this is enabled the scanning process will pause after each
check so you can type in the amount of the check. This saves you from having to go into Rock
later and add the amount for each check as part of a separate step. Simply read the amount
of the check from the scanned image, and add that amount to the appropriate account(s)
listed on the screen in the Check Scanner app.
The list of accounts that you can add amounts to is configurable when you turn on
Capture Amount on Scan
in the configuration area pictured below. From this configuration screen, check the box next
to any accounts that you want available during the scanning process. Selecting multiple
accounts also allows you to split a single check into different accounts if needed.
Scanner Settings
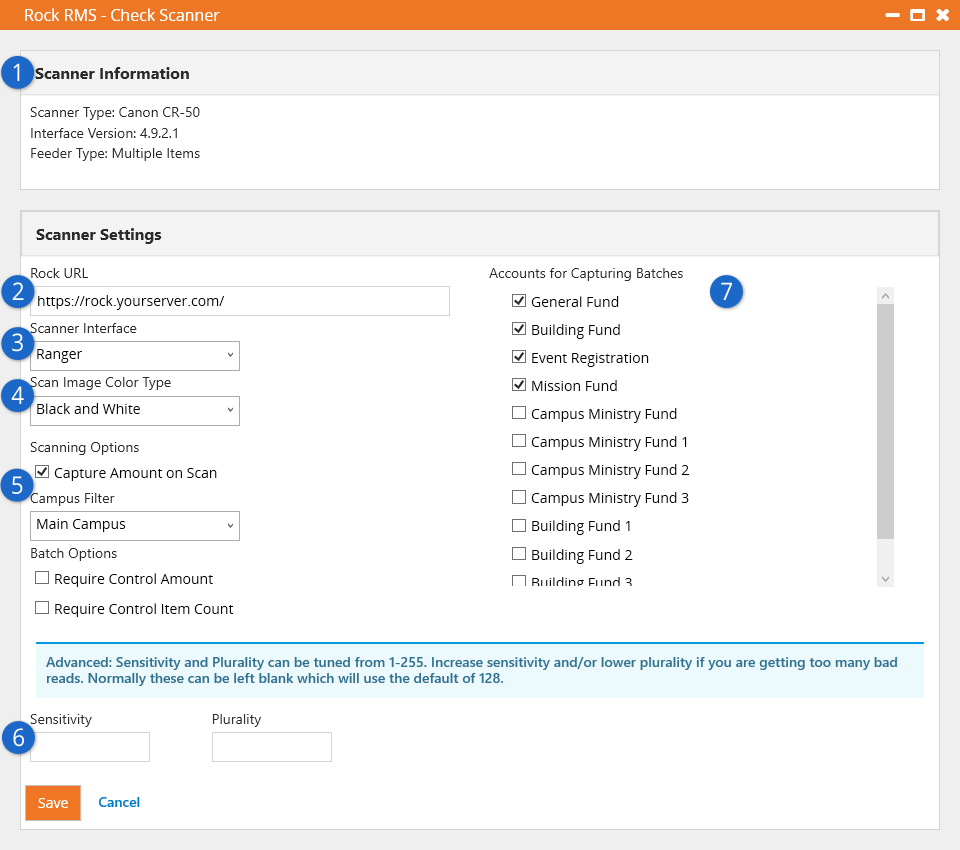
- 1 Scanner Information
-
This area displays information about the physical check scanner that
is currently configured.
- 2 Rock URL
-
You’ll want to confirm this contains the correct Rock server address
for your organization.
- 3 Scanner Interface
-
Select the type of interface that’s currently set up (Ranger or MagTek).
- 4 Scan Image Color Type
-
Select the color depth that should be used when scanning. Options
will vary by scanner. The Ranger interface supports black/white,
grayscale and color. Just understand that using an option other
than black/white will significantly grow the size of your
database.
- 5 Scanning Options
- Select the options that best fit your scanning process.
-
Capture Amount on Scan: If enabled, the scanning process pauses
after each check is scanned to allow the entry of the dollar amount on the check.
Enabling this also enables the "Batch Options" and "Accounts for Capturing Batches"
options.
-
Campus Filter: The list of available accounts (when
Capture Amount on Scan
is enabled) can be filtered by campus. Accounts that are not tied to any campus will always
appear in the list.
-
Batch Options: Select whether the
Control Amount and/or
Item Count fields in the
Batch Details should be required. These options are only available if
Capture Amount on Scan
is enabled.
- 6 MICR Read Sensitivity/Plurality
-
The Ranger driver allows you to adjust the sensitivity and/or plurality of the MICR reading.
You probably won’t need to change these unless your check scanner is having problems reading
checks properly. See the next section below for full details on these settings.
- 7 Accounts for Capturing Batches
-
Used when entering the amount for the check to go to a specific account.
The list of accounts is only available if Capture Amount on Scan is enabled.
Sensitivity and Plurality
For the most part you shouldn’t need to adjust these settings. However, if you’re running into
problems reading checks, changing the
Sensitivity and
Plurality values might help.
Scores
To understand how sensitivity and plurality work, you need to know about scores. When the
scanner reads a character, that character is assigned a score. The score is based on how
confident the scanner is that it read the character correctly.
For instance, let’s say the number “3” is being read on the check. We know it’s the number
“3” but the check scanner thinks it could also be an “8” because those numbers have similar
shapes. The scanner will assign a score to both “3” and “8” based on how confident it is
about which number is being read. In this example, we’ll say “3” is assigned a score of 240
and “8” is assigned a score of 130. These scores indicate the scanner is more confident
about “3” than “8”.
Sensitivity
The Sensitivity setting
is like a cutoff, or threshold, for the scores described above. By default, the sensitivity
is set to 128. So, if the score for a character is below 128, that character is rejected as
incorrect. You can raise or lower the sensitivity to accept or reject different confidence
scores. Any value between 1 and 255 can be chosen.
In the example described above, the numbers “3” and “8” were assigned scores of 240 and 130,
respectively. Because the default sensitivity value is 128, and because both scores are
above 128, both are potentially correct. If we increased the sensitivity to 138, the score
for “8” would be too low and the scanner will select “3” as the correct character being
read.
Plurality
Let’s say the numbers “3” and “8” are assigned scores of 130 and 125, respectively. In this
case, with a default
Sensitivity setting of
128, the number “3” is favored because its score is higher than 128. But the scanner is
almost equally confident about both numbers, so there’s a risk it could pick “3” when the
true character is actually “8”.
To account for this scenario, the
Plurality setting looks
at the difference between scores. This lets you set how different the scores should be
before deciding on the correct character. By default, the plurality value is set to 128.
This means the difference between scores must be at least 128. In this example, the
difference between scores of 130 and 125 is only 5, which falls below the plurality
threshold. In that case, the scores aren’t different enough to know for sure which one is
correct, and neither is chosen.
Working with Sensitivity and Plurality
Now let’s bring it all together. We’ll circle back to the original example, with the
character “3” assigned a score of 240 and the character “8” assigned a score of 130. To
start, we’ll assume default (blank) values of 128 for both
Sensitivity and
Plurality settings.
Keeping in mind what you now know about these settings, we can already tell that neither “3”
nor “8” will be selected. Even though both scores meet the sensitivity threshold, the
difference between them is only 110, which does not meet the plurality threshold of 128. The
scores are too close together to be sure which one is correct. Lowering the
Plurality setting to 100
would resolve this, and “3” would be returned as the correct character.
Both thresholds must be met for a character to be returned. If the
Sensitivity setting is
changed to 255, and the
Plurality setting is
changed to 100, then no character will be returned in this example. Even though the
plurality threshold has been met, neither of the scores are high enough to meet the
sensitivity threshold of 255.
Troubleshooting
When the scanner can’t determine a character, it will return the “@” symbol. If you’re
seeing lots of “@” symbols in your scans, adjusting the
Sensitivity and
Plurality might help.
Finding the right settings can be a bit of a challenge because, unlike the examples we’ve
discussed above, you won’t know what the scores are. The scores are assigned and evaluated
behind the scenes. So, you might need to run a few tests with different settings to see what
works best.
We recommend changing in increments of 10 as a general guideline. Given default values of
128, you might change the
Sensitivity to 138 and
the Plurality to 118. If
that doesn’t work, you might try keeping the
Sensitivity at 128 but
lowering the Plurality
to 118. When you make these changes, be sure to test with several different checks. The key
is to find the right balance that gets you the most consistently accurate results.
Scanning Checks
When you're ready you'll be at the home page. Here you can start scanning checks to a current batch listed or
create a new batch right from this window by pressing the icon next to the
batches panel.
Now press the Scan button
pictured below to start scanning and advance to the
Scan Settings page.
Check Scanner Home Screen
The Scan Settings page
(pictured below) lets you select which tender type you'll be scanning into Rock. In
most cases you'll be scanning checks, but you can also select "Cash" if you want to
scan the envelopes that the cash transaction came in.
Scan Settings

- 1 Currency Type
-
Select the currency type you will be scanning. The available settings will
change based on the currency type and the scanner driver that you select.
- 2 Single / Double-sided
-
Determines if Rock should scan one side or both sides of the selected currency.
- 3 Transaction Source Type
-
This setting allows you to set the transaction source for the scan. This is
helpful for times when you'd like to differentiate bank checks that are from
the bank's bill pay system from normal personal checks. You'll notice that not
all transaction sources are displayed on this list. You'll only see those that
are marked as 'Show In Check Scanner' under
Admin Tools >
Settings > Defined Types > Transaction Source.
- 4 Enable Double Document Detection
-
The Ranger driver can communicate with the scanner to detect when two or more
checks are scanned at once (e.g., because they’re stuck together). It does this
by measuring the thickness of what’s being fed into the scanner, so if you're
scanning items thicker than a single check (like envelopes) you'll want to
ensure this is turned off. Some Ranger model check scanners have a physical
button or switch to press to enable duplication detection such as the CR-120
and 150 models. Be sure to check your check scanner user manual for verification.
- 5 Enable Smart Scan
-
With smart scan turned on the scanner will read the contents of the MICR on the
check to ensure that the same check is not scanned more than once. Also, this
should be enabled if you want to be notified if check account information cannot
be read correctly.
Extra Features
The double-sided scanning and double document detection options are only available
on scanners using the Ranger API. See the
Supported Scanners
section above for more info on scanners that support the Ranger API.
Now the check scanner will start scanning checks. If there is a problem reading one
of the checks, it will immediately stop the scanning process and warn you of the error
(upside down check, check facing backwards, etc.) From here, you can skip the bad scan
and attempt a rescan, upload the scan as-is without the check account information, or
stop the scanning process.
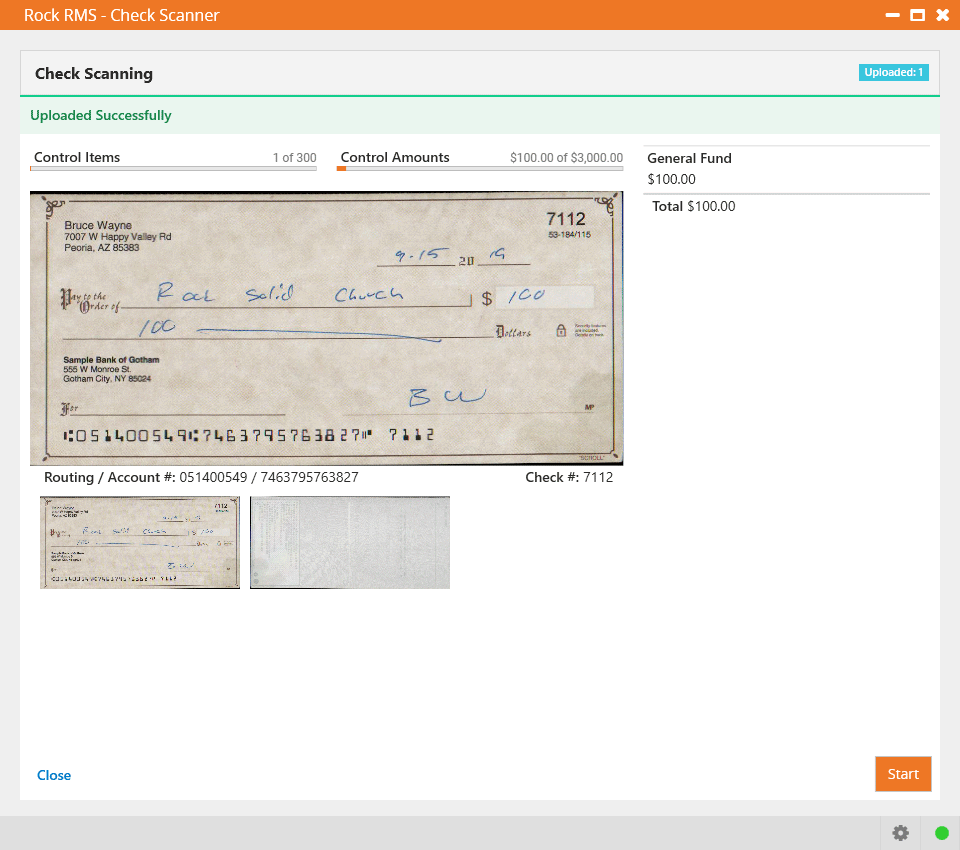
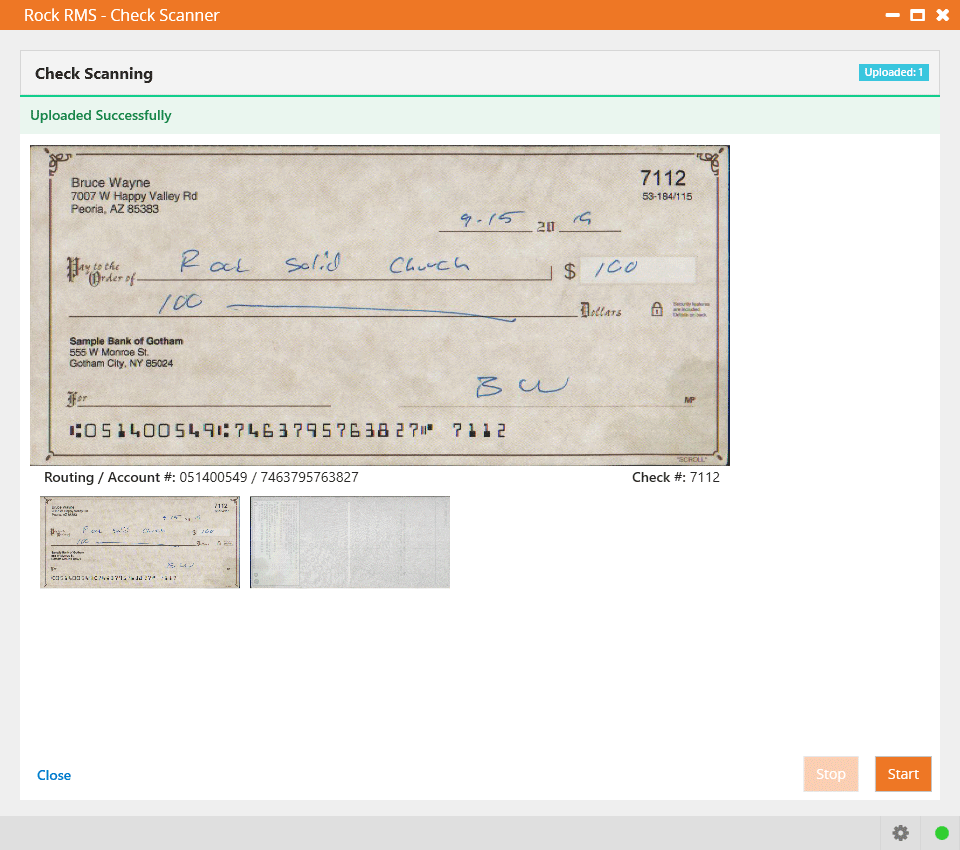
Capture Amount On Scan
When Capture Amount On Scan
is enabled, you'll notice (pictured below) that the check scanning pauses for each check so you
can add the amount. It also shows the
Control Items and the
Control Amounts at the top,
which will be updated after each scan.
Check Scanning - Capture Enabled
If Capture Amount On Scan is not enabled,
the page pictured above will instead appear as pictured below. You’ll note below that the
Control Items,
Control Amounts and check amount fields
are no longer visible.
Check Scanning - Capture Disabled
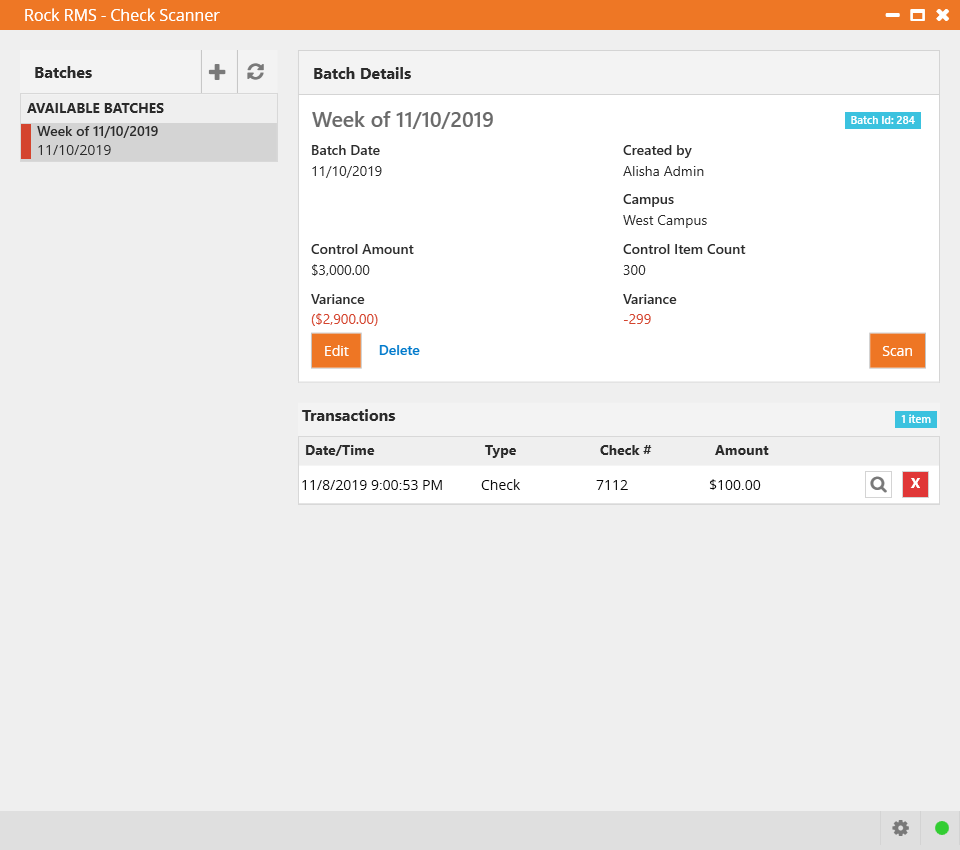
After the scanner finishes with the batch of checks in its hopper, you can add more
and scan again. When you’re done scanning, press the
Close button.
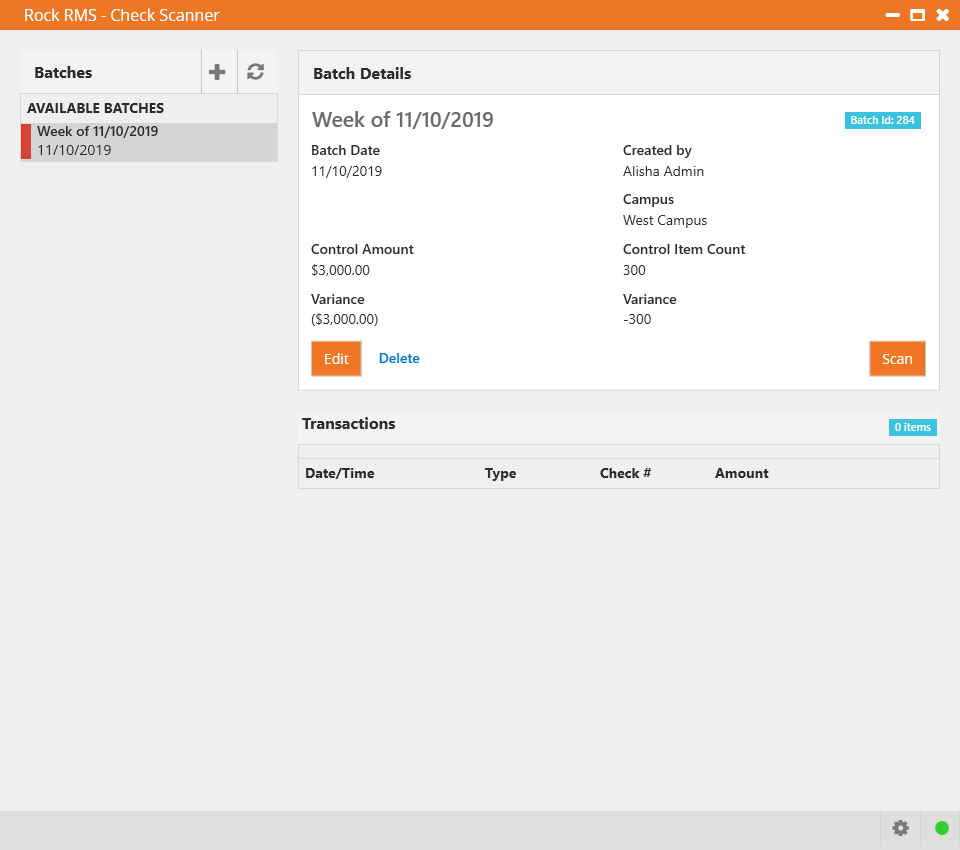
The main page (pictured below) will show the list of batches and the scanned items. From here, you
can add and delete batches, view or delete individual transactions, or start scanning
additional items.
Home Screen with Transaction
When viewing transaction details, you can see the scanned date and time, the
transaction date and time (determined by the batch date), and additional details
of the transaction. You can also adjust the amount of the check and its disbursement for accounts.
Transaction Details - Capture Enabled
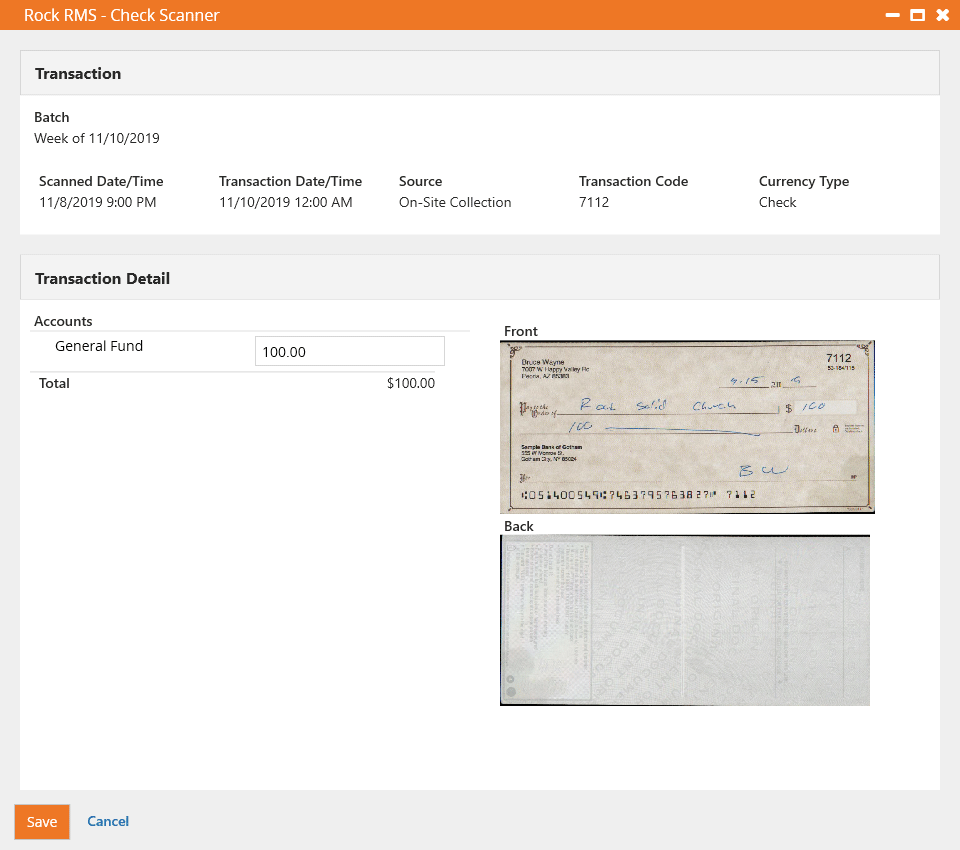
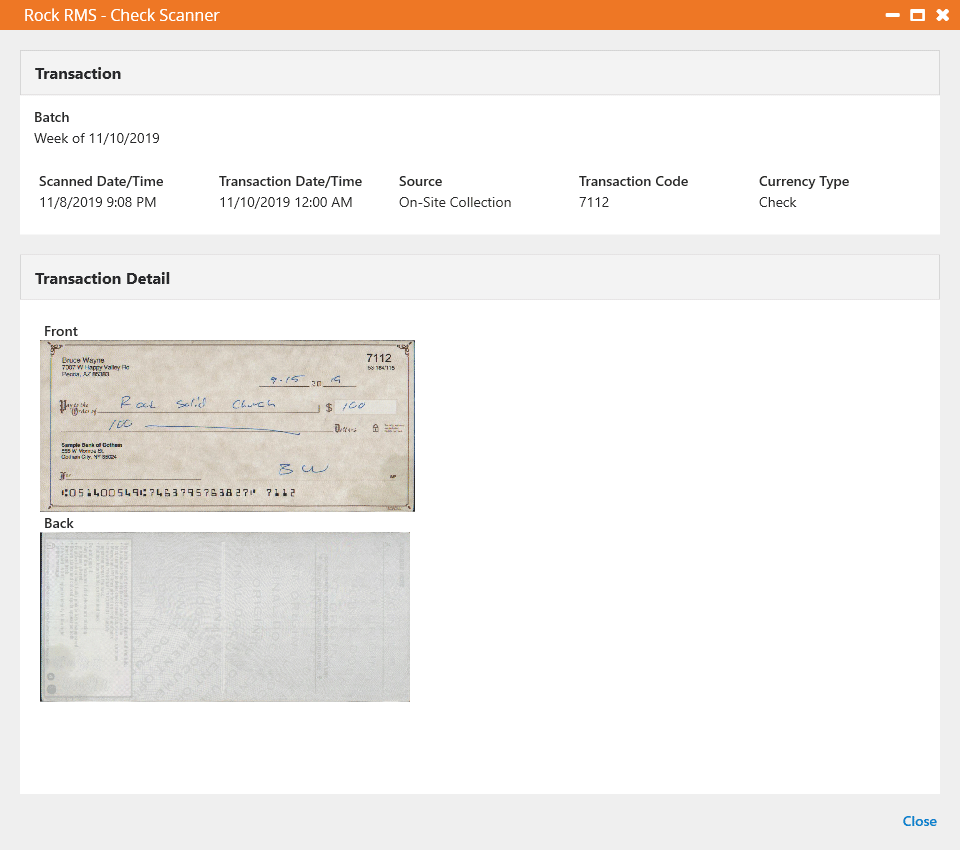
The details page is also impacted by whether Capture Amount On Scan
is enabled or not. It is enabled in the screenshot pictured above, so the check amount is available for editing. In the example pictured below,
Capture Amount On Scan was not enabled, so there is no amount to edit,
but the other details can still be viewed.
Transaction Details - Capture Disabled
Dates Associated with Scanning
The Scanned Date/Time that you see in the Scanner Grid is the Date/Time that the scanned item was uploaded. The Transaction Date/Time of each scanned
transaction is determined by the Batch Date at the time of the scan. Note that if the Batch Date was changed after some checks were already uploaded, the
previously scanned checks would have the old Batch Date and the new scanned checks will have the new Batch Date.
Scheduled Transactions
Many transactions occur once and then they're done. However, sometimes your guests will want to set
up automatic repeating payments that run on a selected schedule (weekly, monthly, etc.). Rock calls
these Scheduled Transactions.
Administrating Scheduled Transactions
You can view all of the scheduled transactions in Rock under
Finance > Scheduled Transactions.
Scheduled Transactions
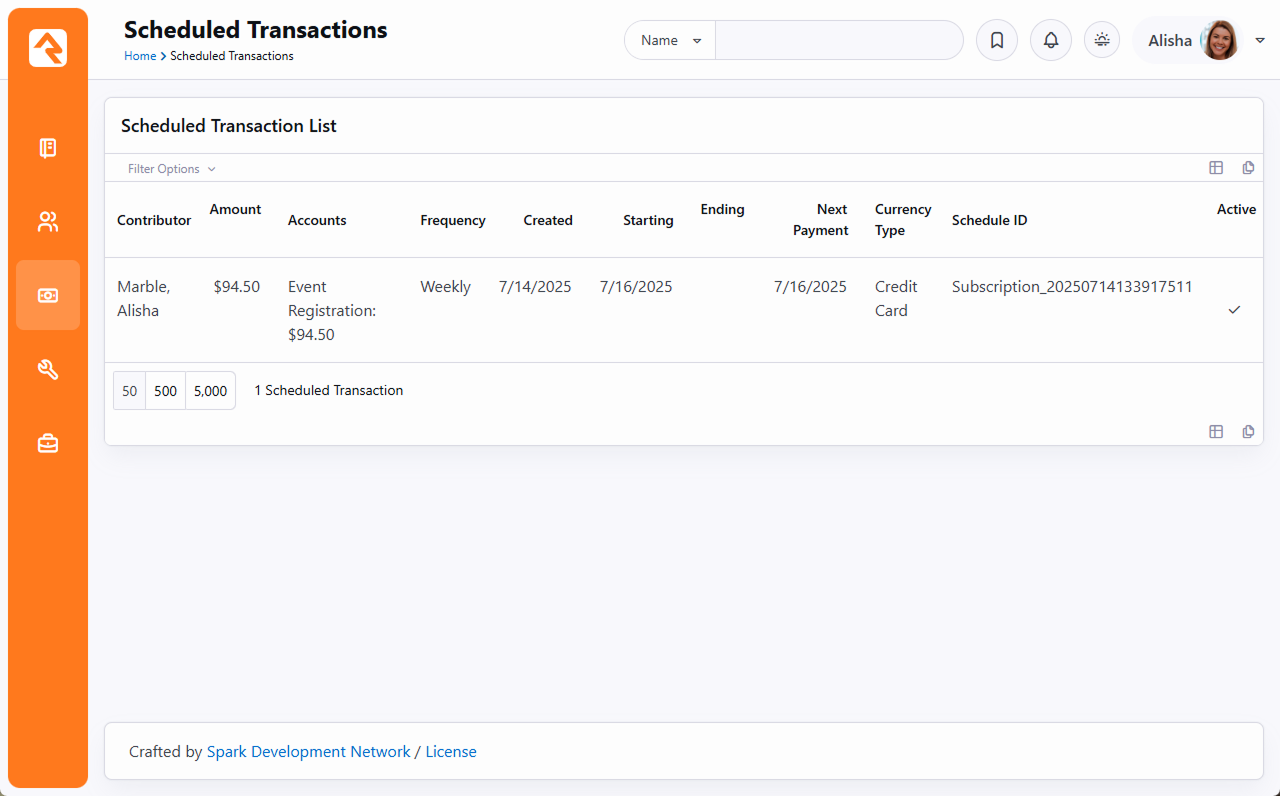
From there you can choose a scheduled transaction to edit.
Adding A New Scheduled Transaction
Scheduled transactions must be entered from the individual’s
Person Profile page.
They can also be added by your guests on your external website.
Scheduled Transaction Detail
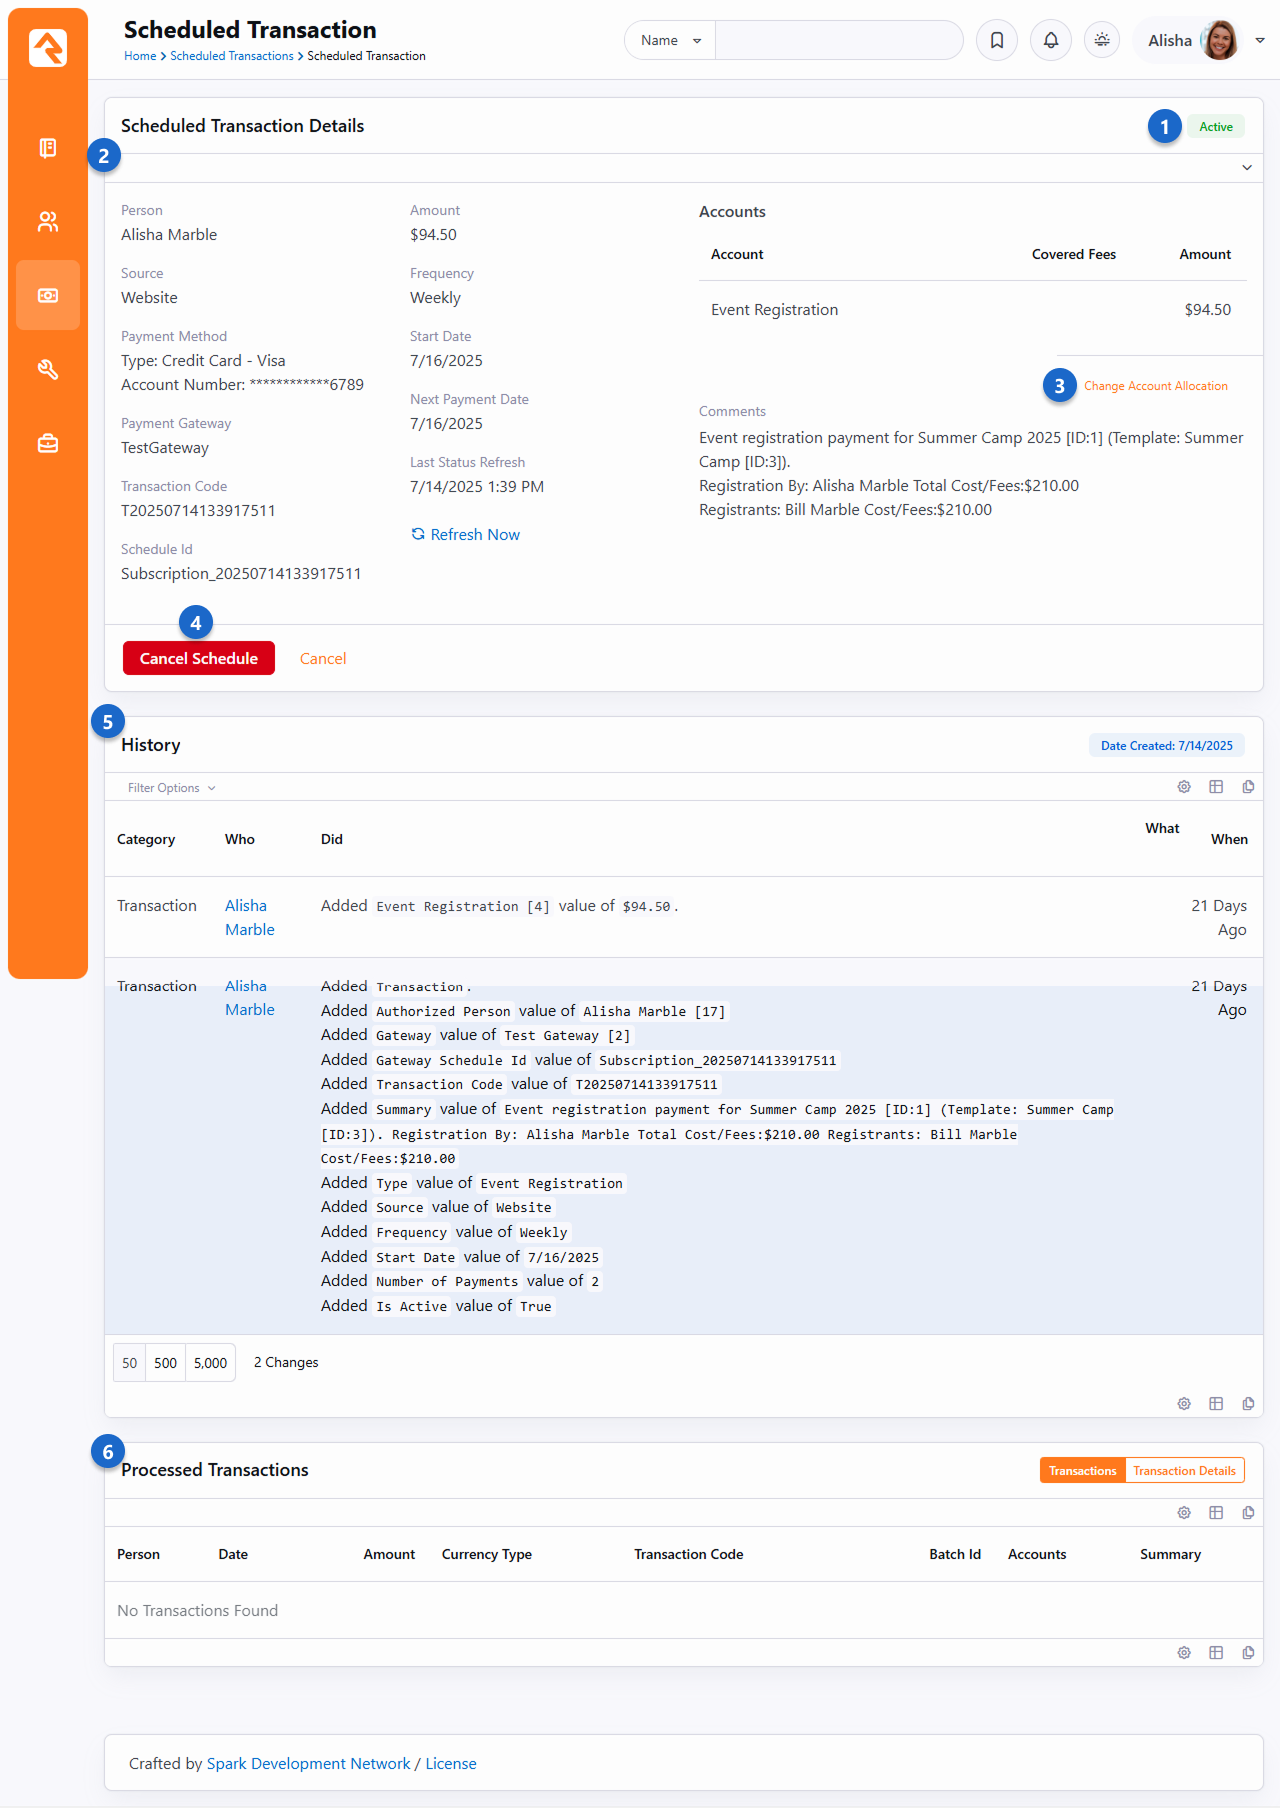
- 1Status
- This displays the current status of the scheduled transaction.
It is Active in the example, but you may also see values like
Canceled, Completed, Failed, Past Due or Paused.
- 2Details
- Here are all the details related to this scheduled transaction.
- 3Change Account
- Link to change account allocation. This option is available for open batches only. When clicked,
Rock displays the current account allocation and allows you the option to add and delete
allocations.
- 4Cancel Schedule
- Button to cancel the scheduled transaction. Some financial gateways, such as Pay Flow Pro,
allow you to edit scheduled transactions. In such cases, an
Edit button is displayed here as well.
- 5History
- History of changes and edits to the scheduled transaction.
- 6Processed Transactions
- Listing of transactions that have been initiated by the schedule.
Personal Profile
Scheduled transactions can also be viewed on the individual's
Person Profile page
under the Contributions tab.
See our Person and Family Field Guide
for more information.
Scheduled Transaction Frequencies
The following options are available as frequency patterns for scheduled transactions.
Each payment gateway will support only a subset of these options. Each gateway will
also have some special rules for how they calculate the schedules. Notes on these
rules can be found at the end of this document under the chapters for each gateway.
-
Weekly: Every seven days starting on the start date.
-
Bi-Weekly: Every two weeks starting on the start date.
-
Twice A Month: Twice a month. Usually this is used with the
start date of the first of the month. Payments will then come out on the 1st
and 15th of the month.
-
Monthly: Once a month on that day of the month established by the start date.
-
Quarterly: Every three months on the same date as the first payment.
-
Twice A Year: Every six months on the same date as the first payment.
-
Yearly: Once a year on the same date as the first payment.
Downloading Transactions
There are two ways to configure this download. The first way is to
set up a Get Scheduled Payments
job to run every night. This can be done under
Admin Tools > Settings > Jobs Administration.
This job will run each night (or when you decide you want it to run)
and create batches and transactions for new payments.
Don't Forget To Set Up The Download Job
It's important to remember to set up the Get Scheduled Payments
job if you want the transactions to download automatically (highly recommended).
The download job has a few settings that you should review. These include:
-
Batch Name Prefix: When the transactions are downloaded
from the gateway, they're assigned to a batch. You can configure the names of
these batches to all start with a certain prefix.
-
Days Back: The number of previous days that the download job should
use when querying the gateway for processed transactions. We recommend a value
of seven. This allows for times that the job may not run every day. There is no risk
in downloading the same transaction on multiple days as Rock keeps track of which
transactions have already been added.
-
Receipt Email: Each time a new transaction is downloaded for a
person, Rock can send them a receipt of that transaction. Use this setting to
specify the system communication that should be sent when new transactions are downloaded.
-
Failed Payment Email: You can send a communication to specific recipients if a scheduled payment fails.
Choose which system communication you want to send from the dropdown menu.
-
Failed Payment Workflow: You can launch an optional workflow if a scheduled
payment fails. Choose the workflow you want to run in this field.
You can also choose to manually download the new payments from the
payment processor. You can do this under
Finance > Download Payments.
This does the same thing as the Rock job but requires you to manually
run the download. This block also has settings that are similar to the job settings
for setting the batch prefix and email receipt.
Setting a Payment Reversal Notification Workflow
The Scheduled Job Detail screen also includes an option to trigger a workflow when a scheduled transaction is declined
(called a "reversal"). You can configure the workflow to perform any necessary follow-up task, such as sending an automated communication. Simply
configure the workflow in your General Settings, then select it from the Failed Payment Workflow dropdown menu.
Downloading transactions from the gateway is actually a bit trickier
than you might think because of certain edge-cases and advanced
features. We'll cover some of these next.
Recent Scheduled Transaction Changes
Consider this example. Ted has a scheduled transaction set that
takes $120 out of his account every week and puts it to the
General Fund
account. Early in the morning the payment gateway creates a new
transaction for this amount. Ted arrives at work and changes
his giving to $100 per week. Finally, later in the day, the
church's Get Scheduled Payments
job runs and pulls that day's transactions down from the gateway.
The gateway's transaction says it's for $120 but Rock's
information only has $100 allocated. When this happens (certainly
a rare edge-case) Rock will apply any extra amount to a
default
account. This default account is the first active account that
does not have a parent account and where the current date falls
between the account's start/end dates.
Naming Batches for Online Giving
The way that Rock calculates the Batch Name
is by combining a batch prefix
and a batch suffix.
The prefix is usually set by a block or job setting (the default
value used by the Utility Payment Entry
block, Scheduled Payment Download
block, Get Scheduled Payments
job etc. is Online Giving).
The suffix depends on the currency type (Tender Type
Defined Type). If it is not a credit card transaction, then the
currency type value is used (e.g., ACH).
If it is a credit card transaction, then the Credit Card
type value is used (e.g., Visa, MasterCard, etc.). However, the
Credit Card
defined value also has a Batch Name Suffix
that can be used to override this value. For example, if you
want to combine Visa, MasterCard and Discover transactions into
the same batch, you can set the
Batch Name Suffix
for all three to the same value (e.g., VMD)
and then transactions of these types will be combined into the same batch.
Expiring Credit Card Notification
By default, a Send Credit
Card Expiration Notices job is configured to run once a month. This can be found under
Admin Tools > Settings > Jobs Administration.
Expiring Credit Card Job Configuration
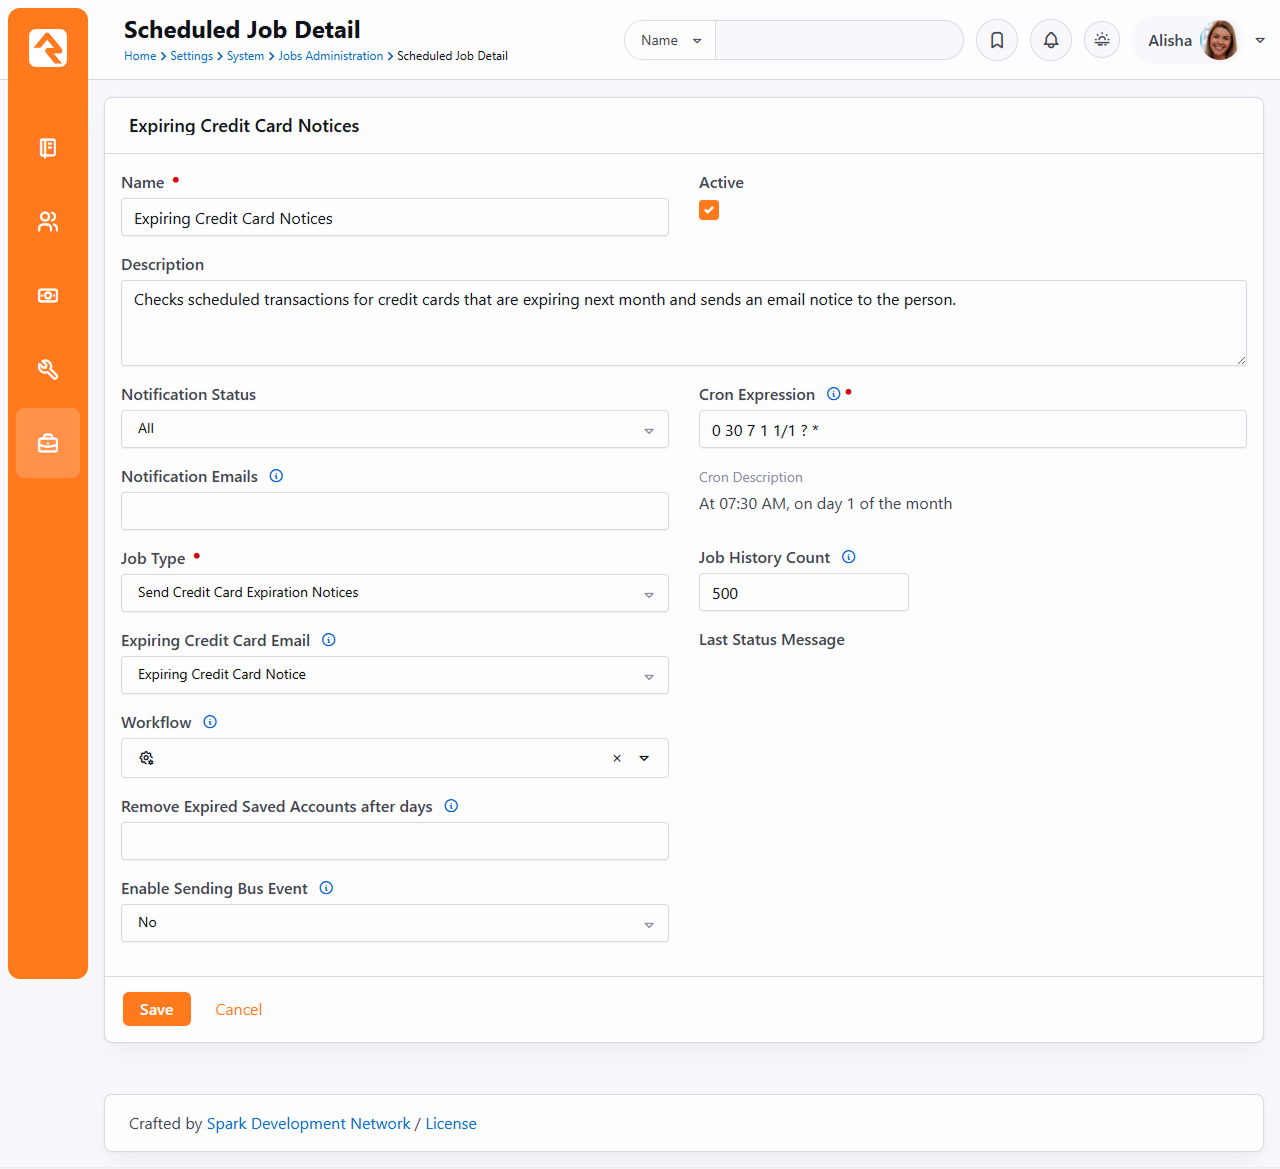
The purpose of this job is to let people know that their credit cards are about to expire.
Typically, this will mean that the job will send an
Expiring Credit Card Notice
system communication
(Admin Tools > Settings > System Communications)
to the person whose credit card will expire the following month. However, some organizations
may use a bus message to signal their system to send an email by enabling the
Enable Sending Bus Event
option.
If you wish to do additional processing for each expiring scheduled credit card transaction, the
job can optionally be configured to launch a custom workflow. You can also choose to delete any saved accounts
with credit cards that have expired after the provided number of days.
Online Giving
In this fast-paced world, people are always looking for a way to save time. Online
donations are a great way to provide flexible options to your attendees, while bringing
consistency to your weekly giving. Let’s tour the online transaction options included in
Rock.
These Tools Can Be Used For More Than Giving
While the tools we'll discuss in this section were created mainly for online
donations, they can be used for any type of online payment or transaction.
Types of Giving Transactions
As we’ve seen earlier there are two types of giving transactions:
-
One-Time Transactions: A single specific gift given on a single date.
-
Scheduled Transactions: A recurring transaction that follows a set schedule (weekly, monthly, etc.)
External Website Tools
Rock provides several pages for your website guests to use to set up and manage their
online transactions. These pages can all be found under the
Give section.
Giving Homepage
Giving Homepage
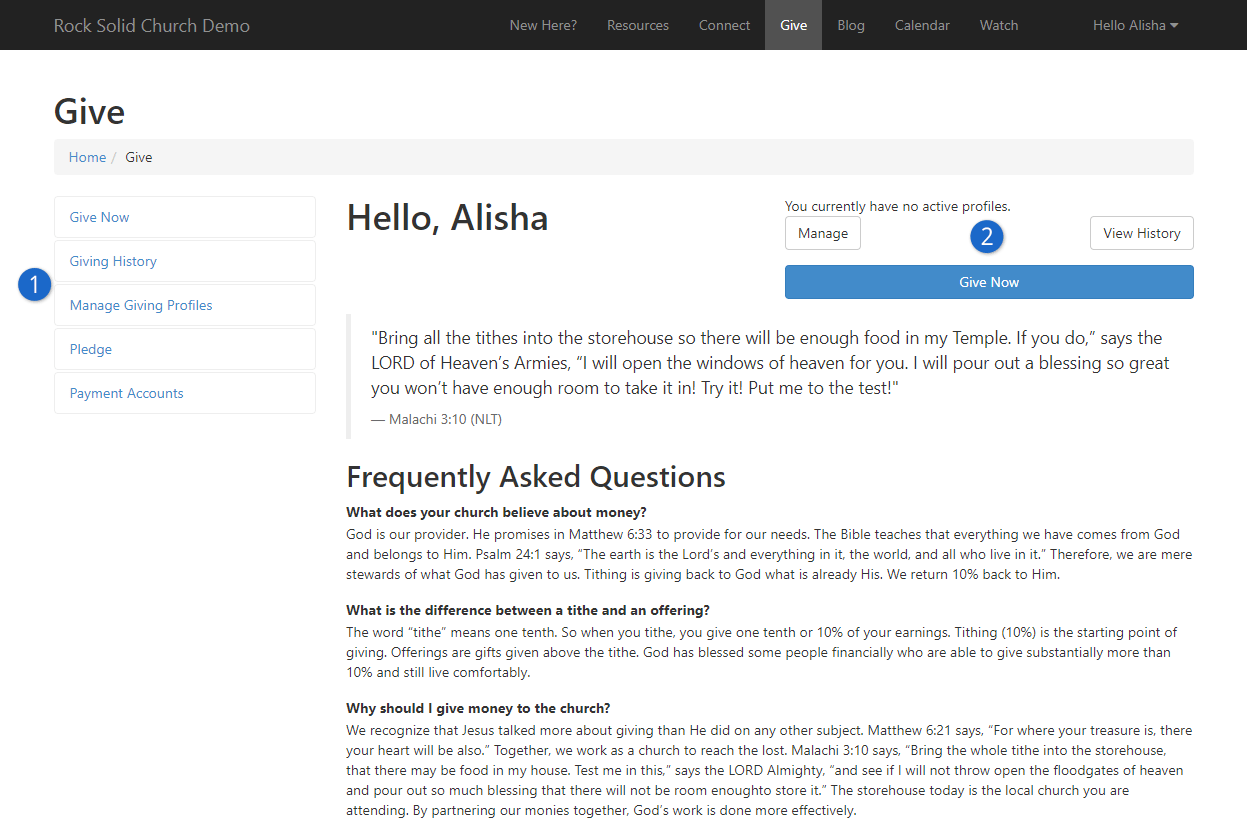
- 1Pages
- Links to the various giving management pages.
- 2Personalization
- If the guest is logged-in, a personalized view of their scheduled
transactions will be shown with the option to give now.
Give Now Page
The give now page is a flexible page that walks a person through the process of
giving in a wizard-like fashion.
Online Giving Flow
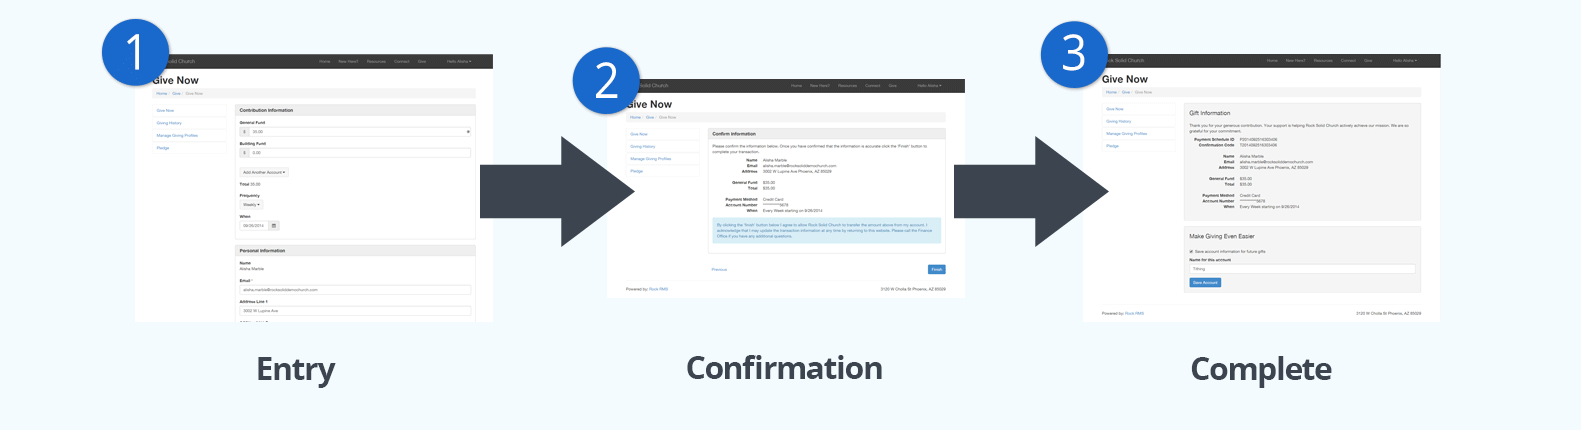
- 1 Entry Step
- The entry page is used to get the giving details from the guest. More
information on this step and its settings can be found below.
- 2 Confirmation Step
- The next step in the process confirms what the guest has entered before
saving and processing the transaction. The confirmation header and footer of this
step can be customized from the block settings.
- 3 Final Step
- The final step provides the guest with the ability to save their account
information (credit card or check account/routing number) for future use. It will
also encourage the visitor to create a login to use for subsequent visits. Like
the confirmation step, the header and footer can be updated from the block
settings.
The entry step is by far the most complex. Let’s look at it in more detail.
Give Now Page
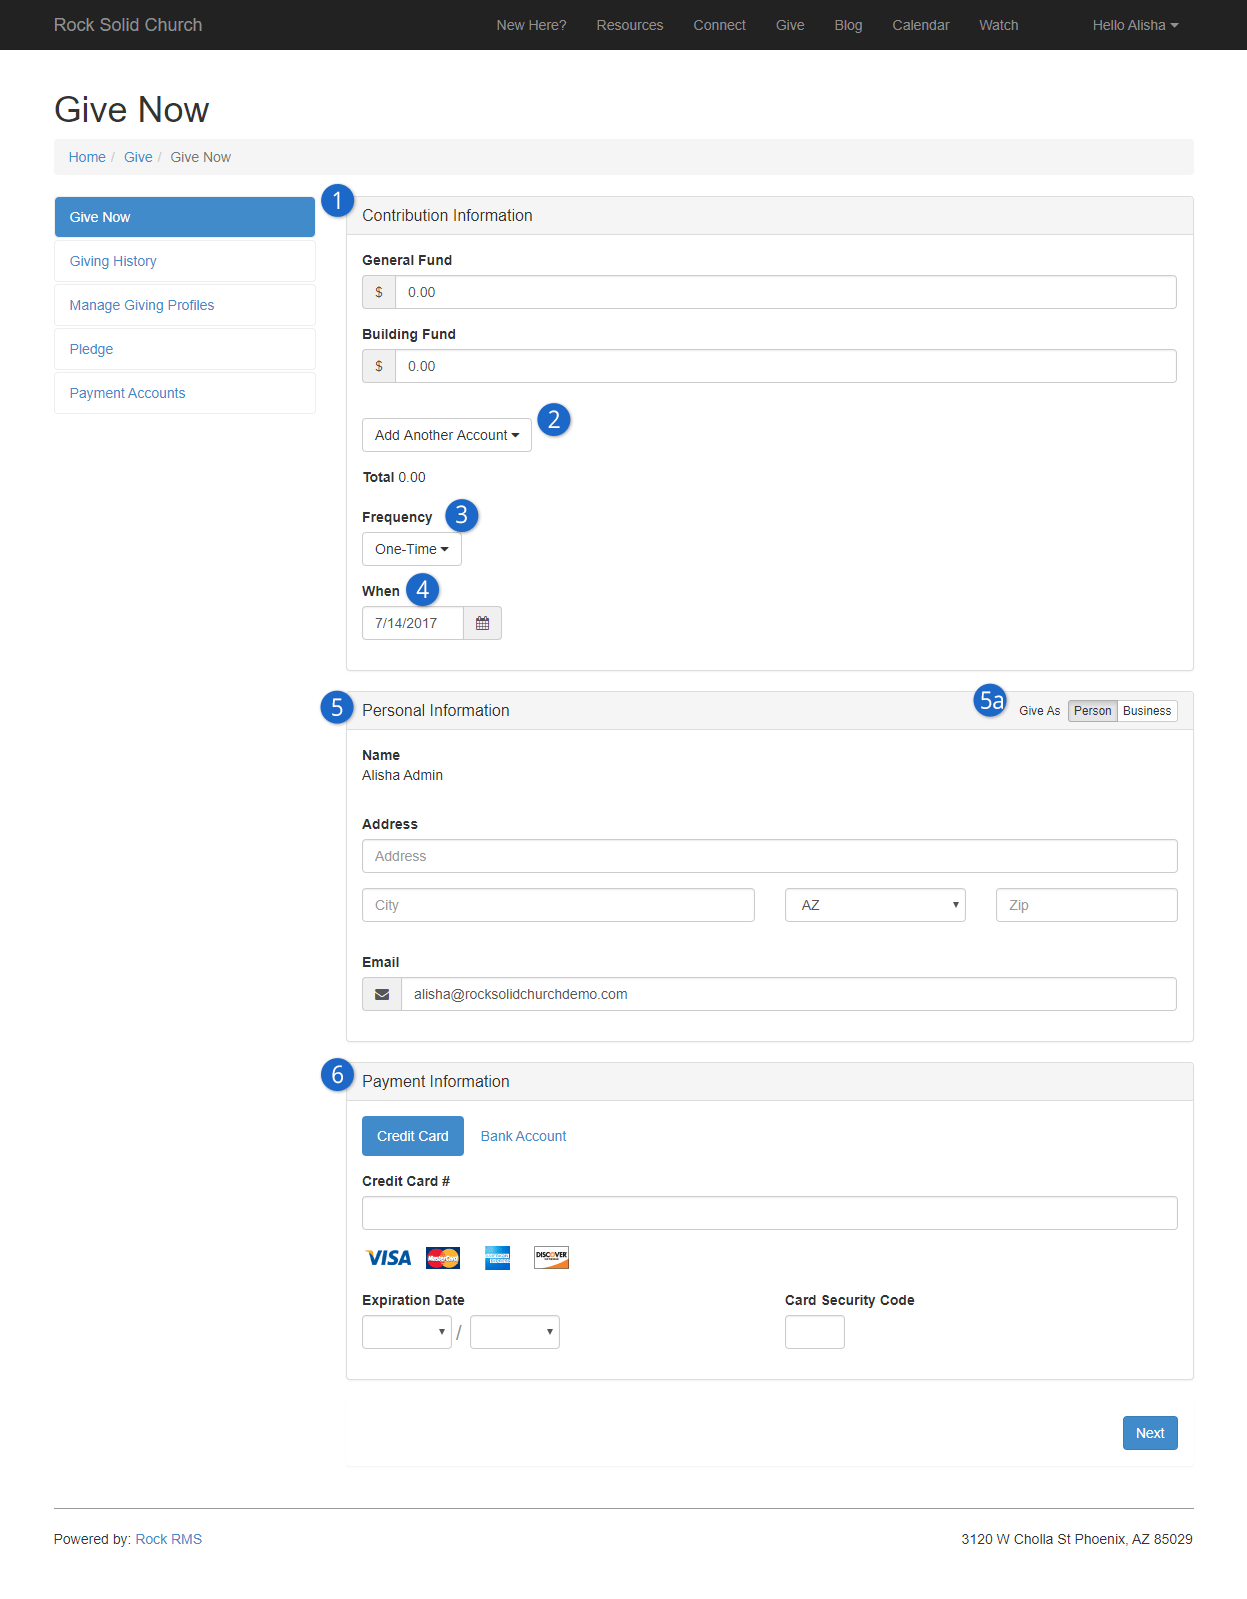
- 1 Accounts
- The guest will first be asked to select the dollar amount they would like to
contribute to each account. The accounts that are listed are configured via a
block setting.
- 2 Additional Accounts
- You can also configure less-frequently used accounts to be added from a list.
- 3 Frequency
- This setting determines if the gift will be one-time or be configured to process
on a schedule of their choosing. See the section
Scheduled Transactions
for details on the scheduling patterns for each option. You can disable the
creation of scheduled transactions using the block settings.
- 4 When
- This determines when the gift will come out of their bank. When used with a
scheduled transaction this will be the start date for the schedule.
- 5 Personal Information / Business Information
- This is the name and contact information of the guest. If they're logged in,
it will be auto-filled with their current information. If they change it here,
this information will also be updated in the database. If they have given as a business, they
can view the business name and information here as well by changing the
Give As
option to 'Business'.
- 5a Give As
- When
Enable Business Giving is enabled
in the block settings, both the individual and business names will appear as tabs which allow the user to
view the information of each.
- 6 Payment Information
- This contains the credit card or checking account information needed to
process the transaction. The block settings define a payment gateway for both
credit card and ACH (checking accounts). If you would like to disable either of
these payment types, simply leave the gateway blank for the one you would like to
exclude.
This block has a few other settings that you should know about. These include:
-
Batch Name Prefix: When the transactions are downloaded
from the gateway, they're assigned to a batch. You can configure the names of
these batches to all start with a certain prefix.
-
Source: For reporting, it’s good to know where a transaction
came from. For instance, you might use this block on your main website or a
web-based kiosk in your lobby. Knowing the source for every transaction will
help you determine the success of each platform. New source options can be
set up under Admin Tools > Settings > Defined Types > Transaction Source.
-
Address Type: You'll want the address information the guest
entered to be for their home address in most cases, but you can change this
if you wish.
-
Layout Style: This setting determines if the layout should be:
-
Vertical: Sections are stacked vertically (default)
-
Fluid: Sections flow in a horizontal layout as they fit.
-
Additional Accounts: Determines if the
Add Another Account
option is shown.
-
Impersonation: This setting allows staff with proper
security to enter gifts for individuals in the database. This is helpful
in cases where the block is used internally.
-
Prompt For Phone: Determines if the guest should be asked
to provide their phone number on the entry screen (default is no).
-
Prompt For Email: Determines if the guest should be asked
for their email address on the entry form (default is yes).
-
Enable Business Giving: This setting displays the option to give as a business. When
enabled, the individual can toggle between their personal and business information on the Give Now and Giving History screens.
-
Confirm Account Email Template: When a guest decides to
create an account after confirming the gift, you can send them an email
confirming this action. This setting allows you to select the email template
to use for this email.
-
Receipt Email Template: When a guest's gift has been processed, you can send them an email receipt. This setting allows you to select the template
to use for this email. If this setting is left blank no receipt will be sent.
-
SMS Opt-in: If you're asking for the person's phone number, this gives
you the option of allowing them to opt in to receiving text messages. The message the
person sees can be customized by going to
Admin Tools > Settings > System Configuration | UI Settings.
Transactions that occur from the Give Now
page will be immediately processed through the payment gateway and added to a batch
using the Batch Name Prefix block setting.
Giving History
This page shows all other previous transactions for the logged-in user. Note the Show Giving For tabs which allow
you to toggle between individual and business giving history.
Giving History
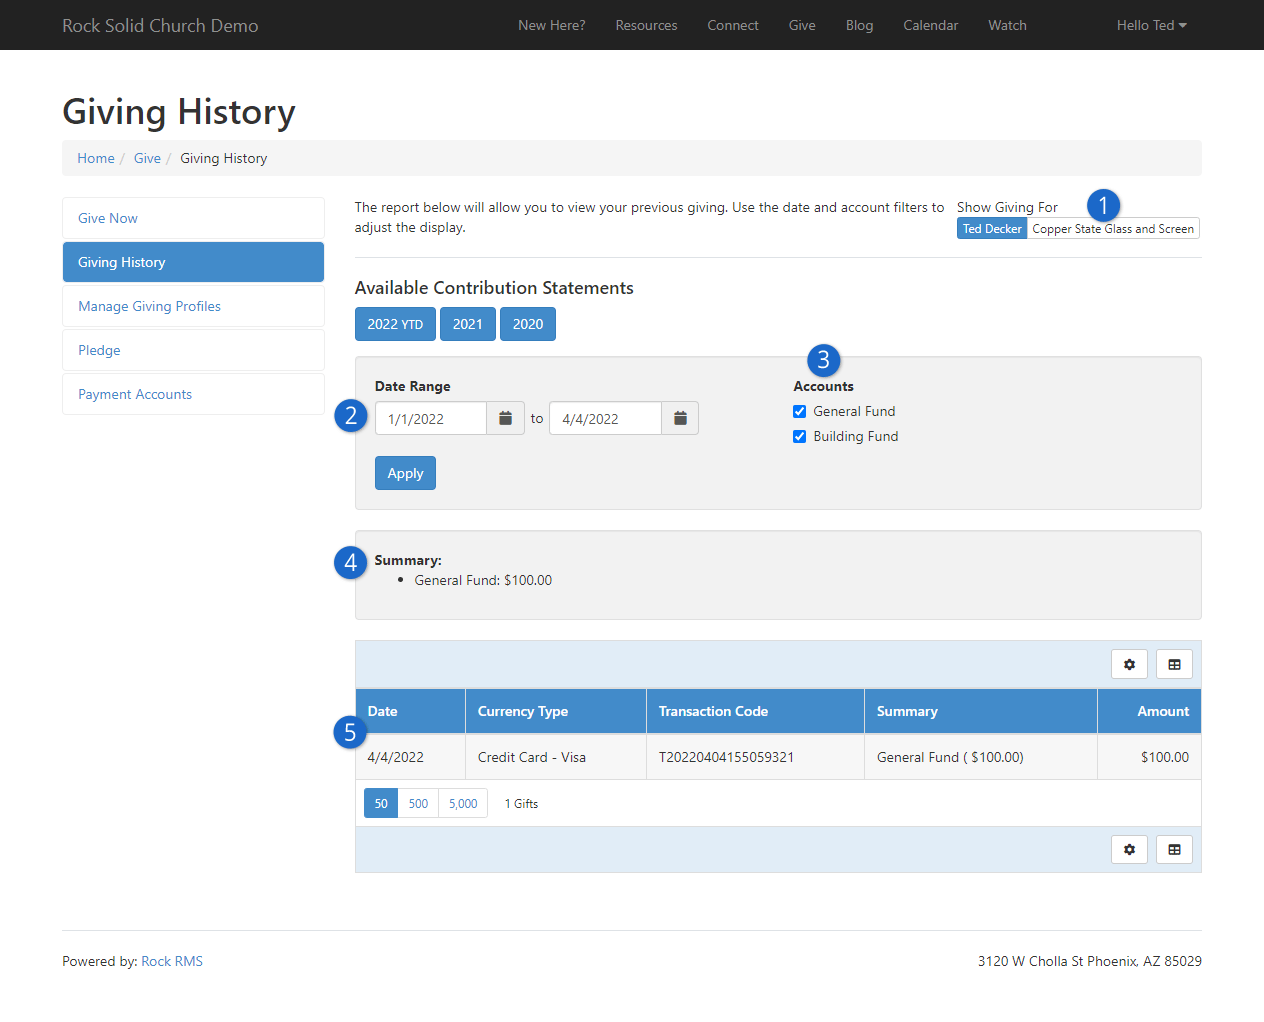
- 1 Show Giving For
- This allows you to toggle between individual and business giving history.
- 2 Date Range
- This allows the person to filter the transactions shown to a specific date
range. The default range is the first day of the current year as the start
date and the current day as the end date.
- 3 Accounts
- Used to filter transactions based on the account. The list of accounts
shown is configured on the block settings.
- 4 Summary
- Shows transaction totals based on the filters provided.
- 5 Transaction List
- Shows all the transactions based on the filters.
Manage Giving Profiles
This page allows the guest to manage any scheduled transactions they have created.
Manage Giving Profiles
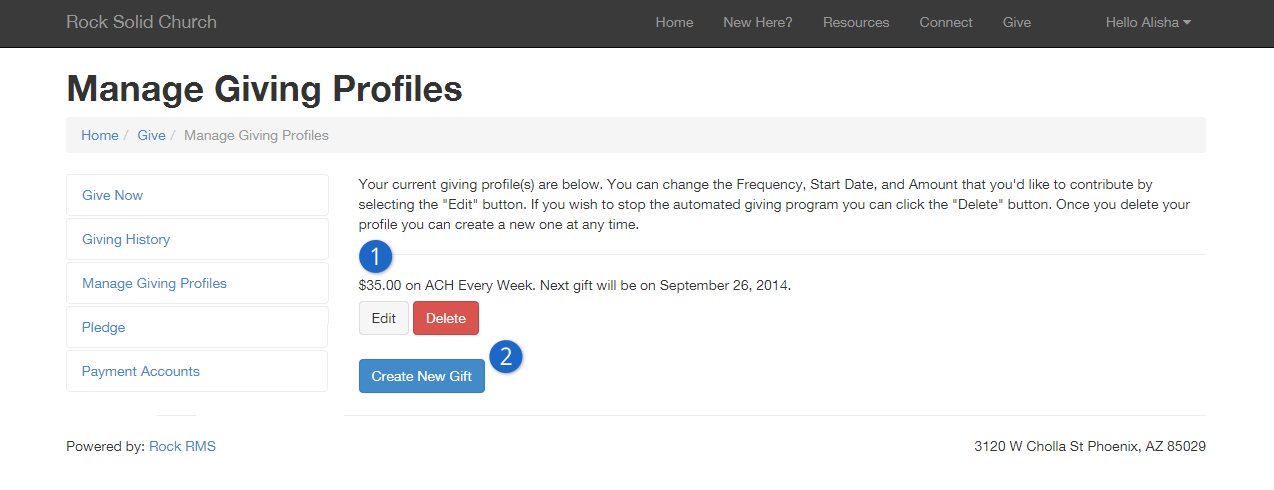
- 1 Profiles
- Listing of all configured scheduled transactions with the ability to edit
or delete each one. This listing is created with a liquid template that
allows you to modify the markup that's used to build the list.
- 2 Create New Gift
- Button that allows the guest to create a new scheduled transaction.
Moving To A New Payment Gateway
If your organization decides to move your online giving to a new payment gateway,
this block has settings to help you transfer your scheduled transactions to the
new gateway. See the
Transferring Gateways
section of the Payment Gateways
chapter for details on how to handle this scenario.
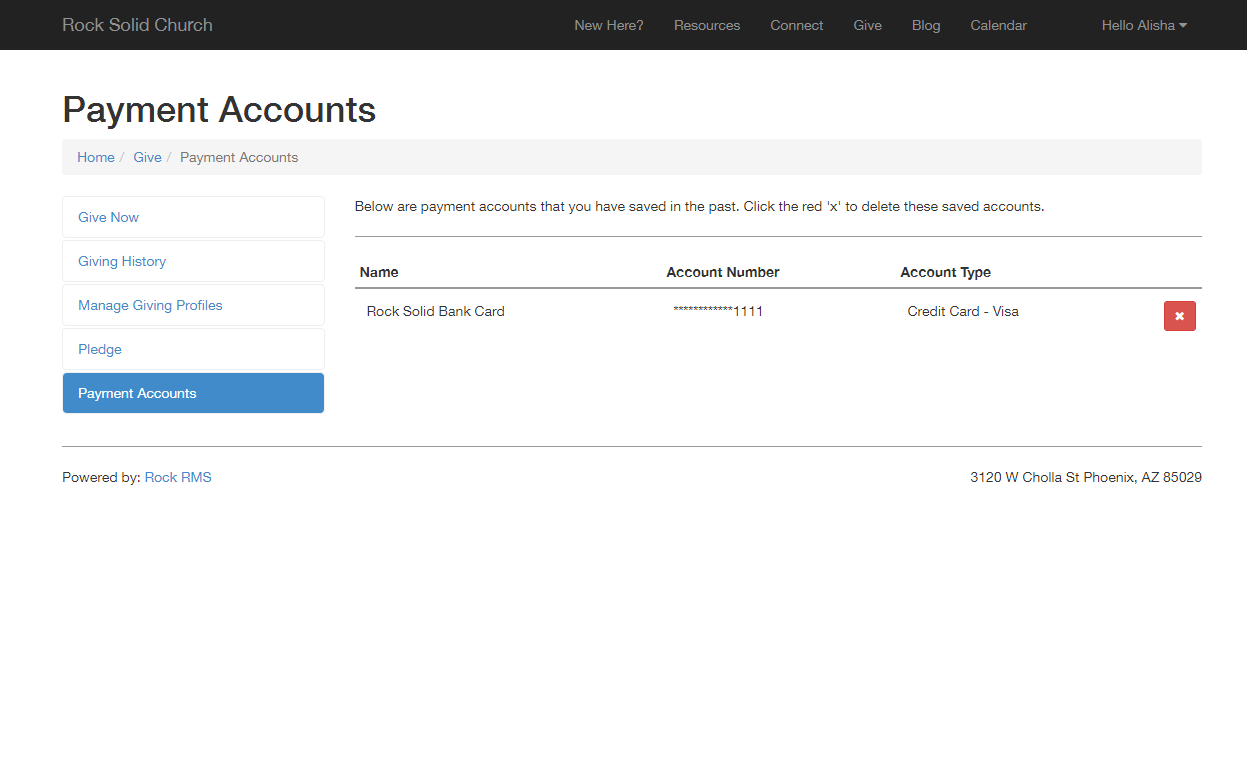
Saved Payment Accounts
Your website guests have the option to save their credit card and bank accounts for later
use. This screen allows them to manage these accounts. The options on this screen will vary depending
on your gateway provider. At the very least your guests will be able to delete these accounts
from this page. Some providers may allow you to also edit the saved payment accounts.
Payment Accounts
Batches For Online Transactions
Unlike processing on-site transactions, which are manually entered, the creation of
online transactions in Rock is an automated process. The steps differ a bit depending
on whether the transaction is a one-time transaction or a scheduled recurring
transaction.
One-Time Transactions
When a one-time transaction is created online, it's immediately sent to the
payment gateway and processed. If the gateway accepts the payment, a transaction
is immediately created in Rock. The transaction is added to an
Online Transaction
batch. The transaction will be placed in an existing batch if one is available
with the following criteria:
-
Is open
-
Has a matching prefix to the one defined on the Utility Payment Entry
block
-
The current date and time falls in between the batch’s start and end date
Otherwise, a new batch will be created for the transaction with a start and end
date of the current day.
Future One-Time Gifts
If a one-time gift is configured to process on a day other than the current
day, it will be processed like a scheduled transaction.
Schedule Recurring Transactions
Scheduled transactions work a bit differently than one-time gifts. These
transactions must be downloaded at a later date from the payment gateway.
See the Downloading Transactions
section for details on how to download these transactions.
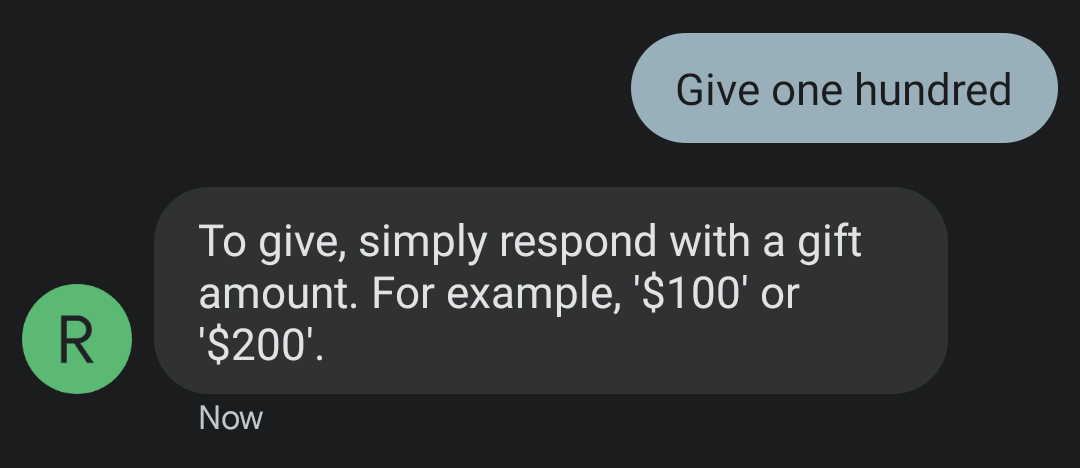
Text Giving
What could be more convenient than texting your financial gift straight from your phone?
Text Giving provides a simple process, making giving via text quick and easy.
Text Giving
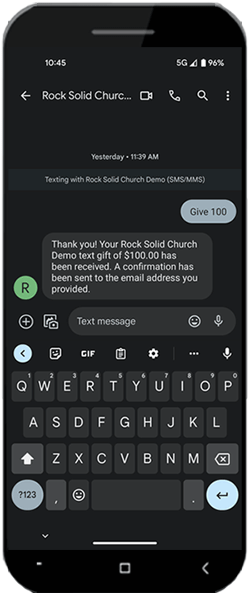
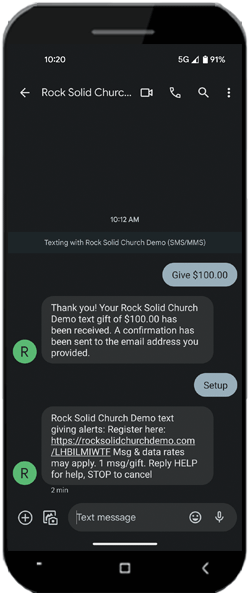
As pictured above, all a person needs to do is text the word “give” and then the amount
they wish to donate. If they entered the wrong amount, then they can just text "refund"
and it will be like the gift never happened.
You can customize which keywords a person texts to donate or request a refund.
The keywords are case-insensitive, so it doesn’t matter if someone
texts “give” or “Give”. Similarly, the person can either add the dollar sign or not. If
the amount is in the thousands, they can include the comma ($1,500) or not ($1500).
Before a person can start Text Giving, though, they’ll need to register. We’ll walk you
through the registration and giving process, and then show you how to set it all up.
The Text Giving Experience
Below we’ll look at what a person can expect as they go through the Text Giving
process. It starts with a one-time registration each person needs to complete
(or you can do it for them, more on that later). Going forward they can
text a keyword and an amount, to give at the push of a button.
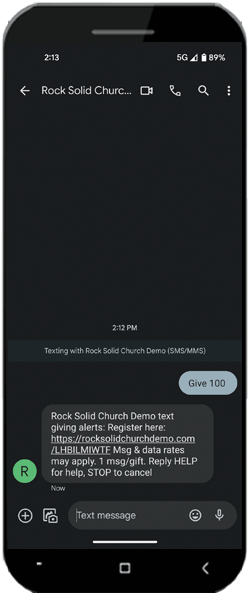
Text Giving Registration
When a person first texts a giving keyword to your SMS Pipeline they’ll
get a response
containing a link to the registration page. This is where
people go to complete the one-time setup needed to give by text
and to complete their first gift.
Text Giving Registration Response
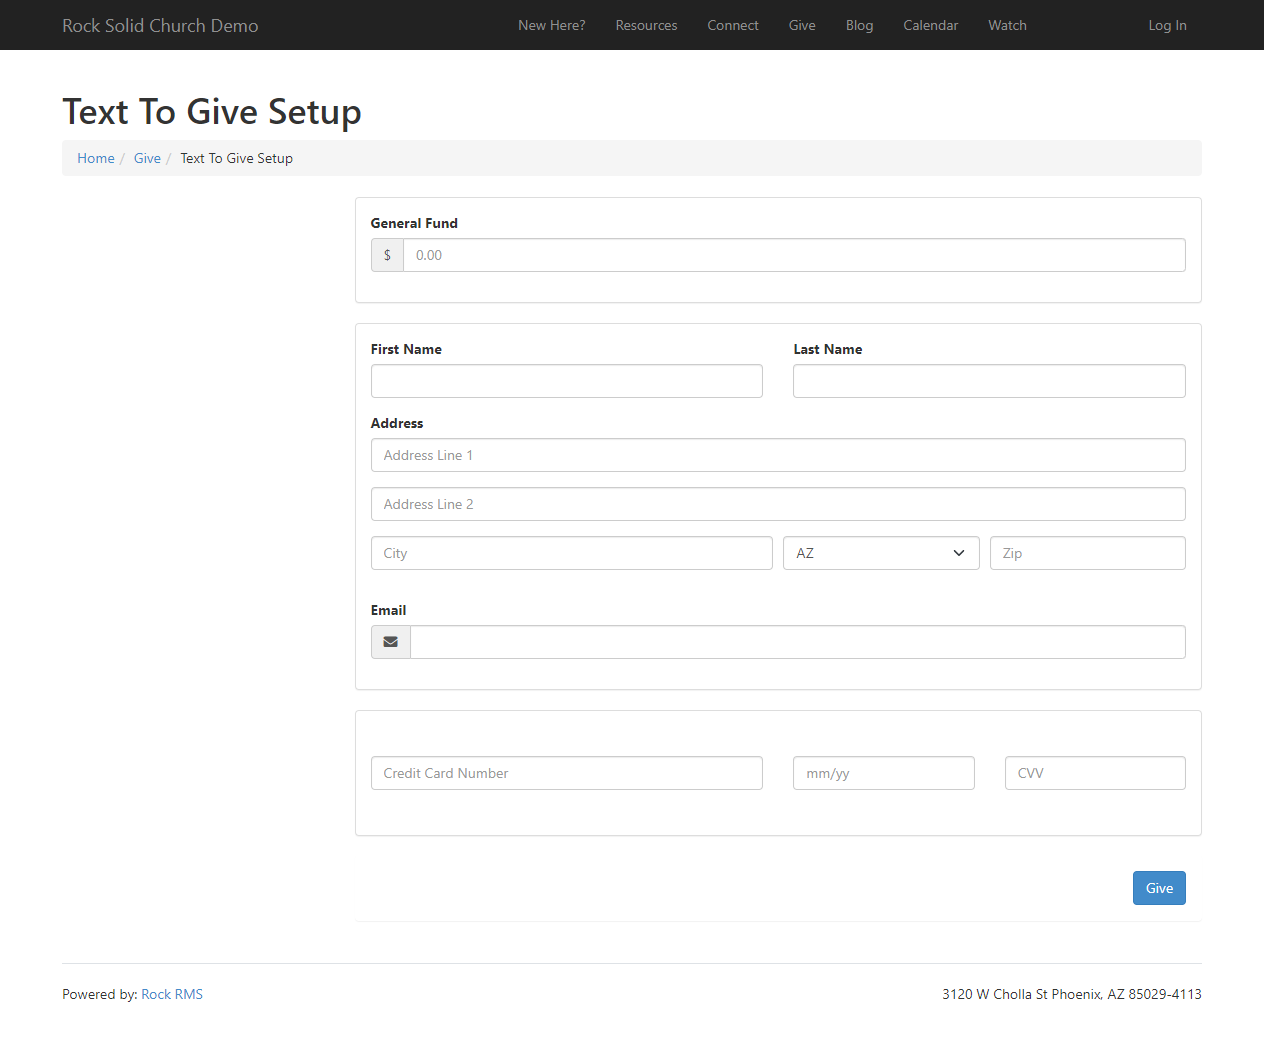
Out of the box, the setup page is configured for you on the external site
template we provide. Located under the
Give
area, a person could navigate there directly rather than accessing it by
text. The page comes with the
Utility Payment Entry
block. The
Utility Payment Entry
block is the money block, literally, for Text Giving. However, an
administrator must configure
this block before Text Giving can be used. We’ll cover that
configuration a little later.
If the person is logged in, most of the form is filled in
for them. They'll just need to provide a payment method. Otherwise,
the form is short and easy to complete.
Text Giving Setup
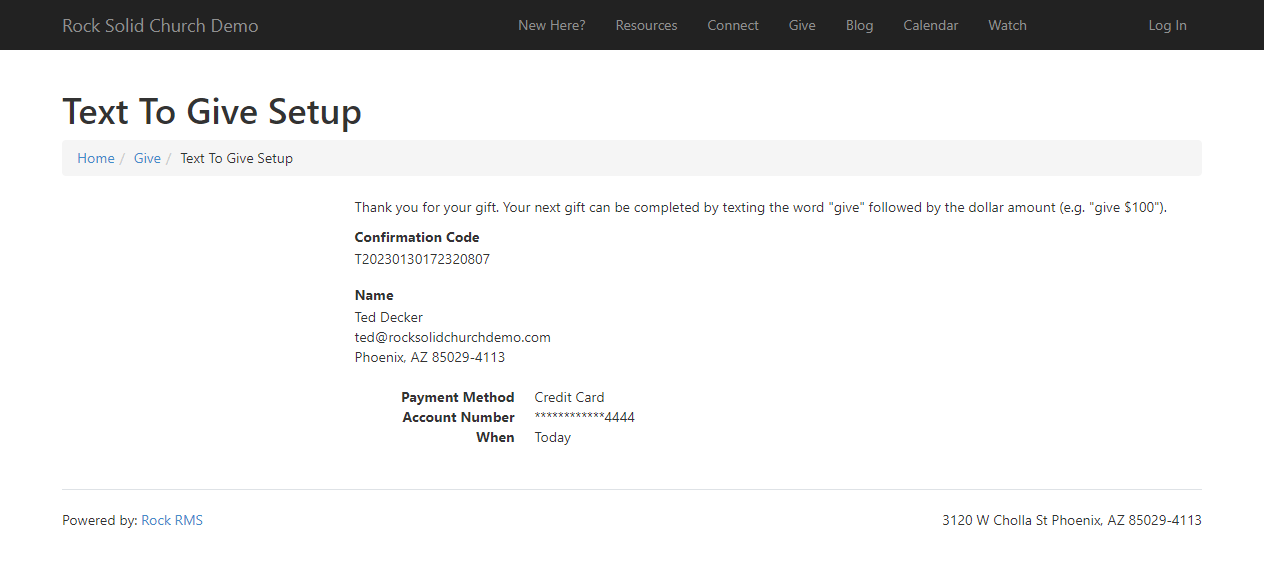
After submitting the form pictured above, the person sees the confirmation
page pictured below. The text near the top of the block lets them know
their next gift can be sent by texting the word “Give” followed by an amount.
Text Giving Setup Confirmation
You can configure what the message along the top says by updating the
Finish Lava Template
block setting for this block. You’ll want to update this if your SMS Pipeline
is configured with giving keywords other than “Give”. We’ll dive into the SMS
Pipeline configuration in a bit, but for now just know that’s where giving
keywords (like "Give" or "Gift") are configured.
Continued Giving
After the above setup is complete, the person can give simply
by texting a keyword and an amount.
Text Giving
If they need to access the setup page again, perhaps because they want to
change their payment method, all they need to do is text “Setup” and they’ll
be sent a link to the setup page. Like the giving keyword, you can configure
what Setup keyword(s) a person can text. You can also customize the response
the person receives. We'll show you how to set that up in the configuration
section below.
Text Giving Setup Keyword
Other Scenarios
What we’ve described will be the experience for most people. They will text
a giving keyword and will receive a response confirming the gift or requesting
they register. Occasionally they may text “Setup” if they need to make changes.
However, there are other scenarios. Below is what comes with Rock out of the
box, but for each of these scenarios you can customize the response.
Help Response
|
Because people can text just about anything, the text a
person sends may not be what Rock is expecting. Or perhaps
an error occurred. In those cases, Rock sends a
response providing directions on how to use Text Giving.
|
 |
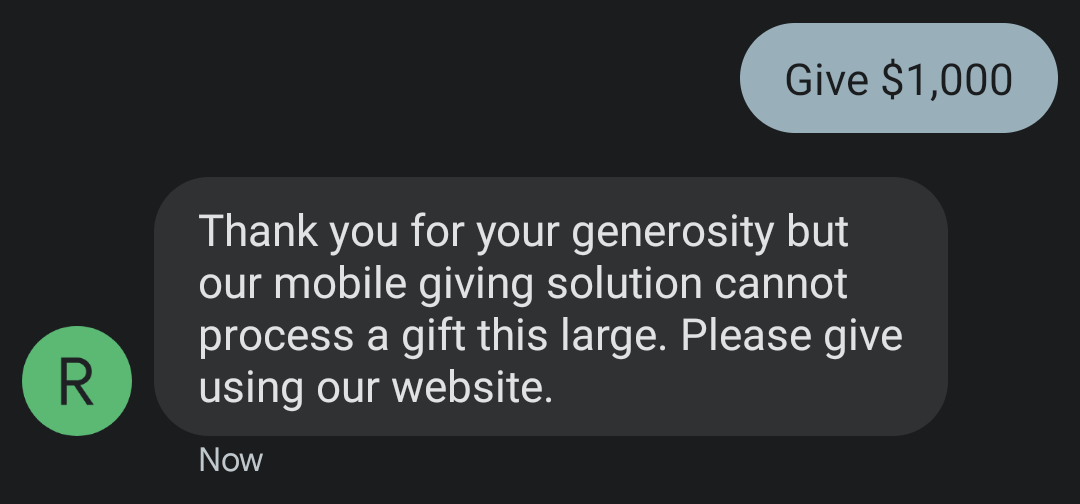
Max Amount Response
|
You can optionally set a maximum allowed amount
for Text Giving. If the person tries to give over that
amount, they'll receive this response.
|
 |
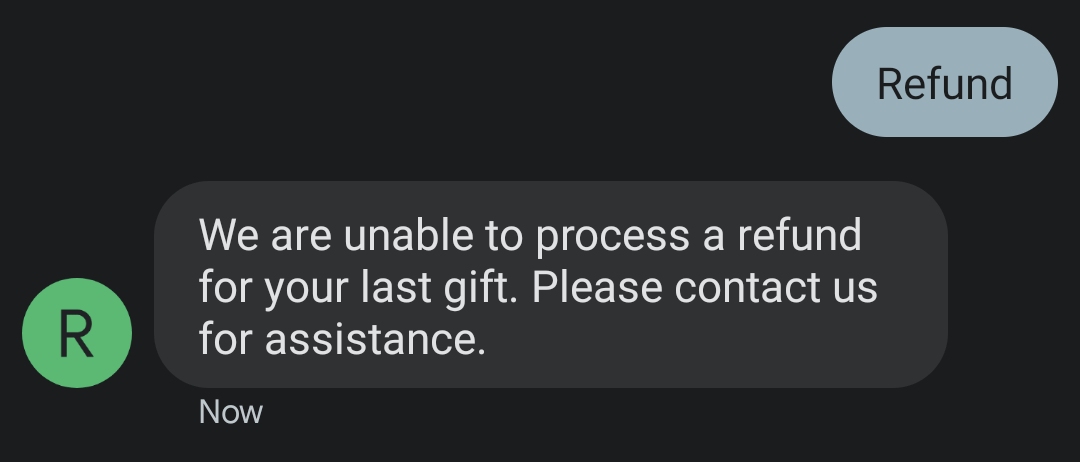
Refund Failure Response
|
Text Giving also allows people to request a refund of
their last texted donation. However, there are scenarios
where the refund can’t be processed via text (see below).
In those cases, the person receives the response
seen here.
|
 |
Refund Success Response
|
If the refund is requested within a configurable
amount of time, the person can text a refund keyword
and it will be like the donation never happened. That’s
because there’s a configurable delay between the person’s
text and sending the transaction through your financial
gateway.
|
 |
Missing Amount Response
|
If Rock picks up a giving keyword in the person’s text,
but can’t determine the amount, the person receives
this response. All the person needs to do here is respond
with the amount they wish to give (no keyword is needed).
|
 |
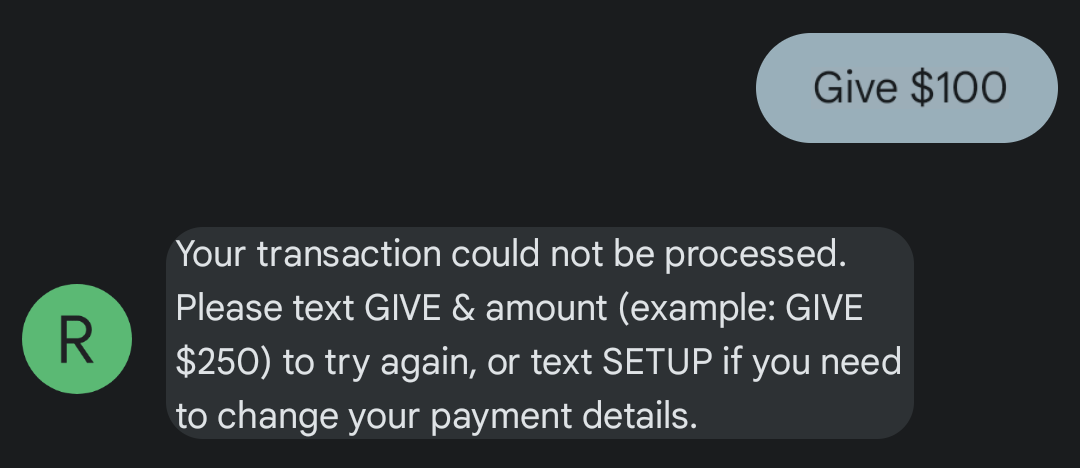
Transaction Failure Response
|
If the transaction can't process or encounters an error,
this is the message the person may receive. However, if you delay
processing
(see Processing Delay Minutes
below) then the message configured in the
Charge Future Transactions
job will be sent instead.
|
 |
Configuring Text Giving
The above is all made possible with just a few configuration steps. Generally, you'll
use what ships with Rock out of the box, but there are opportunities for
customization.
Utility Payment Entry Block
The registration page we showed in the prior section is simple for the person using it,
but there are many settings driving this block. That's because the
Utility Payment Entry
block can be used for purposes besides Text Giving. For now, we'll just highlight
the settings that are needed for Text Giving to work. The rest of the settings for this
block should be kept as-is to avoid any issues with Text Giving.
Utility Payment Entry Block Settings

- 1 Enable Multi-Account
- This should be set to "No" when this block is used for Text Giving.
Text Giving is designed to use a single account.
- 2 Accounts
- If you select an account here, it should
be the same as the one on the SMS Pipeline. If you have
sub-accounts for each campus, choose the parent account here, and
be sure to enable the next setting.
- 3 Use Account Campus Mapping Logic
- If this is enabled, then
Rock looks at the child accounts of the configured account and uses
the first one it finds matching the campus chosen by the person. This
lets you have one page with one set of configuration, but with gifts
going to multiple accounts based on campus. For full details on this
setting and its logic check out the help icon located on the page.
Note, the parent account is used by default if a campus can't be
determined.
Refund Instructions
There's another block setting called
Finish Lava Template
that controls what's displayed on the setup confirmation page.
You'll want to update this if your giving keywords don't include
"give" or if you want to provide instructions on how to request
a refund.
On the Advanced Settings tab of the block settings, you'll
find the option to enable this block for Text Giving as pictured
below. This is enabled on the Text Giving setup page by default,
but you may want to double-check it if you're having issues with
Text Giving.
Utility Payment Entry Advanced Settings
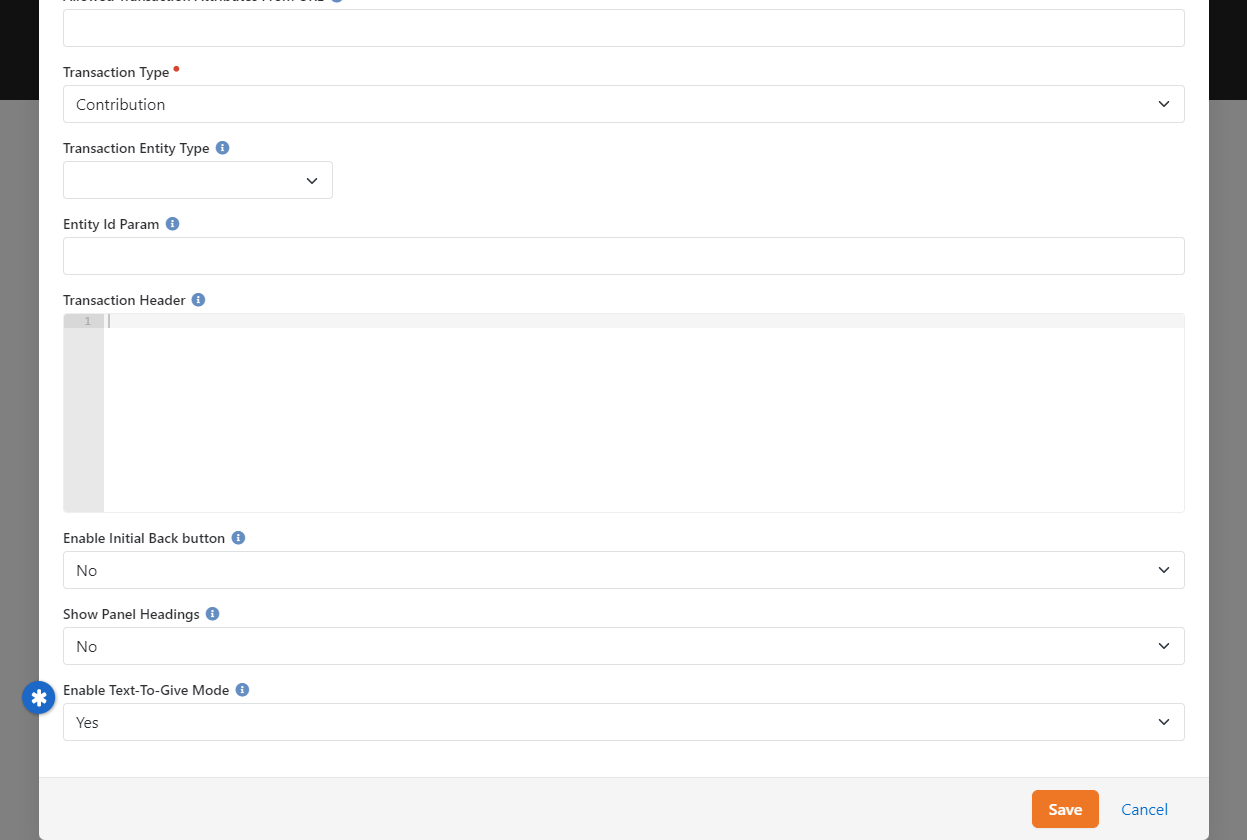
SMS Pipeline Setup
The next step in enabling Text Giving requires configuring your SMS Pipeline.
There's a special
Give action
that is added to the pipeline to support Text Giving. For details on setting up
and using the SMS Pipeline in general, see our
Communicating Using Rock
manual.
Navigate to
Admin Tools > Settings > SMS Pipeline
and select the pipeline you want to use for Text Giving. While editing the pipeline, click and drag the
Give action from the panel on the
left into the center of the page under
Incoming SMS Message. As pictured below, the
Give action is now included in
your pipeline and is ready to be configured.
SMS Pipeline Give Action
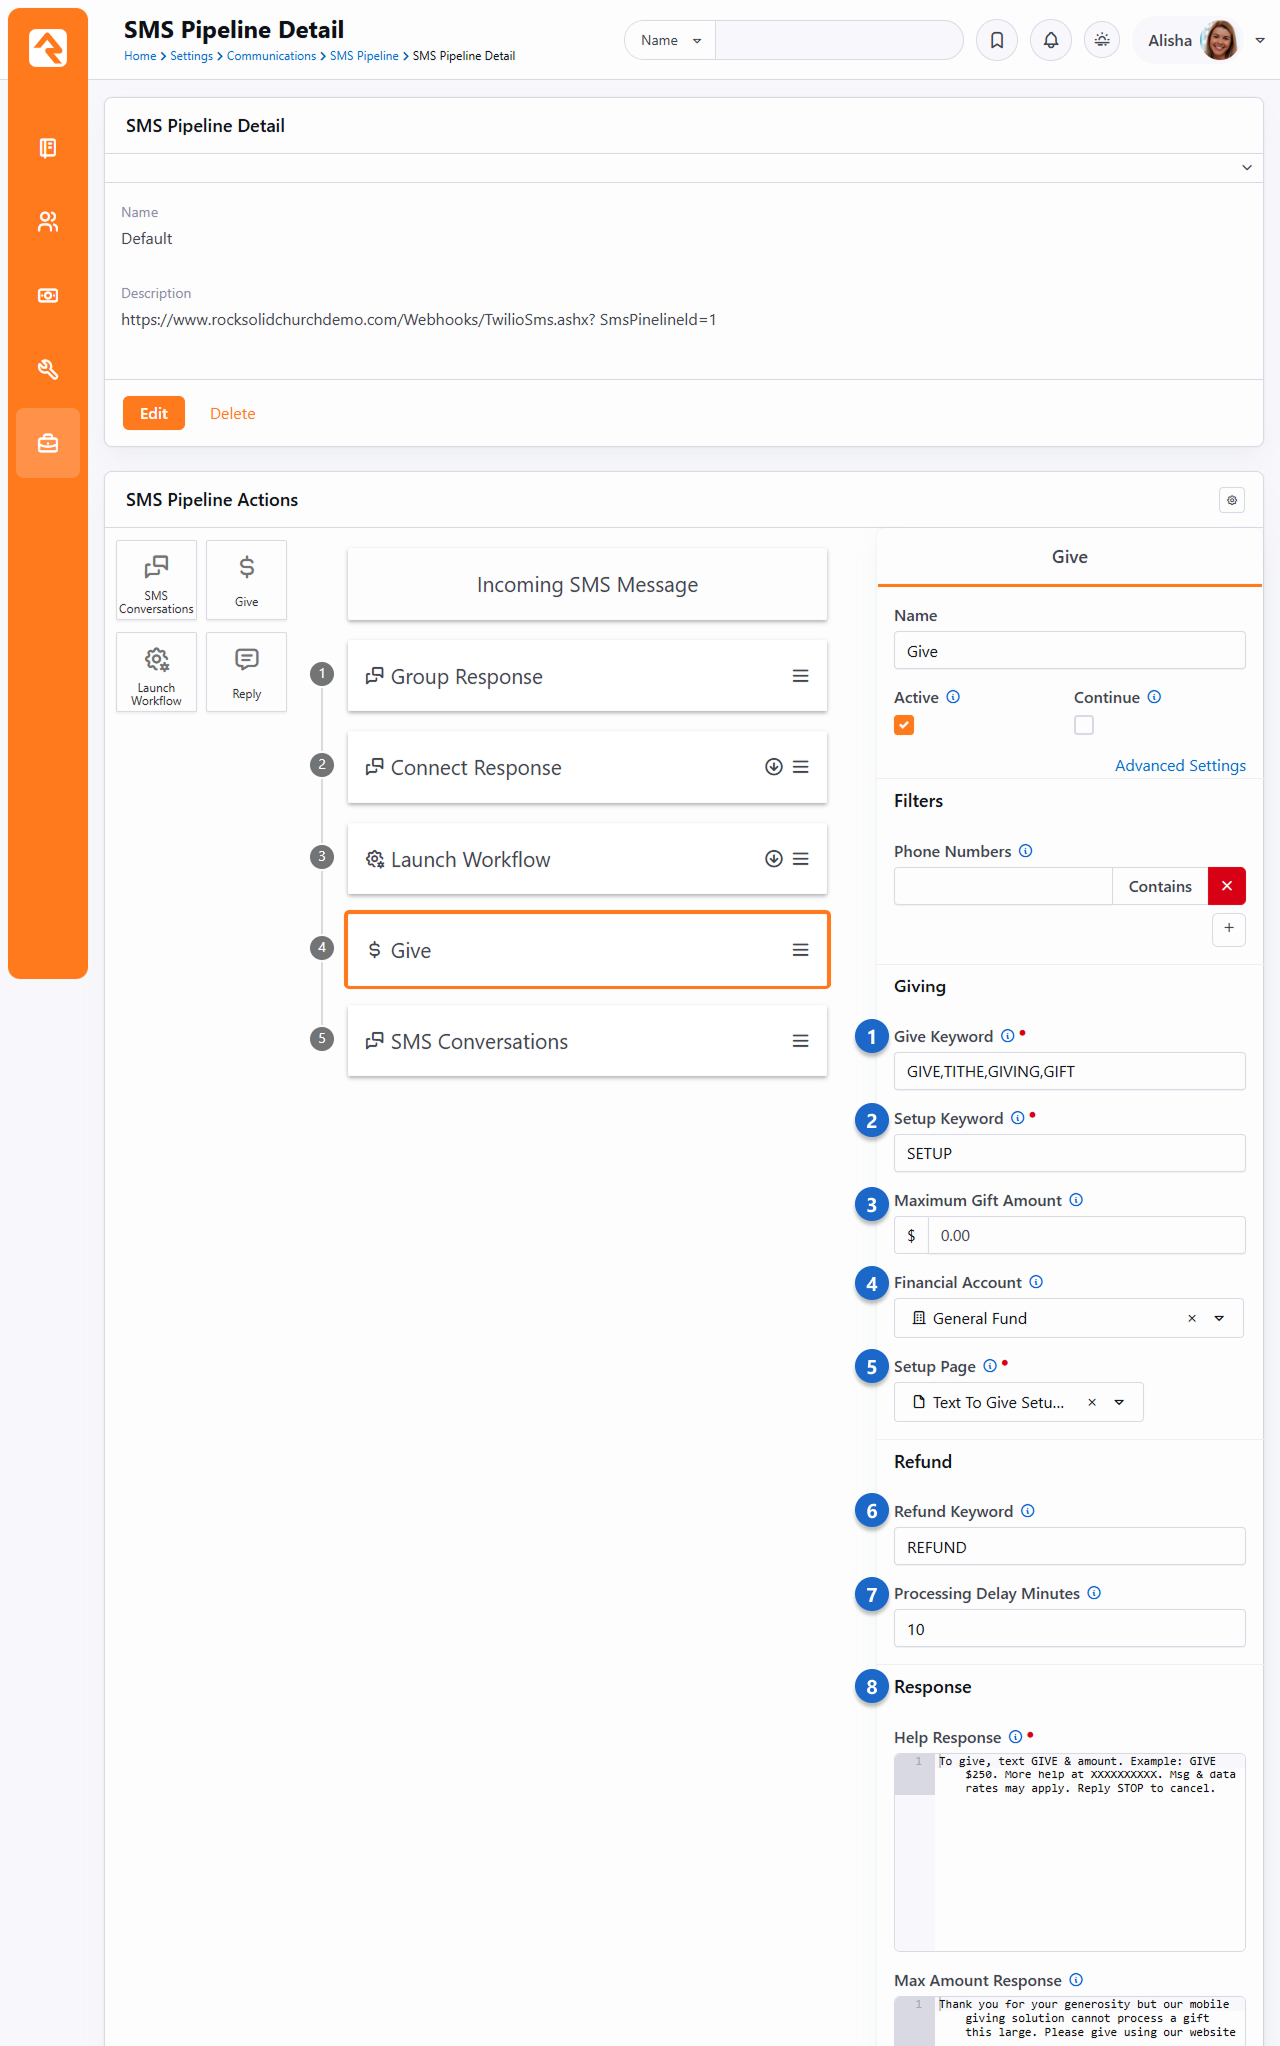
- 1 Give Keyword
- This is where you set which keyword(s) a person can text to
donate. You can have a single keyword, or multiple keywords separated
by a comma. If there are multiple keywords, individuals
don't have to use the same keyword for all their gifts.
- 2 Setup Keyword
- If the person texts the keyword(s) here, they'll get a response with a
link to the
Setup Page
configured below. This is where they'll access the one-time setup needed to enable
Text Giving. You can have multiple Setup Keywords separated by a comma.
- 3 Maximum Gift Amount
- You might not want to accept gifts over a certain amount
via text. This field controls how much a person can give in a single text
before receiving the
Max Amount Response
message configured below.
- 4 Financial Account
- This is the account into which Text Giving transactions go.
If you have sub-accounts for each of your campuses, select
the parent-level account here. This should match the
Utility Payment Entry
block configuration discussed in the prior section. That block has a
setting that chooses the correct account based on the person's campus
selection. Note, if this is left blank then the giving account on
the person's profile (see below) is used.
- 5 Setup Page
- Out of the box, Rock comes configured with a page for setting up
Text Giving for an individual. This page is already set up for you on
the external site template we provide and is located in the
Give
area. An admin needs to configure the block on this page as described
in the prior section above.
- 6 Refund Keyword
- Not only can people give, but they can also request a refund of their last gift
by texting the keyword(s) here. A dollar amount is not needed.
You can have multiple Refund Keywords, separated by a comma.
If the refund can't be issued automatically, the person receives a
message that can be configured below. Leave this blank to disable the
refund function. A person can't request a refund via text if the
Processing Delay Minutes
configured below have passed.
- 7 Processing Delay Minutes
- The person can request a refund via text (using the Refund Keyword described above)
within this amount of time and it will be like the gift
never happened. That's because the transaction won't go through your financial
gateway until this delay elapses. If this is blank or set to zero,
then the refund function is disabled.
- 8 Responses
- For each stage of the process, you can provide a custom, Lava-enabled
message that is sent (as applicable) to the person giving. These
responses are sent automatically depending on the person's scenario.
Failed Transaction Notifications
The person will get an SMS text message if their gift fails to process successfully.
If you're using the
Processing Delay Minutes
setting described above, you must add a
Send SMS Response From
number in the
Charge Future Transactions
job for this to work. If
Processing Delay Minutes
is set to "0" and the transaction fails, then the
Transaction Failure Response
configured in the SMS Pipeline will be sent.
If the person uses Text Giving, you can see that information
on the Person Profile
page under the
Contributions
tab.
Text Giving on the Person Profile
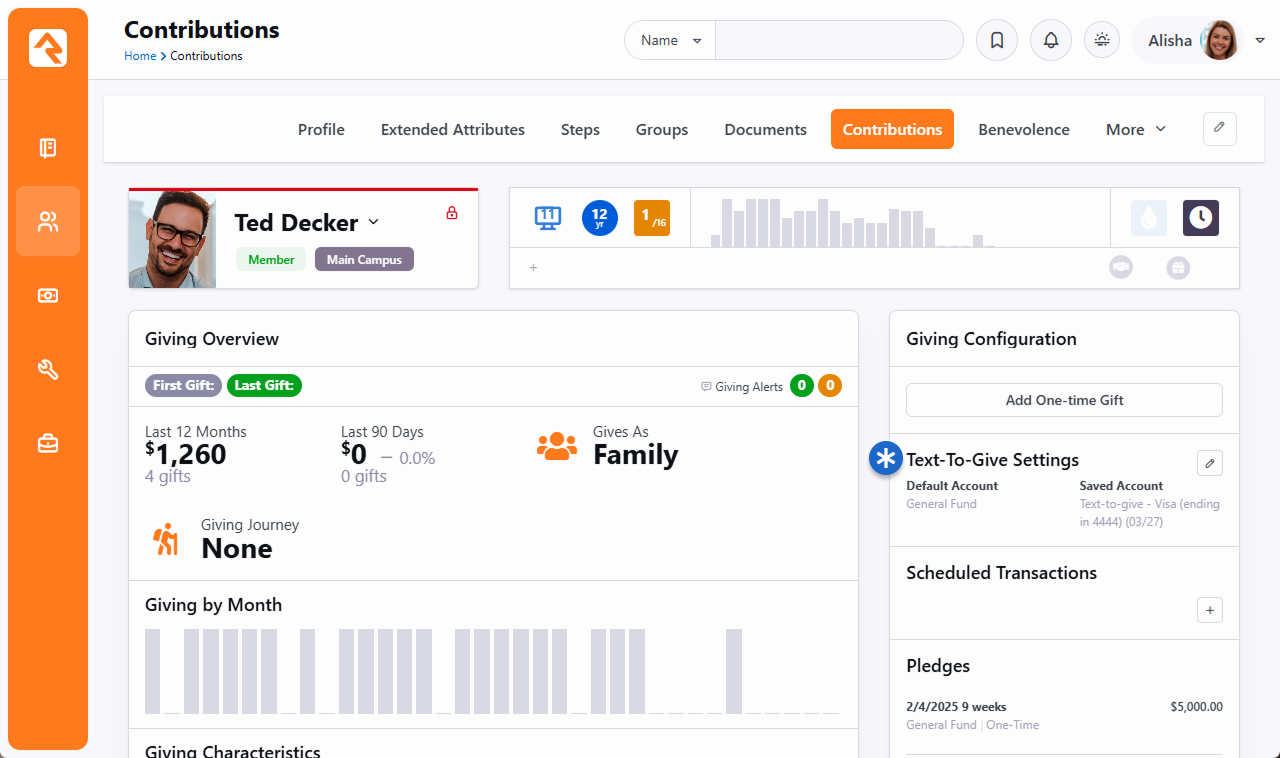
You can also come here to manually add or edit
Text Giving settings for an individual. This is where you can set
or change the default financial account to which the person gives.
The person must have a saved account (e.g., credit card, checking account)
on file to use Text Giving.
Accounts
Accounts determine what a transaction is for. In our examples above, both the
General Fund
and the Building Fund
are accounts. These accounts usually tie into your accounting system. Accounts are managed
under Finance > Accounts.
Account List
This page shows a list of all the accounts defined in Rock.
Account List
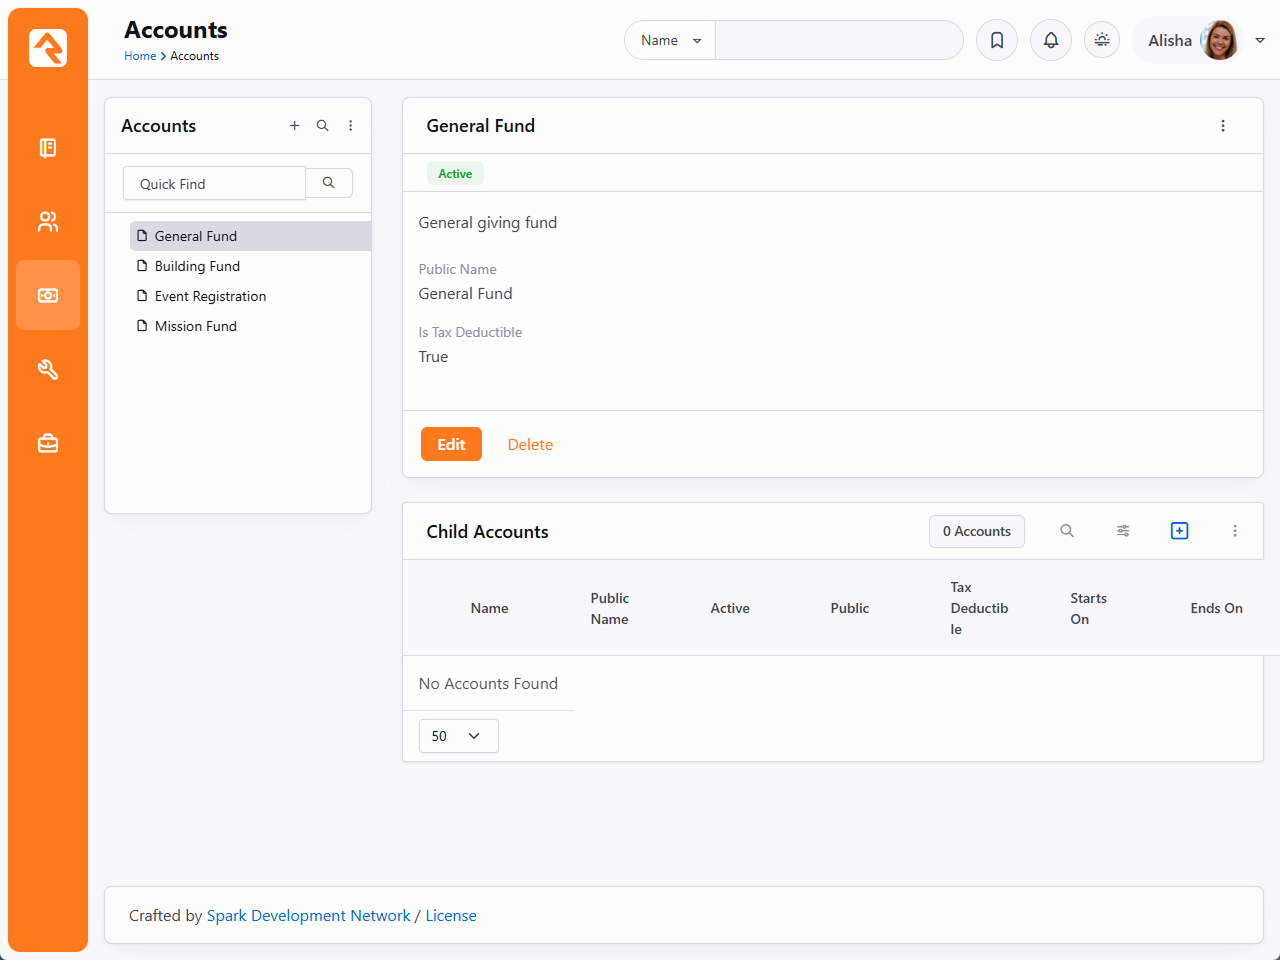
Note the hierarchical navigation tree on the left side of the screen. Like with the Group Viewer,
this structure allows you to quickly and easily organize and
view your accounts. Click the
icon to filter by Active or All accounts. If you have many accounts, you can search for an
account using the
Quick Find field above the
tree.
Account Details
From the list of accounts, you can add or update an account using the account details screen.
Account Details
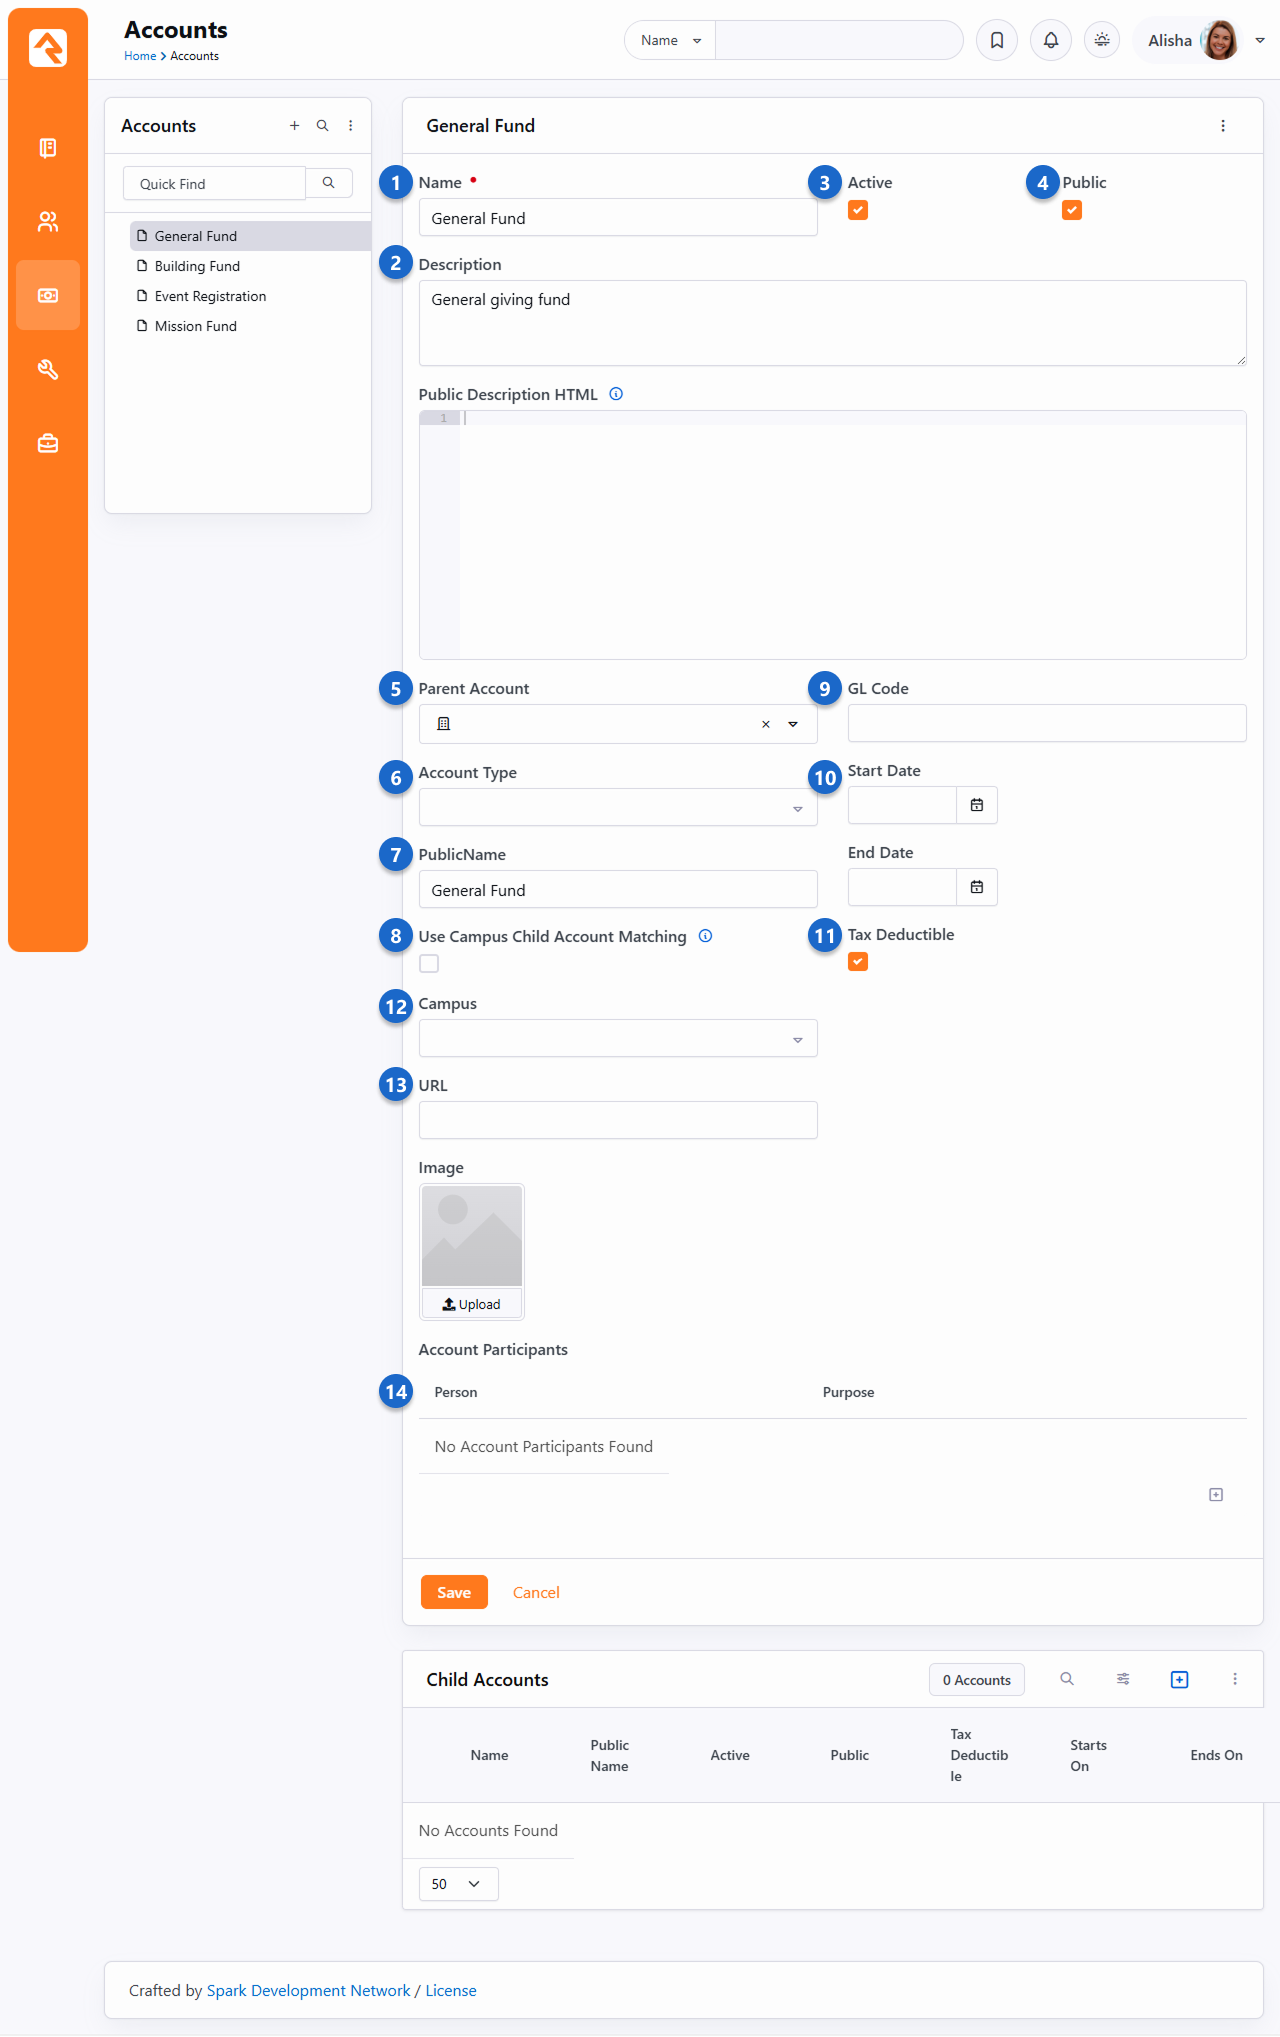
- 1 Name
- The name that will be used when selecting an account.
- 2 Description
- This is a great place to document what the account will be used for and
any details you'd like to keep about when and how it should be used.
- 3 Active
- Since accounts cannot be deleted if they are used by any transactions, you'll
need to mark them Inactive
once they should no longer be used.
- 4 Show Publicly
- This is where you designate if the account is public and should be viewable on the public website.
- 5 Parent Account
- Rock allows you to create account hierarchies to help manage situations when
you need to configure numerous accounts.
- 6 Account Type
- This setting allows you to categorize your accounts to help with reporting.
The setting has no impact on how accounts are used in Rock. The list of account
types can be set under
Admin Tools > Settings > Defined Types > Account Type.
You might consider using this setting to designate accounts that are used for
donations vs. those you use for event registrations.
- 7 Public Name
- You might want to describe your account differently when it's shown on the
public website. This field allows you to configure a public-friendly name for your
account.
- 8 Use Campus Child Account Matching
- Enable to automatically select a child account based on the campus provided by the block. This only works with blocks that support this feature. If no match is found, the parent account will be used and any campus selection will be cleared.
- 9 Campus
- If the account is specific to a campus, you can select the campus here.
This is disabled if you have only one campus.
- 10 GL Code
- The reference code used in the General Ledger software.
- 11 Date Range
- The date range you provide here will help determine when the account is
displayed on various screens in Rock. If the account is no longer valid, based on
the date range, then it will not be displayed when picking from accounts.
- 12 Is Tax Deductible
- Helps determine if the transactions assigned to this account are considered
tax deductible. This is used in reporting.
- 13 Url
- Although unused in Rock's core features, this URL could be used to generate
a link to a custom 'More Info' page.
- 14 Account Participants
- Being an Account Participant is similar to following a person or group.
For now, this area is only used for notifying the listed people of
certain Giving Alerts.
Custom Account Attributes
To add custom account attributes, go to Admin Tools > Settings > Entity Attributes.
Once there add a new attribute and set the Entity Type field
to Financial Account and set the other settings as needed.
Once you do this, the account's attribute value can be edited near the bottom of the
Account Detail page.
Giving Analytics
The giving analytics block provides a powerful tool for analyzing and reporting
giving information. Let's look at how we can use this block to empower your organization.
Chart Mode
Chart mode allows us to get summary information on the transactions that meet our search
criteria. While the main view is the chart, we can also get the numbers behind the chart.
Giving Analytics Chart Mode
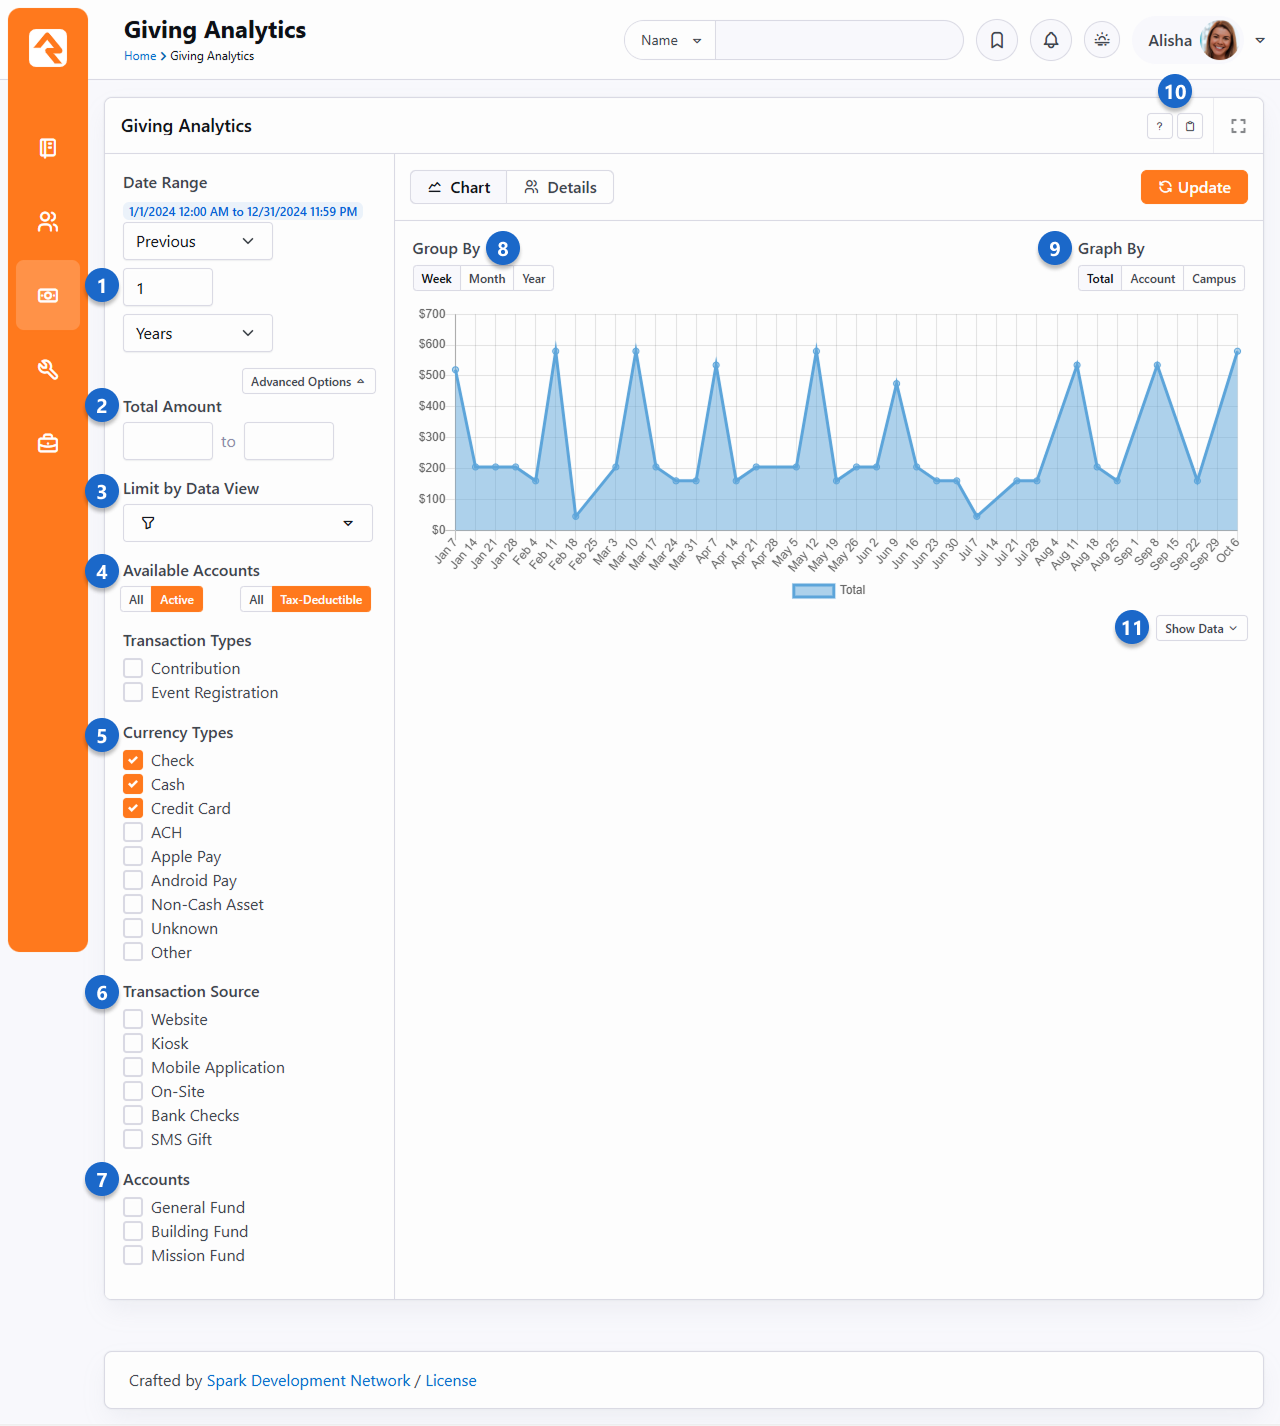
- 1 Date Range
- The first setting is the date range of the transactions that we're interested in.
- 2 Total Amounts
- Located in the Advanced Options, this is a numeric range of dollar amounts that should be used to filter the total gifts on.
Note that this range is on the total amount of gifts per giving unit for the period/filters
you've provided, not a range of a specific gift.
- 3 Limit by Data View
- Located in the Advanced Options, this allows you to limit who is considered for the report based on the data view provided.
- 4 Available Accounts
- Located in the Advanced Options, these allow you to decide whether to include only active accounts and/or only tax-deductible accounts.
- 5 Currency Types
- This allows you to filter gifts that were given by a certain currency type.
- 6 Transaction Source
- You can also filter on a source for the transaction. This allows you to see
what medium your donors give by.
- 7 Accounts
- This setting allows you to filter by financial account.
- 8 Group By
- The group by setting tells us the time series to use on the x-axis of the chart.
- 9 Graph By
- This determines what series you would like to see on the graph.
- 10 Copy Link
- The Copy Link button lets you share the currently displayed overview of giving with a colleague.
- 11 Show Data
- This allows you to see the data behind the graph.
Details Mode
The details mode shows us the individuals behind the data. Note that the data is shown by 'Giving Unit'. If an
individual combines their giving with their family, then the head of household will be listed instead of the
individual matched to the transaction.
Giving Analytics Details Mode
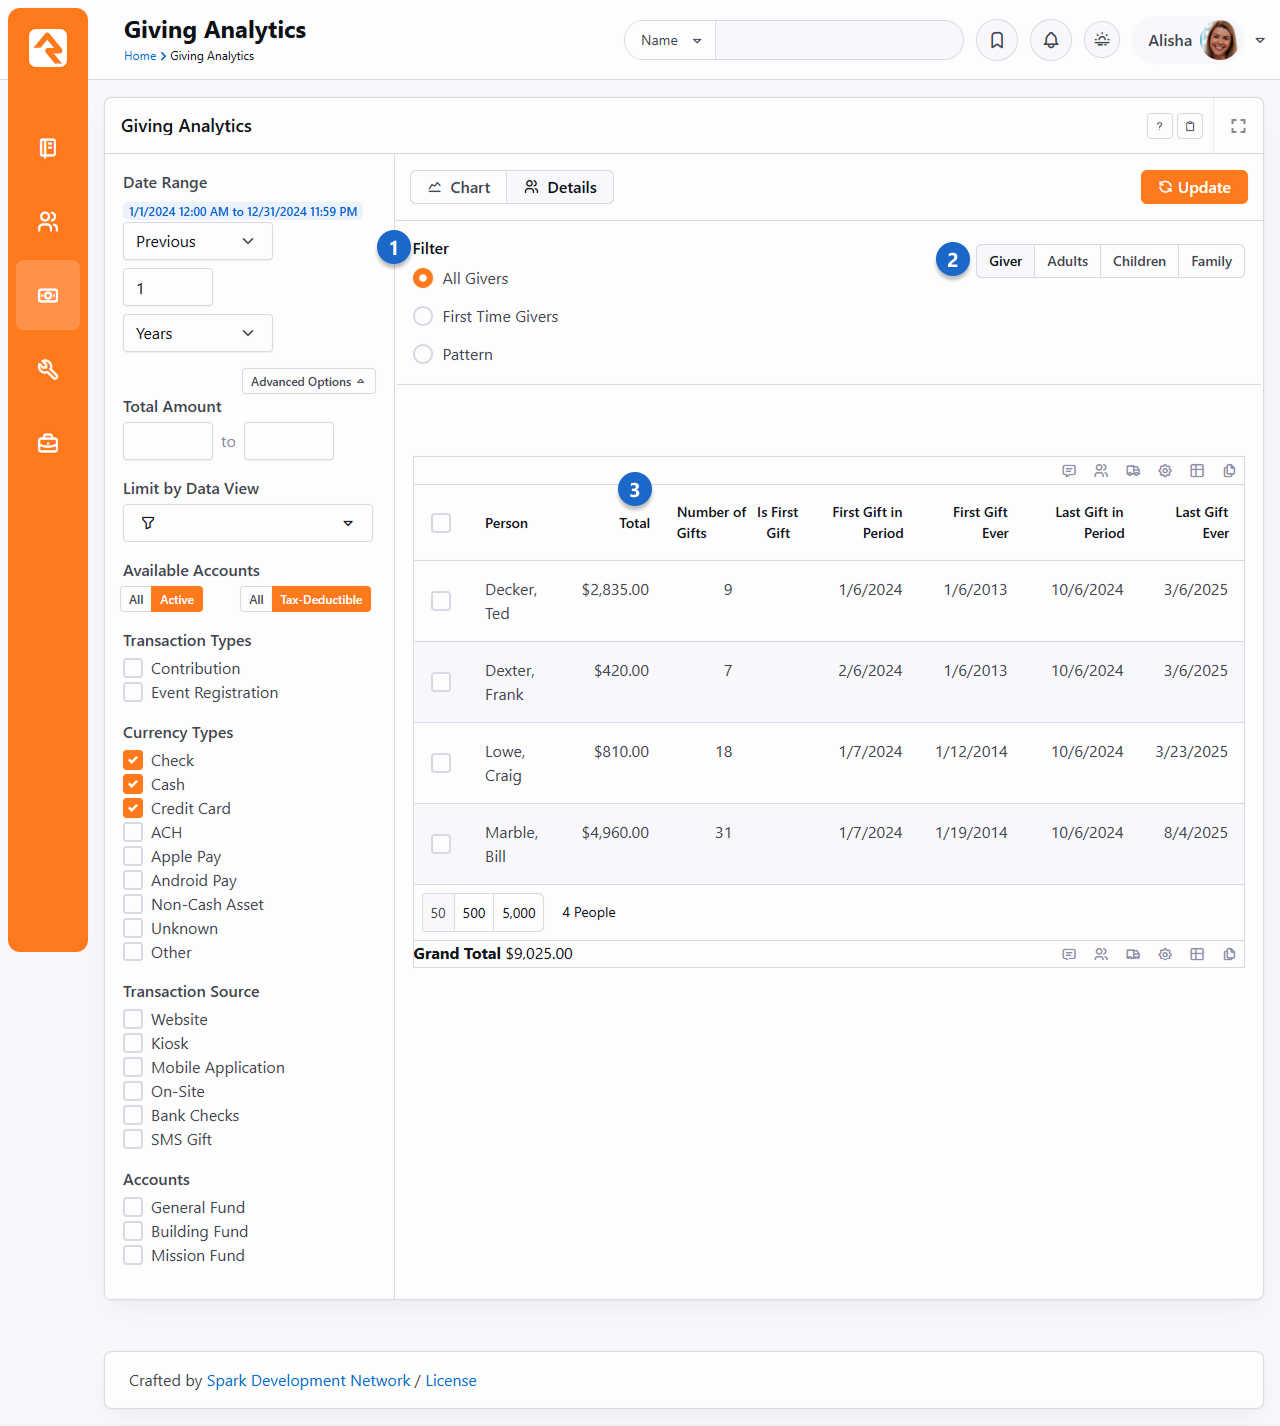
- 1 Filter
- An additional level of filtering is available when looking in details mode. You can choose to view
transactions by:
- All Givers: This displays information for all giving units matching the criteria on the left.
- First Time Givers: This will only show information for giving units whose first gift is within the
date range provided on the left.
-
Pattern: This allows us to provide a pattern like 'Has given at least three times in the selected range and did not give
between another date range.'
- 2 Return Type
- This setting provides four different ways to view family members that have a
contribution transaction matching the selected filter criteria. These settings are
a great way of getting lists of people to send communications to.
- Giver: This will show each of the giving leaders associated with the matching transactions and the amount given.
This view is best for determining the total amount given for each person because multiple people are not shown
for the same transactions. Because of this, it is the only view that displays a grand total amount at the bottom
of the list.
- Adults: This will show all the adults that have matching transactions or are combining their giving with a
person who has matching transactions. It also displays the total amount given by the combined members with
each adult listed.
- Children: This will show all the children that have matching transactions or are combining their giving with a
person who has matching transactions. It also displays the total amount given by the combined members with each
child listed.
- Family: This will show all family members who have matching transactions or are combining their giving with a
person who has matching transactions. It also displays the total amount given by the combined members with each
person listed.
For example, consider the Decker family. Ted and Cindy both have selected to combine their giving with the Decker Family,
but Noah and Alex both give individually (they do not combine giving with any family). If Ted gave $300, Cindy gave $50,
and Noah gave $5 during the selected time period, the views would show the following:
- Giver: This will show Ted with $350 given and Noah with $5. This is because Ted and Cindy are the same "giving unit", and
Noah is his own. Alex is also her own giving unit but did not give anything during the selected period.
- Adults: This will show Ted with $350 and Cindy with $350. This is because they are the adults in their family and their
combined, total given for the family was $350.
- Children: This will show Noah with $5. This is because Noah is a child in his family, he does not combine his giving with
the family and his total given was $5. Alex is also a child in the family but because she did not give anything and because
she does not combine her giving with anyone who did, she will not appear in the list.
- Family: This will show Ted and Cindy each with $350, and Noah with $5. It shows $350 for Ted and Cindy because that is the
combined total of their giving since they are configured to combine their giving. It shows $5 for Noah because he is not
configured to combine his giving and his total was $5. It does not show Alex because she did not give anything, and she
is not configured to combine her giving with anyone.
- 3 Data
- The grid displays the transactions by giving unit that meet the provided criteria.
Last Gift Ever
Quick note on the 'Last Gift Ever' column on the Giving Analytics block. If spacing weren't an issue this column would really be named
'Last Tax-Deductible Gift Ever to Any Account'. When using patterns to exclude people with certain giving trends this column can be a little
confusing until you realize it is not filtered by any account.
It's important to keep in mind that Rock's
Giving Analytics reporting is
focused on reporting on people and ministry weeks, not reporting on dollars and
transaction dates. For that reason, Rock groups contributions together according to a Sunday
date. Rock's weeks, for the purpose of attendance and giving, run on a Monday to Sunday timeframe by
default. This provides insight into giving by people during a specific week. However, this means the
results won't line up entirely with a calculated total of transactions grouped by the transaction
date. For instance, December 31 was on a Monday in 2018. Giving analytics for 2018 split by week
would therefore show contributions from December 31, 2018 in the week of January 6, 2019.
Pledges
Pledges predict the level of donations you can expect in a given timeframe. Some
organizations use them to plan for their yearly budgets. Others use them to track what has
been committed to a specific building or capital campaign. Either way, Rock can help you
easily track these commitments.
Managing Pledges
Pledges are frequently given via paper commitment cards. When this occurs, someone
within the organization will need to hand-enter the pledges into the system. This can
be done under Finance > Pledges.
From this screen you'll see a list of all pledges currently in the system. You can use
the grid filters to help limit which pledges are shown.
Pledge List
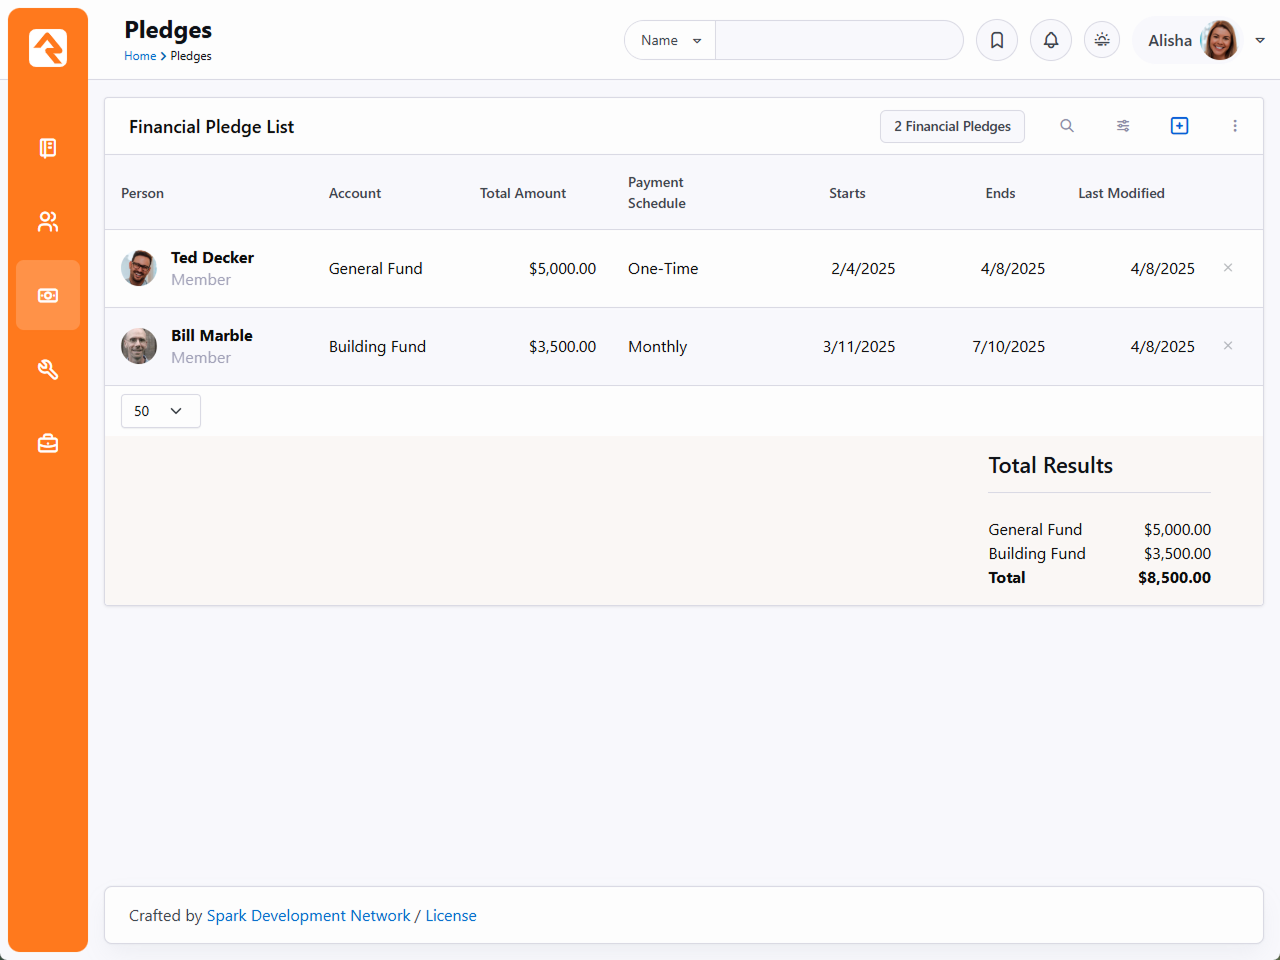
To see the 'Total Results' of pledges, edit the block settings and toggle Show Account Summary to 'Yes'
Ready for the Spotlight
The Pledge List block has several block settings to show/hide columns and filter settings. This makes it
a powerful block for your external website.
From this pledge list page, you can update or add new pledges. The figure below shows
this screen with the various options available.
Pledge Detail
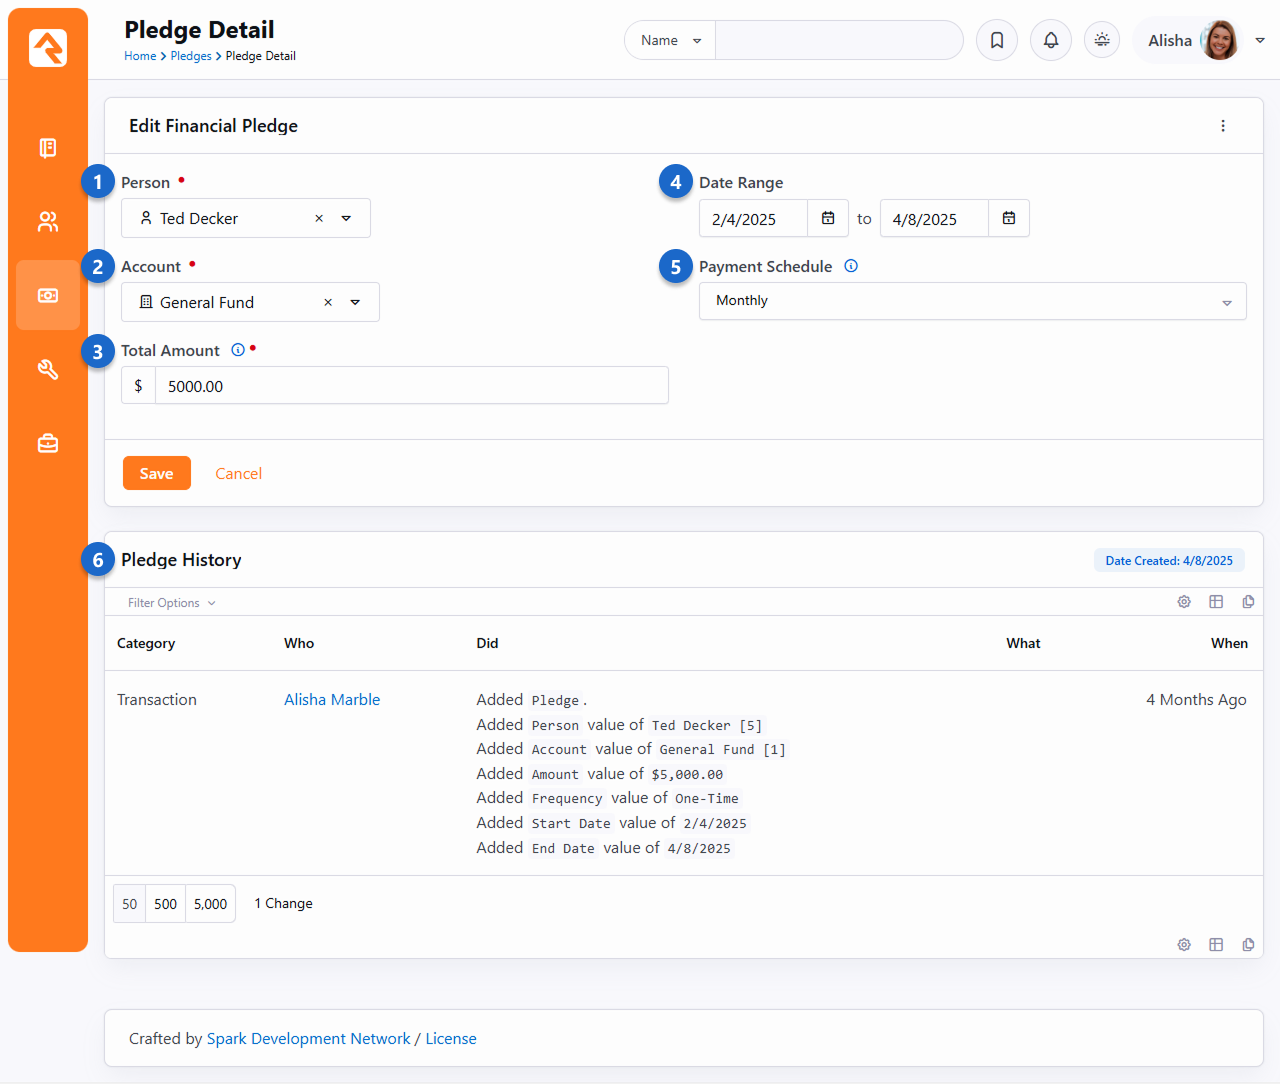
- 1 Person
- This is the person who is making the pledge. For families you'll want to pick
the head of house.
As with many of Rock's financial tools, pledges can be viewed from a family
perspective when linked to any adult in the family.
- 2 Account
- The account that the pledge is for. Often times this will be a unique account
for a capital campaign or building fund.
- 3 Total Amount
- This is the dollar amount that will be given over the duration of the pledge.
- 4 Date Range
- This defines the duration of the pledge.
- 5 Payment Schedule
- This determines how often gifts (financial transactions)
will be given to meet the pledge amount.
- 6 Pledge History
- The Pledge History
tracks any changes made to a person's pledge, including adjustments to the pledge amount,
donation frequency, and time frame, along with details on who made each change and when.
This provides transparency and accountability, ensuring that any updates are clearly
documented. It also helps administrators manage donor relationships and resolve discrepancies
efficiently.
Self-Entry
When possible, it's a great idea for members to enter their own pledges online. This
not only allows you to reduce the amount of data entry, it also allows them to create
a recurring giving profile to match their pledge. The sample external website that
comes with Rock already has a pledge entry screen configured for you to use. You can
find this page under Give > Pledge.
Pledge - Self Entry
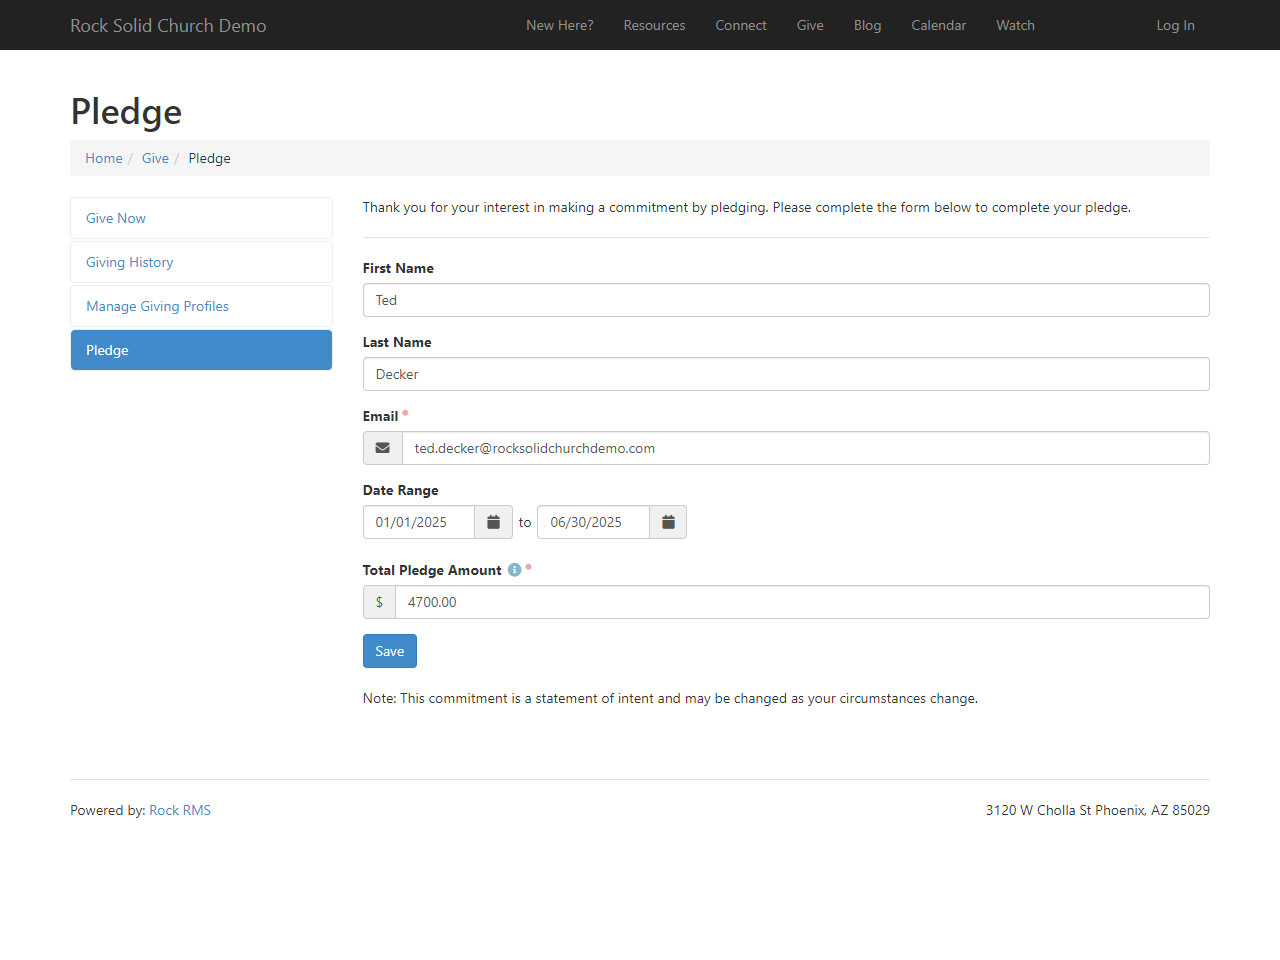
This pledge block on the external site has several block settings to make it very
flexible for you to use.
Pledge Entry Block Settings
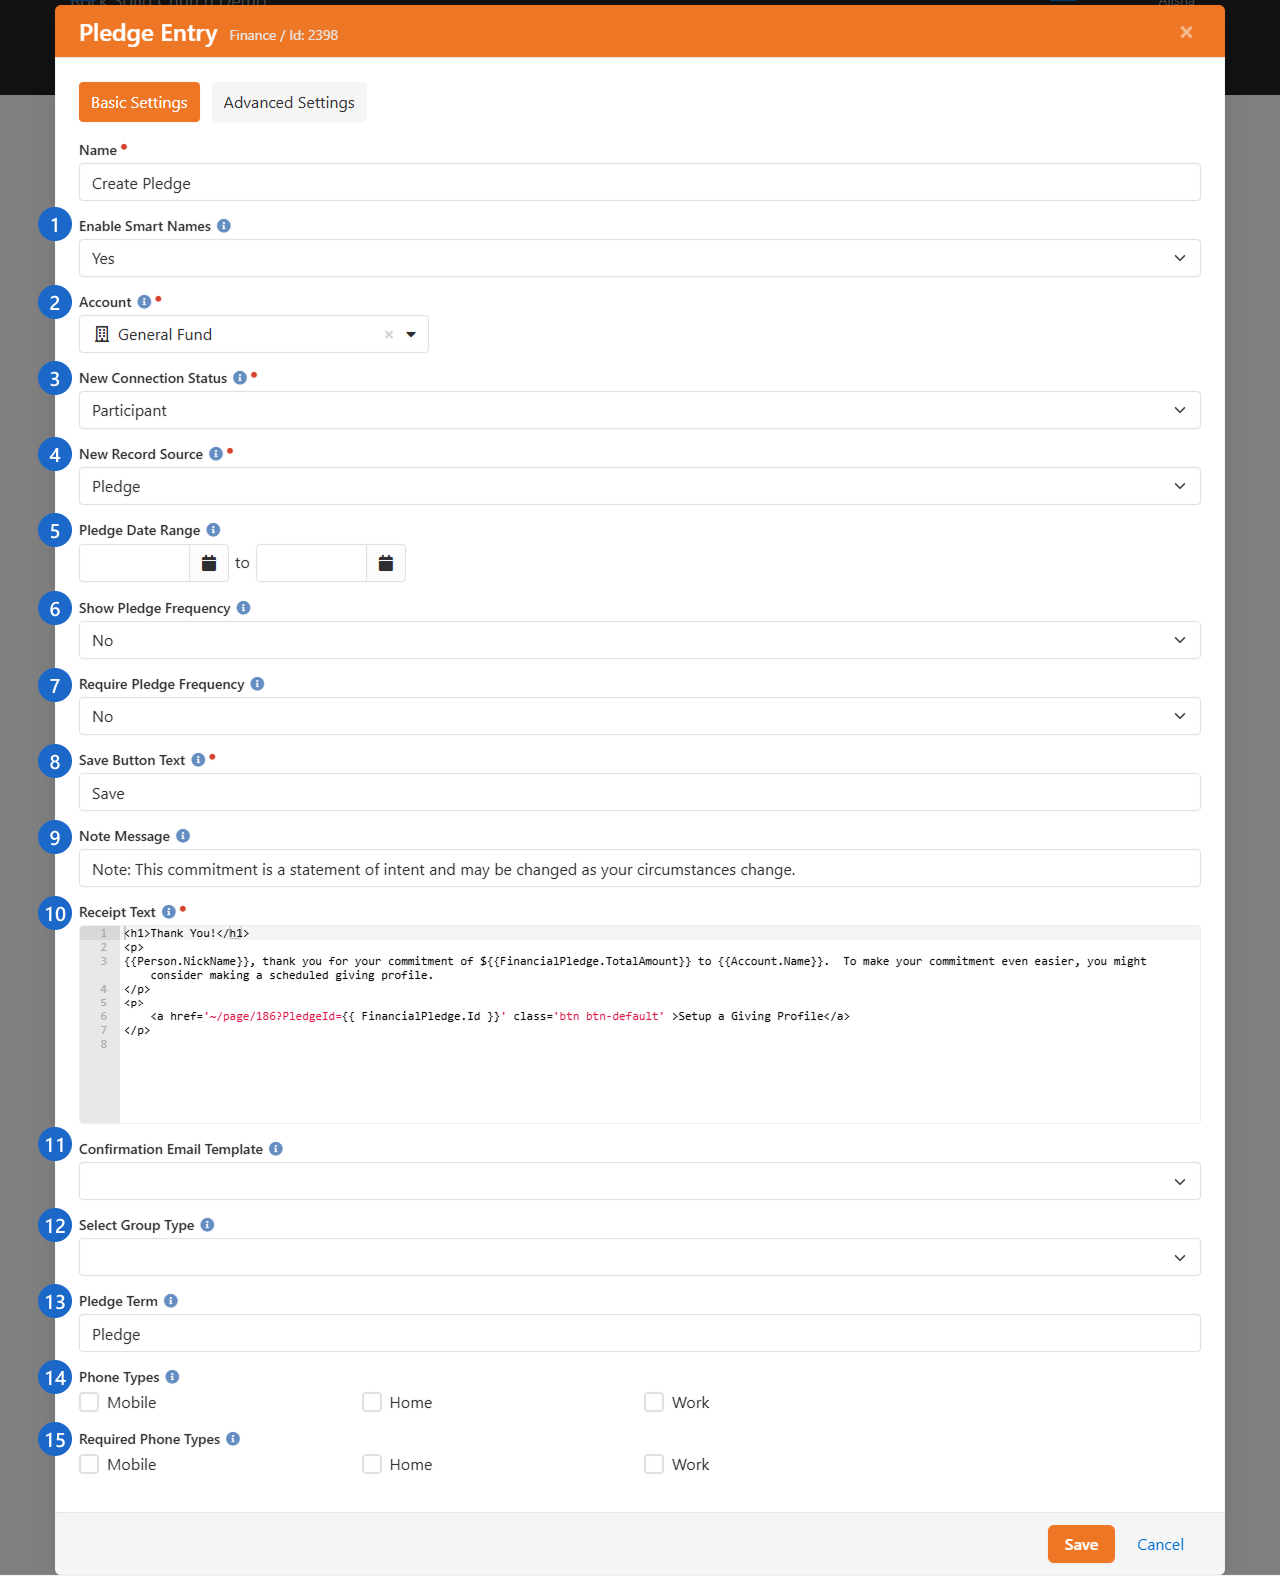
- 1 Enable Smart Names
- This feature will attempt to find a
matching person record in Rock to link the pledge to. This match will occur
if a record exists with an exact match on first name, last name and email
address. There’s also some logic built in to handle cases when someone types
in Ted and Cindy
or Ted & Cindy
in the first name field. When this happens only the value
Ted
will be used in the search. If an exact match does not occur a new person
record will be created with the record status of pending, for future review
by an Admin.
- 2 Account
- If you provide a specific account as a block setting,
the guest won’t have to pick one, and their pledge will automatically be
assigned to this account.
- 3 New Connection Status
- In the case where a new person record must be created this will be the
connection status that will be assigned to the record.
- 4 Record Source
- Discover where a new individual's info was entered into the system. In this case it will be labeled as 'Pledge'.
- 5 Pledge Date Range
- This setting allows you to assign a date range for the pledge. If you provide
both a start and end date, these values will be pre-populated behind the scenes,
so the guest will not have to worry about entering them. In the Obsidian version
of this block, if you provide an end date only, then when the person fills out the
form that end date will be pre-populated for them and the start date will
automatically be set to today's date.
- 6 Show Pledge Frequency
- Determines if the
Pledge Frequency
field should be displayed. You may not want your guest to have to provide this
information.
- 7 Require Pledge Frequency
- There may be times when you would
like to show the pledge frequency but not require someone to enter one. In
other cases, you might want to require this item. With this setting you can
have it any way you'd like.
- 8 Save Button Text
- This setting allows you to customize the
text of the Save button.
- 9 Note Message
- The block allows you to provide a note to your
guests to help explain the pledge in more detail.
- 10 Receipt Text
- This is the message that will be displayed to
your guest upon saving. This is a great place to celebrate their commitment.
It comes out of the box configured to link them to set up a recurring
donation to match the frequency they selected. If one was not selected,
it will allow them to pick one. This field supports Lava, so you can
personalize it.
- 11 Confirmation Email Template
- You can also select to send a
template confirmation email after the save. This email template can use the
same liquid merge objects from the Receipt Text field.
- 12 Select Group Type
- When you choose a group type here, the person will see a list of groups
to which they belong that are of this type. The pledge will be associated
with the group the person selects.
- 13 Pledge Term
- This will change the word "Pledge" in "Total Pledge Amount" to
whatever term you provide. For instance, you might use "Donation"
as your Pledge Term, which means the person would see "Total Donation Amount"
on the self-service pledge screen.
- 14 Phone Types
- If you're using the Obsidian version of this block, you can select which
phone types to make available for the person to provide. The phone number
field(s) will only show if the person is not logged in.
- 15 Required Phone Types
- If you have any Phone Types selected from the setting above, here you can
choose which of those phone types are required. This is only available in
the Obsidian version of the block.
Once a person enters their pledge on-line you can still view and
manage it using the same pages as described in the
Managing Pledges section above.
Pledge Frequencies
In several of the screens above, we mention picking pledge
frequencies for determining how often someone will be giving towards
their pledge. Rock comes pre-configured with several frequency values,
but you can add to or edit them under
Admin Tools > Settings > Defined Types > Recurring Transaction Frequency.
Pledge Analytics
Being able to track the status of pledges and report on pledge progress is critical for most capital campaigns. The
pledge analytics block
(Finance > Pledge Analytics)
helps to answer these questions. Let's see what it's capable of.
Pledge Analytics
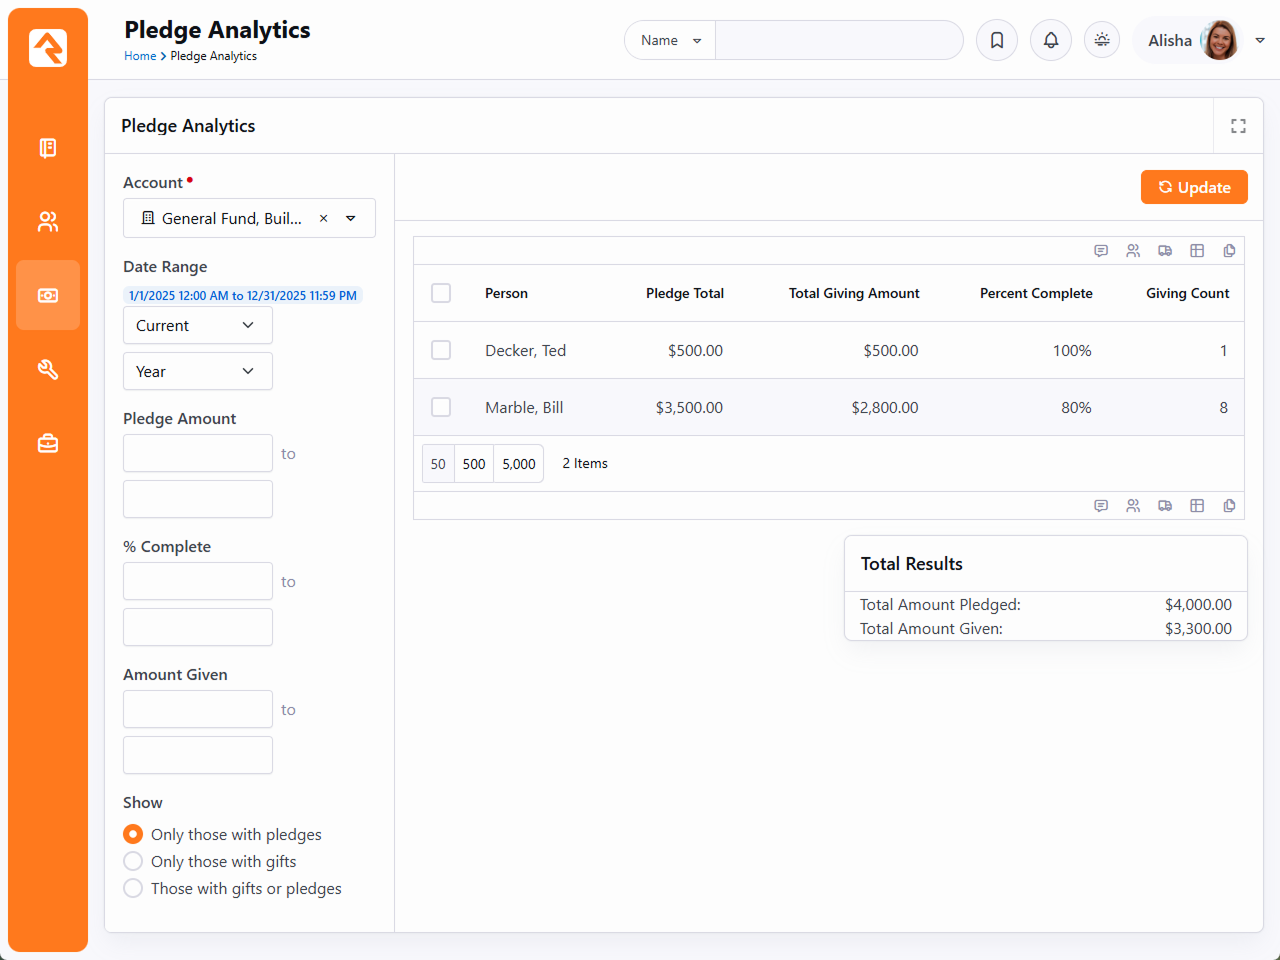
- 1 Account
- The account(s) that you would like to report on. This will filter both the pledges and giving.
- 2 Date Range
- The date range that will be used to filter pledges. Any pledge that is active during
any part of the date range will be used. All gifts in the account selected above will be
included in the report regardless of date.
- 3 Pledge Amount
- Limits the pledges that are shown based on the amount of the pledge.
- 4 Percent Complete
- Limits the returned results based on the percentage that has been given towards the pledge.
- 5 Amount Given
- Limits the returned results based on how much the person has given.
- 6 Show
- Determines what should be shown in the result grid.
- Only those with pledges: Only people where a pledge exists will be shown.
- Only those with gifts: Will show anyone with a gift during the date range even if they don't have a pledge.
- Those with gifts or pledges: If you have either a gift OR a pledge, we're going to show you.
- 7 Result Grid
- After clicking the Update button, the results are shown here.
Giving On The Person Profile
If you're interested in the giving information for a specific person, you can
visit their Person Profile
page. There is a tab that allows you to view their giving information. This
tab is configured to only be accessible by people in the following groups:
-
RSR - Finance Administration
-
RSR - Finance Worker
-
RSR - Rock Administration
Contributions - Person Detail Page
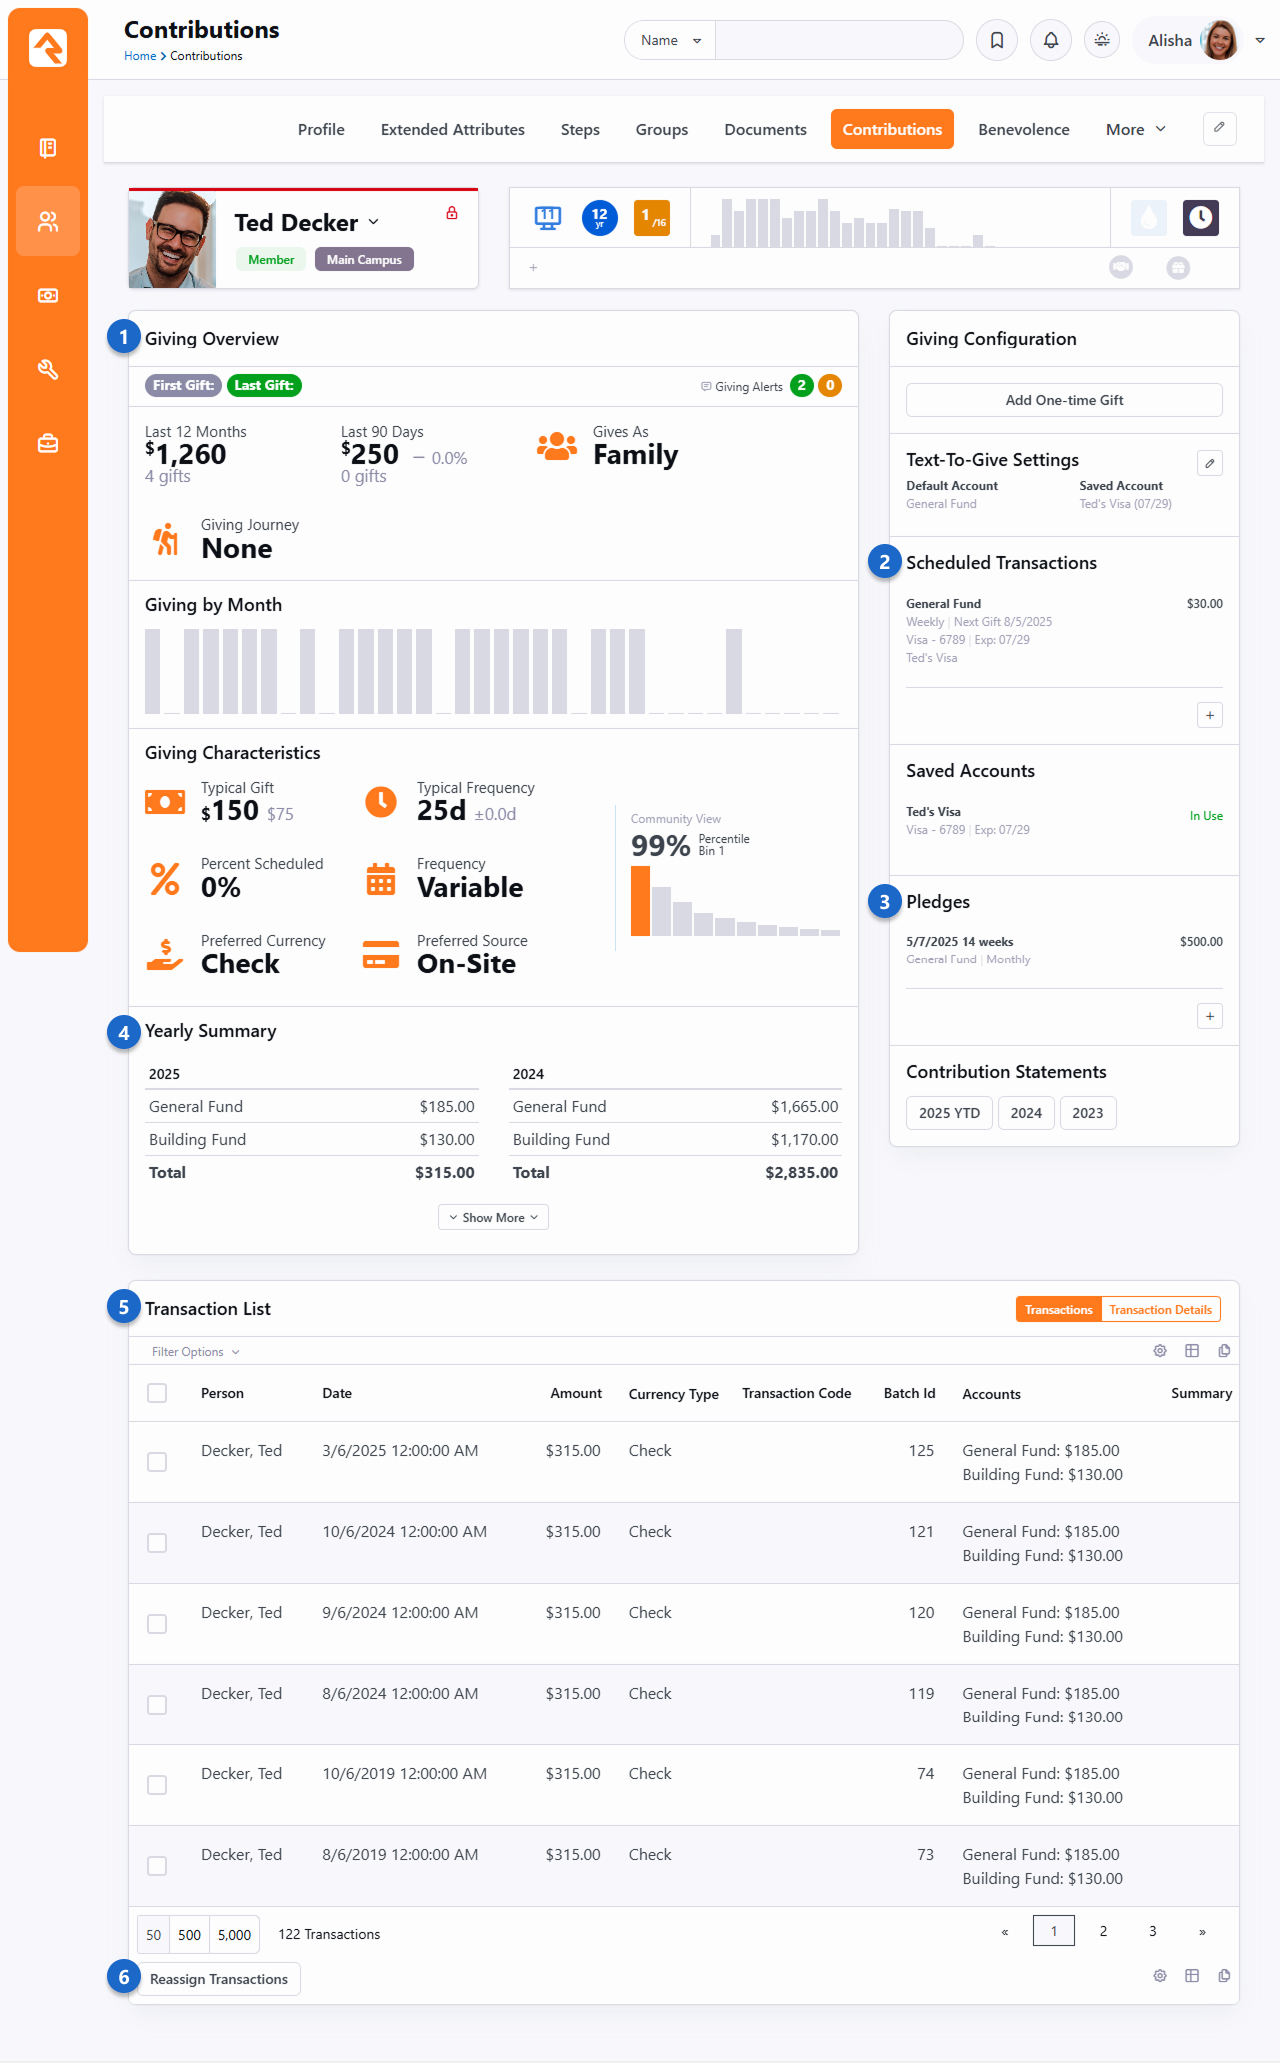
- 1 Giving Overview
- The Giving Overview provides a lot of information about the person's giving. We have an
entire section dedicated to this below.
- 2 Scheduled Transactions
- Scheduled transactions for the person are listed here, and more can be added.
- 3 Pledges
- A listing of any pledges the person has made, with the ability to add more.
- 4 Yearly Summary
- Summary of total contributions by year for the current person.
- 5 Transaction List
- Filterable list of transactions for the current person.
- 6 Reassign Transactions
- This lets you take the selected transactions and reassign them to a different person. You
can also optionally reassign bank accounts. This may be needed in cases of divorce or if two
spouses want separate giving statements.
Giving Overview
The Giving Overview features provide detailed analyses of a person's giving and provides you with
innovative alerts when an individual’s giving patterns change.
Keep in mind that this feature is not about money, but instead about shepherding. This feature
allows you to respond to life changes as well as celebrate with individuals when they make the
decision to trust God with their finances. It's all about measuring heart change.
In this chapter we'll explore the different parts of the Giving Overview, how it can be used
and the configuration that drives how it works.
Person Profile Giving Overview
Giving Overview information for a person can be viewed on the Contributions tab of the
Person Profile page.
There's a lot of important information packed into the Giving Overview that lets you
see many details of a person's giving habits, and changes to those habits. For instance,
you'll want to keep an eye on the Giving By Month chart, to look for bars that are
unusually high or unusually low, as these can be good indicators that maybe something
has changed in the person's life.
Let's take a look
at an example for Ted Decker. As you read through, keep in mind that each of these items is
stored as a person attribute, making it easy to access this data in reporting, communications
or workflows.
Person Profile Giving Overview
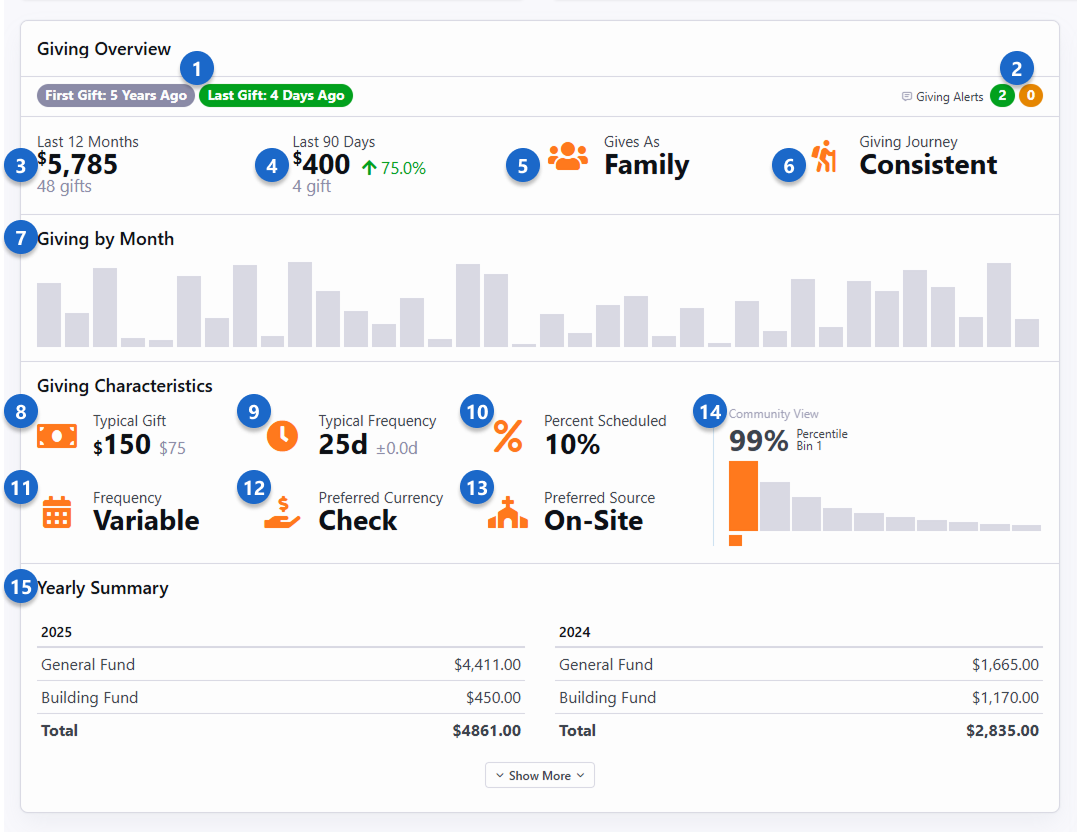
- 1 First/Last Gift
- This lets you know how long the person has been giving, and how long it's been since
their last gift. This high-level information gives you insight into the person's
giving history.
- 2 Giving Alerts
- Giving alerts are triggered when a person's gift meets certain criteria. We have
a whole section on Giving Alerts below.
- 3 Last 12 Months
- The total amount given in the past 12 months, as well as the number of gifts during
that time.
- 4 Last 90 Days
- This shows how much the person has given in the last 90 days, and the number of
gifts. The change compared to the past 12 months is shown, so you can gauge changes
to the person's giving and whether they're trending up or down.
- 5 Gives As
- Here you can easily see if the person gives as an individual or as a family.
- 6 Giving Journey
- A person's Giving Journey stage tells us more about their giving habits. In this
example Ted is a Consistent giver. Others might be in a different stage in their
journey. See the Giving Journey section below for more
details.
- 7 Giving by Month
- At a glance you can visualize patterns of giving, showing times when the person's
giving has gone up or down compared to other months.
- 8 Typical Gift
- It's important to know what the typical gift looks like for a person, to allow us to
identify when their giving changes from the norm so we can react
appropriately. This statistic gives the median giving amount, and the typical
amount by which that might vary.
- 9 Typical Frequency
- This is the average number of days between gifts. In this example Ted typically gives
every eight days, but that can vary by as much as 3.5 days. This tells us that he
probably gives weekly, but perhaps not every week.
- 10 Percent Scheduled
- Shows the percentage of the person's gifts that come from scheduled transactions.
This helps you identify people who aren't giving as consistently as they could, so
you can reach out to them.
- 11 Frequency
- This uses the typical frequency to calculate an overall frequency of giving for the
person. Ted gives on a regular basis, so his frequency is classified
as Weekly. Others might give on a bi-weekly, monthly, quarterly, erratic or variable
basis.
- 12 Preferred Currency
- In this example we can see that Ted primarily gives by writing a check. Others might
give using cash, credit cards or other methods.
- 13 Preferred Source
- Ted's preferred way to give is through on-site collection. Others might give through
places like your website or mobile application.
- 14 Community View
- This shows you how the person's giving compares to others in the community. This
isn't to classify people, but rather to show where this person's giving falls
in a larger context. Each person is assigned a bin based on their giving, as
detailed in the next section below.
- 15 Yearly Summary
- This area shows a total amount of giving by year for the person, broken up by
account. This gives you insight into where the person is giving, in addition to
how much.
The Giving Characteristics area of the Giving Overview is calculated by the
Giving Automation job. The
other areas are calculated when the information is accessed.
You might have noticed that we use two different methods to calculate the
Typical Gift and
Typical Frequency. A lot
of time and effort went into ensuring that we use the right calculations the right way.
As you continue to read this chapter, you'll find that anything related to a dollar amount
(e.g. Typical Gift) uses
a
median
and
Interquartile Range (IQR)
to show the typical giving amount and the amount by
which it varies. On the other hand, anything related to giving frequency
(e.g. Typical Frequency)
uses
mean (average)
and
standard deviation
to provide the typical frequency and the length of time by which it varies.
Calculating Community View
The Community View
is based on a typical yearly giving distribution. In the chart pictured below, the orange
line represents giving amounts. The largest gifts are assigned to bin 1, while smaller
gifts are assigned to bins 2, 3 and 4.
Typical Yearly Giving Distribution
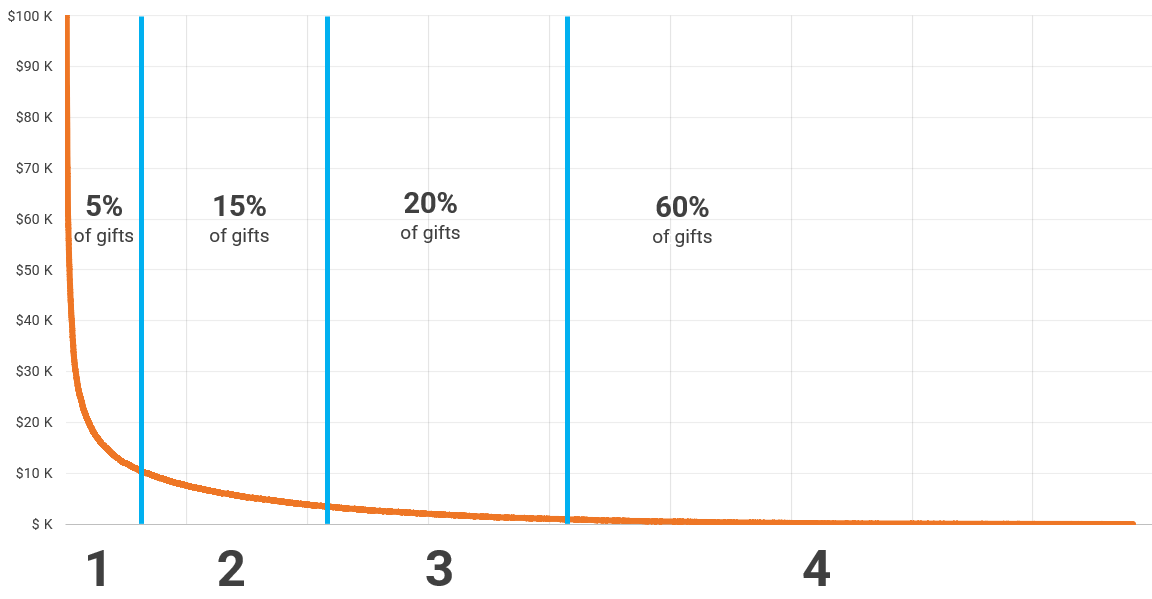
- Bin 1: Top 5% (+/- 1%) of gifts (e.g., $12,243 and above)
- Bin 2: Next top 15% (+/- 2%) of gifts (e.g., $4,000 to $12,242)
- Bin 3: Next top 20% (+/- 3%) of gifts (e.g., $1,364 to $4,499)
- Bin 4: Bottom 60% (+/- 5%) of gifts (e.g., $1 to $1,363)
It's important that we not apply judgement to people based on the bins into which they are
placed. We don't want to classify people based on their giving. Instead, we just want to
recognize that people are in different stages of their giving. For instance, someone in
Bin 4 may simply not understand generosity yet or have not yet put trust in God with
their finances.
If a person goes from Bin 4 to Bin 3, we often say they've had a change of mind, while
going from Bin 3 to Bin 2 is perhaps a change of heart.
If you dive deeply into the numbers, you may find that the placement into bins won't be
exactly perfect. It might be off by a percent or two. This is to avoid a scenario
where multiple people who gave the same amount are split into different bins. For
instance, bin 1 is intended to hold the top 5% of givers but may actually contain 6% of
your attendees if many of them have given the same amount or near the same amount.
Giving Automation Configuration
There are some general settings that control how giving automation features
work at a high level. These settings drive much of what you see on the Giving Overview
and are used by the
Giving Automation
job. This configuration can be accessed by clicking the
icon near the top right of the list of alerts under
Finance > Giving Alerts.
Typically, you won't make changes to these settings once they're in place.
General Settings
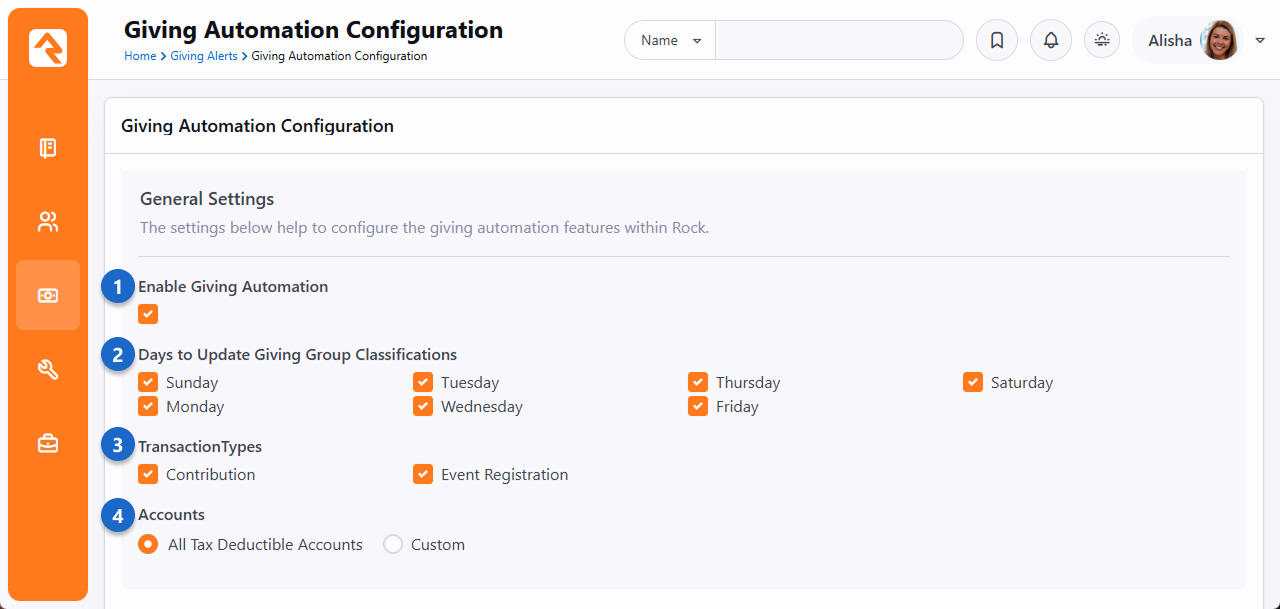
- 1 Enable Giving Automation
- This needs to be enabled for the
Giving Automation job
to run, perform calculations and assign giving alerts. Even if you're not using
alerts, you'll probably want to keep this enabled to ensure the giving information on
the Person Profile page
is up to date and accurate.
- 2 Days to Update Giving Group Classifications
- You might not need to update your giving data every day, or you only need the data
updated weekly. For instance, Sunday giving is typically entered on Mondays, so you might
choose to only run the update on Mondays. Choosing only certain days to update giving
group classifications can help lighten the load on your system.
- 3 Transaction Types
- By default, the giving information described in the prior section comes only from
contributions. However, you can choose to include payments for event registrations in the
calculations. If you include event registrations, be sure to keep in mind that they do
not apply to giving alerts.
- 4 Accounts
- Typically, you'll want the giving calculations to include gifts to any tax-deductible
account. However, you can optionally provide a custom list of individual accounts if you
want to limit where the giving data is coming from.
Giving Alerts
Giving data has the potential to help you spot changes in a person's
life or circumstances. Bearing that in mind, Giving Alerts are designed to let
you know when something has changed in a person's giving habits, so you can take
action accordingly. You might want to follow up with someone who has suddenly
stopped giving, to make sure everything is okay. Or you might want to show your
appreciation for someone who has given more than they usually do. Having two
alerts for the same person often signals a significant life change.
There are two types of Giving Alerts. The
Gratitude
alert type is intended to identify when someone has given a large amount or is giving more
frequently than they normally do. On the other hand, you'll get a
Follow-up
alert type if the person starts giving less frequently. These alerts
are calculated and generated by the
Giving Automation
job and are highly customizable as you'll see below.
Follow-up Alerts
Follow-up
alerts should be about the frequency of giving rather than a change to the amount a
person gives. For instance, a person might give a smaller amount than normal, but that
gift might be in addition to their regular giving and not a sign that they're giving
less.
Giving Alerts for an individual can be accessed from the
Person Profile
page under the Contributions tab. A list of all Giving Alerts can be found by
navigating to
Finance > Giving Alerts.
In either case, you'll be brought to a page like the one pictured below.
Giving Alerts
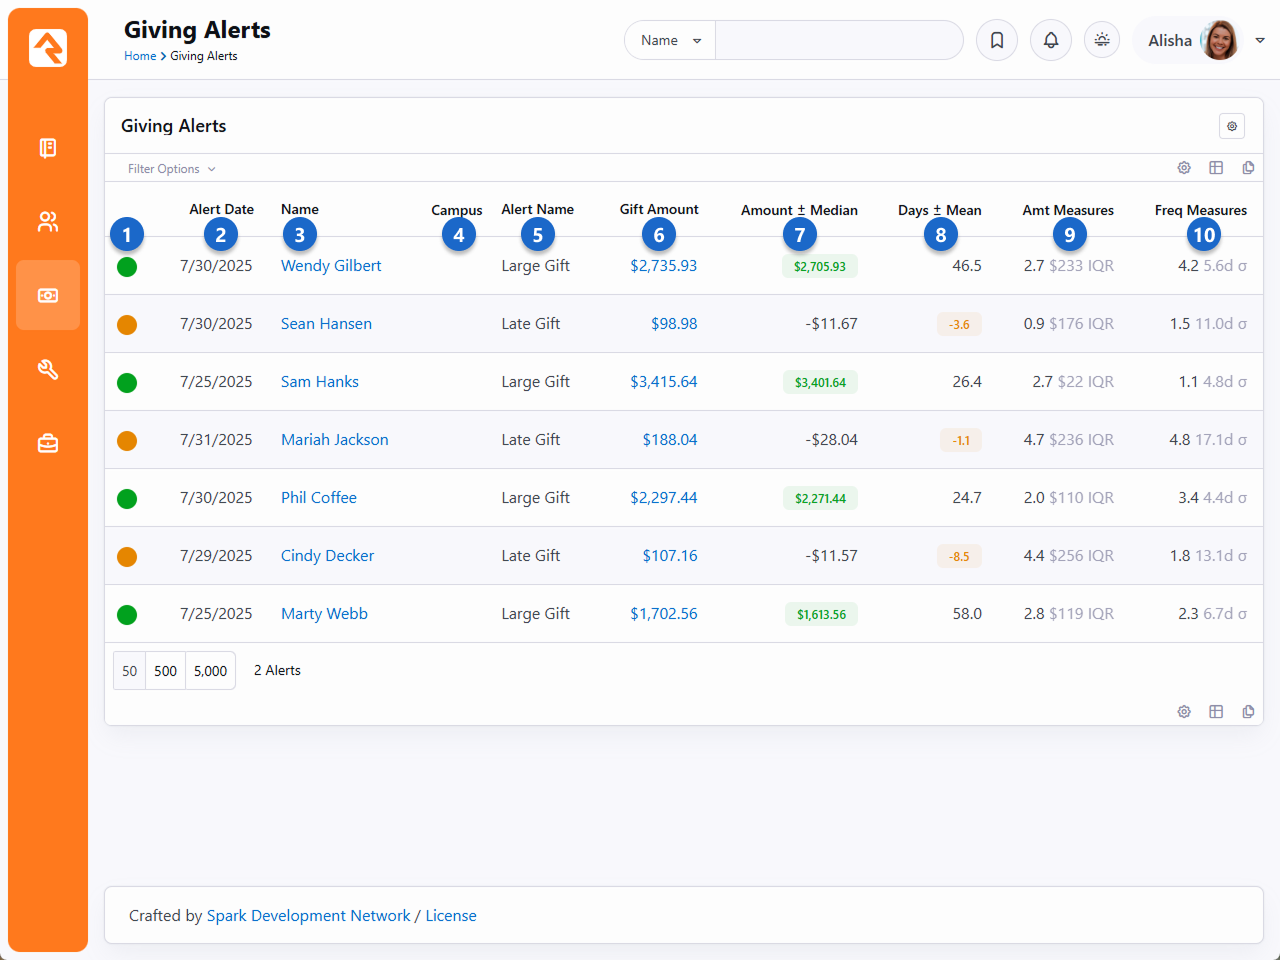
- 1 Alert Type
- The alert types are color coded so you can distinguish between
Gratitude
(green) and
Follow-up
(yellow).
- 2 Alert Date
- This is the date the alert was created. This can be useful for reporting or
filtering the results.
- 3 Name
- The person's name is displayed as a link. Clicking the link will take you to the
Contributions tab of the
Person Profile page
for that person so you can view more information about their giving.
- 4 Campus
- As applicable, the campus associated with the alert is displayed. You can also
filter the list of alerts by campus.
- 5 Alert Name
- You can have multiple alerts of the same type, so you'll need to know which specific
alert is being viewed. This is a good reason to give your alerts descriptive
names.
- 6 Gift Amount
- The amount of the gift that triggered the alert is shown for reference as a link.
Clicking the link will take you to the
Transaction Detail
page for the transaction, allowing you to view its details.
- 7 Amount +/- Median
- Each person has a median giving amount, which reflects their typical
gift. For the gift that triggered the alert, this column shows how much above or
below the gift's amount is compared to the person's median gift amount. For
instance, if a person's typical gift is $100 and an alert was triggered when they
gave $200 then this column would show $100. It will also become highlighted green
to draw attention to the condition that triggered the alert. You might set up a
Gratitude
alert for people in this scenario.
- 8 Days +/- Mean
- Each person has a typical giving frequency. For instance, a person might have a
mean average of one gift every 30 days. For the gift that triggered the alert, this
column shows how many days before or after their expected gift that it was
received. This tells you if the person gave sooner or later than expected.
The value is highlighted yellow in this example to draw attention to the condition
that triggered the alert.
- 9 Amount Measures
- Provides the person's current median giving amount and current IQR (Interquartile
Range) at the time of the gift. This lets you compare the gift that triggered
the alert to the person's typical gift amount.
- 10 Frequency Measures
- Provides the current mean frequency of giving for the person and the current
standard deviation at the time of the gift.
Giving Alert Configuration
Now that you're familiar with what Giving Alerts look like, let's see how you can set
them up. The configuration for Giving Alerts can be accessed by clicking the
icon near the top right of the list of alerts under
Finance > Giving Alerts.
The Giving Alert configuration is near the bottom of the page, below the General Settings
and Giving Journey settings. As you review this configuration, keep in mind that you don't
want to be bugging people all the time about changes to their giving patterns. Make use of
the Repeat Prevention Duration settings as described below to ensure alerts are generated
at reasonable frequencies.
Giving Alerts Configuration
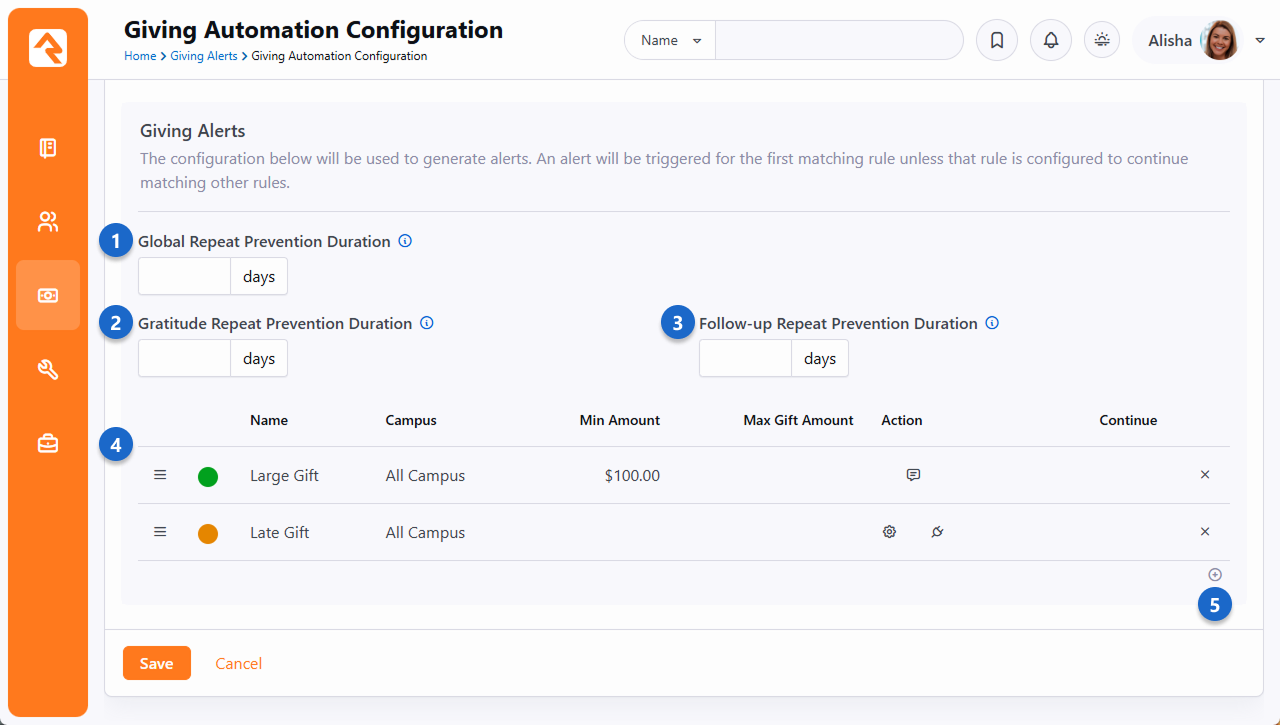
- 1 Global Repeat Prevention Duration
- You don't want to be bugging people all the time about changes to their giving
patterns. Setting this will prevent alerts of either type from being created within
the specified number of days after an initial alert. In this example, if an alert
is triggered for a person, that person won't get another alert of any type for at
least 30 days.
- 2 Gratitude Repeat Prevention Duration
- This setting controls how many days should pass after a
Gratitude alert is
generated for a person before another
Gratitude
alert is generated for the same
person. A person may give more generously or more frequently, but that doesn't mean an
alert should be generated every time. For instance, if a monthly giver were to give a
large gift in the middle of the month, you might only want to thank them once even
though they gave more frequently and more than usual.
- 3 Follow-up Repeat Prevention Duration
- This is like the above setting but applies to
Follow-up alert
types. Typically, if you wanted to check in on someone who is giving less
frequently, you don't need multiple different reasons to do it. In other words,
you don't want to have multiple follow-up alerts in a small timeframe because
you probably don't want to reach out to the person more than once in that
timeframe.
- 4 Alerts
- This is the listing of alerts that you have configured. The order of these alerts
matters. Rock will evaluate a person for alerts from the top down. Once a person gets
an alert they will not be evaluated for the next alert in the list unless the
Continue option
is enabled. You can click and drag the
icon to move each alert up or down. Clicking on an alert row will open the configuration
for that alert.
- 5 Add New Alert
- New alerts can be added by clicking the
icon near the bottom of the list. The configuration you'll use is described below.
Settings for Giving Alerts
Each alert has its own settings, with options that let you control exactly when the
alert should occur and what actions to take when it does.
As you set up your alerts there are a few things to keep in mind. The most important part
is deciding whether you're creating a
Gratitude alert or a
Follow-up alert.
Gratitude alerts are
great for recognizing when someone gives a larger gift than normal, or more frequently
than usual. Follow-up
alerts should be used for tracking when someone starts giving less frequently. In the
next section we'll give some suggestions for how to use these settings to set up alerts
of different types.
Giving Alert Settings
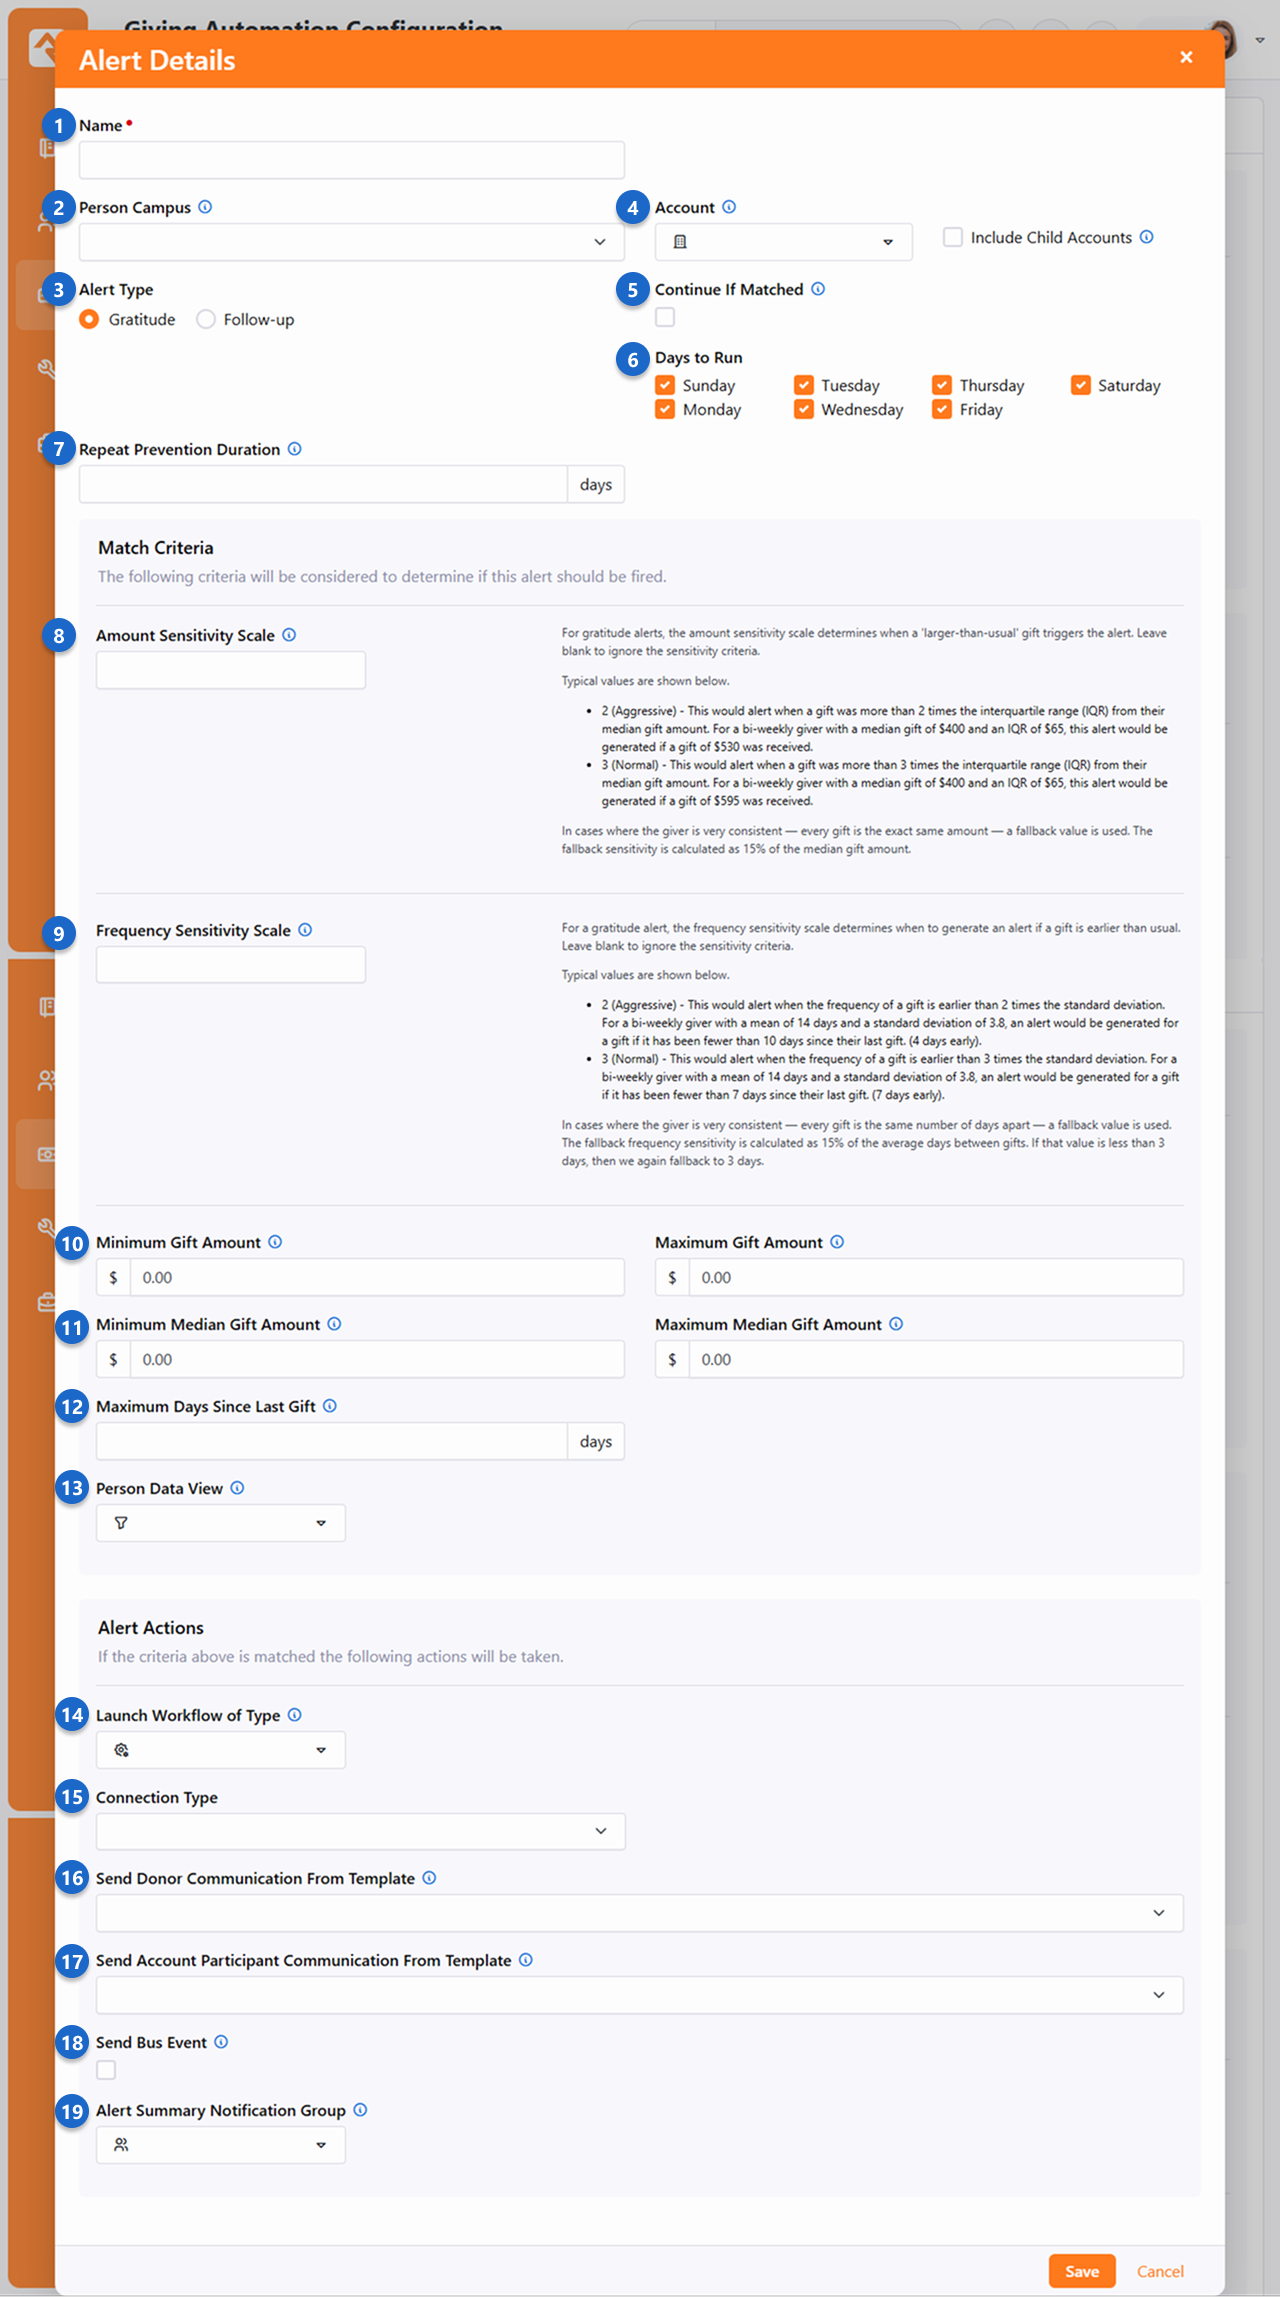
- 1 Name
- A descriptive name will help you easily identify the alert and its purpose. This
is especially helpful when you're looking at lists of alerts as shown in the
sections above.
- 2 Person Campus
- An alert will only be generated if the person's campus matches the campus
selected here. This lets you have different alerts for different campuses.
- 3 Alert Type
- As described in the sections above, alerts can be of type
Gratitude or
Follow-up.
It's important to pick the right type for the alert you're setting up.
- 4 Account
- You can optionally limit alerts to gifts given to a certain financial account.
You also have the option of including child accounts under the selected
account.
- 5 Continue If Matched
- This setting controls whether Rock should continue evaluating a person for
other alerts if they get this alert. Leaving this disabled can help ensure the
person doesn't get multiple alerts for the same gift. However, depending on your
setup, having multiple alerts can provide a more complete picture of how this gift
compares to the person's normal giving.
- 6 Days to Run
- You probably won't need every alert to be processed on every day of the week. For
instance, you may only want to calculate alerts on Mondays or Tuesdays after all
the weekend giving has been entered. Calculating alerts only one or two days out
of the week also lightens the load on your system when the
Giving Automation
job runs.
- 7 Repeat Prevention Duration
- This is the number of days that must pass before an individual who gets this alert
can get it again. This is similar to the Repeat Prevention Duration configurations
discussed in the prior section, except this applies to only this one alert.
- 8 Amount Sensitivity Scale
- This is where you find people who gave more or less than usual. The higher the
number, the further from the person's normal giving level the gift must be to
trigger the alert. You could use this to trigger a
Gratitude
alert for people who gave more than usual. Be sure to read the on-screen details
and examples to guide you in choosing a value. This setting only applies to people
who have given more than five gifts in the previous 12 months.
- 9 Frequency Sensitivity Scale
- This is like the above setting but identifies people who gave more
frequently or less frequently than normal. You might use this to trigger a
Follow-up
alert for someone who gives regularly but seems to have stopped for some
reason. This setting only applies to people who have given more than five
gifts in the previous 12 months.
- 10 Min/Max Gift Amount
- You might not want an alert created for all gifts, even if they match the alert
criteria you've configured. Adding values here will limit who gets an alert based
on the amount of their gift. For instance, you might skip an alert for gifts under
$10. Or, you might have a separate alert for particularly large gifts.
- 11 Min/Max Median Gift Amount
- This is similar to the above setting but looks at the person's median gift
amount. This lets you trigger the alert only if the person regularly gives
a certain amount. For instance, you might not want an alert to be triggered for
someone who gives $1 every week and then stops.
- 12 Maximum Days Since Last Gift
- This setting gives you another way to control who gets alerts based on the
frequency of giving. You could use this to set up a
Gratitude
alert for someone who has given twice in the past week.
- 13 Person Data View
- Data Views are a powerful and flexible way to identify the exact population of
people for whom you want to create alerts. For instance, you might only want
alerts for people with a certain connection status.
- 14 Launch Workflow of Type
- A workflow is a great way to take action on an alert. With the power and
flexibility of workflows, you can do just about anything. Keep in mind that the
person the alert is about (i.e., the financial transaction's 'authorized' person)
is set as the workflow initiator.
- 15 Connection Type
- Especially for
Follow-up
alerts, you might want to create a connection request for the person. Selecting
a Connection Type will provide a second field where you can specify the
Opportunity that the connection request should be added to. The person
receiving the alert will be set as the requester.
- 16 Send Donor Communication From Template
- You can choose to automatically send a communication to the person receiving
the alert using the selected template. If you're creating a new alert you might
want to wait before using this feature, to ensure the alert is getting generated
for the population you intend to target.
- 17 Send Account Participant Communication From Template
- If you have an Account filter set up (see #4 above) you can use this field to send
a communication to anyone who is listed as an
Account Participant
within the Account's configuration, with the Purpose
Key of
Giving Alerts.
- 18 Send Bus Event
- This setting only applies if you have a Message Bus set up. If you do, and if this
is enabled, the alert will trigger an event to be sent.
- 19 Alert Summary Notification Group
- Members of the selected group will receive an email notifying them that a giving
alert has been created for the person. By default, the email only provides the
person's name and a link to the alert. The system communication used for this is
Financial Transaction Alert Summary.
Deleting Transactions
If you delete a financial transaction that triggered an alert,
the alert will also be deleted automatically behind the scenes.
Giving Alert Examples
Now that you're familiar with the different options you have for Giving Alerts, below are
some ways that you might implement them. Keep in mind these are only suggestions based on
some common use cases.
- Late Gift Alert
- Alert Type is Follow-up
- Positive number in the Frequency Sensitivity Scale
- Early Gift Alert
- Alert Type is Gratitude
- Negative number in the Frequency Sensitivity Scale
- Larger Gift Than Usual
- Alert Type is Gratitude
- Positive number in the Amount Sensitivity Scale
- A Single Large Gift
- Alert Type is Gratitude
- Frequency Sensitivity Scale and Amount Sensitivity Scale are blank
- Minimum Gift Amount has a high value
- Large Gift for People Who Don't Normally Give That Amount
- Alert Type is Gratitude
- Frequency Sensitivity Scale and Amount Sensitivity Scale are blank
- Minimum Gift Amount has a high value
- Maximum Median Gift Amount has a value lower than the Minimum Gift Amount
(first-time giver would be $0.00)
Giving Journey
Each person can be thought of as being in a certain stage of a giving lifecycle. Has the
person just started giving, or have they been giving for a while, or have they stopped giving?
Rock's Giving Journey feature helps you identify which stage a person is in. This gives you
insight into where their heart is, and helps you identify the changes in heart that are
reflected in giving patterns.
There are six stages in the Giving Journey that a person moves through:
- Non-Giver
- New Giver
- Occasional Giver
- Consistent Giver
- Lapsed Giver
- Former Giver
A person is evaluated for each stage, from the top down in the order listed on the page
pictured below, until a match is found. For instance, a brand-new giver who gave $1 on
Monday and $1 on Tuesday would be evaluated on Wednesday as a
New Giver even
though they technically also meet the requirements for a
Consistent Giver.
To access the Giving Journey settings, navigate to
Finance > Giving Alerts and
click the icon near the top right corner of the block.
Giving Journey Configuration
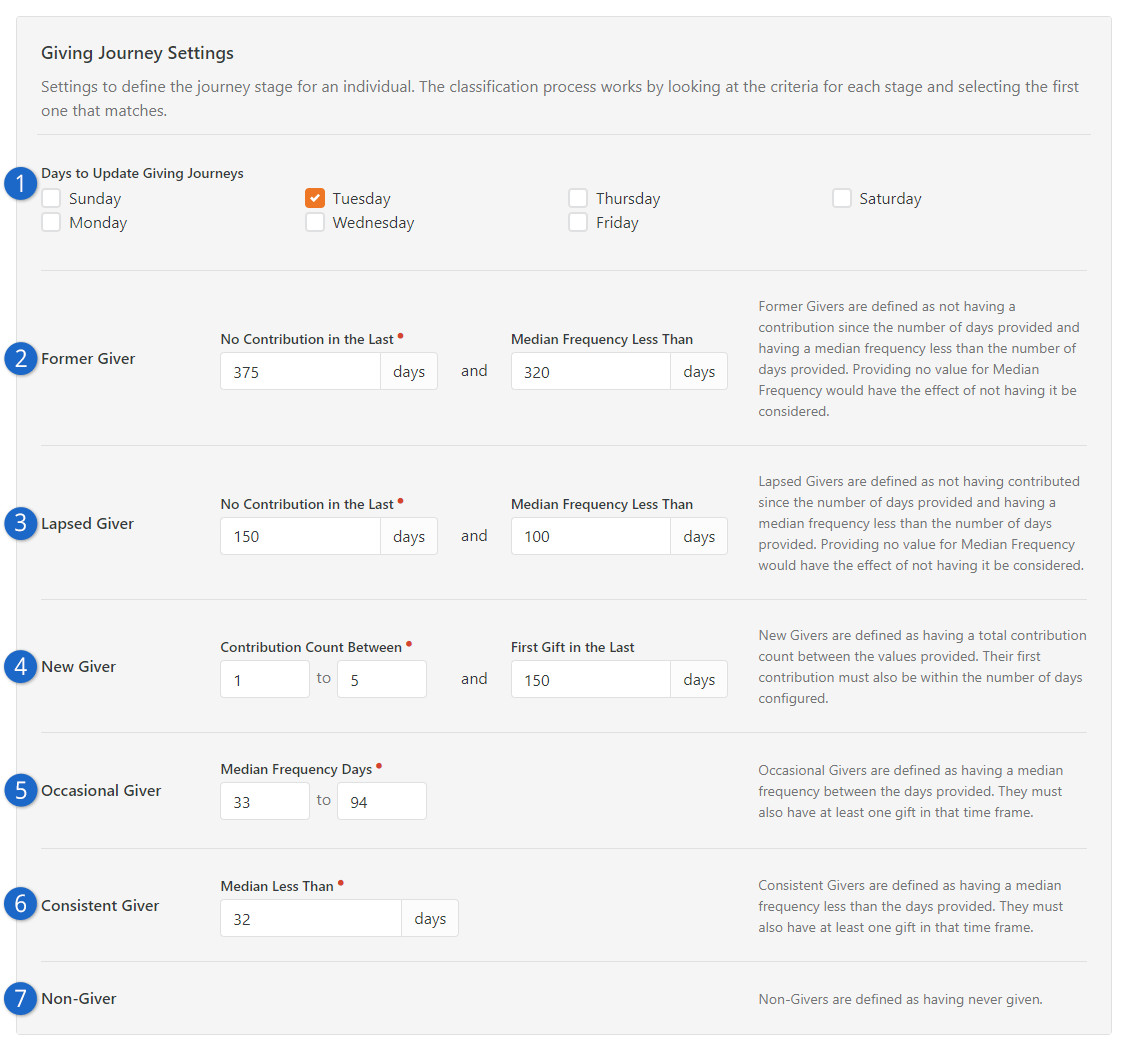
- 1 Days to Update Giving Journeys
- It takes a lot of number crunching to calculate a person's Giving Journey stage, and
the stage is unlikely to change twice in the same week for a person, so you don't need
to calculate this every day. The default day is Tuesday, which is typically after most
giving from the weekend has been entered into Rock.
- 2 Former Giver
- This stage applies to someone who hasn't given for a significantly long time, where we can
confidently say that the person has stopped giving entirely. Out of the box, Rock defines
this as someone who hasn't given in over a year and who used to give at least once every
320 days (median frequency).
- 3 Lapsed Giver
- Lapsed givers were likely occasional givers or consistent givers at some point but
haven't been giving lately. Someone in this stage might have recently had a change in
their lives.
- 4 New Giver
- As you might have guessed, this is someone who has recently given for the first time. New
givers should be celebrated, as this likely reflects a change in heart.
- 5 Occasional Giver
- An occasional giver gives somewhat sporadically. They are active givers, but maybe only
give once every couple of months.
- 6 Consistent Giver
- Out of the box a consistent giver would be someone who regularly gives at least once a
month. This speaks volumes about where their heart is. A consistent giver might be someone
with a Scheduled Transaction set up.
- 7 Non-Giver
- A non-giver has never given. This could identify someone who hasn't yet put full
trust in God regarding their finances.
While a lot of thought and effort went into the configuration that ships with Rock, you
can customize the conditions that must be met for a person to be placed in
each stage according to what makes sense for your organization.
Keep in mind that a person's current and previous Giving Journey stage are both stored as
person attributes called
Current Journey Giving Stage
and
Previous Journey Giving Stage.
There's also a person attribute for the date that their stage changed, called
Journey Giving Stage Change Date.
This makes it easy to create data views, reports, SQL queries and targeted communications
based on a person's Giving Journey information.
All changes to the
Current Journey Giving Stage
are written to the History table for in-depth analysis. Also, you could
enable Analytics and Analytics History on the attribute for BI purposes.
Family Giving
By default, giving transactions are summarized by family. This means that
spouses share the same giving total even if they split the duties of
writing the checks.
Multiple Families
Since Rock allows people to be in multiple families, you can choose which
family their giving applies to. This can be set from their
Person Profile
page by clicking the Edit Individual
button, then Advanced Settings.
The Combine Giving With
allows you to pick a specific family.
Individual Giving
There are situations where even married couples will want their gifts split onto
separate giving statements. If you leave the Combine Giving With
field discussed above blank, it will mark the individual as giving separate from the family.
Businesses
While Rock is all about managing people, there are some scenarios when
financial transactions need to be managed for entities like businesses.
Don't worry. Rock still has you covered. Businesses can be easily managed
under Finance > Businesses.
Managing business giving is also easy. Out of the box, Rock is set to allow business giving. When an
individual gives as a business, both the individual and business information and giving history will
appear in the Give Now and Giving History screens. If you don't want business giving available for
your organization, simply disable this feature by selecting 'no' in the Enable Business Giving
option in the Contributions block settings of the Give Now screen. For more information on Rock's
business giving options, see the Online Giving section above.
Business List
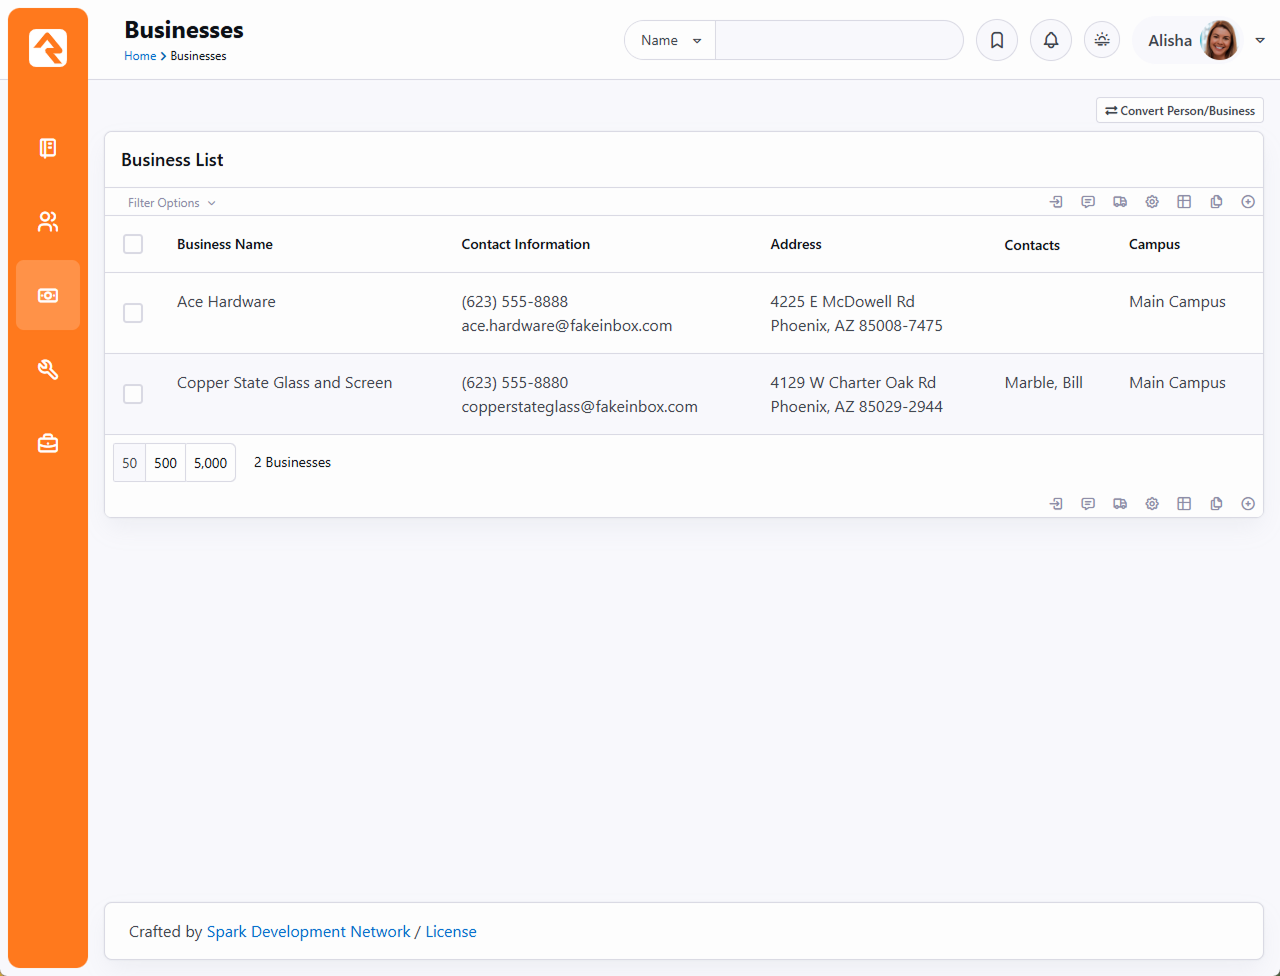
From the business list you can add new businesses, or you can click on
a business to edit its details.
Business Details
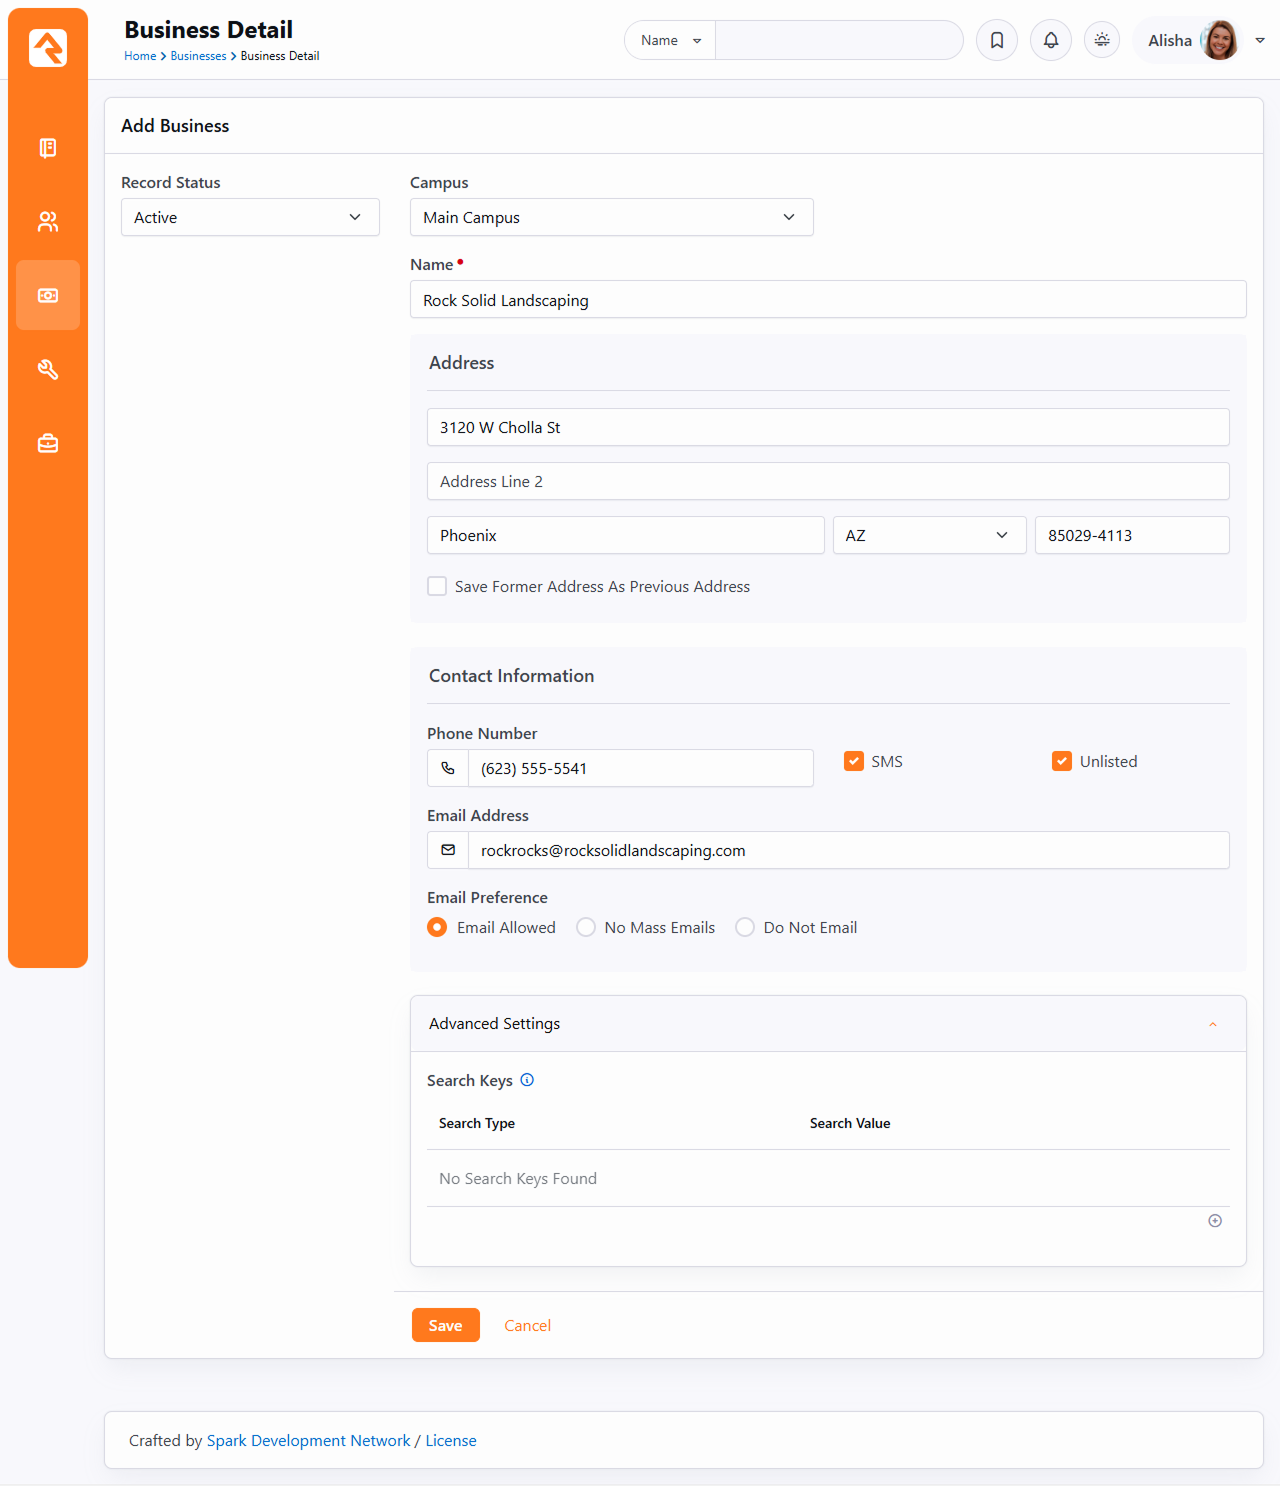
- 1 Record Status
- Like individuals, businesses have a record status that allows you
to mark them as inactive. Businesses can't be deleted from the
database because there are historical financial transactions tied to
them.
- 2 Campus
- Also like individuals, businesses can be assigned to a campus.
- 3 Name
- The name of the business.
- 4 Address
- The address of the business. Like families, businesses can have a
Previous address.
- 5 Contact Information
- Businesses allow you to store a phone number and an email address. This
should be the contact information for the business itself, not the person
associated with the business.
- 6 Advanced Settings
- Search Keys help prevent duplicate records from being created. Typically,
you would use this field to store outdated or alternate email addresses for
the business.
Businesses Are People Too
Behind the scenes, businesses are actually stored as special types of person
records. You'll find people and businesses have much in common. For instance,
you can optionally include businesses as valid values for attributes of
type Person.
Business Contacts
While businesses will be the source of donations and gifts (financial
transactions), there will most likely be an individual that links the
business to your organization. Being able to manage these
relationships is important.
Once a business is saved, you can add contacts to the business from
the individuals stored within Rock. These relationships can be viewed
on the Business Detail
page and also on the Known Relationships
section of the Person Profile
page of the individual.
Business Details
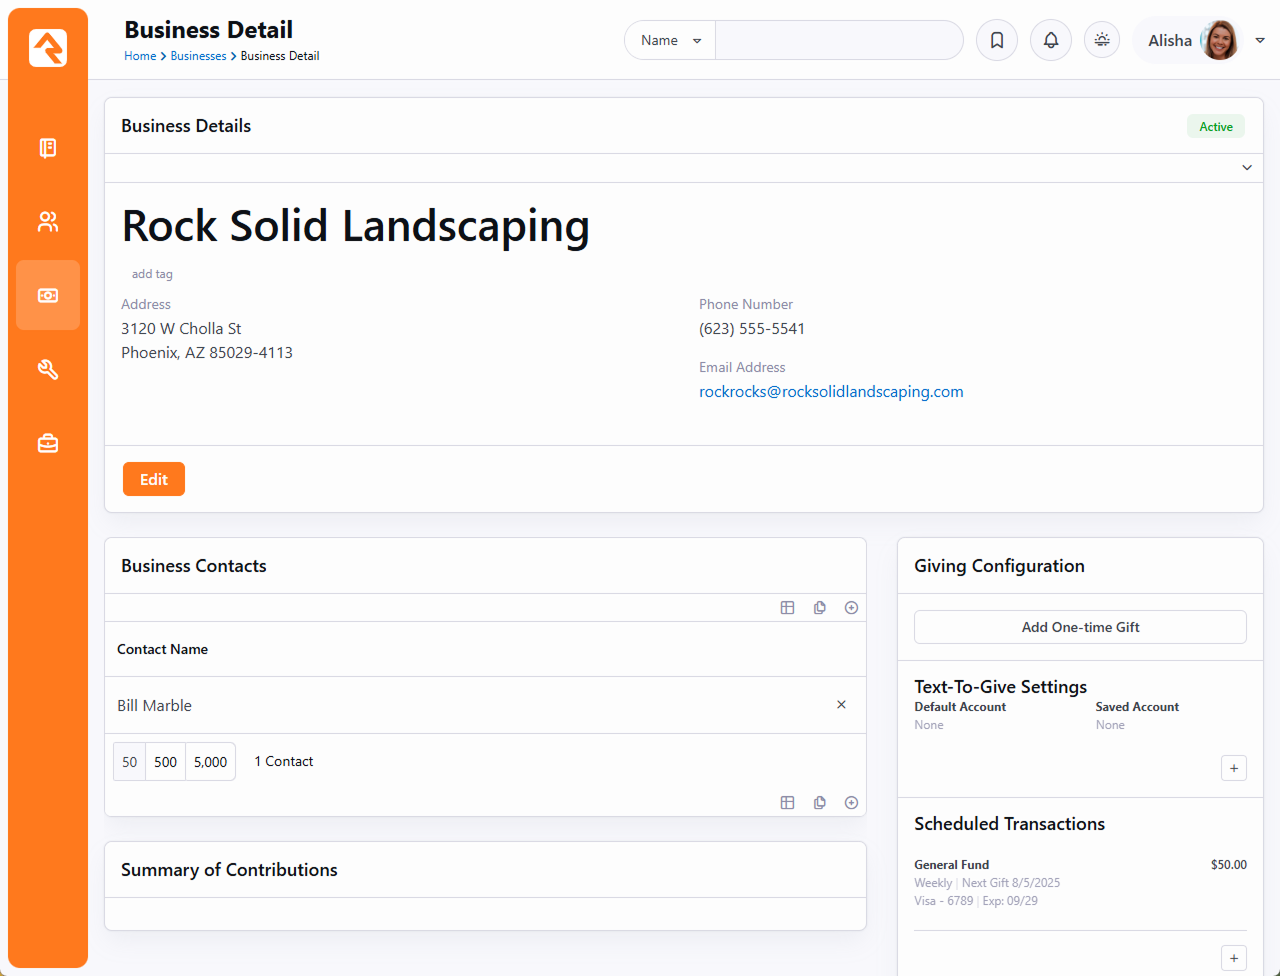 Person Detail Page

Business Contributions
Just as you can view the giving information for a specific person, you can also view the giving
information for a business. To do this, simply go to
Finance > Businesses and select
the business name from the Business List. Rock will display all of the information and
contribution history for that business, including yearly contribution statements. Financial
transactions can also be entered from the Business Detail screen. Options include either a
one-time gift or a new scheduled transaction.
Contributions - Business Detail Page
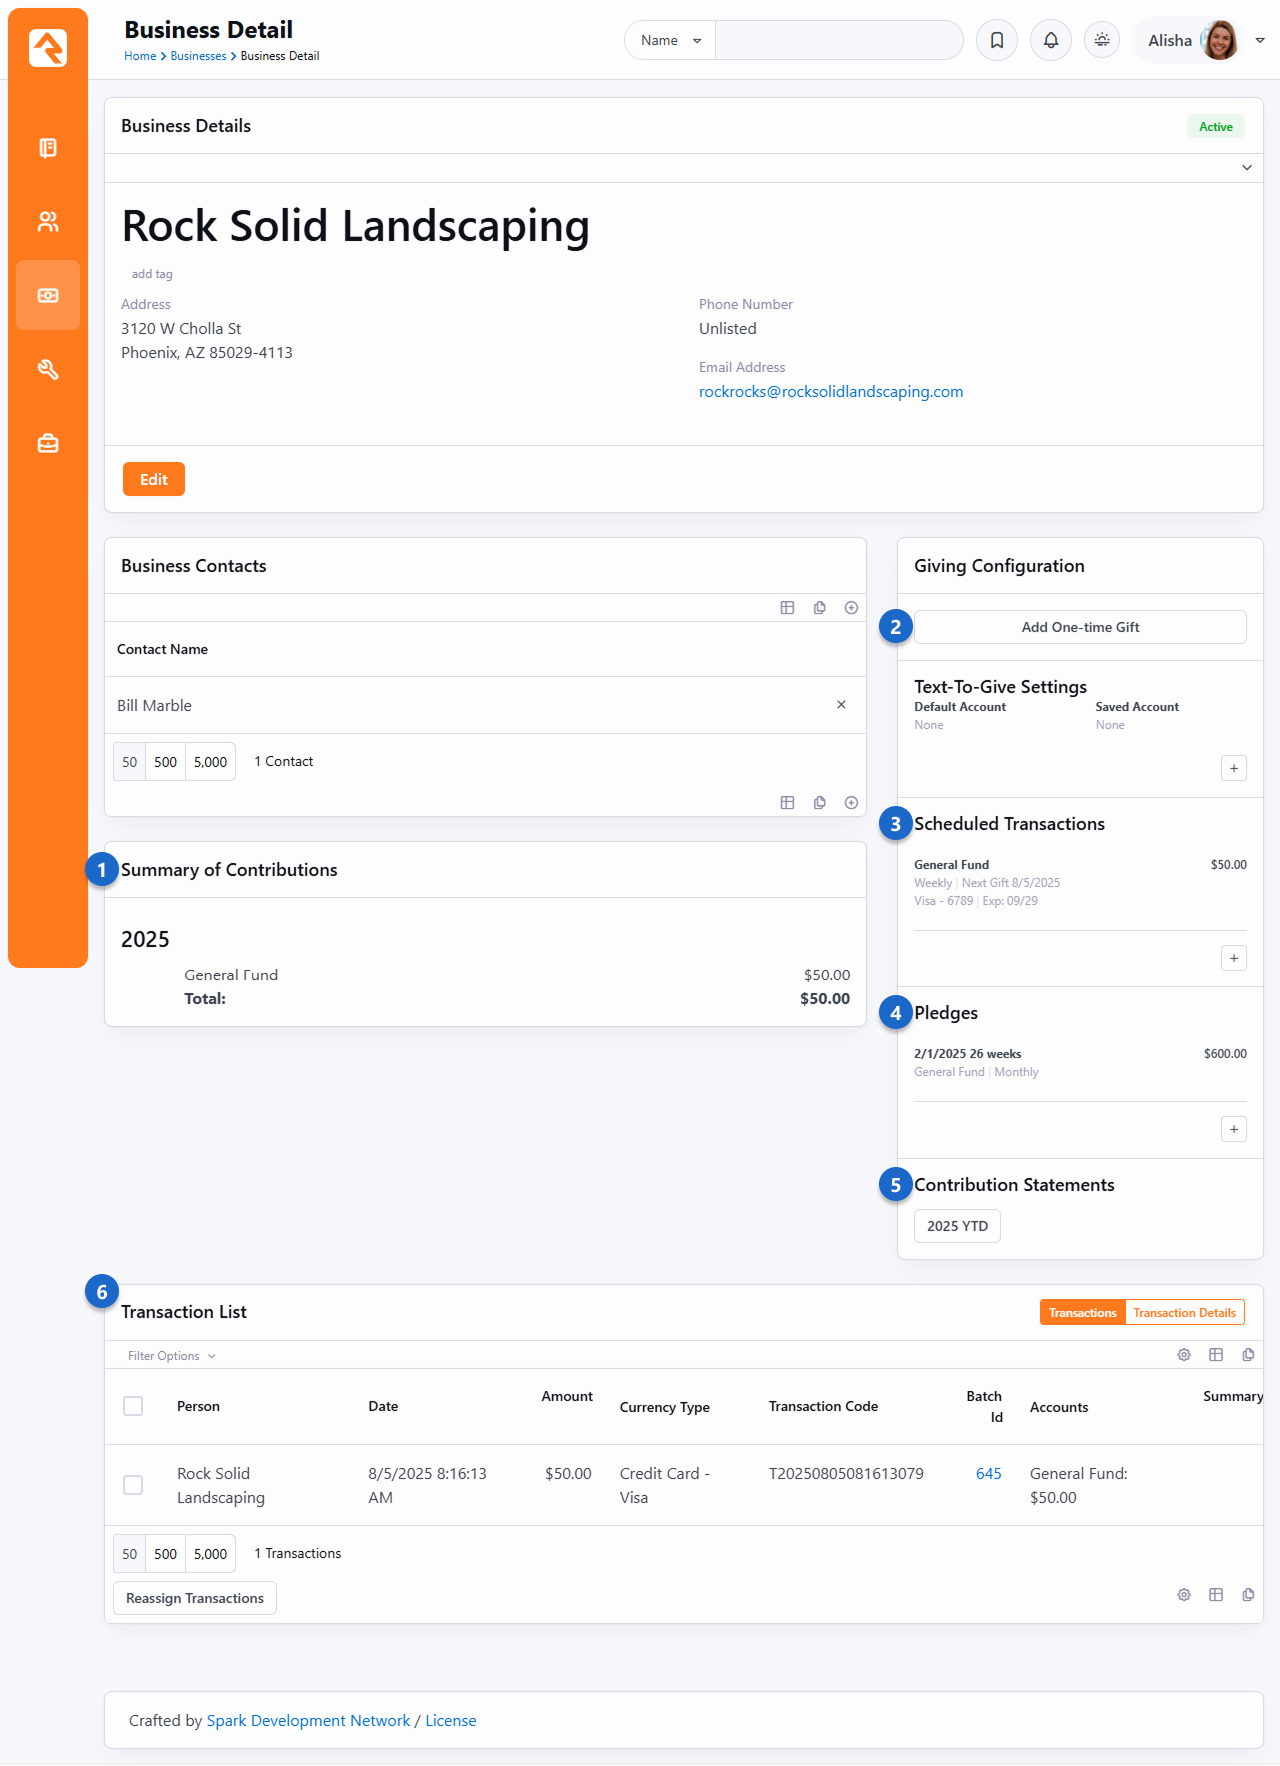
- 1 Summary of Contributions
- Summary of total contributions by year for the business.
- 2 Add Transaction
- Click this button to add a one-time gift from the business.
- 3 Scheduled Transactions
- List of all recurring scheduled transactions.
- 4 Pledge List
- List of financial pledges for the business.
- 5 Available Contribution Statements
- Links to available contribution statements by year.
- 6 Transaction List
- Filterable list of transactions for the business.
Scheduled Transactions for Businesses
Just as you can set up scheduled transactions for an individual, you can also set them up for
a business. The process is the same, but rather than going to the contributions tab on a
person's profile, you locate the business in the Businesses screen
(Finances > Businesses). From
the Business Detail screen, you can either enter a one-time gift or set up a new scheduled
transaction.
Business Details
At the top of the
Business Detail page is the
Business Detail block. This block shows details about the business like the name and contact
information and allows you to edit those details. It also has a few settings that you'll want
to know about.
Business Detail Block Settings
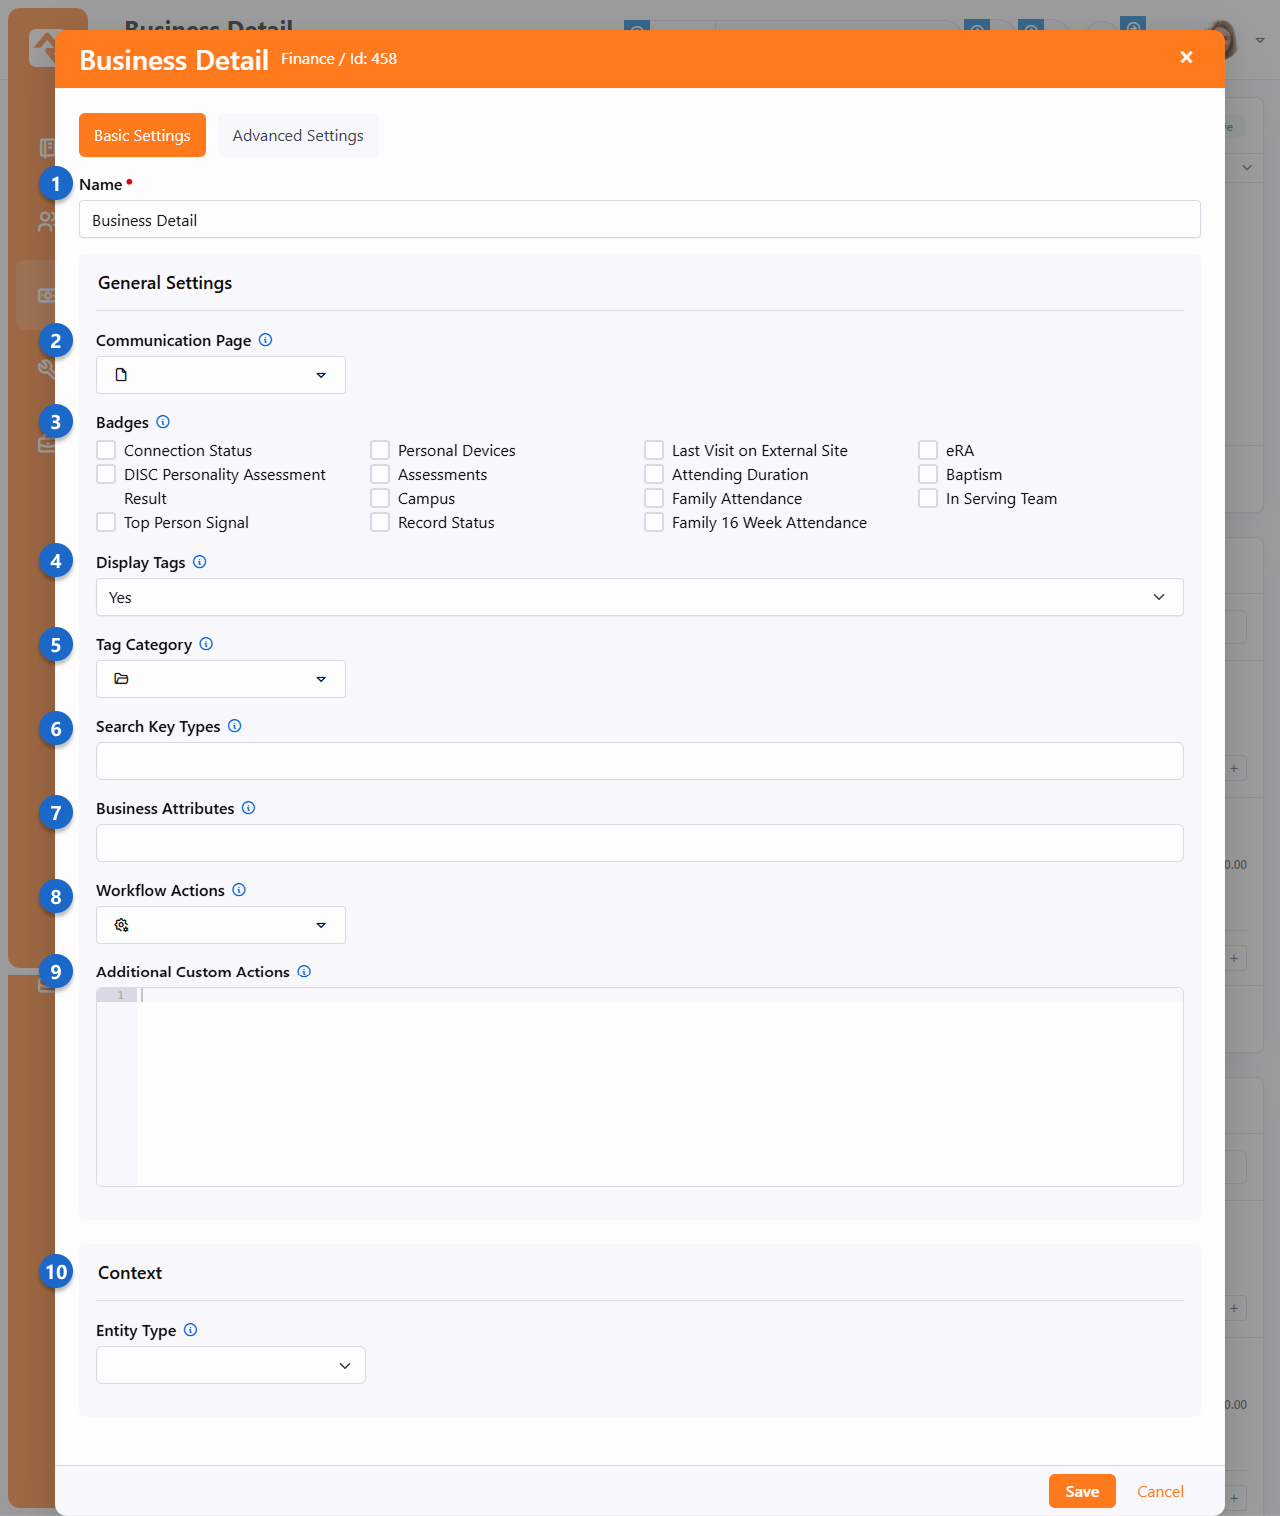
- 1 Name
- You can change the name of the block if desired. This is typically only visible to
administrators.
- 2 Communication Page
- By default, clicking on the email address for the business will take you to the
New Communication page that
ships with Rock. Here you can set an alternate page that the person will be taken to instead.
- 3 Badges
- Yes, businesses can have badges too! Badges selected here will be displayed under the name of
the business.
- 4 Display Tags
- Just like you can tag other entities like people or groups, you can tag businesses. Tagging is
a great way to organize and categorize businesses for reporting purposes. If you don't want tags
to be displayed for businesses, set this to No.
- 5 Tag Category
- If you are displaying tags, you can set the Category here to only show tags in that category.
If specified, all new personal tags will be added with this category. You can maintain your tag
categories under
Admin Tools > Settings > Tag Categories.
- 6 Search Key Types
- Rock ships with only one Search Key Type (Email) but you may have added others. This
setting lets you limit which Search Key Types can be added to businesses.
- 7 Business Attributes
- Attributes are a great way to track information about a business beyond their name and
contact information. The attributes you list here can be edited when the business is edited and
will be displayed near the bottom of the Business Detail block.
- 8 Workflow Actions
- Just like you can on the
Person Profile
page, you can launch actions for businesses. Simply list the workflows you
want to have available, and an
Actions
drop-down menu will be available near the top right of the page.
- 9 Additional Custom Actions
- Beyond workflows, you can have other custom actions. See the help icon
on the page for an example of how this would look.
- 10 Context - Entity Type
- This block is context aware, and this is where you set the entity type. You can read more
about using context in our
Designing and Building Websites Using Rock
manual.
Converting a Person to a Business
While working with transactions, you may realize it would be best for Rock to consider a
particular person a business or vice versa. Rock allows you to do this, though you'll rarely
need to.
The process of converting a person to a business or a business to a person is simple. Access the
Business Conversion screen
by clicking the
Convert Person/Business button
at the top of the
Business List screen,
located at Finance > Businesses.
Business Conversion Screen
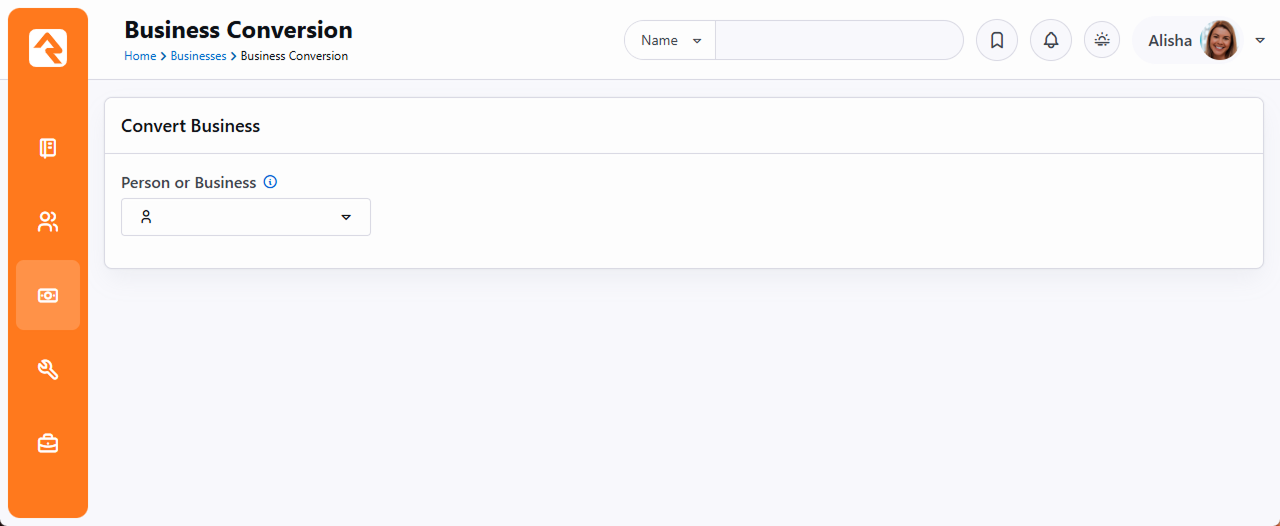
Select the person or business you want to convert, double check that the settings Rock will use
to convert the person or business are correct and click
Save.
Rock won't convert a person with family members to a business because it would result in those
family member records being lost. To convert a person with family members to a business, first
move the person to their own family.
Merging Business Records
Just like you can
merge person records,
you can also merge business records. Typically, this is only needed if a single business has more
than one record in your system.
You can merge business records directly from
Finance > Businesses
by selecting the businesses you want to merge and clicking the
icon. You can also use the Smart Search to look for businesses with similar names.
Select Businesses to Merge
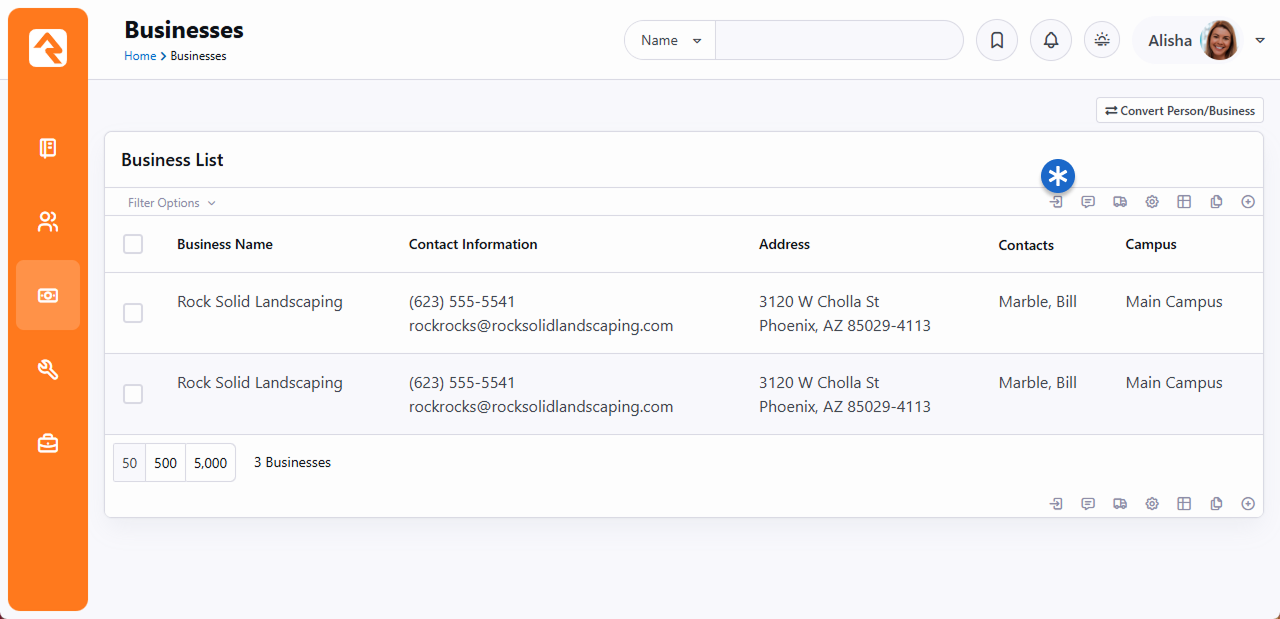
If you've ever merged person records before, the page below will look very familiar. The first
thing you'll want to do on this screen is pick the master record near the top. This is the
record that the others will be merged into. Then, look at each row and ensure that the correct
value is selected. If a value isn’t correct on the master record, you can choose to select the
data from one of the other records. After you've selected the data to keep, just click
Merge Records
to complete the merge.
Merge Businesses
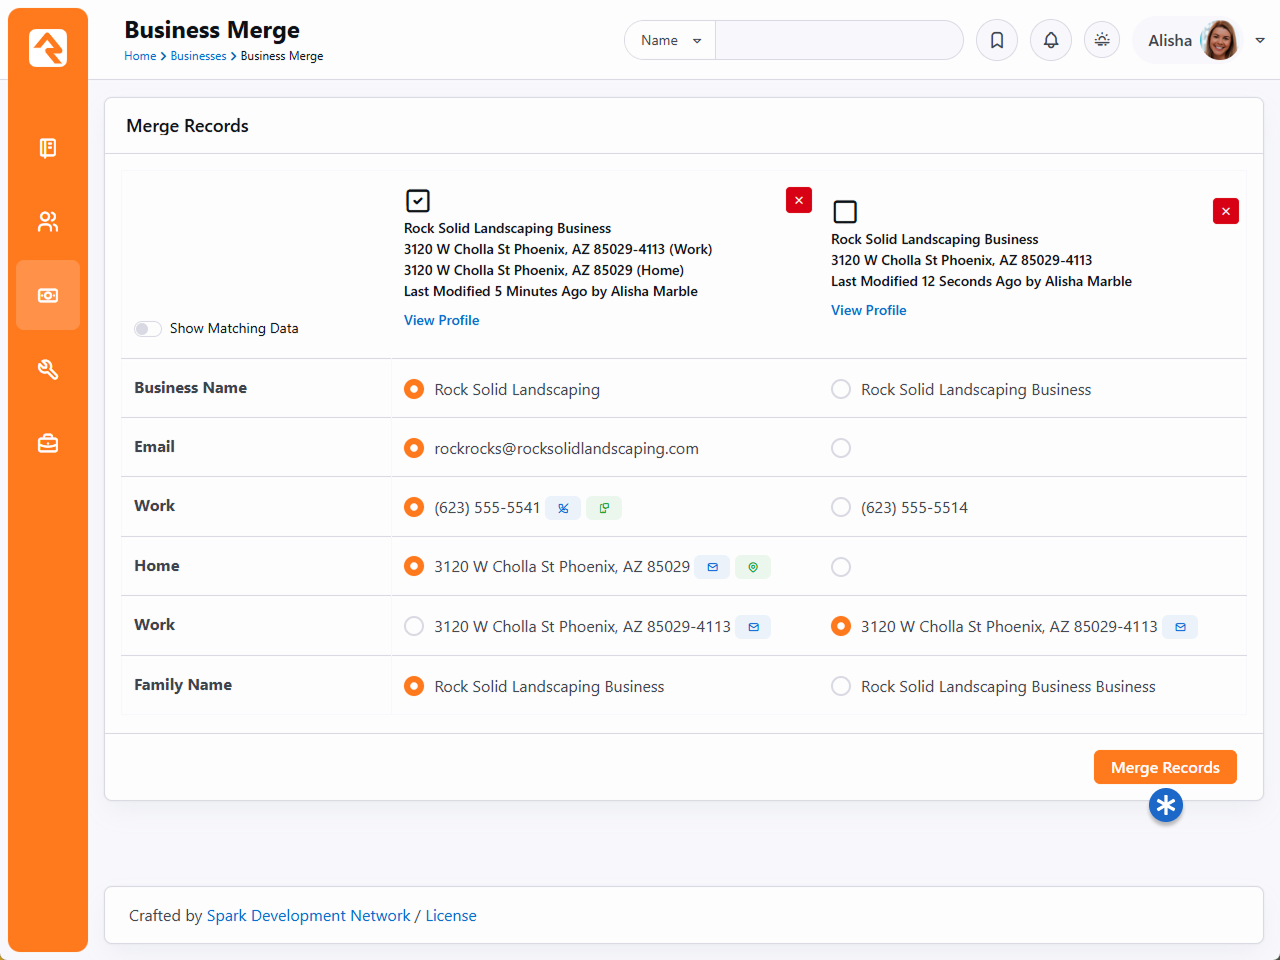
The address displayed at the top of the merge block is shown for reference only. After selecting
the primary/master record, you'll still need to pick which address(es) to carry forward.
Security For Finance
The finance features in Rock have been secured to only give access to
those who need it. The following security roles have been created with
the permissions below.
Finance Security Roles
RSR - Finance Worker: The finance user role is allowed to
view and edit basic finance information like batches and transactions.
They are not allowed to make modifications to the configuration of
the finance features. For instance, they can't add a new account or edit
an existing account. Similarly, this role can view businesses but cannot
add new businesses or edit existing ones. This role does not have access
to any benevolence features.
RSR - Finance Administration: The finance administrator
role is allowed to view and edit all finance information including
configuration information like accounts.
Areas That Are Secured
The following areas of Rock have been secured to limit access to
financial information. Only those in the finance roles will have
access to the following:
-
Finance Admin Pages: All the pages under
Finance
on the main navigation.
-
Person Details Contribution Tab: The
Contributions
tab on the Person Profile page.
-
Rock Check Scanner: Log-in to use this application.
-
Data View Filters: Write data views that
report on financial information. (Once the data views are
created however, anyone who has permission to view the data
view can run them. Be sure to secure the data views you create.)
-
Reports: Creating reports. (Once the reports
are created though, they can be run by anyone with view access
to the report.)
Additional Security Actions
The following can be secured separately from the permissions provided to Finance Workers and Administrators:
-
Financial Batch Entity: Only those with security permission will be able
to reopen or delete a batch.
-
Financial Transaction Entity: Only those with security
permission will be able to initiate a refund.
-
Filter by Person on Transaction List Block: Only
those with security permission will be able to filter transactions on the
Transaction List block by person.
Benevolence
The benevolence feature allows you to track the assistance you provide to those in need.
This tracking allows you to better understand who is being helped and how much help you
are providing. Let’s see what's possible.
Request List
The benevolence features can be found under
Finance > Benevolence.
The first screen shows a list of benevolence requests that have been entered into the
system. This list will quickly grow to be quite long so be sure to use the filters at
the top to help you find the specific requests you're working on.
Benevolence List
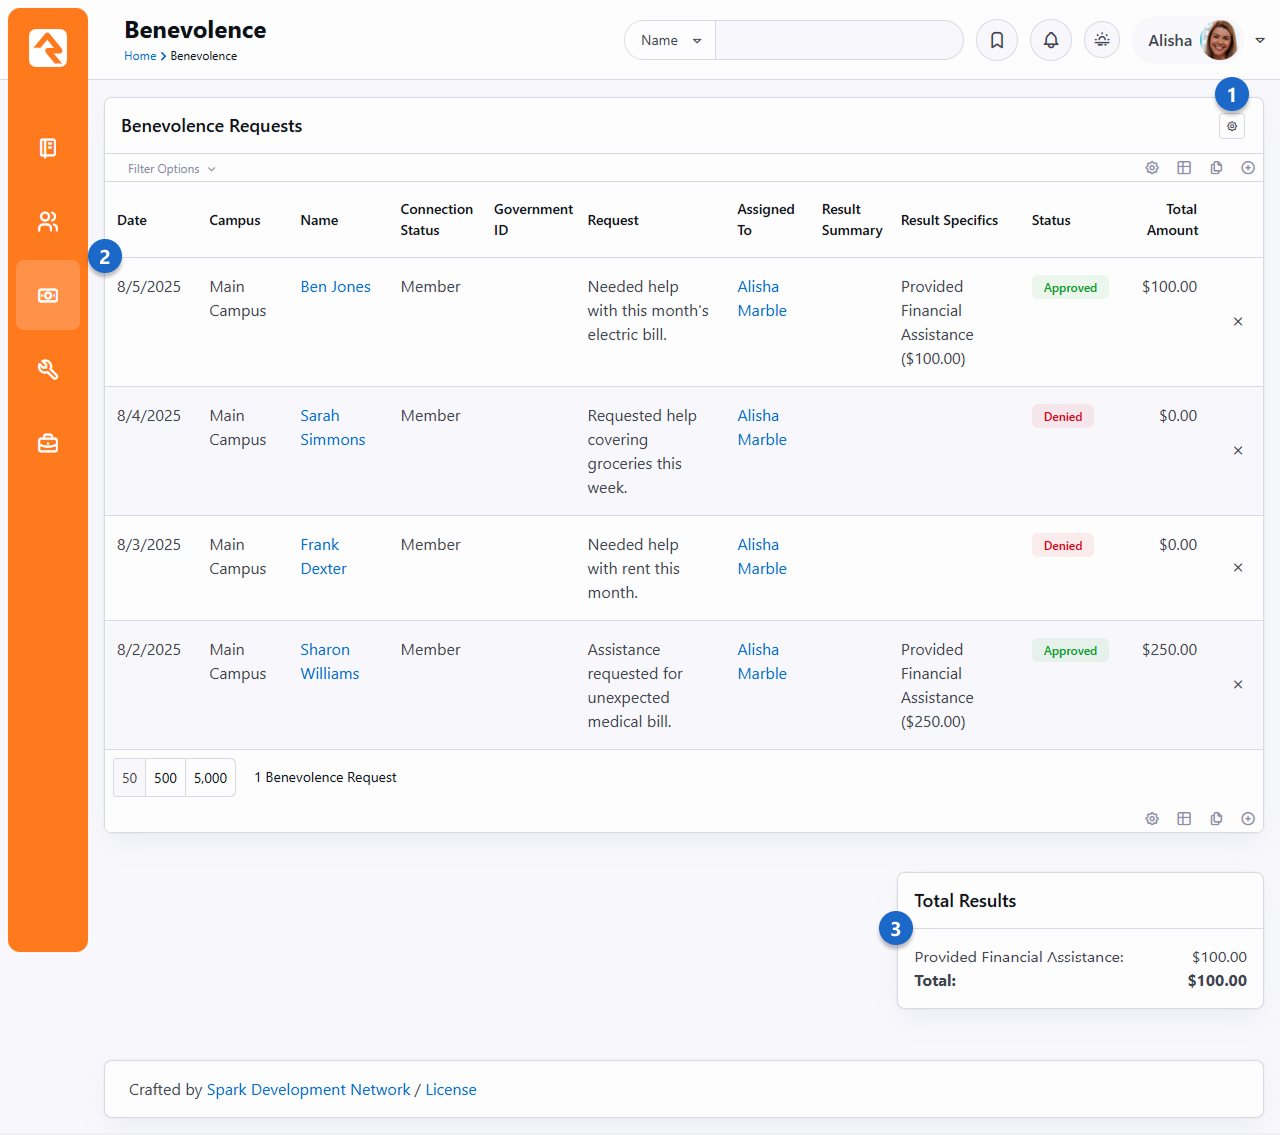
- 1 Benevolence Types
- Click the gear icon to add or manage different
Benevolence Types.
For instance, you might have a type for "Housing" or "Food Assistance".
- 2 Benevolence Requests
- This is a filterable list of all the Benevolence Requests in your system.
New requests can be added by clicking the
button at the top or bottom of the grid.
- 3 Total Results
- At the bottom of the screen, you'll see summary totals for each category of assistance
you have provided. These totals are for all of the transactions that match the
provided filters.
Benevolence Types
Rock lets you create
Benevolence Types
that can be assigned to each Benevolence Request. This is a great way to categorize requests,
allowing you to specify the type of benevolence (e.g., Housing, Food Assistance, Utility Bills)
that applies to the request.
You can create or maintain
Benevolence Types by
navigating to
Finance > Benevolence and
clicking the
button near the top-right of the grid. As
described below, there are a few features of
Benevolence Types that
you'll want to know about.
Benevolence Type

- 1 Show Financial Results
- If this is disabled, then you will not be able to add a Result Type to the request.
The Results Summary and Next Steps Provided fields can still be used.
See the following sections below for more information.
- 2 Active
- You can make each
Benevolence Type
Active or Inactive. You might make a type Inactive if it's no longer being used or
is only used certain times of the year.
- 3 Request Lava Template
- The template you provide here will appear on the Benevolence Request view screen,
below the person's contact information and above the request details.
You can personalize this content using Lava. This is a powerful way to add more
detail to the request, or to provide buttons or links that the person working
the request can click.
- 4 Maximum Number of Documents
- Here you can specify how many documents can be uploaded for each request of
this type. If "0" is chosen, then documents can't be attached.
- 5 Workflows
- Workflows can be automatically launched for the Benevolence Request using
triggers that you define. You can also select
Manual to have a
button added to the request page that the person can click to launch the workflow.
In this example, the workflow is launched when the request's status changes from
Pending to Approved.
Benevolence Request View
The screen pictured below is what you'll see when you access a specific Benevolence Request
from the request list. This page lets you view all the details surrounding the request and
allows for adding Result Types if
Show Financial Results is
enabled for requests of this type. Let's break down what you can see and do on this page.
View Benevolence Request
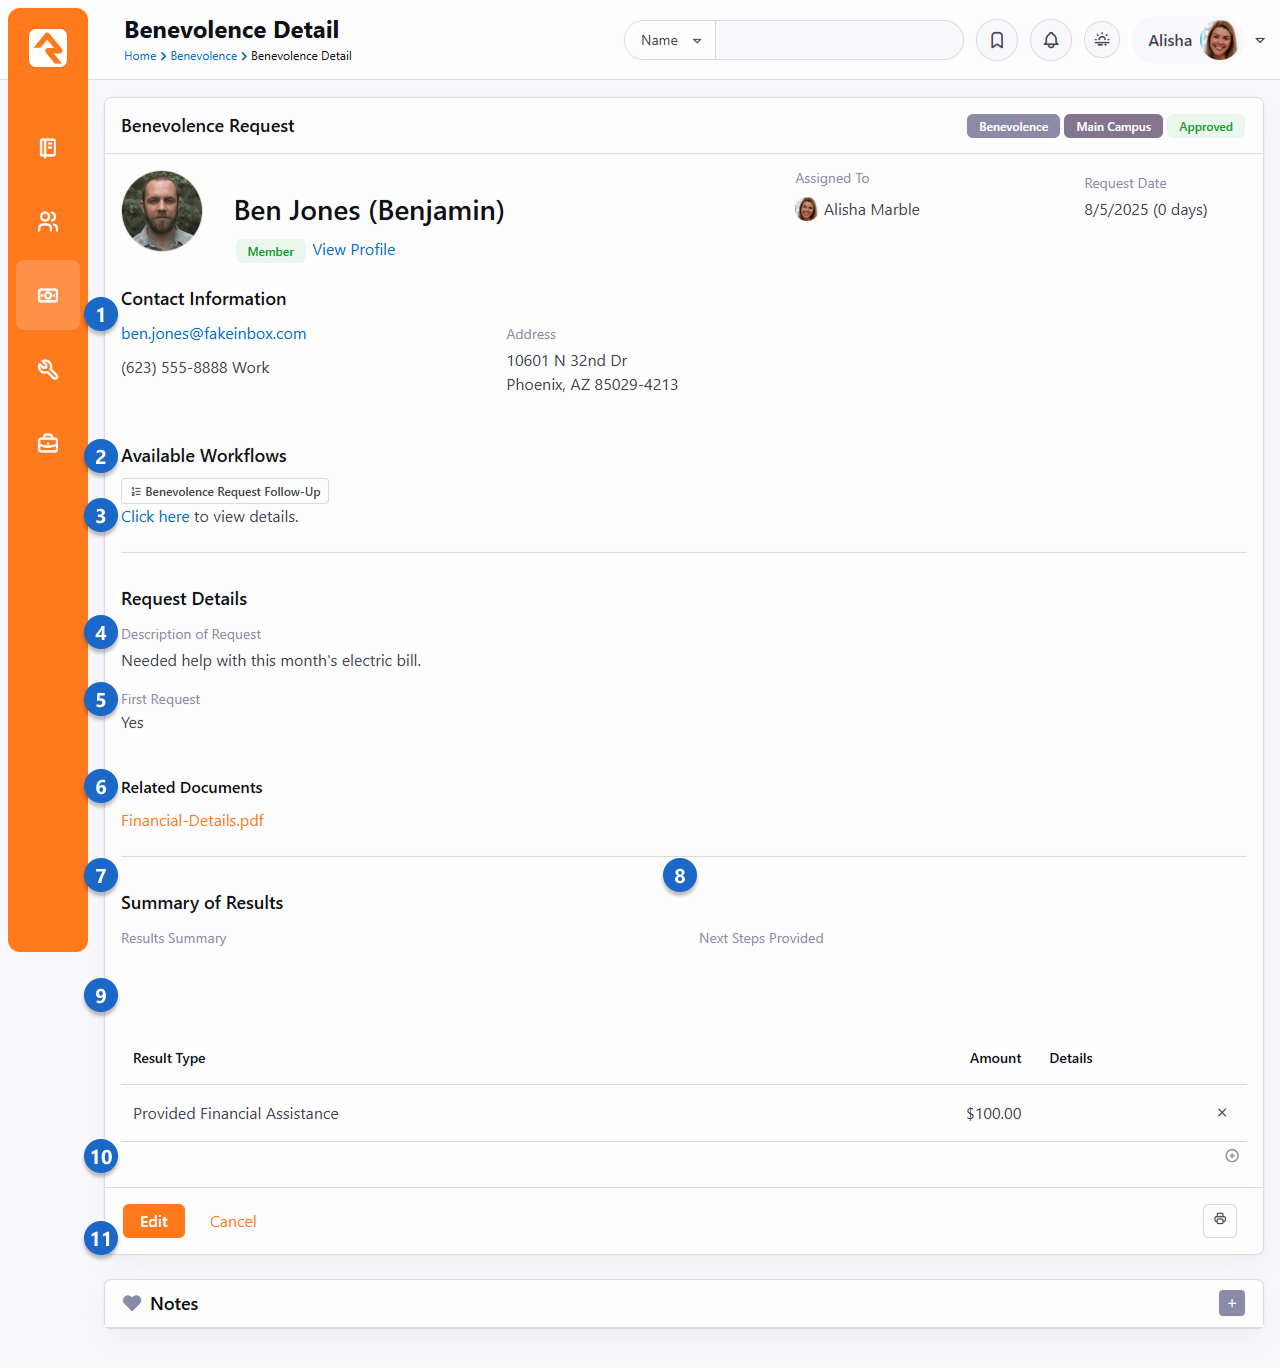
- 1 Person Information
- Near the top of the page, you can see the requestor, their contact information, who
the request is assigned to and the age of the request.
- 2 Available Workflows
- In this case a Manual workflow has been added to the
Benevolence Type
of this request. A person viewing the request can click this button to launch the
workflow.
- 3 Request Lava
- If you've provided a
Request Lava Template
(see section above) then the output will be displayed here. Each
Benevolence Type
has its own template.
- 4 Description of Request
- The details about the request itself are shown here. This is typically where you'll
see why the person is making a benevolence request.
- 5 Custom Attributes
- This is where attributes with an entity type of
Benevolence Request
will be displayed. Using custom attributes lets you collect data beyond the
items that ship with Rock. In this example we've added an attribute to track
whether this is the person's first benevolence request.
- 6 Related Documents
- A link is provided to access any documentation associated with the request.
Documents can be added to a request by editing the request.
- 7 Results Summary
- If a summary of the result of the Benevolence Request has been provided it will be
displayed here.
- 8 Next Steps Provided
- If a description of any next steps is provided, then it will be displayed here.
- 9 Result Type
- You'll see this section as long as
Show Financial Results
is enabled for requests of this type. You can add a row here to indicate the actual
assistance that was given, as well as a dollar amount and any other relevant details.
You can add (or remove) new Result Types under
Admin Tools > Settings > Defined Types > Benevolence Result Type.
- 10 Edit
- Click the Edit
button to add or edit details for this request. We'll cover editing a request in
the next section below.
- 11 Notes
- Person Notes can be added directly from the request detail page. By default, the
Note Type is "Benevolence Request: Benevolence Request Notes" but this can be
changed in the Notes block's settings.
Edit Benevolence Request
Adding a new request or editing an existing request lets you provide specifics of the request
as well as the results of the request. Note that in many cases you will be selecting a person
in the database that the request is for. Since some requestors may not be in the system, you
can also simply enter in their name and contact information here. This keeps you from having
to enter a new record in the database for them. It's up to you if you would like to
have a record or not.
Edit Benevolence Request
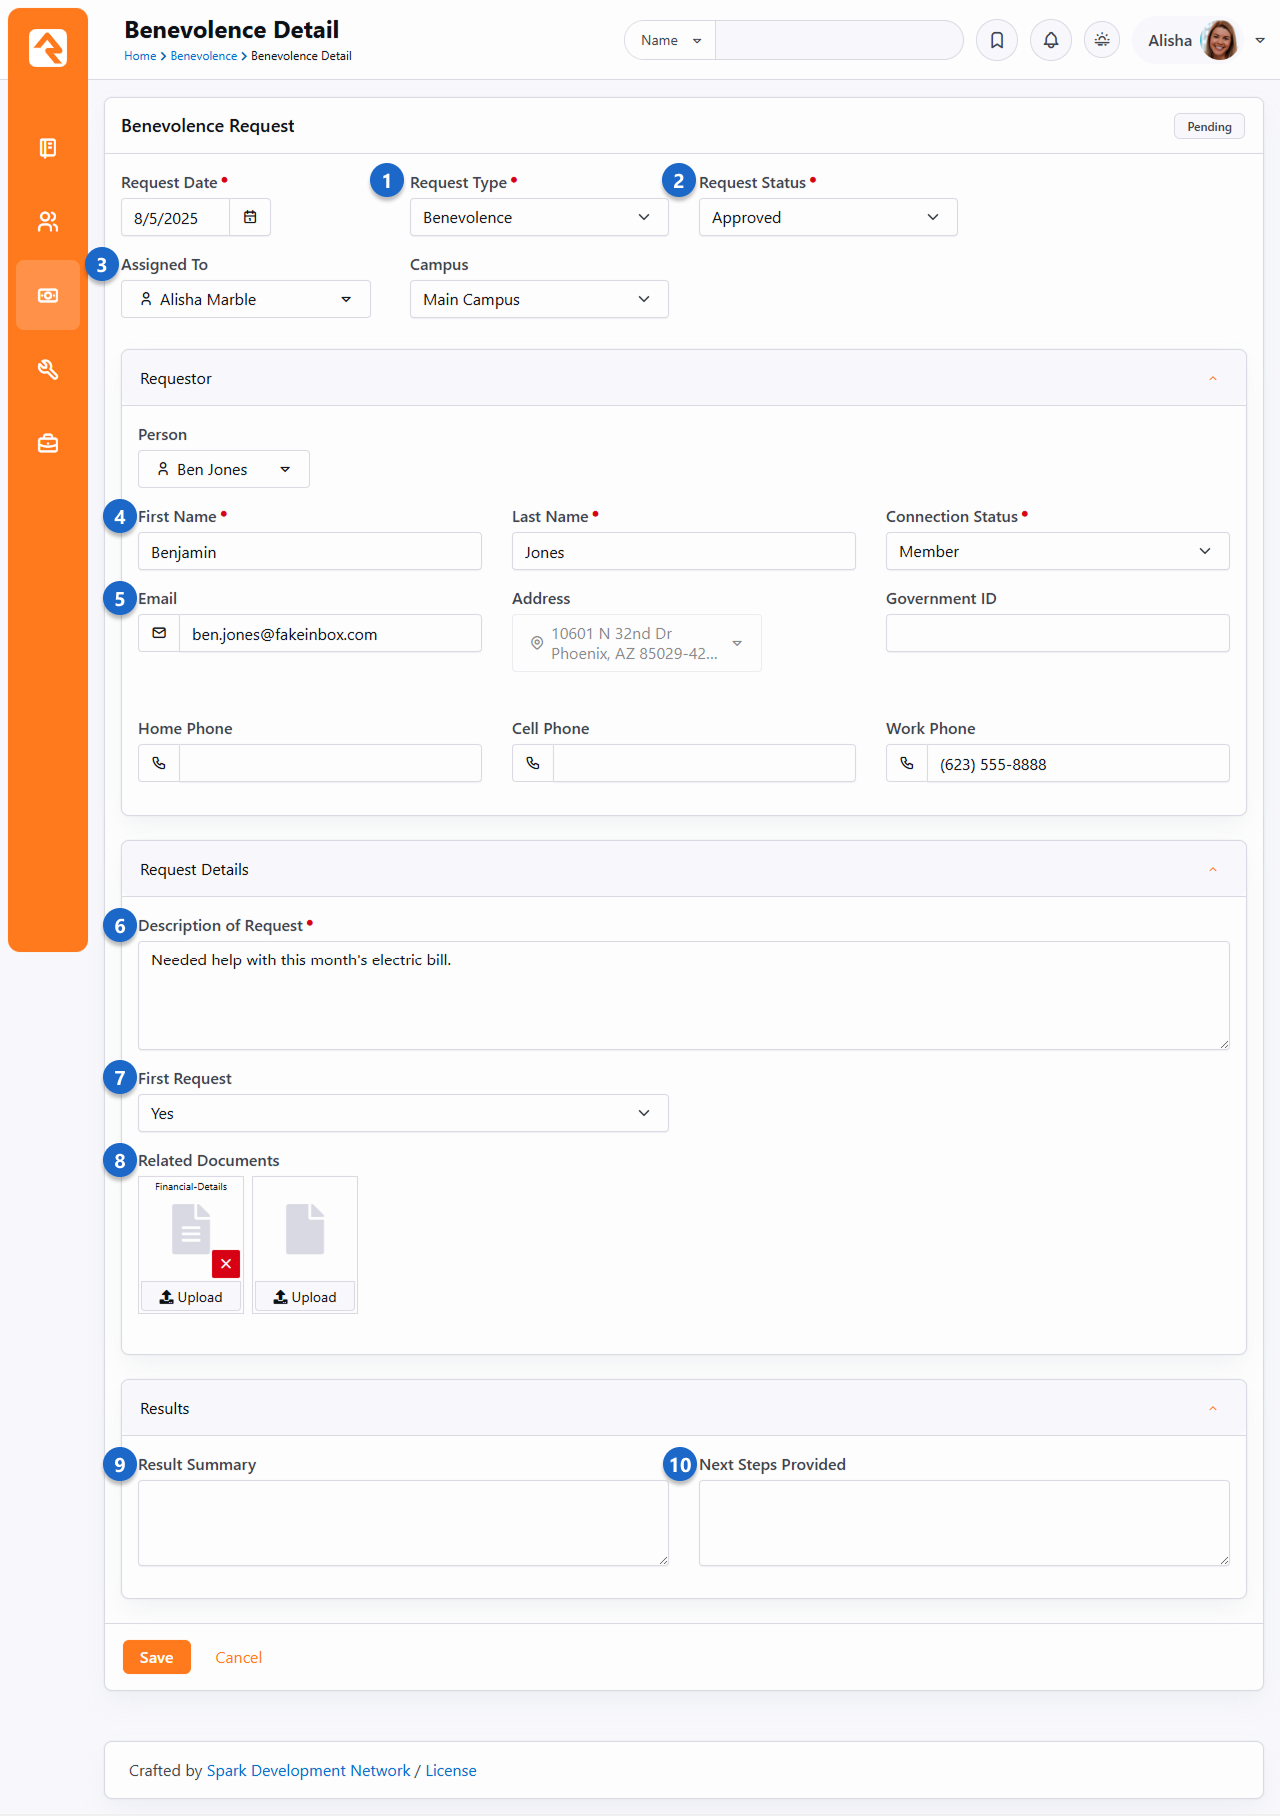
- 1 Request Type
- As described in a prior section above, each request can be designated as being of a
certain type. The Request Type can't be changed after the request has been saved.
- 2 Request Status
- This is the current status of the request. You can manage the options that are
displayed in this dropdown under
Admin Tools > Settings > Defined Types > Benevolence Request Status.
- 3 Assigned To
- This is the person who will be working with the individual to determine need
and what the response should be. This is helpful if there is a team of people
working on these requests. The values in this dropdown come from the group members of
the 'RSR - Benevolence' security role. You can change this to use a different group in
the settings of this block.
- 4 Person
- The person record to tie the request to. Selecting a person
here will automatically enter the contact information below and set the campus for the
request if one is not already present. Note that campus fields are disabled if you
have only one campus.
- 5 Contact Information
- You can also choose not to tie the request to a record in the database and
simply enter the person's name and contact information instead.
- 6 Description of Request
- This is where you'll document what the person is seeking in terms of help.
- 7 Request Attributes
- If you've added custom attributes to your benevolence request, they would display here.
For our example we've added a single attribute. This won't be in your database. We'll
cover how to add custom attributes to benevolence requests below.
- 8 Related Documents
- Here you have the ability to attach documents to the request. You can add up to six
documents. These documents are stored in the database. If you'd prefer to use a
different storage medium be sure to update the file type for the 'Benevolence Request
Document'.
- 9 Result Summary
- This field allows the person working the request to enter notes about what was given,
including background information on the decision.
- 10 Provided Next Steps
- Often times the results of a benevolence request will have associated next steps. For
instance, you may suggest they take a specific class. You can keep these notes in this
field.
Benevolence on the Person Profile
Those with access to view benevolence information will see a
Benevolence tab
on the Person Profile
page. The requests shown here are summarized for the entire family. So, if Ted
Decker makes a benevolence request, it will also show on Cindy Decker's profile.
Person Profile Benevolence List
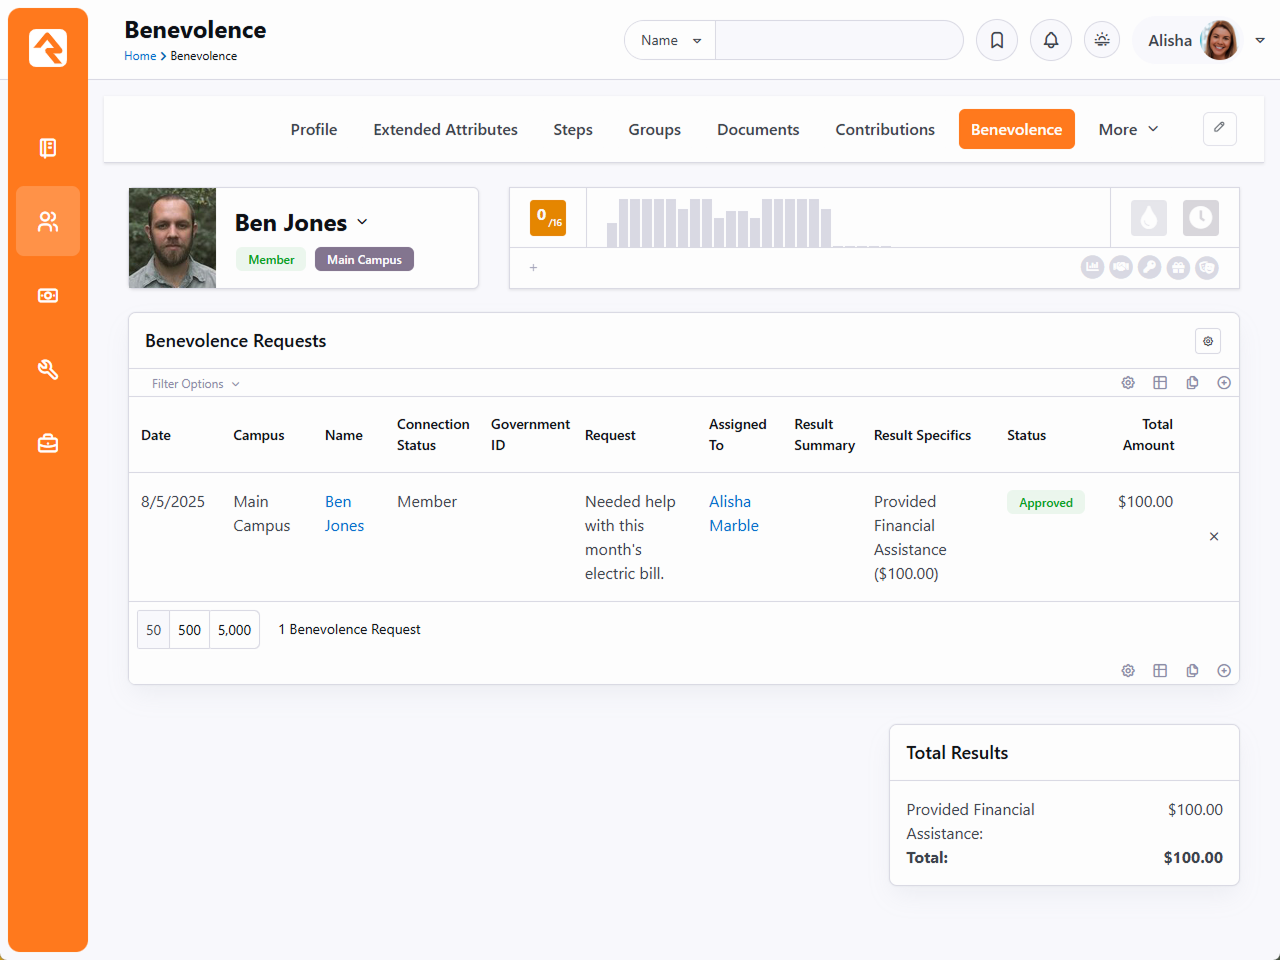
Benevolence Security
The benevolence pages are secured to only allow those in the 'RSR - Benevolence' security group access to them.
Be sure to add the appropriate people to this group to enable this feature.
Adding Custom Attributes
Adding custom attributes to benevolence requests is simple using the steps below.
-
Head to the Entity Attributes page under
Admin Tools > Settings > Entity Attributes.
-
Click the add button to add a new attribute.
-
The first thing you'll want to do is set the 'Entity Type' field to 'Benevolence Request'. You can leave the
qualifier fields blank as they are not needed.
-
Complete the attribute setup as you would any attribute. Note though that enabling 'Show in Grid' will display the
attribute on the benevolence request list block and allow you to filter on it.
Defined Types For Financial Features
There are several defined types used by the various financial features of
Rock. Below we'll talk about each of them and tell you why they're
important. See our
Rock Admin Hero Guide
for more information on defined types in general. Defined types can be accessed under
Admin Tools > Settings > Defined Types.
Account Type
This groups or categorizes Accounts by their usage. It’s provided for
you specifically to help with reporting and is not used by Rock for
any specific purpose.
Benevolence Request Status
Benevolence requests can have a status assigned to them, to indicate where they are in the
process. Rock ships with three values (Pending, Approved, Denied) but you may wish to add
others to reflect different stages in your benevolence process. For more information see the
Benevolence chapter above.
Benevolence Result Type
The
Benevolence Result Type
indicates the outcome of a benevolence request. Some values that ship with Rock include
Provided Financial Assistance,
Referred to Counseling or
Unable to Make Contact.
You may wish to add new values for different outcomes of a benevolence request. For more
details see the Benevolence chapter above.
Credit Card Type
This defined type determines which credit card types your organization
will accept. Each card type also has several configuration options.
These include:
-
Regular Expression Pattern: This pattern
helps Rock determine if a given card number matches this type
of credit card. The default values should not be altered.
-
Batch Name Suffix: Many times, accounting
teams want online transactions to be placed in batches
specific to the credit card types when they are downloaded
from the payment gateways. The suffix is what helps group the
cards into batches. If all the cards have the same suffix,
they will all share a batch (default setting). If you'd like
all the Visa transactions to be in their own batch, then you'd
change the suffix to something like Visa.
Currency Code
This defined type lists codes that reflect a given country and the type of currency used by that
country. For instance, the code "USD" indicates "United States Dollars". It's unlikely that you
would ever need to make changes or additions to this defined type. It's primarily used by the
Organization Currency Code
global attribute. For more information see our
Rock Admin Hero Guide.
Currency Type
Determines the method (Cash, Check, Credit Card, etc.) a person used
to make a financial transaction. Currency Type is used to help describe
the payment source for a transaction and is also used in determining
how batches are created.
Non-Cash Asset Types
This defined type only applies to the Non-Cash Asset
Currency Type.
Rock ships with values for Property, Stocks and Bonds, Vehicles and Other. You can
add your own values for other types of non-cash assets.
Recurring Transaction Frequency
This defined type determines which frequency types you want to offer
your guests. These options must be supported by your payment gateway
to work, so don't add new ones and wonder why they don't show up.
Refund Reason
This defined value is used to specify why a refund was granted.
The values that ship with Rock should cover a variety of scenarios,
but additional values can be added if needed.
Transaction Source
This value helps determine where the transaction took place. This is
helpful in reporting. Many of the transaction entry blocks allow you
to pick this value, so by all means add additional items that make
sense to your organization. For instance, if you run multiple
websites with their own giving pages, you may want to make a new
source type for each site. This will help you determine which is most
effective in generating donations.
Transaction Type
The Transaction Type helps describe the purpose of each transaction to Rock.
For instance, all transactions of type 'Contribution' tell Rock that these are
contributions and should be shown on
Contribution Statements. You should not
create new types that replace the ones that come out of the box. You can, however,
rename the existing ones. For instance, you could rename 'Contributions'
to 'Offerings' if you prefer.
Payment Gateways
When we start getting into the concepts of how financial transactions
work in our modern economy things can get confusing pretty quickly. Don't
worry though, we not only want you to understand how to use Rock, we also
want to help you to understand the concepts of what's going on behind the
scenes. Let’s help to demystify the concept of payment gateways.
We're all familiar with the concept of checking out at the store. The
clerk rings up our purchases at the register and once a total amount has
been determined, we swipe our card through the credit card terminal and
we're done. Using this analogy Rock would play the role of the register
and the payment gateway is the digital equivalent of the credit card
terminal. Like the register, Rock helps determine what is being
purchased/donated and comes up with a total amount. Rock then takes the
guest’s account information (either their credit card or checking account
information) and sends it through the terminal (aka payment gateway).
Gateway Analogy

At that point the transaction has started its journey through the
financial system. In many ways you're done with it, but let's track its
journey and note some places that you'll need to initially configure.
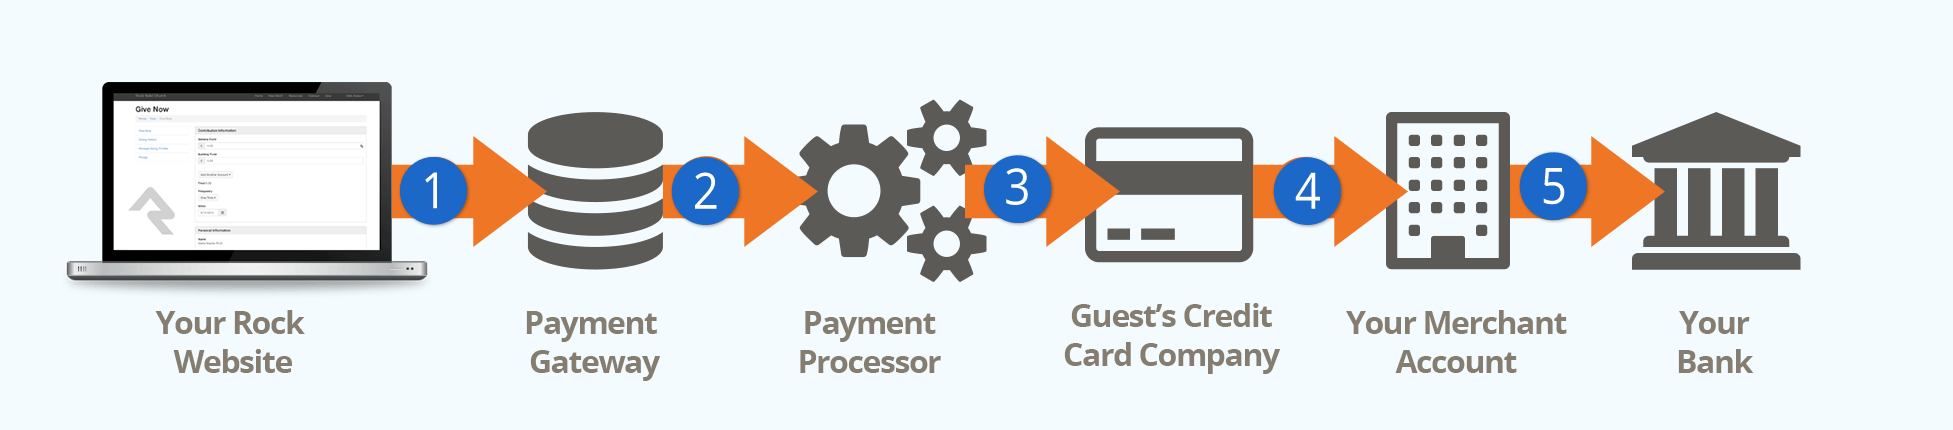
- 1Rock Website / Payment Gateway
- A guest completes their transaction on your Rock website. Rock then
sends their account information to the payment gateway that you have
configured.
- 2Payment Processor
- Next, the payment gateway passes the transaction on to the payment processor. The processor gets
the 'opportunity' to facilitate the rest of the transaction.
- 3Credit Card Company
- The payment process then facilitates the transaction with the guest's
credit card company.
- 4Merchant Account
- Once the transaction is approved the funds are transferred to
your Internet merchant account. You'll need to work with your bank to
establish this account. This is as easy as calling your bank and
asking them for help creating an
Internet Merchant Account
that is compatible with the payment gateway you've selected with Rock.
- 5Your Bank
- The Internet merchant account then transfers the funds to your
bank account via regularly scheduled transfers.
Learn More
You're probably thinking this is all too much information. Understanding how this works though can
save even a small organization tens of thousands of dollars. One large organization recently started
saving over $200K per YEAR by understanding how this process works and ensuring they received the
best rates.
We highly recommend reading this Credit Card Processing
101 PDF from NMI. They've made the process easy to understand with a visual walk-thru.
Available Payment Gateways
Rock supports several payment gateways. You can find the current vendors and additional details in the Rock Shop.
Rock also comes with some gateways, which we'll talk about a little later.
So, you might be wondering which one you should select? Here are some factors to consider:
- Do you already have a gateway? If you already use a supported gateway, then it makes the
most sense to keep using it.
- PCI: PCI is a credit card process standard to ensure the security of credit cards. Compliance with
PCI is a very time-consuming process. Some gateways drastically reduce your PCI compliance requirements by
ensuring that a visitor's credit card information never touches your server.
- Fees: Of course, fees are a huge consideration when looking at gateways. You'll want to consider
the fees and rates of each before selecting a gateway.
- Location: Are you located outside the United States? For countries outside the continental US,
please contact Carolyn Irwin directly at cirwin@gotnp.com.
Because each giving vendor offers different packages, you'll want to discuss your needs with all of them to
determine the best fit.
It's also important to make a strategic decision when selecting a gateway. As you start building a base of scheduled gifts it
will be hard to transition them to a new gateway in the future. Their card data is stored in the gateway and most gateways
will not give you your cardholder data back if you choose to move. See the
Transferring Gateways section below
if you find yourself in this situation.
Configuring a Gateway
Payment gateways can be configured under
Admin Tools > Settings > Financial Gateways.
Many settings are similar between gateways, so we'll examine the
Test Gateway as an example.
We created the Test Gateway to let you sample Rock's tools without having to configure an actual payment gateway.
But don’t be fooled by the name. Changing the Gateway Type and providing real configuration makes the Test Gateway
function like any other live gateway. To avoid potential issues, we recommend against changing its configuration.
Payment Gateway Settings
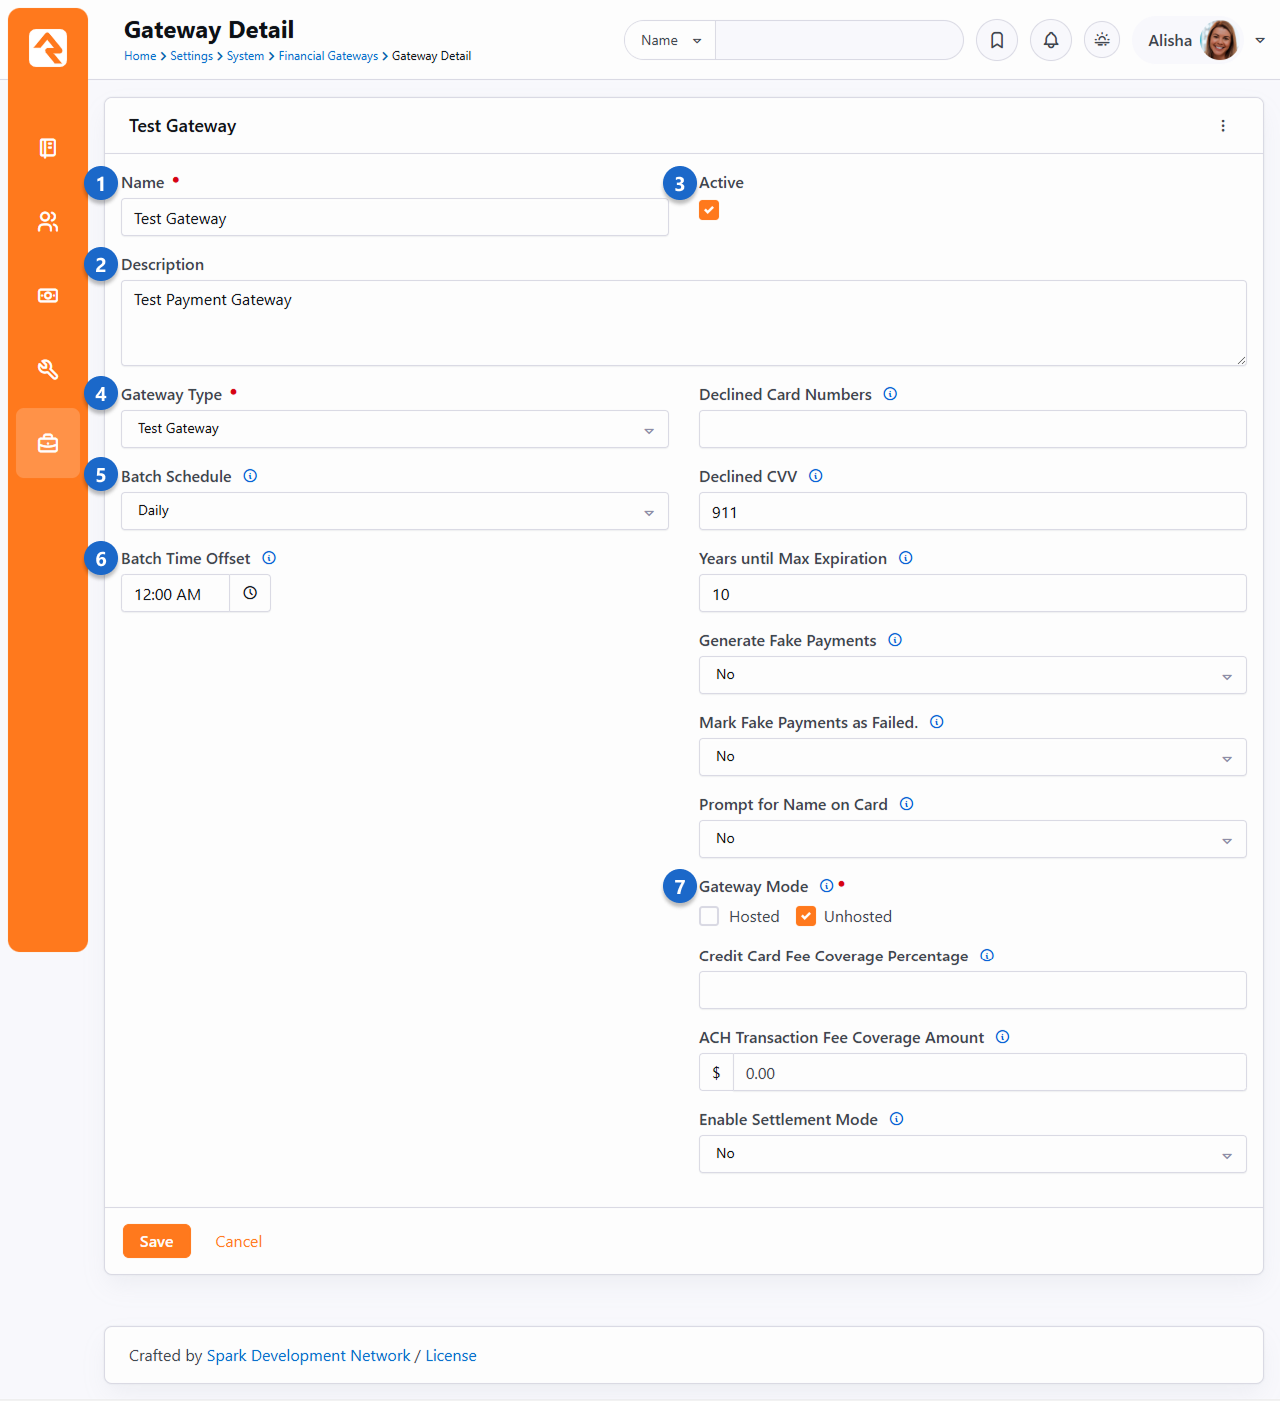
- 1 Name
- The name of the gateway can be changed, but this is rarely needed.
- 2 Description
- A good description is helpful if you plan to have multiple gateways of the same type.
- 3 Active
- Be careful when making a gateway Inactive. An Inactive status does not prevent charges from
being processed for registrations where the gateway is already assigned.
- 4 Gateway Type
- This determines which gateway you'll be using.
- 5 Batch Schedule
- You can choose to have Rock create batches daily, or weekly on a specified day.
- 6 Batch Time Offset
- By default, online payments will be grouped into batches with a start time 12:00:00 AM. However, if
the payment gateway groups transactions into batches based on a different time, this offset can
be specified so that Rock will use the same time when creating batches for online transactions.
- 7 Gateway Mode
- What you see here varies based on the Gateway Type. Sometimes you'll see options for a live mode
(transactions are real and will be processed) or a test/sandbox mode (transactions are not processed).
In other gateways you'll see Hosted and Unhosted, as pictured above. If Hosted is selected, the payer
will leave your app or website to make the payment and then come back to your website to complete the
checkout process. Check with your provider if you're unsure which one to use. Use Unhosted for the Test
Gateway.
Other Configuration Steps
The Test Gateway doesn't require credentials or login information, but other gateways will. Typically
you'll receive or create these credentials as part of your setup with the gateway provider.
After you're done setting up your gateway, you'll need to set it as the active gateway on giving pages.
Transferring Gateways
As mentioned earlier, transitioning to a new payment gateway is difficult due to the way
the payment gateway providers control the credit card details. Once you set up
your new payment gateway, you have two things to consider:
- You need to prevent people from setting up new giving transactions using the old gateway.
- You want people with scheduled transactions tied to the old gateway to transfer to the new gateway.
The first item is easily accomplished by changing the block setting
on the Give Now page
to use the new gateway. The second item is a bit trickier.
There are some block setting options on the
Manage Giving Profiles
page that will help people transfer their scheduled transactions to the new
gateway. Consider adjusting these settings from the Scheduled Transaction List Lava block:
-
Gateway Filter: Setting a particular gateway here will cause only
those scheduled transactions using this gateway to show up in the output list.
-
Transfer-To Gateway: When set, the
Edit button
becomes a Transfer
button if the scheduled transaction's gateway does not match the transfer-to gateway.
When users press the Transfer
button, they will be taken to the
Give Now page
with many details from their existing transaction copied onto the form. Once
the new transaction is completed, their old scheduled transaction is automatically
deleted.
-
Transfer Button Text: This setting lets you control the text that
appears on the transfer button.
Contribution Statements
When it's time to generate contribution statements, we've created some tools to
make the process simpler. Since you may need to be able to both email and mail
printed statements, the best file format will be a PDF, and we have just the
tool for the job. Let's walk through the process of generating PDF statements
with our statement generator software.
Installing the Statement Generator Software
Installing the statement generator software is easy. It does require a Windows
machine running Windows 7 or better to run. It will not work with other
operating systems. To install, follow the steps below:
-
Download the setup application under
Admin Tools > Settings > External Applications > Rock Statement Generator.
-
Run the setup. The statement generator setup is a breeze with just three quick screens.
Using the Statement Generator Software
Once you have it set up, it's pretty simple to operate the statement generator software.
Start by launching it and logging in. Users must be a member of one of the
groups below to log in with this software:
-
RSR - Finance Administration
-
RSR - Finance Worker
-
RSR - Rock Administration
First Time Use
Please note that if this is your first time logging in, you'll also be asked
for the web address of your Rock server in addition to the Username and Password.
Be sure to use HTTPS and not HTTP.
Login Screen
If you need to change the Rock URL, you can do so from the Statement Generator screen pictured below by clicking the
Tools button in the upper-left corner and selecting
Options.
To generate statements, click the Start button.
Home Screen
Step 1: The Who Needs a Statement screen lets you select whether you want to generate statements for
All individuals with transactions and/or pledges,
filtered by a dataview, or for a specific individual.
There are several options to consider when selecting All individuals with transactions and/or pledges.
- Exclude inactive individuals: Select this option if you don't want to generate statements for people with an inactive status.
- Include Businesses: This option, which is selected by default, allows you to generate statements for businesses.
Adding Children to Families and Giving Groups
If your Rock system has a custom job or workflow to move children to new families, don't
forget that it will also need to set the child's person record's giving group to the new
family (or null to indicate giving individually). If this step isn't done, the
statement will go to the address of both the old and new family with the transactions still
combined.
The Move Adult Children
portion of the
Data Automation
job that ships with Rock will take care of this automatically.
If you select
Single individual,
you'll be prompted with a search box where you can type in a person's name.
If more than one person is listed in the grid, click on the person you want
to generate the statement for. Press
Next to go to the next step.
Who Needs a Statement
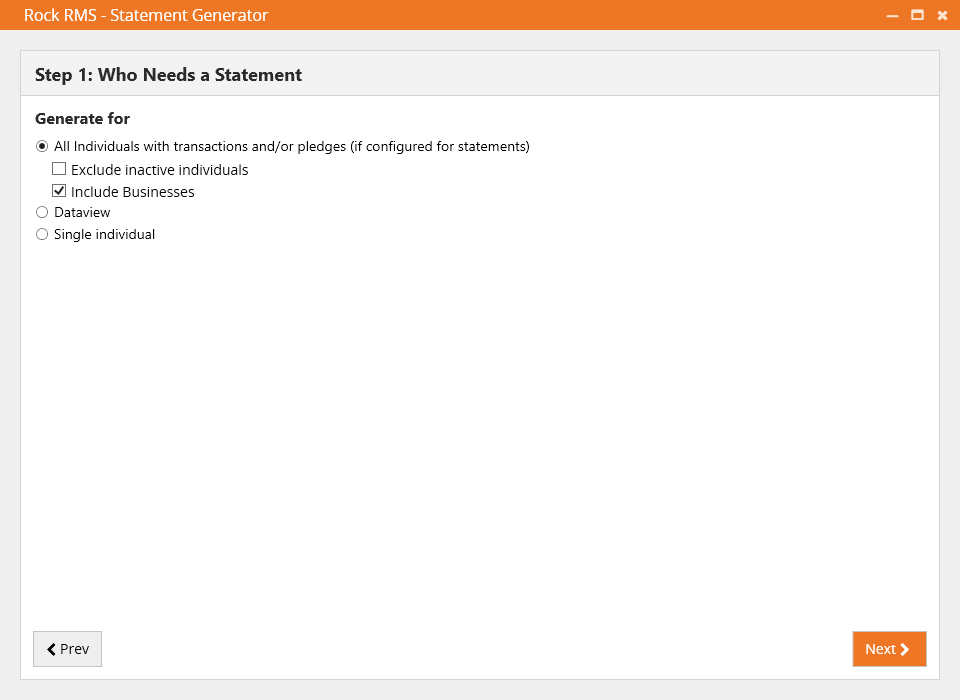
Step 2: Select the template you want to use for the statement output. Rock ships
with a default template, which you can customize with your own logo, wording, etc. You can also create your own. The Statement Generator
templates are located in Finance > Financial Settings > Contribution Templates.
If you select a data view, it's filters will be in addition to the configuration of the "Statement Template".
Statement Layout
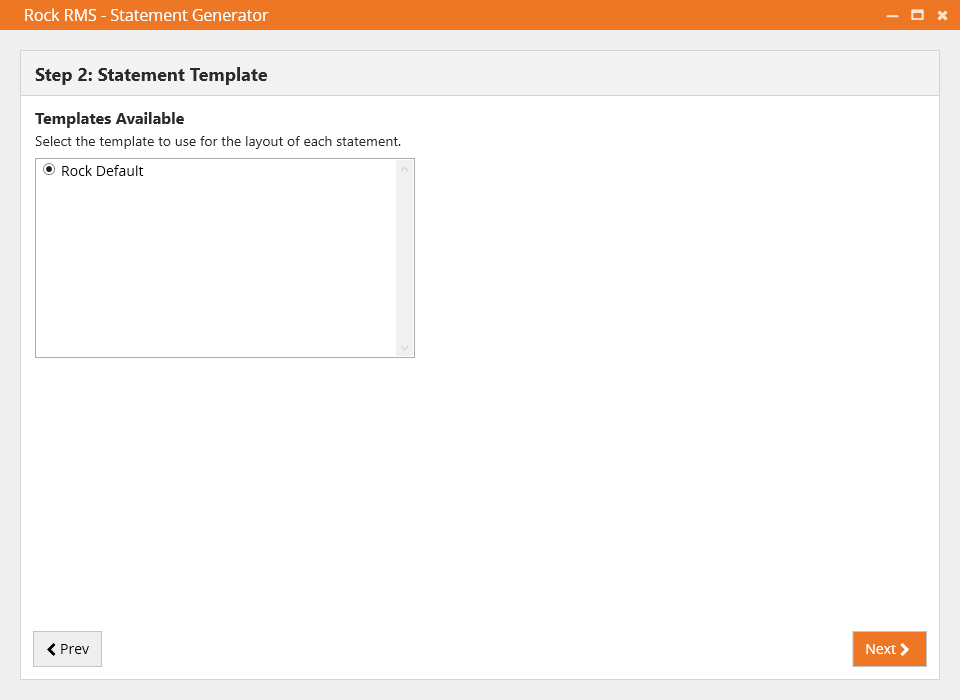
Step 3: The Statement Date Range
screen is where you specify the date range of the statements you want to generate. The generator defaults to the current year-to-date.
Date Range
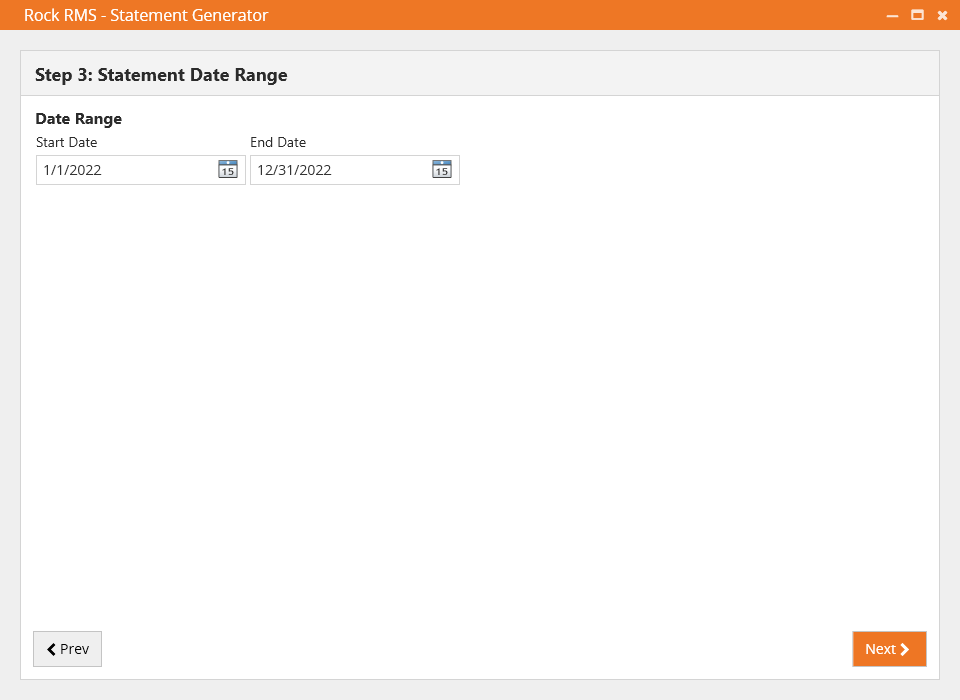
Step 4: The Individual Save Settings
screen is where you can optionally choose to save statements to the person's profile under the
Documents tab. You can control things like
the name of the document, and which members of the family (technically, the Giving Group) should have the document added.
Individual Save Settings
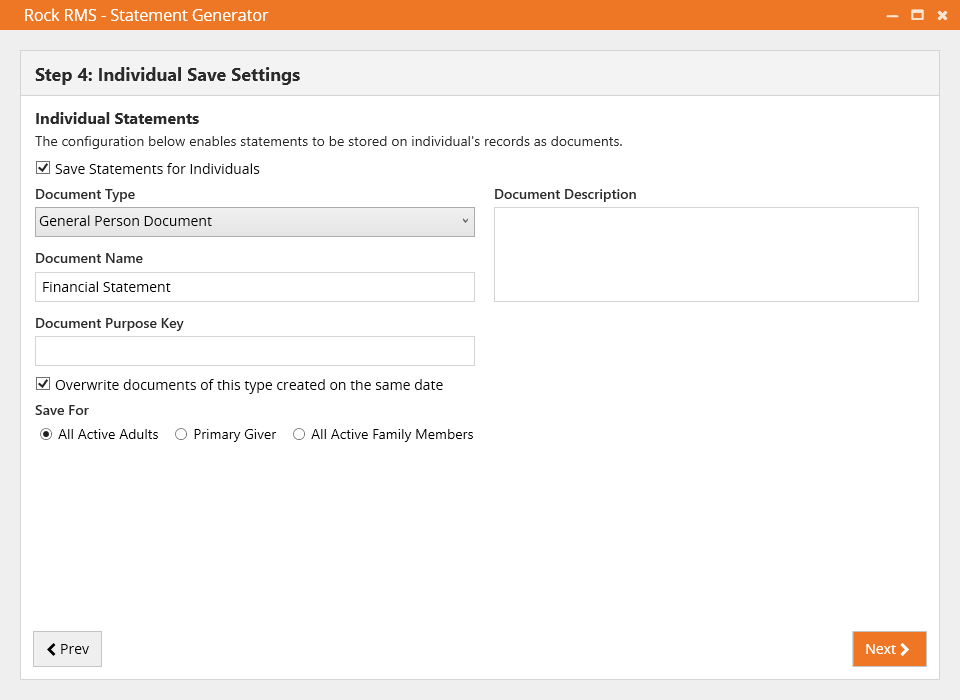
Step 5: The Report Settings
screen allows you to choose the location where you want to save the statements, designate a base
Filename Prefix to use when saving, and determine how the statements will be sorted. You can also choose
how the statements are broken up into chapters by entering the number of statements you want to include per
chapter in the Max Statements in Chapter field. These settings and others can be updated by clicking the
icon,
described below. You can also choose to
Save Settings so the configuration
you choose will be set up for you the next time you generate statements.
Enabling Page Count Pre-Determination
runs each statement twice, increasing generation time and overhead. So, why use it? It helps create a cleaner,
more professional statement layout, especially for multi-page statements. Pre-determining the page count
allows template adjustments to ensure consistent and appealing design across pages. However, for simple,
one-page statements, the benefits may be minimal and not worth the extra processing.
Report Settings
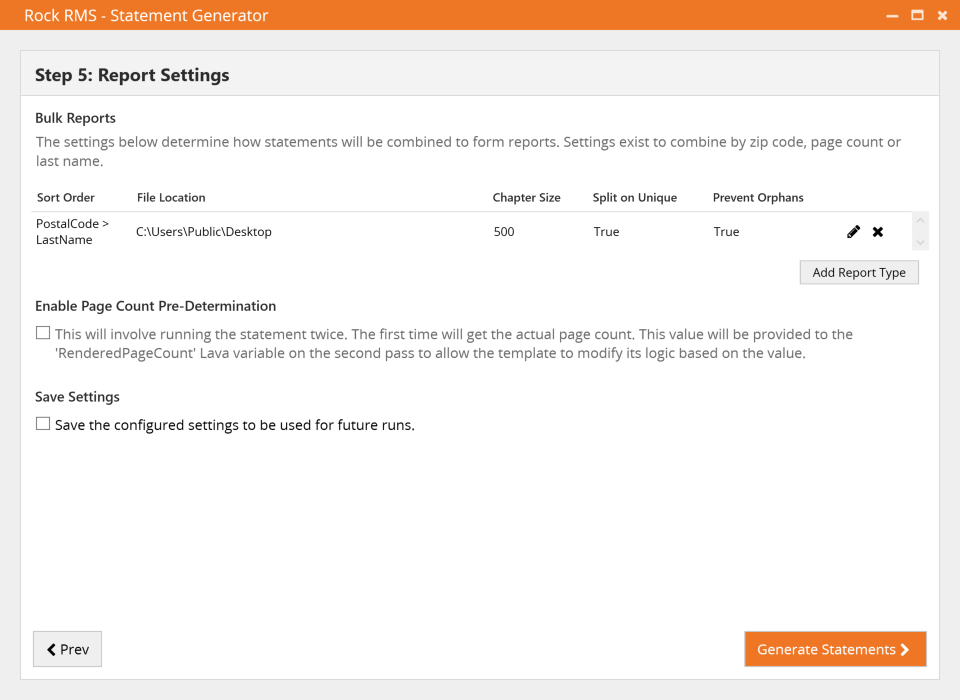
You can access the settings described below by clicking the
icon shown above. How you configure these settings determines how the PDF statements will be created.
You might want more than one report. Often it can be useful to have one for mailing, sorted by zip code,
and one for internal or auditing purposes, perhaps sorted by Last Name. You can create as many
reports as you need, each with its own settings and sort order.
Edit Report Settings
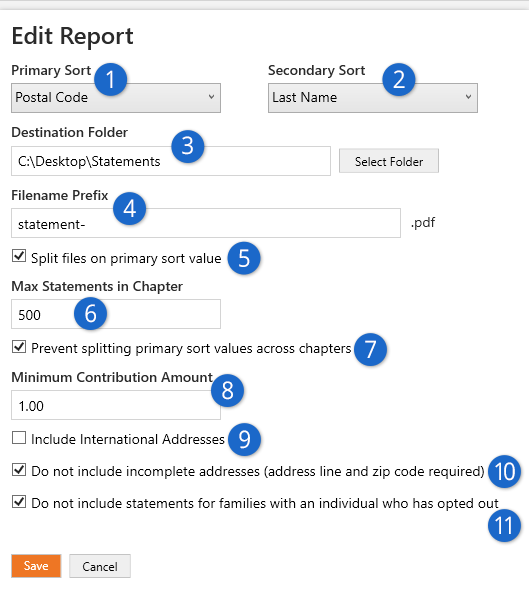
- 1 Primary Sort
- This is the highest level of sort order for the statements. For instance,
if Postal Code is selected then the PDFs that are generated will be sorted in
order of people's zip code, which is ideal for mailing statements. Sort options
include:
- Postal Code
- Last Name
- Page Count
- 2 Secondary Sort
- This is the sort order that's used after the Primary Sort. This lets you
order the statements by Postal Code (Primary Sort) and then by Last Name
(Secondary Sort).
- 3 Destination Folder
- This is where the generated PDF statements will be saved. If you are
creating multiple reports, then you can save each of them to a different
location.
- 4 Filename Prefix
- All of the files that are generated will have a name that starts with the
value you enter here. Especially when you have multiple reports, this can help
you identify which files belong to which report.
- 5 Split Files on Primary Sort Value
- If you have this enabled, then you'll get a new PDF file every time the Primary Sort
value changes. For instance, if you have a Primary Sort of Postal Code then you'll get separate
PDF files for each zip code, which is helpful for mailing.
- 6 Max Statements in Chapter
- This is the maximum number of statements that should be included within a single PDF file. The
Split Files on Primary Sort Value
setting respects this setting. For instance, if you split files on zip code while setting Max
Statements to 100, and if you have more than 100 statements in the same zip code, you'll get
more than one file.
- 7 Prevent Splitting
- This setting will keep the Primary Sort values from being split across PDF files. When this is
enabled, it could mean that more statements are in a file than the
Max Statements in Chapter setting allows.
- 8 Minimum Contribution Amount
- This is the minimum dollar amount a statement must have in order for the statement to be
generated. For instance, you can choose to print statements only for those who have
given $10.00 or more. This can help save on mailing costs by reducing the volume of statements
generated. You might set this to a lower value for reports you'll only be using internally.
- 9 Include International Addresses
- Determines if individuals with international addresses should have statements generated.
Addresses with countries that are the same as the organization’s address (Global Attribute)
or addresses with blank countries will be considered local. You might not mail statements
internationally, but you may want to include these for your own internal purposes.
- 10 Do Not Include Incomplete Addresses
- If this is enabled, then statements will only be generated if the associated address
has at least an address line and a zip code. You'll want this enabled if you're generating
statements to be mailed.
- 11 Opted Out
- If an individual has opted out, then a statement will not be generated for the family
if this option is enabled. Like the setting above, you'll probably want this enabled
for statements that you're mailing but you might not need it if you're generating
a report for internal purposes.
Opt-Out/In Strategies
Rock includes a person attribute named 'Suppress Sending Contribution Statements,' which enables individuals to
opt out of receiving paper statements. By default, if any member within a giving group selects 'Yes' for this
attribute, the family won't receive a printed statement.
To transition to an 'opt-in' strategy, ensure that the default value for 'Suppress Sending Contribution Statements' is
set to 'Yes.' In this configuration, statements will only be generated for giving groups where at least one person has
chosen 'No.' If you're switching from an opt-out to an opt-in approach, consider clearing all existing attribute
values. This can be accomplished using SQL queries or bulk updates.
The statement generator will start to process the statements after you press
Generate Statements.
When the process is complete, the generator will display a summary with the
number of statements generated and related details.
Process Complete

An additional file called
@Summary of Results will
be saved along with the generated statements. This file contains all of the run information
pictured in the screen above.
Display Scaling
If you notice the statement generator results are the wrong size (e.g., the font is very small)
it could be related to your display's scale setting. The recommended setting is 100%. For
Windows computers the Scale and Layout can be adjusted under Settings > Display.
Speeding up Generation
The Statement Generator typically runs quickly, but larger organizations may notice
long processing times. Below are some tips to help reduce the time it takes for
the process to finish.
- Fast Disk: The hard drive on the computer where the Statement
generator is installed can have an impact on how long the process takes. We recommend
an SSD (M2s) for the computer that's running the application.
- Page Count Pre-Determination: In Step 5 of the process described above
you have an option to
Enable Page Count Pre-Determination.
The generation process will take longer if this is enabled.
- Multiple Processors: Having multiple processors will significantly reduce the generation
time. The Statement Generator will utilize all of them.
- Logo: The file size of the image used for your logo has an impact on the size of the
PDF files that are generated. A smaller image file, and a logo with a Base64 (inline) source will help
speed up the process.
- Broken Links: Broken links in the template will cause performance problems. For instance,
if the logo can't be loaded due to a broken link, PDF generation can take up to four times longer.
Online Contribution Statements
Your website visitors can get access to their contributions online from the Giving History
page. Statement links will be available for years in which they gave. The
Transaction Report block settings allow you to pick which accounts to consider (by default all tax-deductible
accounts are used). The output is all customizable using Lava, so feel free to change it.
Contribution Statement List
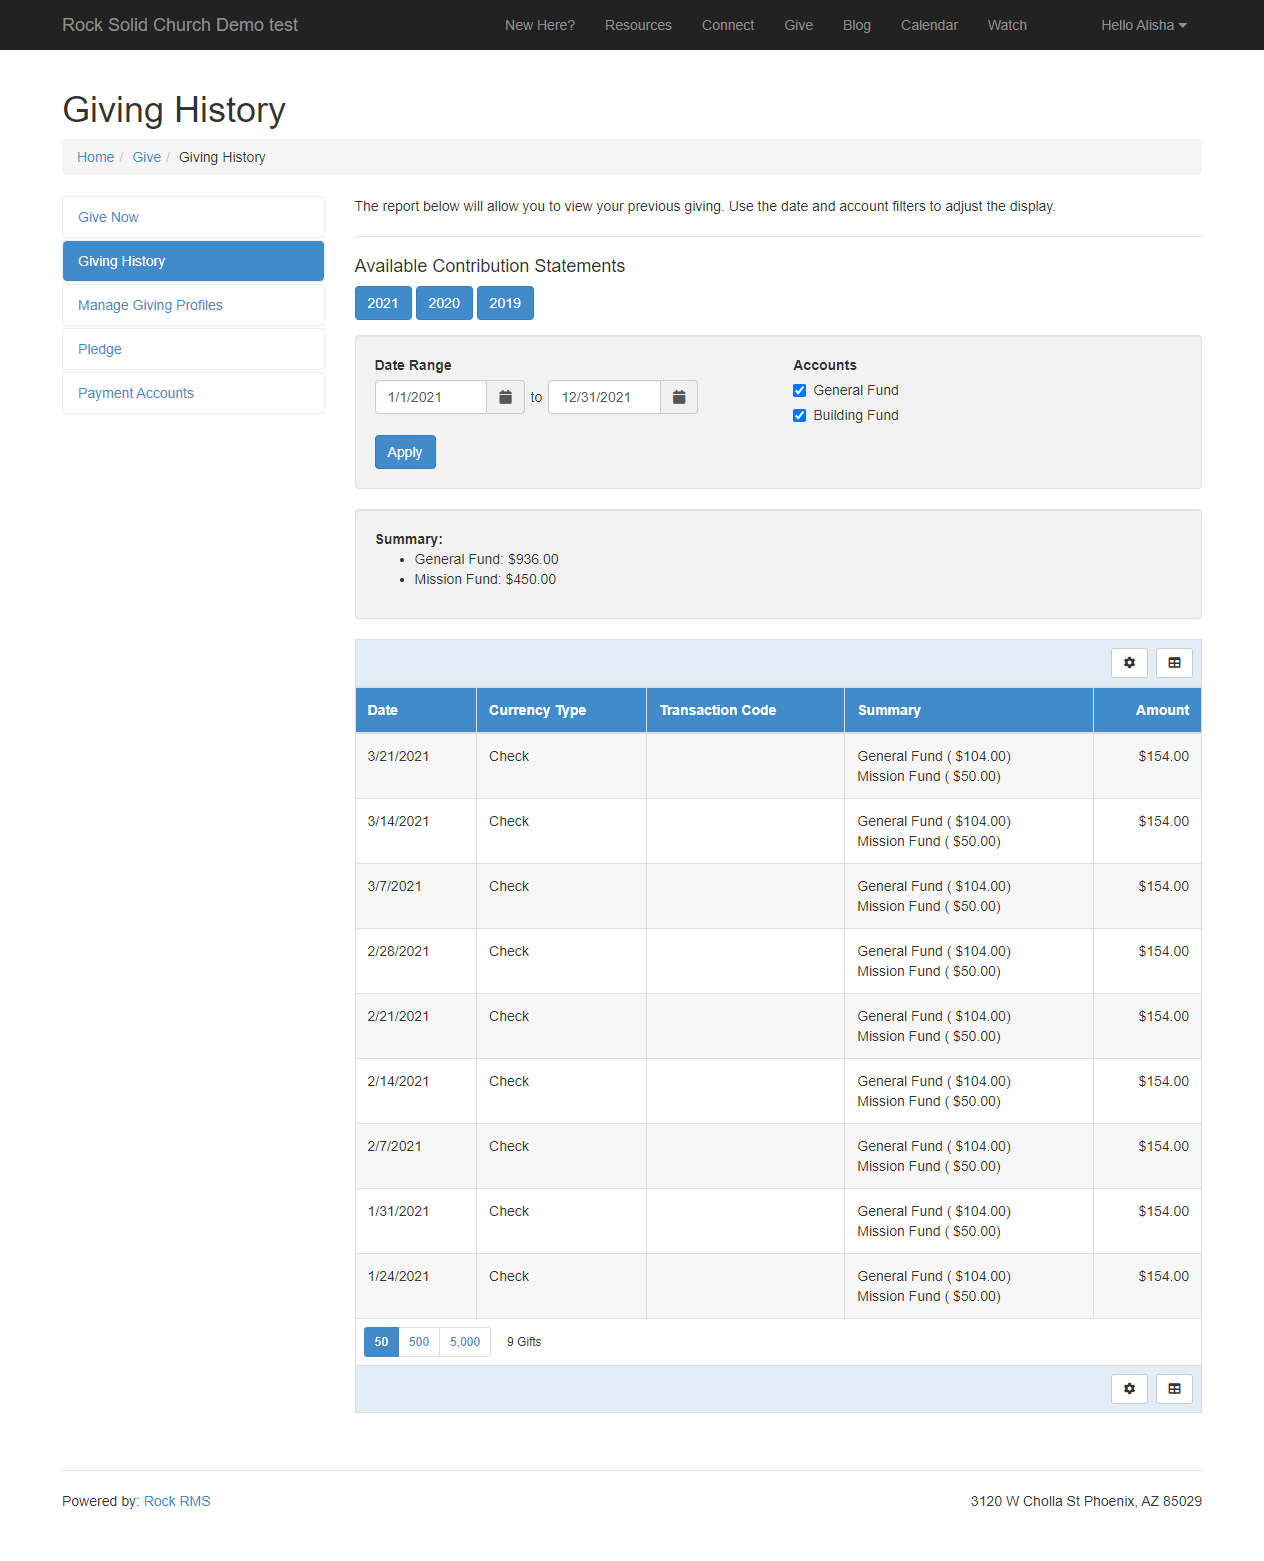
The resulting contribution statement is shown below. This is produced using the
Contribution Statement Generator block.
Legacy Configuration
The Contribution Statement Generator
block uses the Contribution Templates described in Step 2 above to generate statements. This block is
intended to replace the 'Contribution Statement Lava' blocks found on both the internal and external sites
in prior versions of Rock, but it will not replace that block if you've customized the settings.
Contribution Statement Sample

Giving Outside Pledge Date Range
Contributions that occur outside of a Pledge’s date range won't count toward the Amount Given or Pledge Progress
on the Contribution Statement. This could happen if someone is able to give sooner than they had planned. If the
gift should count toward the Pledge on the Contribution Statement, you could adjust the Pledge’s date range to
include the date of the gift.
Contribution Statements on the Person Profile Page
You can view the same contribution statement above on the Person Profile page.
You'll find a listing of contribution statements on the 'Contributions' tab.
Contribution Statement List
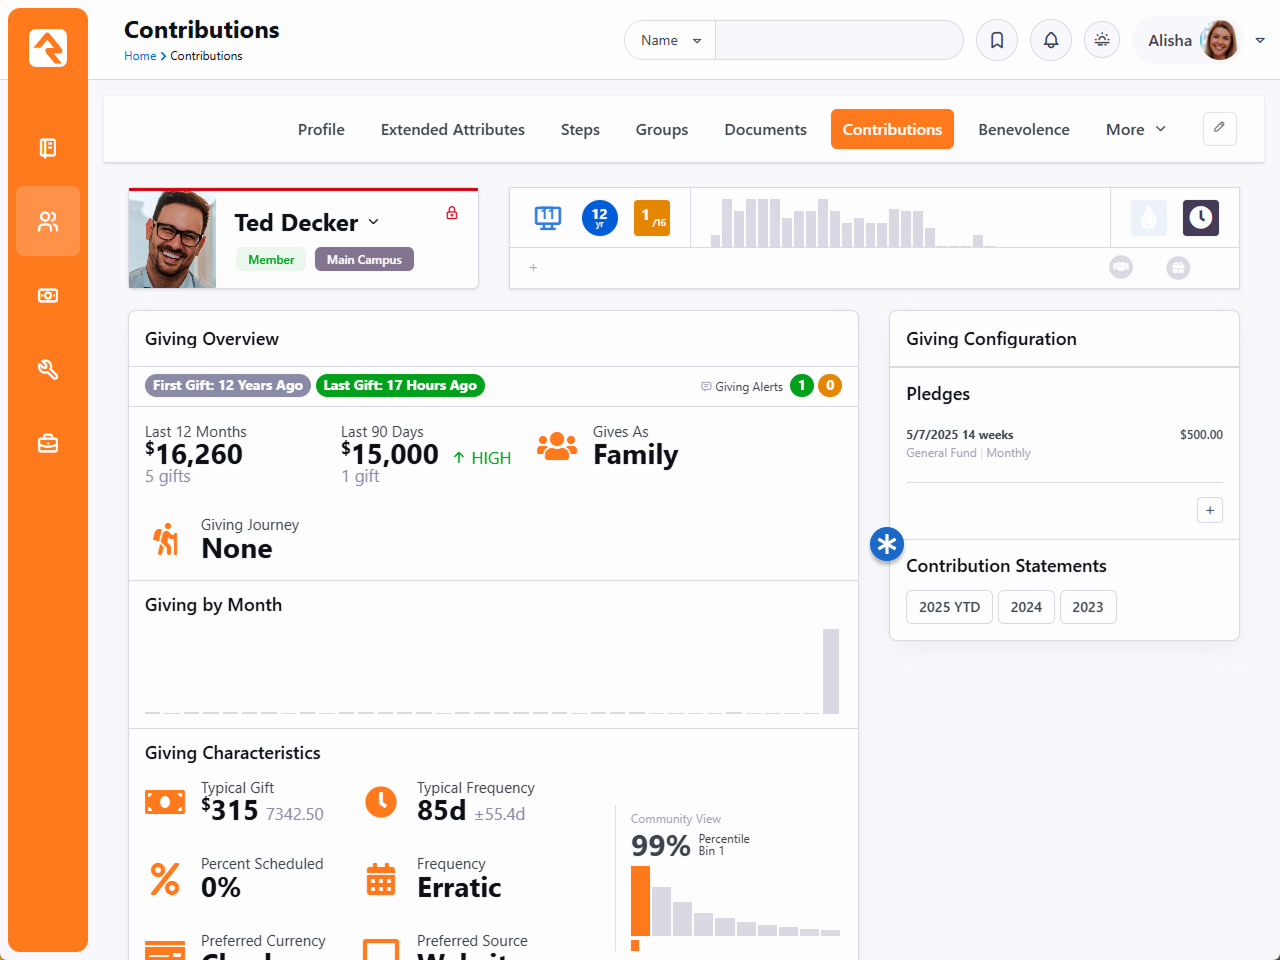
Contribution Statement Templates
Rock ships with a default template that’s used by the Statement Generator to create statements.
This template is also used by the web versions of the statements, like those accessed from the
Person Profile page.
The settings on the template drive what goes into the statement and how it looks. You can
create a template of your own under
Finance > Financial Settings > Contribution Templates
to customize the statement to your needs. For instance, you’ll probably want to change the logo
at a minimum.
Contribution Statement Template
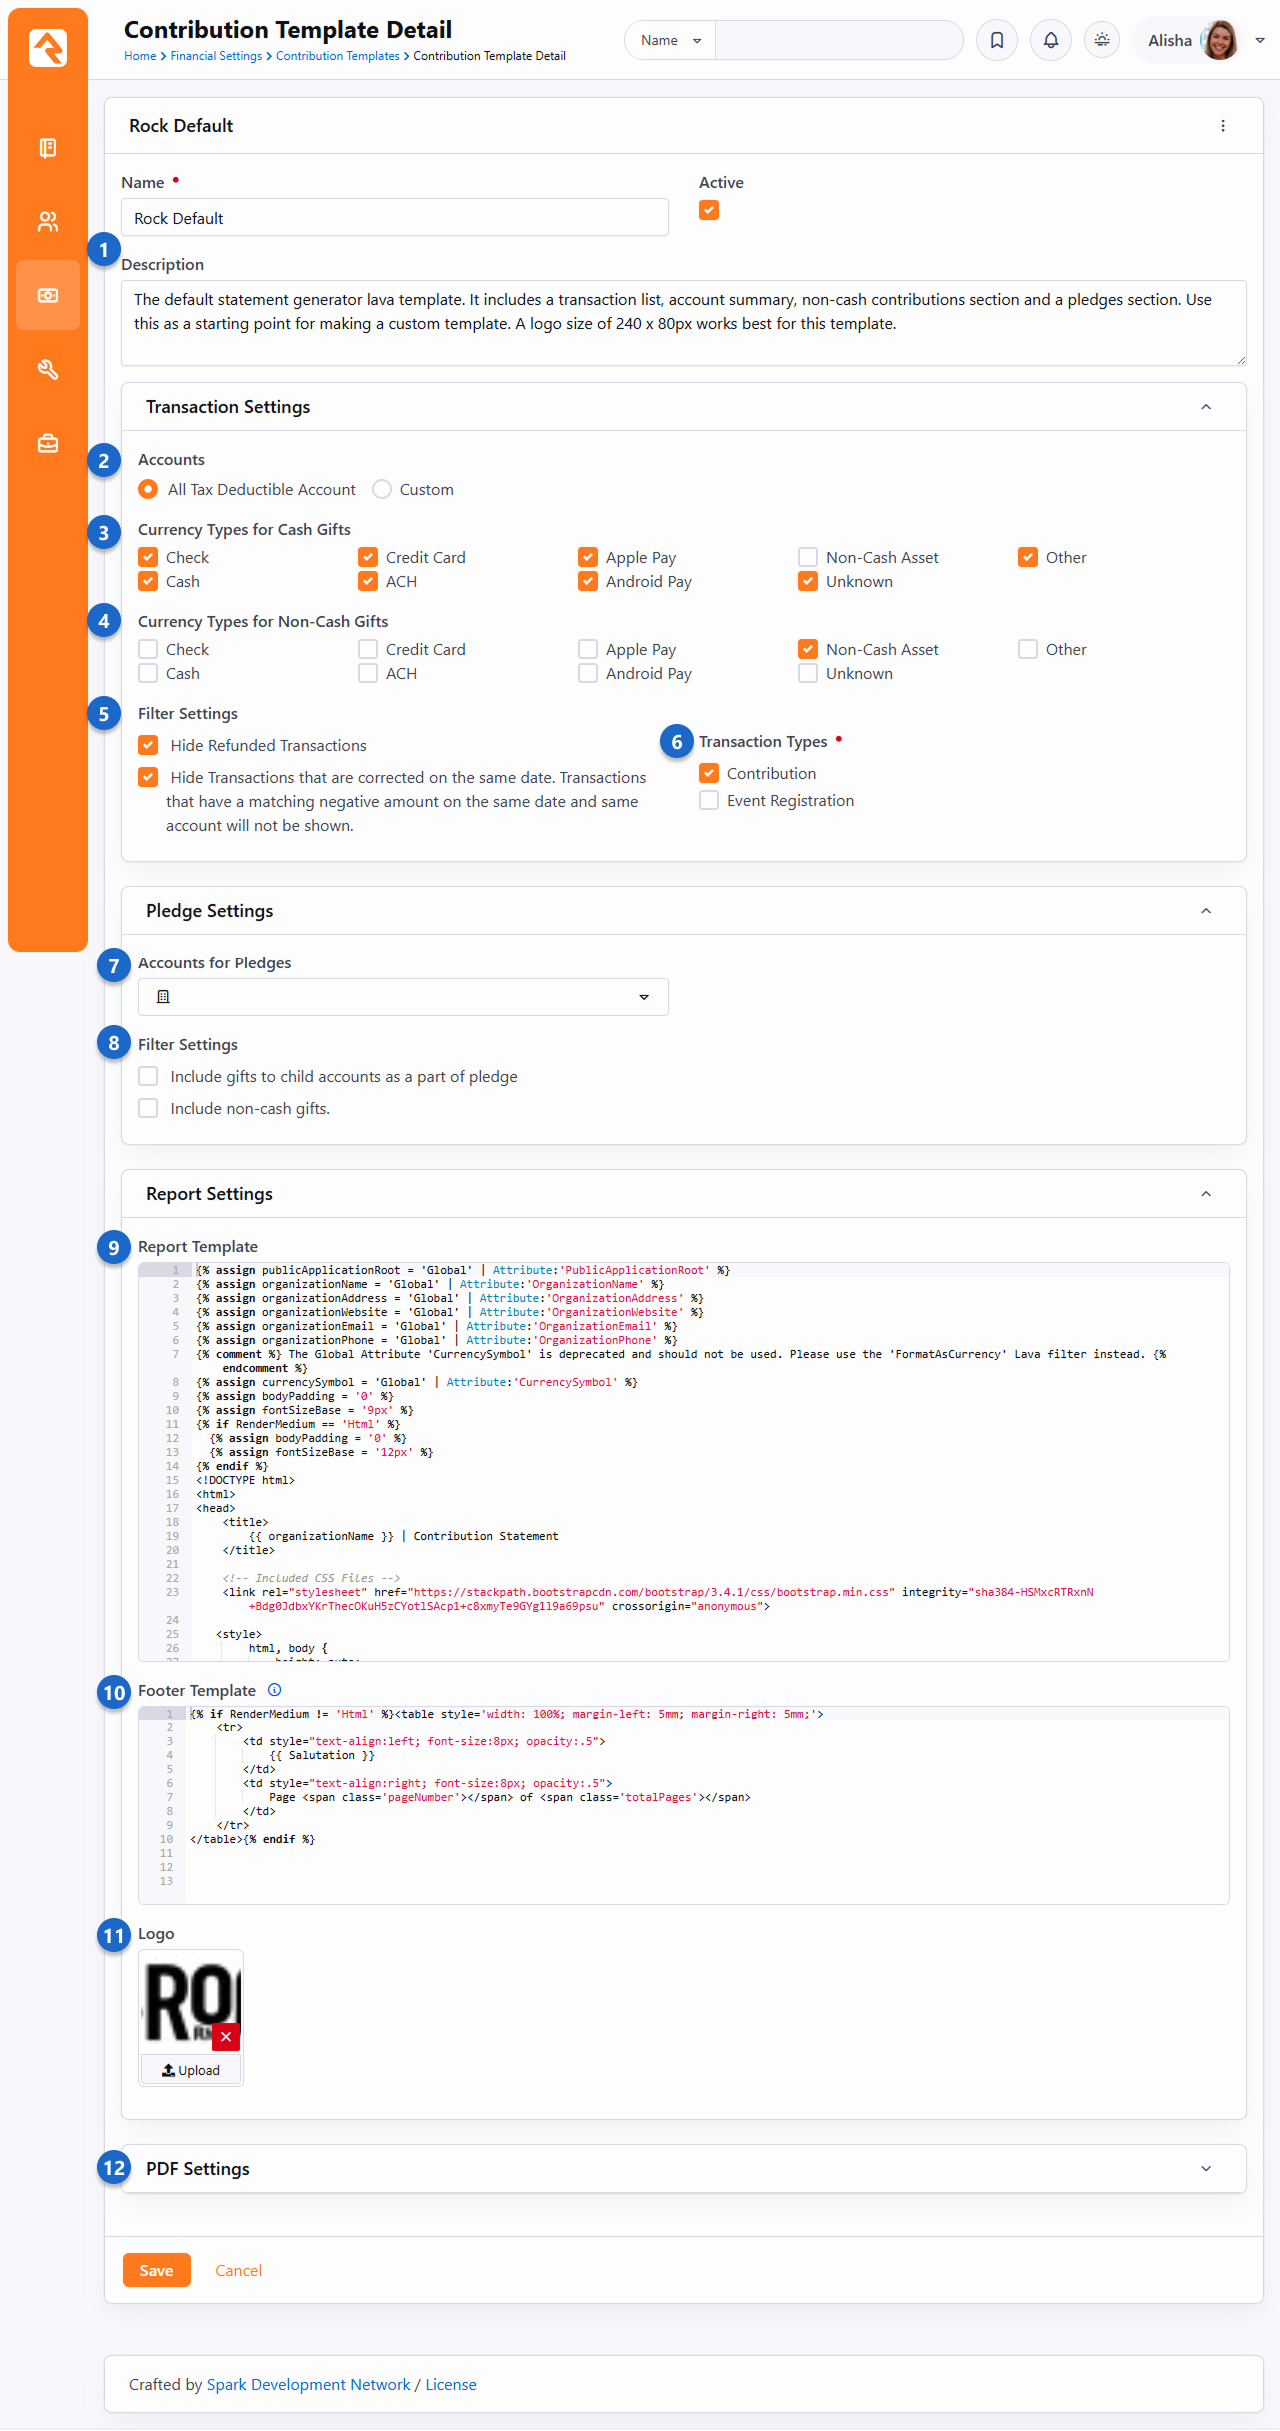
- 1 Name and Description
- Each template you create should have a clear name and a description that indicates how
it will be used. When you’re using the Statement Generator, only the Name of the
template will be visible.
- 2 Accounts
- You can restrict which accounts get pulled into the statements by either selecting
All Tax Deductible Account
or by providing a custom selection of which Accounts to show. This ensures you’re
including or excluding the data you want.
- 3 Currency Types for Cash Gifts
- Here you’ll select which types of currency count as cash gifts. The default
configuration is typically all you’ll need, but if you’ve added other currency types
that should count as cash gifts you can select them here.
- 4 Currency Types for Non-Cash Gifts
- Select the types of currency that represent non-cash gifts, like vehicles or property.
By default, these are grouped together under the
Non-Cash Asset
currency type. Non-cash gifts appear separately from cash gifts on the contribution
statement.
- 5 Transaction Filter Settings
- These settings let you filter out refunded transactions or transactions that were backed
out on the same day they were applied. In most cases you’ll want to exclude these types
of transactions from statements that get sent out to people, but you may want to see
them for internal purposes.
- 6 Transaction Types
- By default, only contributions will be shown, but you can also include payments for
events.
- 7 Accounts for Pledges
- Pledges are not shown on the contribution statement by default. If you want to show
pledge information on the statement, select the accounts for pledges here.
- 8 Pledge Filter Settings
- These filter settings only apply to pledges. You can set whether or not gifts to child
accounts of the selected accounts should count toward the pledge, and whether or not
non-cash gifts should be included.
- 9 Report Template
- If you’re creating your own template, then you’ll most likely want to start by copying
the default template that ships with Rock before making any changes. This is an advanced
setting that lets you control exactly how the statement looks and what kind of
information it displays.
- 10 Footer Template
- This is another advanced setting that lets you control the footer information of the
contribution statement. By default, it includes the
Salutation (e.g.,
“Ted & Cindy Decker”) and the page number.
- 11 Logo
- You’ll want to replace the default logo with your own. The logo size should be 240 x 80
pixels.
- 12 PDF Settings
- These settings let you control the margins and page size of the PDF documents that will
be generated. You typically won’t need to change these.
Customize Displayed Content With Lava
Want your template content to change depending on whether it's viewed as a PDF or in a browser? Use the RenderMedium Lava merge field to control what appears based on the output format—like showing a salutation only in print or hiding links in a PDF. For example:
{% if RenderMedium == 'Html' %}
{% else %}
<table style='width: 100%; margin-left: 5mm; margin-right: 5mm;'>
    <tr>
        <td style="text-align:left; font-size:8px; opacity:.5">
            {{ Salutation }}
        </td>
        <td style="text-align:right; font-size:8px; opacity:.5">
            Page <span class='pageNumber'></span> of <span class='totalPages'></span>
        </td>
    </tr>
</table>
{% endif %}
Advanced Utility Payment Entry Block Settings
This section may get a bit advanced. Not that you can't handle advanced; we just want to give you
a heads up that we're going to be talking about detailed settings and their uses. It isn't rocket
science, but it might be a little challenging.
Transaction Entry Block
The Utility Payment Entry block is the eventual replacement for the Transaction Entry block.
The documentation for the Transaction Entry block can still be
found here
if needed during this transition period.
The Utility Payment Entry block is one of the most useful and versatile blocks available in Rock.
You can set it up on any page of your site and use it for any number of purposes: online giving,
on-site giving, scheduled transactions, fundraising, text giving...and so on. It's the Swiss
Army Knife of transaction entry features.
Utility Payment Entry
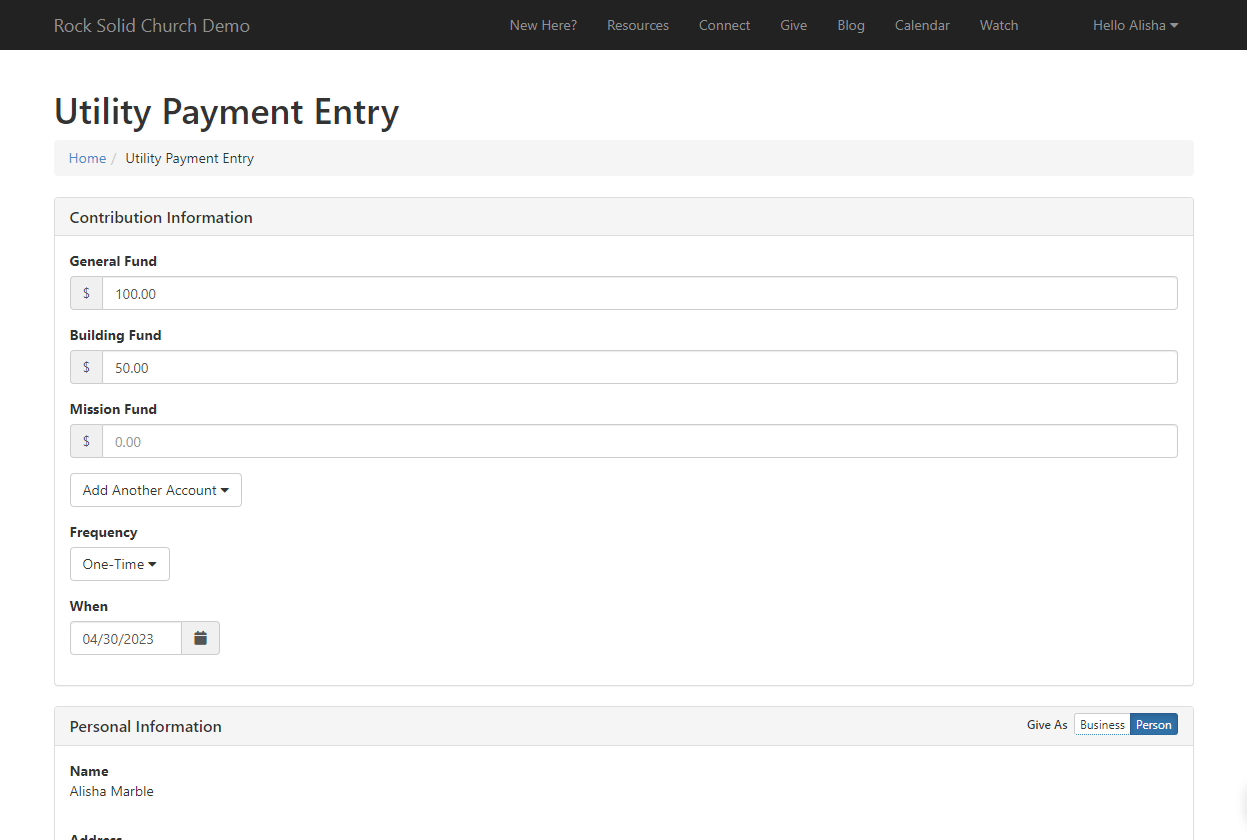
The reason this block can be used in so many ways is because of its settings. There are two configuration
tabs in the Utility Payment Entry block: Basic Settings and Advanced Settings. Let's take a look at the
options available on both.
Basic Settings Tab
The Basic Settings tab is where you'll likely do most configuring.
Utility Payment Entry Block Settings - 1
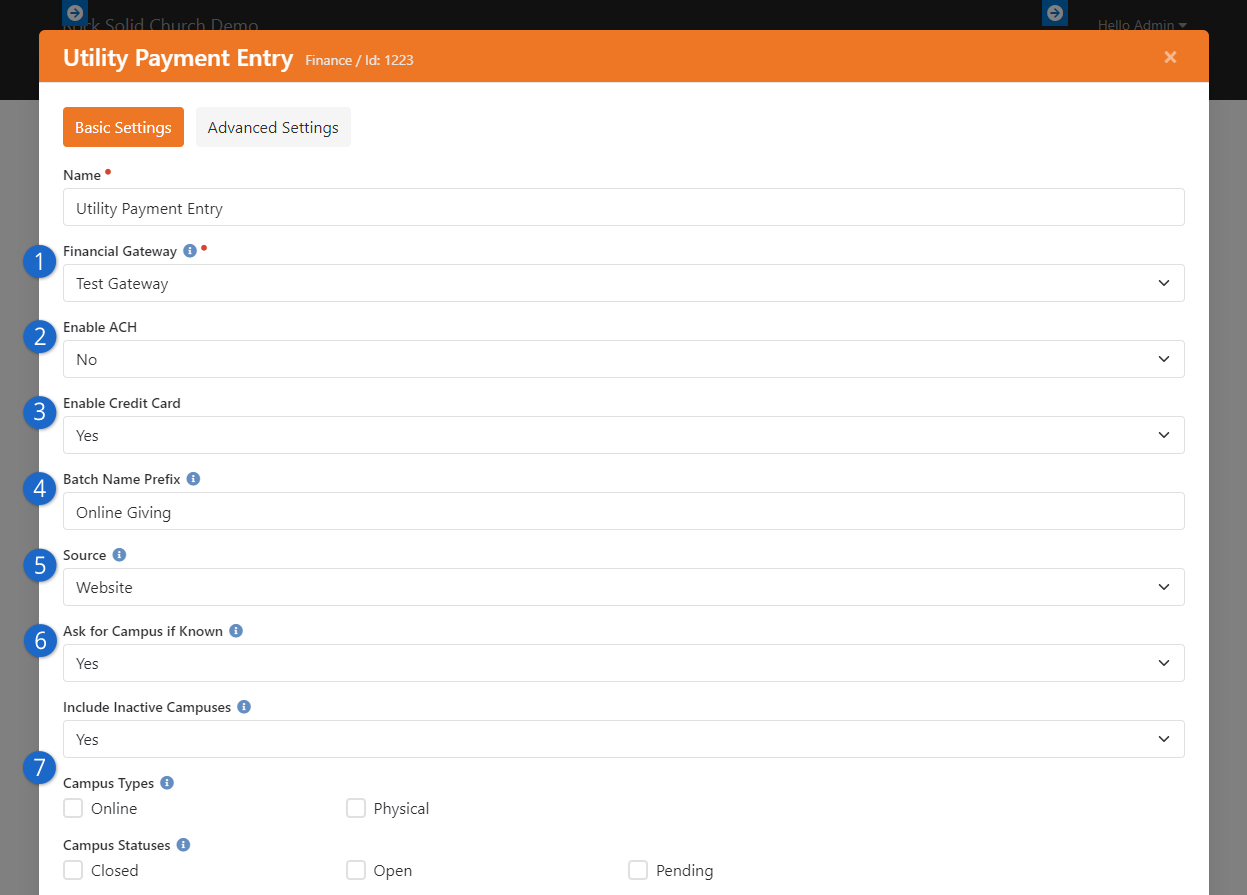
- 1 Financial Gateway
- Of course it's important to select a valid, active gateway.
Check out the Payment Gateways chapter for more
information.
- 2 Enable ACH
- This simply determines whether the person should get the option to use a
bank account (e.g., checking account).
- 3 Enable Credit Card
- Just like the above setting, this determines whether credit cards can
be used.
- 4 Batch Name Prefix
- When a financial batch is created as a result of this transaction, this will
be the batch name's prefix.
- 5 Source
- Typically this will be "Website" or "SMS Gift" but you can choose any
transaction source. The list of available options are defined values of
type Transaction Source.
- 6 Ask for Campus if Known
- If the person's campus is already known (e.g., because they're logged in),
should we ask for the campus anyway? You might enable this to allow
people to give at different campuses. This relates to the
Use Account Campus mapping logic
setting described below.
- 7 Campus Options
- These settings let you filter out which campuses are available for
selection. For instance, you might want to show only
Active
campuses that are
Open.
Utility Payment Entry Block Settings - 2
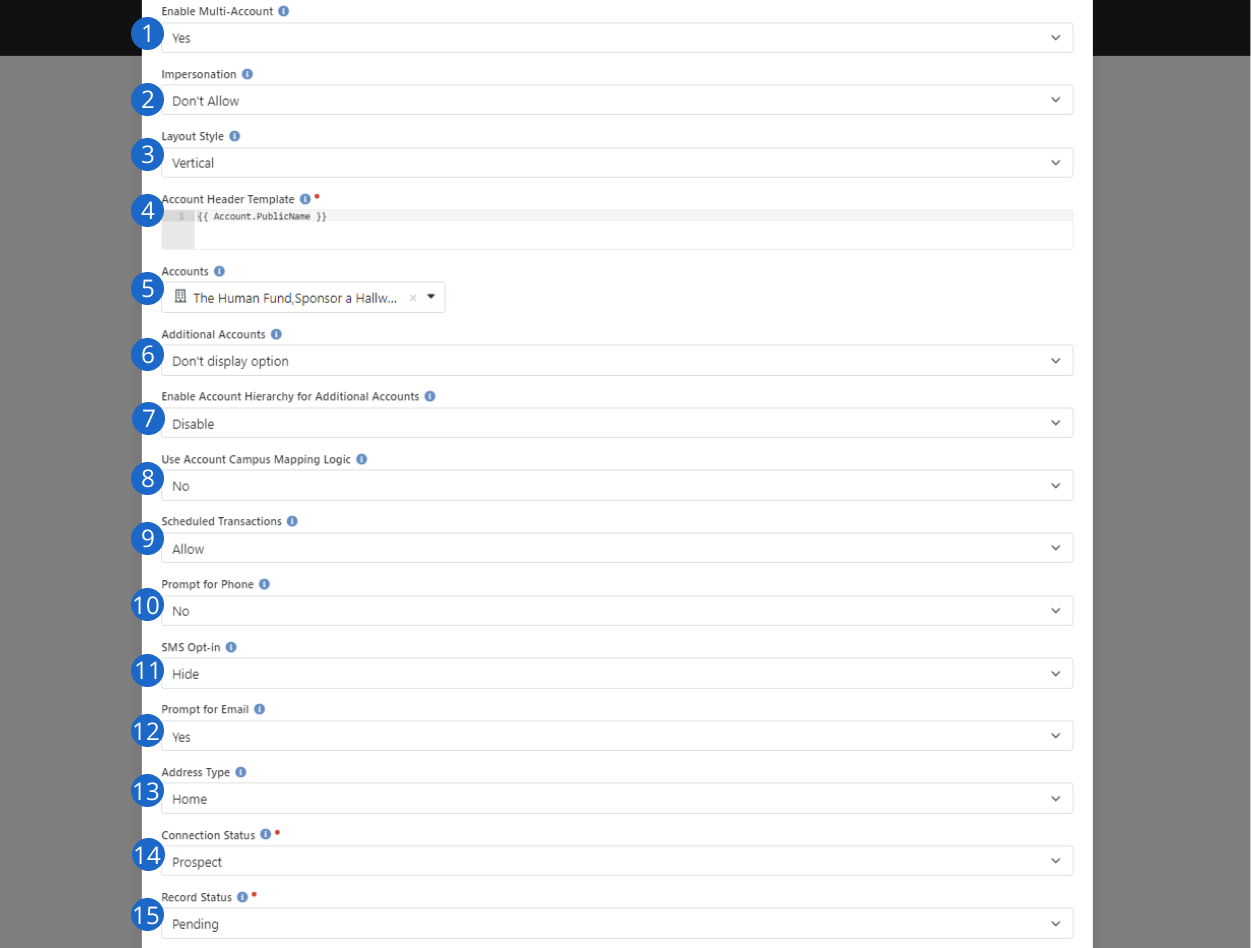
- 1 Enable Multi-Account
- This setting applies if the block is configured with multiple accounts.
When disabled, people can select an account, but they can only give one
amount to one account. When this is enabled, the person can enter different
amounts for multiple accounts.
- 2 Impersonation
- Set whether this block should allow impersonation. If it does, then
someone could impersonate someone else and take actions as the other
person. This should only be needed rarely, if ever, and shouldn't be enabled
on your public-facing website.
- 3 Layout Style
- You can toggle the layout style between Vertical and Fluid. Feel free to
experiment to see which one you like better.
- 4 Account Header Template
- Typically, you'll only want to show the name of the account, but you can
provide a custom Lava template to show whatever you like.
- 5 Accounts
- Here is where you'll select which account(s) are available. This
can be left blank to either allow all accounts or to have other block
settings control which account(s) are shown. For Text Giving we
recommend adding a single account here.
- 6Additional Accounts
- Here you'll simply choose whether the person should be allowed to pick
accounts in addition to what's configured in the
Accounts
setting above. Any
Active
accounts with a
Public Name will be shown.
- 7Enable Account Hierarchy for Additional Accounts
- If the above setting is enabled, then you can also enable this to
group accounts under their parent accounts. This makes longer lists of
accounts and sub-accounts easier to navigate.
- 8 Use Account Campus Mapping Logic
- For full details on this setting check out the help icon located on the page.
In short, this setting provides options for determining the account to use based
on the campus.
- 9 Scheduled Transactions
- This simply determines whether scheduled transactions can be created
from this page. This is dependent on the financial gateway you're using. You
wouldn't want to allow scheduled transactions for something like Text Giving.
- 10 Prompt for Phone
- This is disabled by default, but you can enable it to ask the person
for their phone number.
- 11 Prompt for SMS Opt-in
- If the “Prompt for Phone” is set to “Yes” then selecting “Show” here will allow a
person to opt-into receiving SMS communications for that number..
- 12 Prompt for Email
- This is the same as the above setting, but for email. We recommend
keeping this on, especially because it helps match people to a record in
Rock.
- 13 Address Type
- This is the type of address that the person will provide
on the page.
- 14 Connection Status
- If a new person record is created from this transaction, this is what
its connection status will be.
- 15 Record Status
- This is the same as the above setting, but for record status.
Utility Payment Entry Block Settings - 3
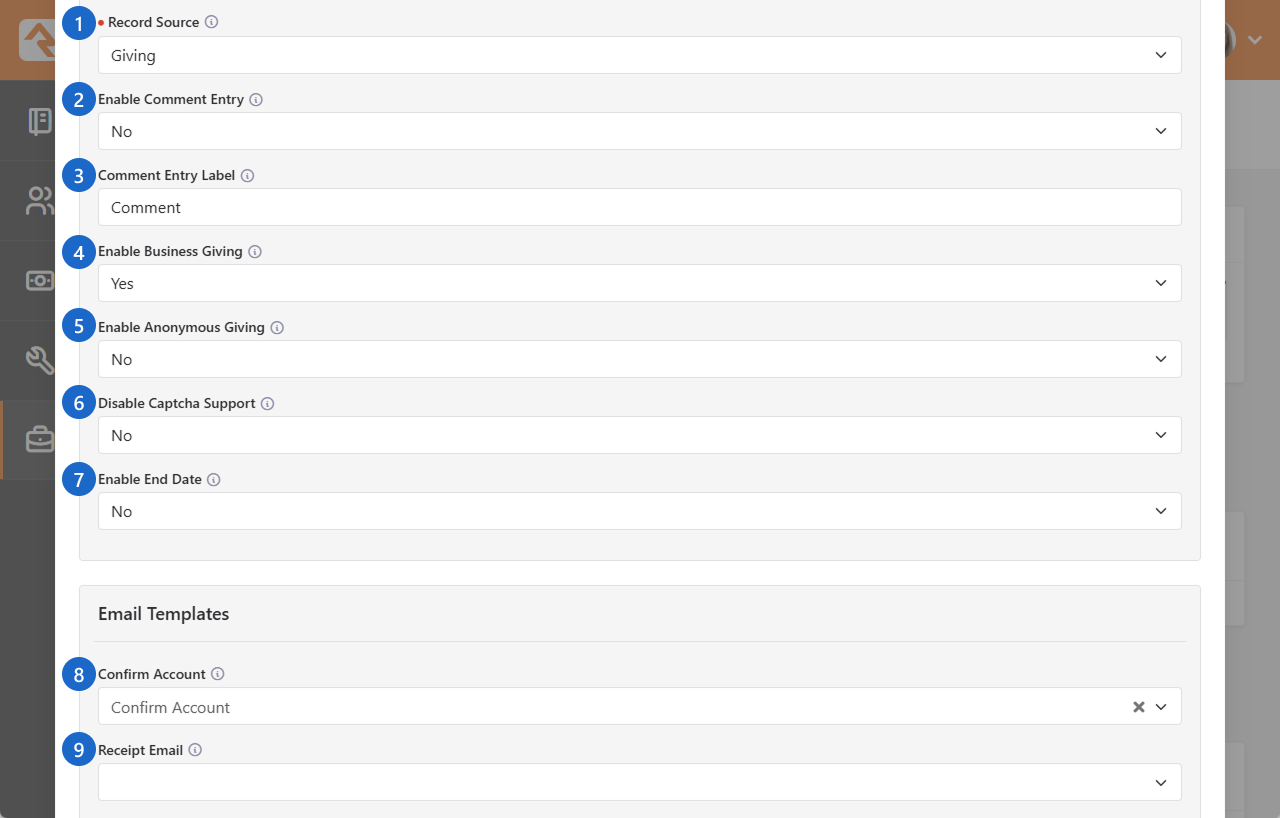
- 1 Record Source
- Discover where a new individual's info was entered into the system.
- 2 Enable Comment Entry
- If enabled, the person is required to enter a comment. The comment will be
included with the transaction when it's sent to the payment gateway.
- 3 Comment Entry Label
- If you've enabled comment entry, then you can customize what label will appear above
the text entry field. You may want to do this to indicate what's expected to be entered.
- 4 Enable Business Giving
- If this is enabled, then a person associated with a business in Rock can choose
to give either as themselves or as the business. For most people this option
won't appear.
- 5 Enable Anonymous Giving
- If this is enabled, then anyone filling out the form can check a box to
"Give Anonymously" and the gift will appear as "Anonymous" in any public-facing
context. If you enable this, you may want to check out the
Anonymous Giving Tooltip
setting below.
- 6 Disable Captcha Support
- When enabled, the CAPTCHA verification step is skipped. This can be helpful for troubleshooting when you need to bypass the global CAPTCHA settings.
- 7 Enable End Date
- When enabled, this setting allows individuals to specify an optional end date for their recurring scheduled gifts.
- 8 Confirm Account
- Rock ships with an email template specifically for this. It's a security
measure, to ensure the person truly intended to update their account.
- 9 Receipt Email
- Rock can automatically send a receipt email. You can use the
Giving Receipt
System Communication that ships with Rock or create your own.
Utility Payment Entry Block Settings - 4
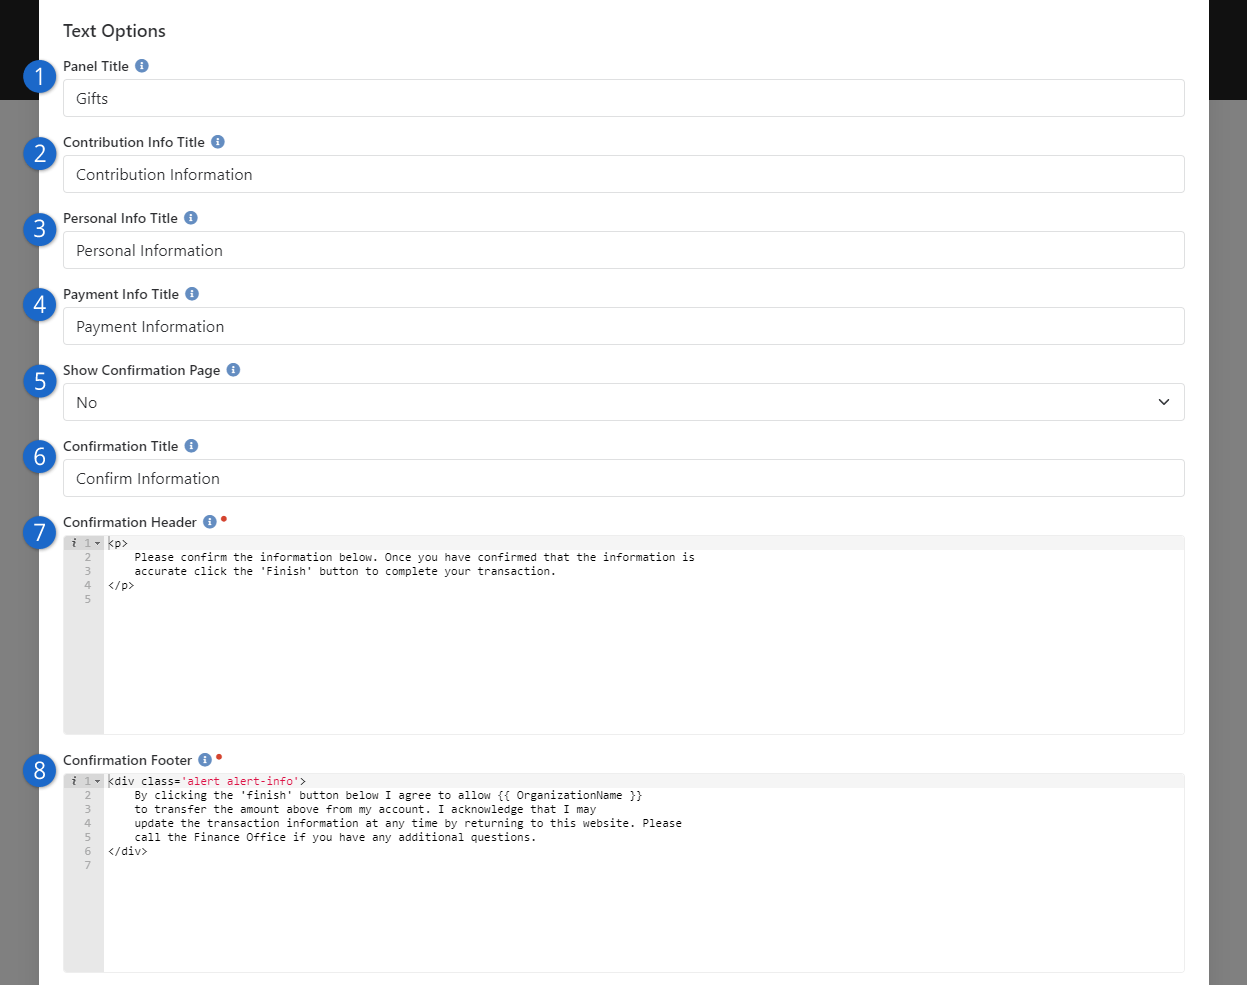
- 1 Panel Title
- The text you enter here will be displayed near the top of the screen.
- 2 Contribution Info Title
- This title will appear above the area where the person indicates how much
they're giving.
- 3 Personal Info Title
- The title you enter here will appear above the area where the person
provides their personal information, like name and email address.
- 4 Payment Info Title
- The text here will appear above where the person provides their credit card
or ACH information.
- 5 Show Confirmation Page
- You can optionally show a confirmation page, where the person is asked to
confirm the transaction before it completes. This will display the person's information,
the amount they're giving, and their payment information. The next few settings only apply
if the confirmation page is being shown.
- 6 Confirmation Title
- This is the title that will be seen near the top of the confirmation screen.
- 7 Confirmation Header
- The text here will appear above the confirmation details for the person
and their gift, if the confirmation page is shown.
- 8 Confirmation Footer
- The footer text will appear below the confirmation details on the
confirmation page.
Utility Payment Entry Block Settings - 5
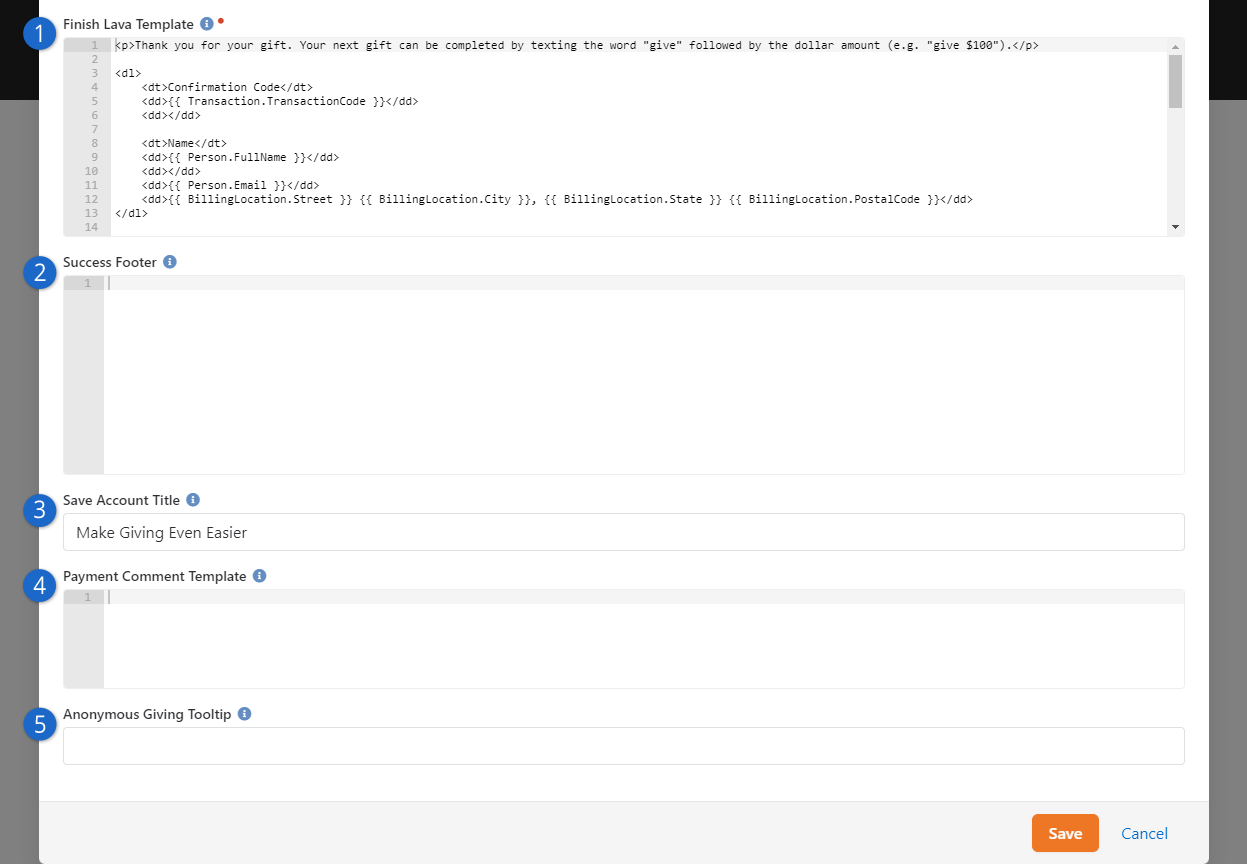
- 1 Finish Lava Template
- What is provided here will be shown to the person on the last screen in the
process.
- 2 Success Footer
- Most of what you want to display on the final page will be in the
Finish Lava Template,
but you can add content here to display near the bottom of the page.
- 3 Save Account Title
- Sometimes "Make Giving Even Easier" can be more friendly and approachable
than "Save Account".
- 4 Payment Comment Template
- The content of the template you provide will be sent to the payment gateway
as a comment.
- 5 Anonymous Giving Tooltip
- If you allow anonymous giving, you might want to provide a tooltip explaining
what that means. The tooltip will be shown when the person moves their mouse over the
Give Anonymously
checkbox.
Advanced Settings Tab
The Utility Payment Entry block has additional settings under Advanced Settings.
Utility Payment Entry Block Settings - 6
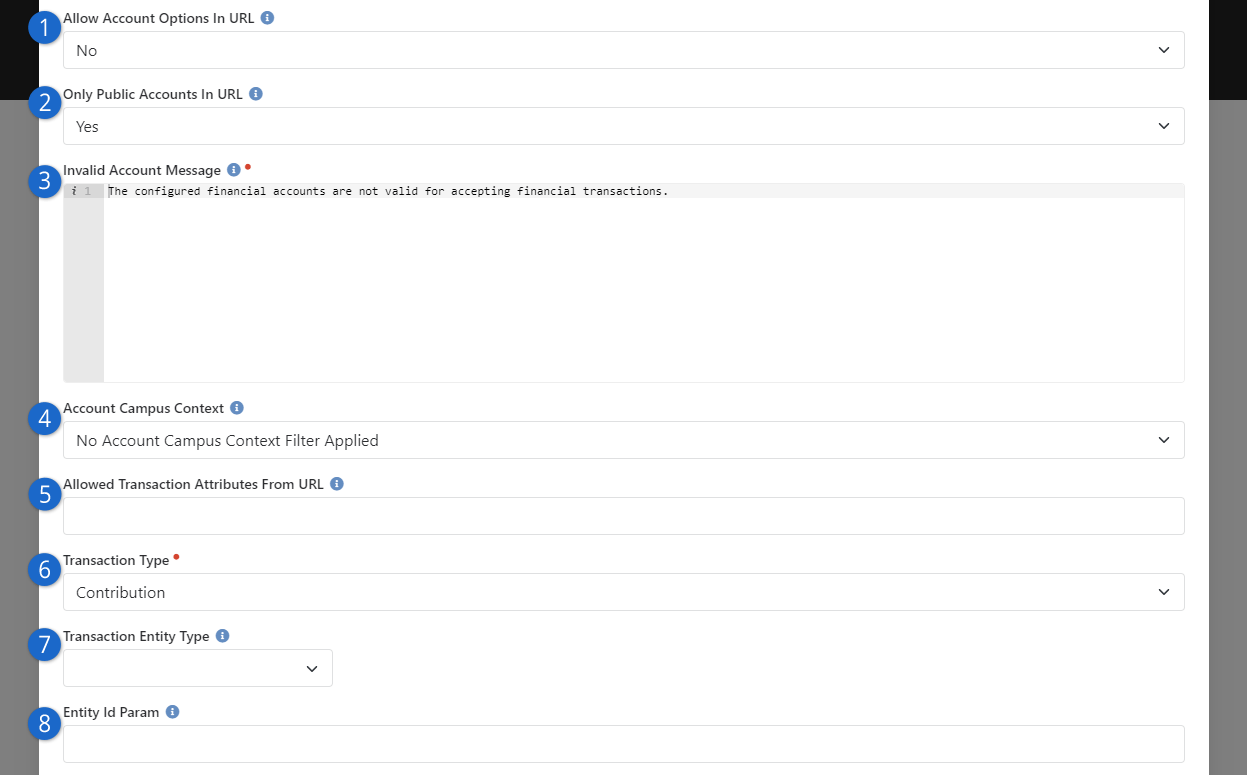
- 1 Allow Account Options In URL
- You can set the account by passing it in through the URL. But that's not all you can do.
You can also set the default amount, and whether that amount should be editable.
- 2 Only Public Accounts In URL
- If you're using the above setting, this will ensure that only Accounts
marked as Public can be passed in from the URL.
- 3 Invalid Account Message
- If the account you're trying to pass in isn't valid (e.g., a typo in the URL)
then this message displays.
- 4 Account Campus Context
- You can filter the list of accounts using campus context. To learn more about
setting context check out our
Designing and Building Websites Using Rock
manual.
- 5 Allowed Transaction Attributes From URL
- If you have attributes set up for transactions, you can set the value of those attributes
from the URL. The URL should be formatted like:
?Attribute_Attribute1Key=Attribute1Value&Attribute_Attribute2Key=Attribute2Value.
So, to set a text attribute with a key of "GLCode", it might look like:
?Attribute_GLCode=abd46c03.
- 6 Transaction Type
- For the most part you'll leave this as
Contribution but
this block can be used for
Event Registration.
- 7 Transaction Entity Type
- Technically the transaction can be associated with a specific entity type, but generally you'll
keep this blank.
- 8 Entity Id Param
- If you've selected an Entity Type above, then you can specify a page parameter
where the Id for the entity can be found.
Utility Payment Entry Block Settings - 7
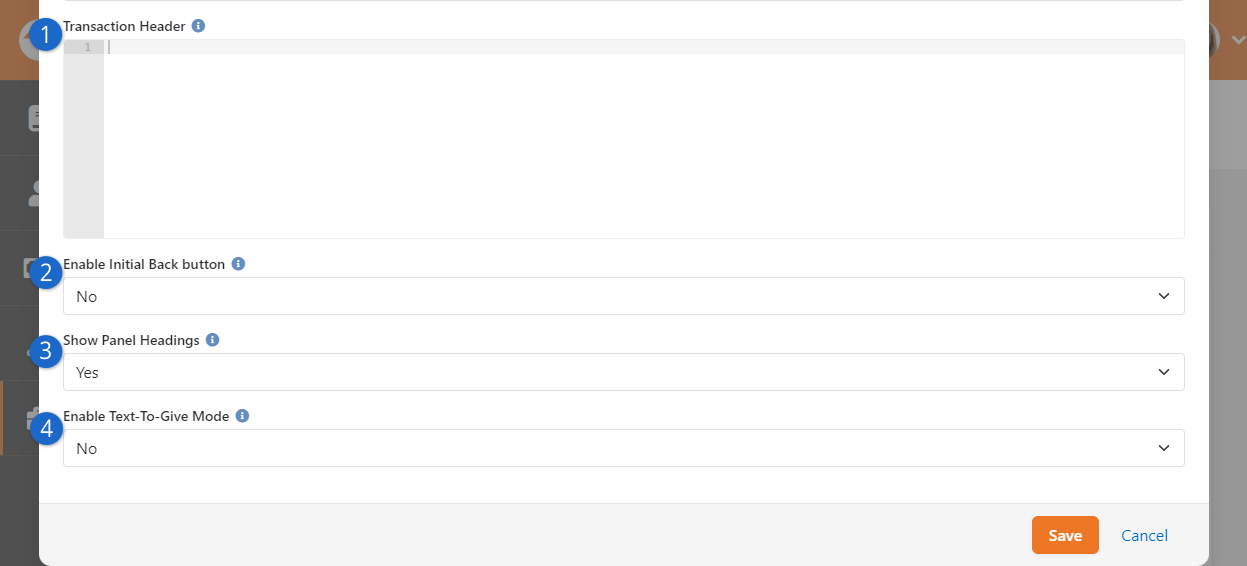
- 1 Transaction Header
- What you enter here will be displayed above the area where the person chooses
the account(s) and amount(s) they're going to pay.
- 2 Enable Initial Back button
- If this is enabled, then a Back
button will be shown that you can use to go back to the last page you were on. Because this block could
be accessed from a workflow, email, or other methods besides web page navigation, you may want to
leave this disabled.
- 3 Show Panel Headings
- There are panel headings for Contribution Information, Personal Information and
Payment Information. This setting lets you hide those headers.
- 4 Enable Text-To-Give Mode
- Text Giving
will not work without this option enabled.
Account Selection Behavior
The Utility Payment Entry block allows people to enter payment information for selected
accounts. The account selection behavior for the block is primarily controlled by four
block settings:
- Accounts: The
Accounts
block setting lets you restrict the block to
only being used with specified accounts.
- Additional Accounts: The
Additional Accounts
setting allows you to make payments for active public accounts not listed under
"Accounts" above.
- Enable Account Hierarchy for Additional Accounts: Financial Accounts
can be nested and, when enabled, this will group accounts under their parents when looking
at the Additional Accounts dropdown list. Those that
are top-level accounts will be the root of the dropdown. For those that have parents, their
parent account will be in the dropdown.
What this means is that:
- If an account called "Special Fund" is at the root of the account tree it will be at
the root of the dropdown.
- If an account called "Glendale Campus" exists under a Parent account called "General
Fund" ("General Fund > Glendale Campus") Glendale Campus will be shown in the
dropdown under a parent item of "General Fund".
- If there is a 3-level nested account hierarchy like "Events > Youth Events > Summer
Camp", Summer Camp will be shown in the dropdown under the parent item of "Youth
Events". The "Events" grandparent will not be displayed.
- Use Account Campus Mapping Logic: When enabled, this will match payments to
accounts based on the associated campus. The account mapping is determined as follows:
- If the selected account is not associated with a campus, the selected account will
be the first matching active child account that is associated with the selected
campus.
- If the selected account is not associated with a campus, but there are no active
child accounts for the selected campus, the parent account (the one you see)
will be returned.
- If the selected account is associated with a campus, that account will be returned
regardless of campus selection (and it won't use the child account logic).
Note that the
Use Account Campus Mapping Logic
setting is not compatible with the
Enable Account Hierarchy for Additional Accounts
setting, since
Use Account Campus Mapping Logic
automatically picks the best fit account based on the associated campus and
Enable Account Hierarchy for Additional Accounts
allows you to pick a specific account from a hierarchy of
accounts. Use one or the other, but not both.
Finance Reports
Financial reporting is crucial not only for tracking finances but also for understanding significant changes
within your organization. Tithing is an important indicator of your organization's health. By analyzing giving
patterns, you can identify direct correlations between people and their contributions. For example, you can
reach out to individuals who have recently stopped giving to see if they need support or prayer, and you can
also connect with those who have recently started giving to learn about the positive changes happening in their lives.
Rock introduced two new finance reporting features in version 17. Your finance team can now view or generate:
- Volunteer Generosity Report
- Tithing Overview
- Transaction Fee Report
For some reports, the goal is not to see total dollar amounts but to be able to check in on your congregation
and follow the data to better serve your organization.
Below are details explaining these new reports in Rock. Please note, for some blocks, data is based on estimations.
This is not the area that will give exact dollar amounts (that can be found on a person profile page). The goal is
to show key areas that need attention to increase potential tithe opportunities. To view these reports, go
to Finance > Reports.
Volunteer Generosity
This report is used to compare and capture insights on your volunteer team and their
giving. It shows which volunteers have donated within a specific
time range and lets you filter by Attendance Date Ranges, Campuses, and Teams. This
helps you understand how volunteering relates to financial giving.
Just a Note
This tool tracks the connection between volunteers' giving and their service, not their exact donation amounts.
Volunteer Generosity Report
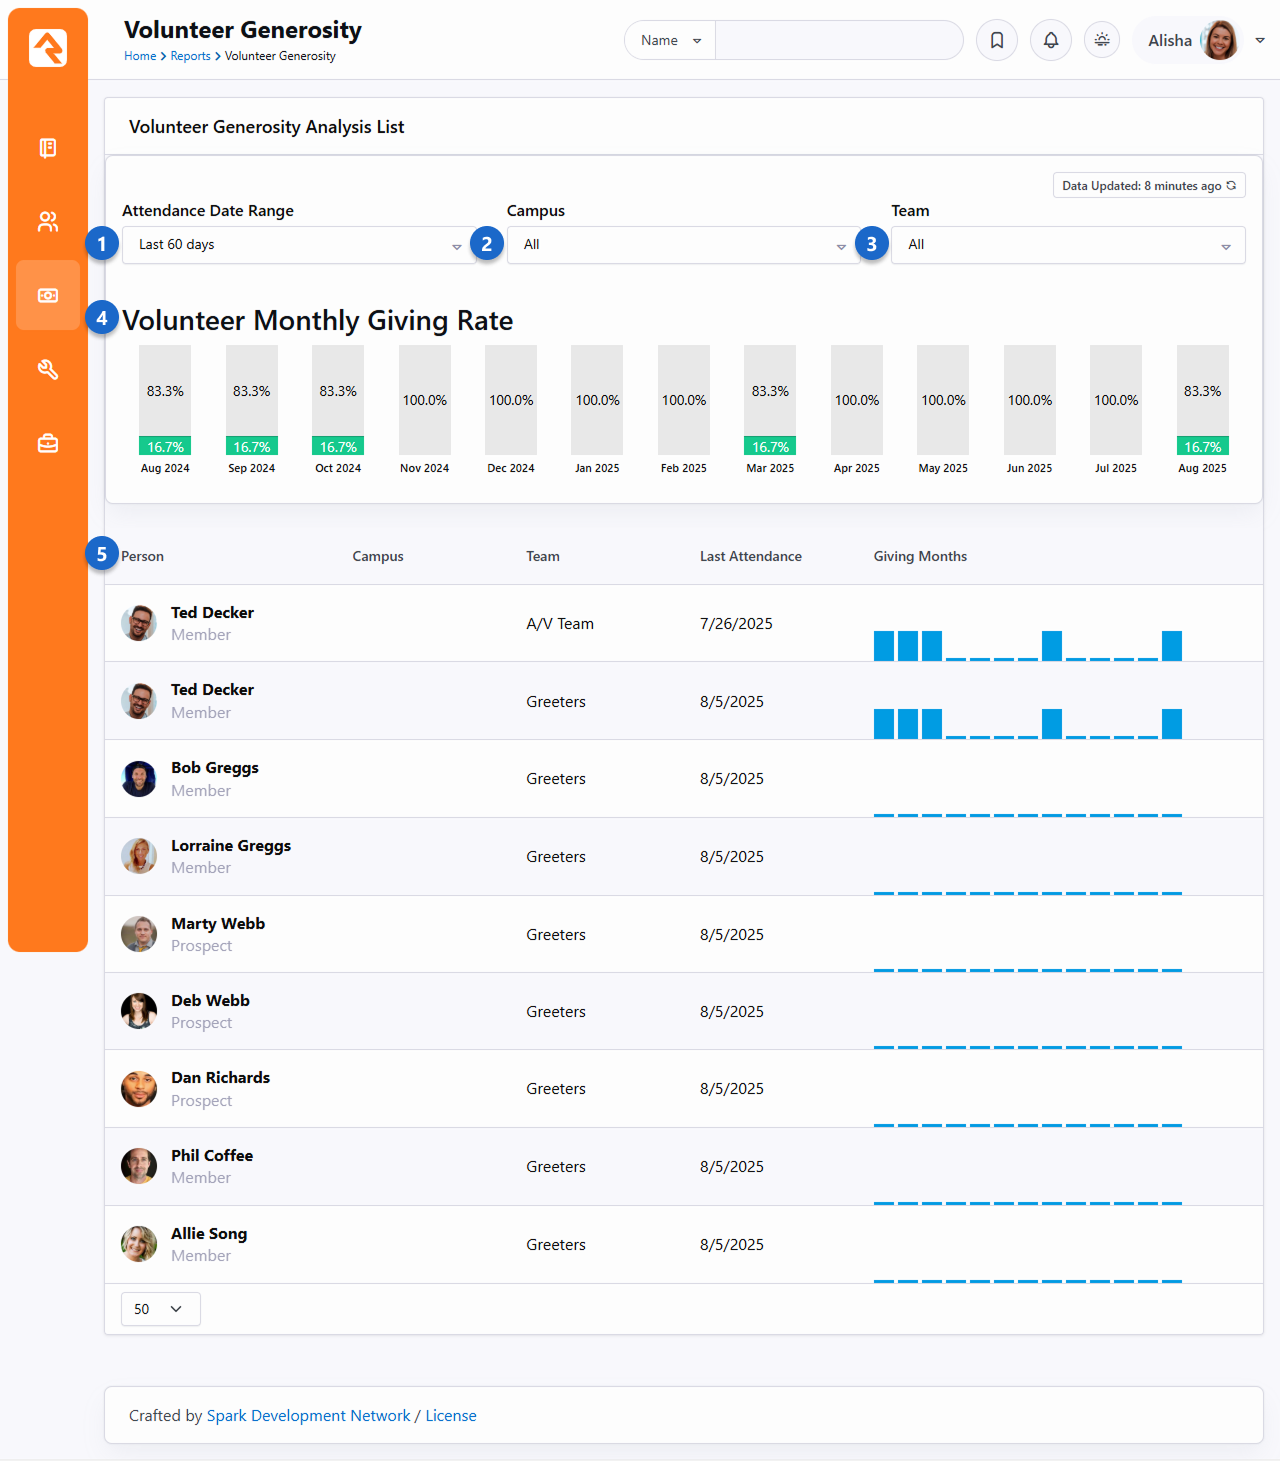
- 1 Attendance Date Range
- Filter by when a volunteer last checked in to serve, with options for 30, 60, or 90 days, or view all-time attendance.
- 2 Campus
- If you have multiple campuses, select a specific campus for this report.
- 3 Team
- Filter by serve teams (e.g., Ushers, Kids, Groups).
- 4 Volunteer Monthly Giving Rate
- View a rolling 12-month summary of how many volunteers have given each month. The green portion
of the bar indicates which percentage of the people gave during that period.
- 5 Individual Views
- See details for individual volunteers, including their campus (if applicable), the team they serve on, their last attendance date,
and their monthly giving history over the past year. A blue bar indicates a month when
they gave.
How Rock Defines a Volunteer
A volunteer is any active person who has recorded attendance at least once within the past year in a group where the group type's Purpose is set to "Serving Area". This can be set at Admin Tools > Settings > Group Types in the group type's General settings.
Tithing Overview Report
The Tithing Overview Report allows Rock Finance Teams (or your organization's leadership team)
to see how their campuses are performing with overall estimated tithing.
The estimations on this report could be used to foster discussions on how and when to encourage
giving within your organization.
Tithing Households (%) represents the percentage of giving households estimated to
be tithing. A "giving household" is defined as one that has contributed to a tax-deductible account
within the past 365 days.
This report leverages US Census, location information, and average income figures to estimate
potential tithe amounts, referred to as the "Tithe Index". For example, if the average household income
for all 'givers' at a particular campus is $100,000, the Tithe Index would be $10,000, suggesting each
person at that campus might tithe approximately $192 per week. Since average household income varies by
postal code, the Tithe Index will differ across campuses, reflecting local economic conditions.
Rock comes populated with a schedule that runs once a week to calculate tithing metric data (you can adapt
this schedule to meet your organization's needs if necessary). If needed, you can access this by going
to Admin Tools > Settings > Schedules > Tithing Overview.
The calculated data is stored into three separate metrics under
Tools > Metrics > Tithing Overview.
There are two views within this report, the Bar Graph View and Line Graph View.
- Bar Graph View: Displays the most recent set of data with each bar color coded based on the age
(Opened Date) of the campus.
- Line Graph View: Will display a rolling 12 month set of data for each campus, with each line
color coded based on the Color of the campus.
Opened Date and Color
The campus Opened Date and Color can be set by going to Admin Tools > Settings > Campuses.
Bar View
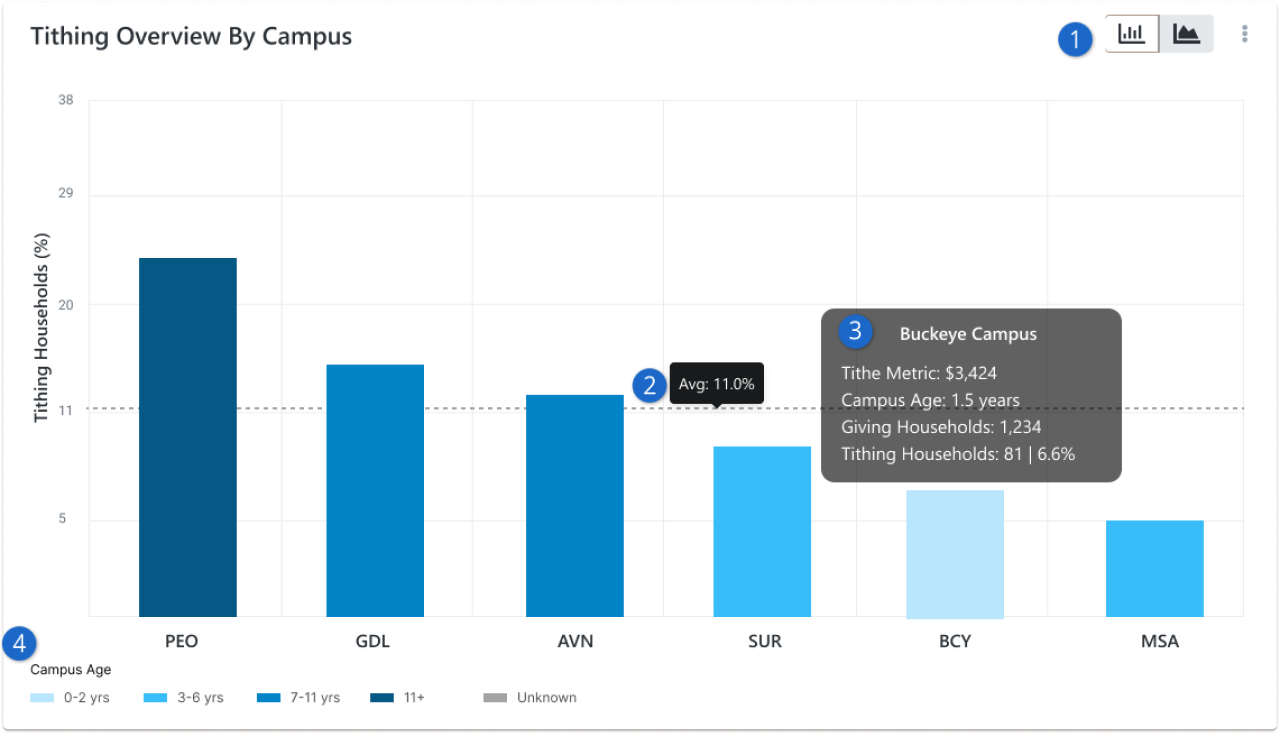
- 1 View Display
-
Used to switch between the two view modes. The bar graph shows the estimated percentage of tithing households
for each campus using only the most recent set of data. So this represents the live view for each campus.
- 2 Average
- This is the average percentage of estimated tithing households across all campuses.
- 3 Campus Metrics
- When you roll over each campus you will be able to see the individual campus metrics popup:
- Tithe Index is the estimated possible tithe amount based on location and family median income estimates of givers.
- The age of the campus allows you to draw conclusions on how the long a campus has been around and how many Tithing Households are at this campus.
- Giving Households shows how many households at this campus gave within the rolling year. This is not tied
to a dollar amount or regular giving patterns at your campus.
- Tithing Households displays the total number of families who gave at or above the estimated Tithe Index; and the percentage based on all giving households.
- 4 Campus Age
- The color coding is tied to the age of the campus. The assumption would be the older the campus, the higher the tithing households would be.
Line View
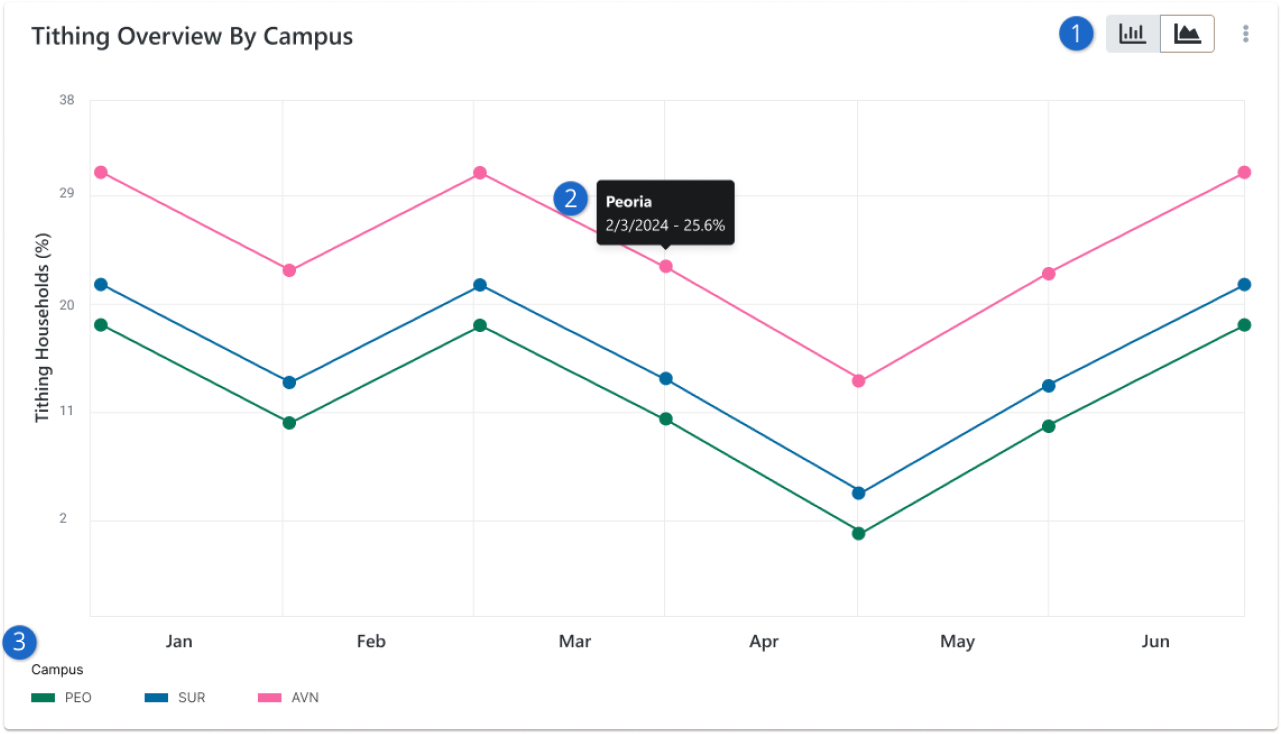
- 1 View Display
- Used to switch between the two view modes. The line graph view allows you to see a rolling month over month view of the tithes that come in for that specified month.
- 2Tithing Percentages
- This is the percentage of estimated tithing households for that particular period.
- 3 Campus Display
- The color coding is specific to the campus.
Transaction Fee Report
The Transaction Fee Report let's the finance team track account gifts and the "covered" fees
associated with the gift. The Transaction Fee Report breaks down the Total Fees, Credit Card Fees
and ACH Fees, showing total transactions and the fees associated with each transaction. You can set
specific time frames to see what each giving period brings. This report will help gain insight into
all the fees associated with gift transactions.
Transaction Fee Report
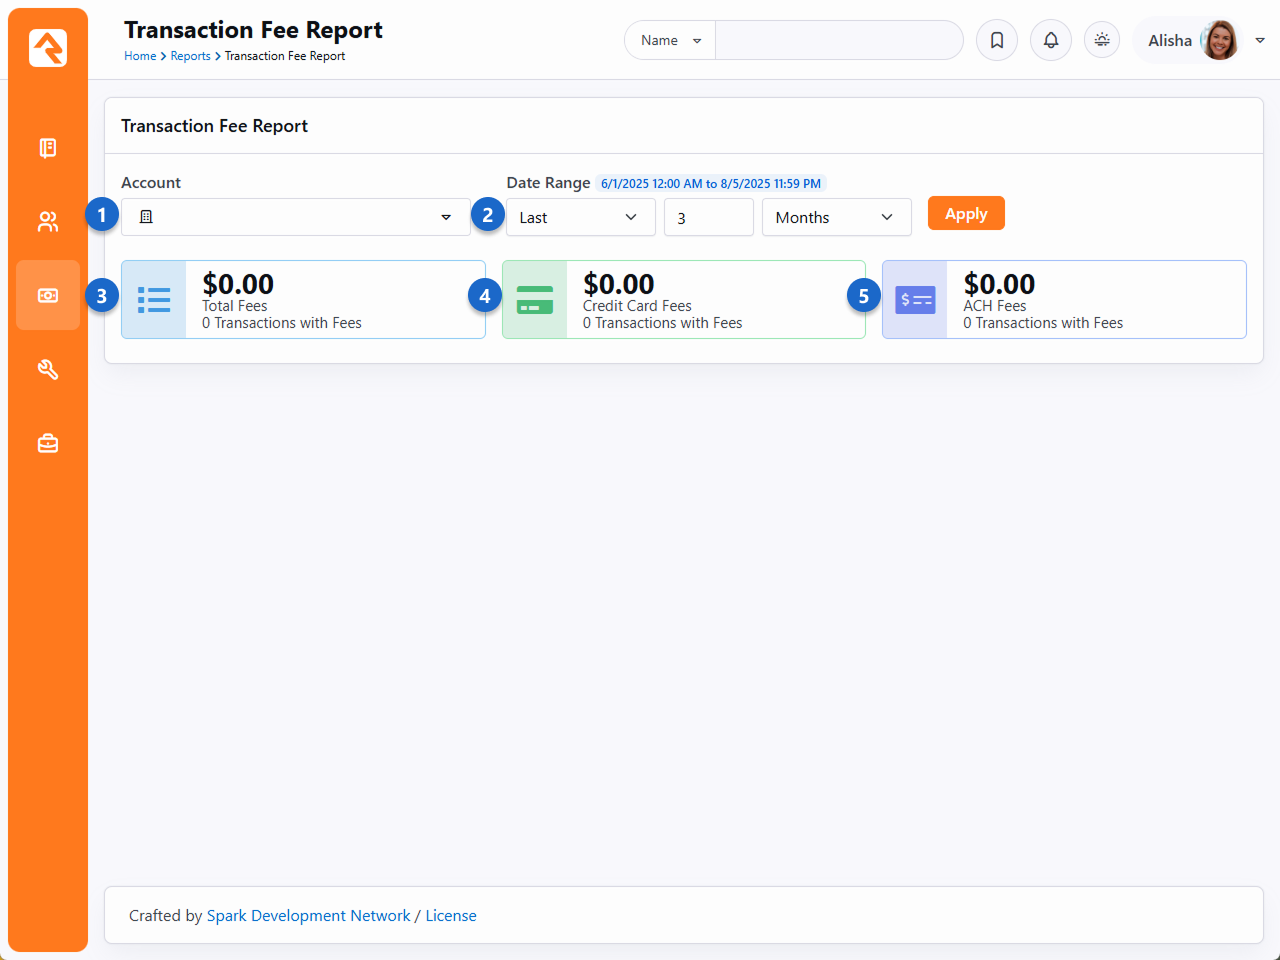
- 1 Account
- Select individual accounts (e.g., General Fund, Building Fund, Event Registration, Mission Funds) to view transaction history. You can filter by one or multiple funds.
- 2 Date Range
- Choose a specific time frame to track financial gifts during that period.
- 3 Total Fees
- View the total fees for all transactions within the selected time frame.
- 4 Credit Card Fees
- See fees specifically related to credit card transactions.
- 5 ACH Fees
- View fees associated with ACH transactions.