Improve
Updates for Rock 5.0
Below is a summary of the updates for this version.
- Documented new feature to disable indexing of a site by web crawlers.
- Added information on new feature that allows a site to be placed into an iFrame.
- New information on using Rock's Theme Styler.
- Provided new information on how to design a theme that uses the Theme Styler's tools.
- Documented Rock's tools that help compile Less files
Updates for Rock 1.0
No updates made.Updates for Rock 2.0
Below is a summary of the updates for this version.
- Added tip to not change the Stark Theme
- Add Less tip to reference the Stark theme's CSS if you will not be compiling your own CSS.
Updates for Rock 3.0
Below is a summary of the updates for this version.
- Added information on the new Universal Channel Type.
- Documented how to add item attributes to a Content Channel
(before the documentation only showed how to add item attributes
to the channel types.)
- Noted the location change of the content channel admin pages
from 'Admin Tools > Communications' to 'Admin Tools > CMS Configuration'
- Added information on the new theme CSS edit classes. These classes help
you alter your theme's layout when Rock's in-page edit features are enabled.
Updates for Rock 4.0
Below is a summary of the updates for this version.
- Added email form block description.
- Added tips for creating an email form.
- Documented Rock's new mobile redirect settings on the site configuration.
- Added information on the new site page view tracking options.
- New chapter on SEO topics.
Updates for Rock 6.0
Below is a summary of the updates for this version.
- Added tip regarding site scoped routes.
- Documented the new 'Require Encryption' feature on sites.
- Described the new page copy features.
- Renamed the chapter 'Custom Content' to 'Content Channels'.
- Documented the new parent/child content channel capabilities.
- Outlined how podcasting is implemented.
- New chapter on making your Rock pages social sharable.
- Moved Managing Dynamic Content chapter from the Communications manual to this one.
- Fixed incorrect screen location name in Dynamic Content chapter.
Updates for Rock 7.0
Below is a summary of the updates for this version.
- Updated Page Properties Advanced Settings screenshot and added Body CSS Class description.
- Updated Content Channel Type screenshot and added Disable Content Field and Disable Status descriptions.
- Updated Content Channel Configuration screenshot and callout information.
- Updated Admin Toolbar screenshot.
- Added Short Links documentation to Managing Content and Pages chapter.
- Added Page Attributes information and code sample to Creating a New Site chapter.
- Updated Add Site screenshot and callouts to include Site Icon info
- Added Lava Shortcodes section in Standing on the Shoulders of Giants chapter.
- Updated Add Block documentation in Adding Content to Rock chapter to include how to add a block to every page in a site.
- Added Content Channel Tags section to Content Channels chapter.
- Updated the Add Content Channel screenshot.
- Moved Managing Dynamic Content chapter from Communications manual to this one.
- Added Cookies chapter.
- Added chapter on Font Awesome 5.
Updates for Rock 8.0
Below is a summary of the updates for this version.
- Documented the new Content Channel View Detail block
- Documented the new Landing Pages feature
- Updated screen shots for version 8
Updates for Rock 9.0
Below is a summary of the updates for this version.
- Added Content Component Template to v9 for web developers and designers
- Added "URL slug" section
- Added Working With Images section
- Added Asset Manager System section
Updates for Rock 10.0
Below is a summary of the updates for this version.
- Persisted Datasets
- Caching for Rock Websites
- Google Cloud Asset Storage Provider
- Added additional details to Content Component chapter
- Added new chapter on Cache Tags
Updates for Rock 11.0
Below is a summary of the updates for this version.
- Added Categories to Content Channels
- Added new Content Channel Item Editor - Structured Content
- Routes can be designated as Global
- Added Azure Cloud Storage as a supported Asset Storage Type
- Added ability to view and set values for Site attributes from the Site Detail block
- The Content Channel View block supports multiple values in query string parameters for
Defined Value attributes that have 'Allow Multiple' enabled
Updates for Rock 12.0
Below is a summary of the updates for this version.
- A new Admin Toolbar button gives Rock admins the ability to temporarily disable caching for certain blocks via a cookie
- Added cache control settings to Page Properties for selecting the Cacheability Type and the maximum age for cached pages
- A new "Enable Archive Summary" setting on the Content Channel View block lets you use Lava to create a summarized list of older Content Channel Items
- Attribute values for Content Channel Items can be updated automatically using the Content Channel Item Self Update job
Updates for Rock 13.0
No updates made.Updates for Rock 14.0
Below is a summary of the updates for this version.
- Rock's personalization features help ensure the right content is getting to the right people
- Content Collections let you group content channels together to search for content across all channels in the collection
Updates for Rock 15.0
Below is a summary of the updates for this version.
-
The rate limiting feature lets you throttle pages,
to reject requests when they exceed the provided limits
-
New settings were added to the Campus Context Setter block
-
Urchin Tracking Module (UTM) filters can be added to
Personalization segments
Updates for Rock 16.0
Below is a summary of the updates for this version.
- The Content Library feature enables churches to share and download content
- Enhance worship with real-time Interactive Experiences through Rock Mobile
- Display relevant Content Channel Items by filtering using context
Updates for Rock 17.0
Below is a summary of the updates for this version.
- Adaptive Messaging tailors pre-defined messages based on an individual's data, view counts and date ranges
- Personalization Segments can be assigned to categories.
- New Request Filter for Geolocations such as: country, region and postal codes
- Short Link Advanced Settings
- Scheduled Short Links
Updates for Rock 18.1
Below is a summary of the updates for this version.
- Migrate HTML Content Channels to Structured Content Editing with ease.
- Short Links can now be pinned, categorized or copied.
- Rock now supports a new icon pack, Tabler
Welcome
Rock RMS was conceived and built by web designers and programmers just like you.
We understand that you might be a little hesitant about using Rock as your
Content Management System (CMS). In fact many of you are probably thinking
that you won't use Rock as a CMS at all. Instead, you're considering
integrating it to your current CMS using our REST API. We don't blame you.
We thought the same thing years ago when we developed our first relationship
management system. But we were wrong. Hopefully, you'll read this entire guide.
If you do, we think you'll see the light too. But let's be honest right up
front and address some of your top concerns.
Your Top Five Concerns With Using Rock as a CMS
-
Rock will never have all the features of my current CMS.
Yep, you're right. We'll never be able to have every feature that
your current CMS has, although chances are, they don't have every
feature we have either. Rock makes creating powerful websites easy.
We’ve stolen borrowed the best ideas from the top CMS
out there. We've leveraged our years of experience building sites to
create tools we’ve always wanted.
-
We'll never be able to find someone who knows Rock; everyone knows xxxxx.
We're working hard to establish an ecosystem full of vendors and
freelancers who can help you. Not only that, but documentation like this
manual makes it simple to quickly bring any web designer vendor up to
speed. You should probably hesitate to use any vendor who resists using
the tool the customer wants and instead uses their favorite tool.
Remember, you're the one who needs to live with the site.
-
Rock is built on Microsoft .Net. Come on, no serious CMS uses that.
While there are several popular .Net CMS systems (Umbraco, DotNetNuke,
Orchard) that really isn't the point. When looking for a CMS, you need
powerful features with blazingly fast performance that can scale. Rock
excels at each of these. Think about it this way: Should the builder be
judged by the tools he brings to the worksite or the building that
stands when he's finished? That's not to say we're not proud of our
tools. We LOVE .Net and we think you will too once you try it on.
-
There are a limited number of .Net webhosts to run Rock on and the
ones that do exist are more expensive.
True, there are fewer than our PHP/MySql cousins, but there are
numerous vendors to pick from. We've outlined a couple of recommended
choices in our Rock Solid External Hosting
guide. As far as price, .Net hosting on average costs about 20% more
than Linux hosting. On the lower end this translates into $2-$3 dollars
a month. The return on investment with using Rock as your CMS will far
outweigh this small difference.
-
But I’m a PHP developer; I don’t know .Net.
That's just a part of the job. Constant change
is the career you’ve chosen. Technologies like LESS, jQuery
and Bootstrap didn't exist two years ago. To not change is to
become extinct. Don't see yourself as a .Net Developer, instead
look at yourself as just a developer who today uses .Net. If
you're a developer, you'll have no trouble with .Net. It's an
elegant and well-designed language.
But What Are the Benefits?
Hopefully you're starting to see that some of the barriers aren't as
large as they may appear. But there's no reason to change for change's
sake; the benefits must out weight the cost. Reading through this
manual will show you numerous ways to exploit the power of Rock's
CMS features. But let’s touch on one simple example. The biggest
"killer app" of Rock is personalization. Just picture adding the
markup below into your baptism page using Rock's on-page HTML editor
(You’re going to love the editor!):
{% if Person %}
    {% if Person.BaptismDate != '' %}
        {{ Person.NickName }}, remember the joy of your baptism? Share that joy
        with a friend who hasn't yet taken the plunge at one of our upcoming
        baptism events!
    {% else %}
        {{ Person.NickName }}, now is the time! Don't put off baptism any longer,
        take the plunge at one of our upcoming events!
    {% endif %}
{% else %}
    Take the plunge at one of our upcoming baptism events!
{% endif %}
Rock uses an upcoming templating engine called Lava.
Paired with Rock data, Lava is very powerful. The markup above does this:
-
If the user is logged in and has been baptized it shows the message:
"Alisha, remember the joy of your baptism? Share that joy with a friend
who hasn't yet taken the plunge at one of our upcoming baptism events!"
-
If the user hasn't been baptized yet they will see: "Alisha, now is the
time! Don't put off baptism any longer, take the plunge at one of our
upcoming events!"
-
Otherwise, if the user is not logged in, the greeting reads:
"Take the plunge at one of our upcoming baptism events!"
Armed with just a little knowledge of Lava, we've created a very personal
experience on our site; one that is much more likely to draw the user in and
promote action. Are you starting to see the power of Rock? And we're just
getting started.
Anatomy of Rock CMS
Grab your lab partner and let's dig in to what makes the Rock CMS tick. There's
no better place than to start at the top with sites and work our way down to the
components that make up a page. Pass the scalpel and let's start cutting.
Sites
The top of the CMS hierarchy is the site. Each website you create should be
created as a unique site. Think of sites as a collection of related pages that
share a consistent look and feel. Site aren't limited to external websites
though. You can use them to contain your check-in pages or a set of pages for
a metrics dashboard.
Sites are created and managed under
Admin Tools > CMS Configuration > Sites.
Be sure to use the chapter Creating a New Site
before setting out on your own.
Themes
Themes are a set of resources that add styling to the pages of a site. The
theme is defined at the site level. This makes it very easy to change the
look of an entire site with a single configuration change. You can read more
about themes in the chapter
Working With Themes.
Pages
The concept of pages is pretty obvious; they represent a single web page.
Unlike many CMS however, the page does not exist as a file on the website.
Instead, a page is dynamically assembled by Rock with each request. This
allows each page to be personalized by the person requesting it and allows
you to secure portions of the page based on the security rights of the user.
Pages are arranged in a parent-child hierarchy. This hierarchy allows us
to build dynamic menus.
Layouts
Each page is configured to have a specific layout. This determines the
content areas (or zones) that the page has. Available layouts are defined by
the theme that the site is configured to use. While you can create as many
new layouts as you'd like, we strongly recommend that you use the standard
names for reasons that will be made obvious in future chapters.
Zones
Zones are content areas that are defined by the layout. They represent things
like the header, navigation menu, footer and content areas.
Blocks
Blocks make up the actual content of the page. They come in all shapes and
sizes. Each has a specific purpose. The most common block is the "HTML Content"
block. This block allows you to display and edit HTML content to a specific
zone. Other blocks are used to generate navigation menus, list groups, show
maps, etc. Think of blocks as your Legos® that you can use to build a world
of new inventions.
Blocks can be placed on either a page or a layout. When tied to a layout
they are displayed on every page that uses the layout. This is very helpful
when adding content like navigation in the header or footer text that should
be the same across all pages.
The Anatomy of a Page
Now that we've covered all of the components of the Rock CMS system let's
look at a visual representation of a page.
Anatomy of a Page
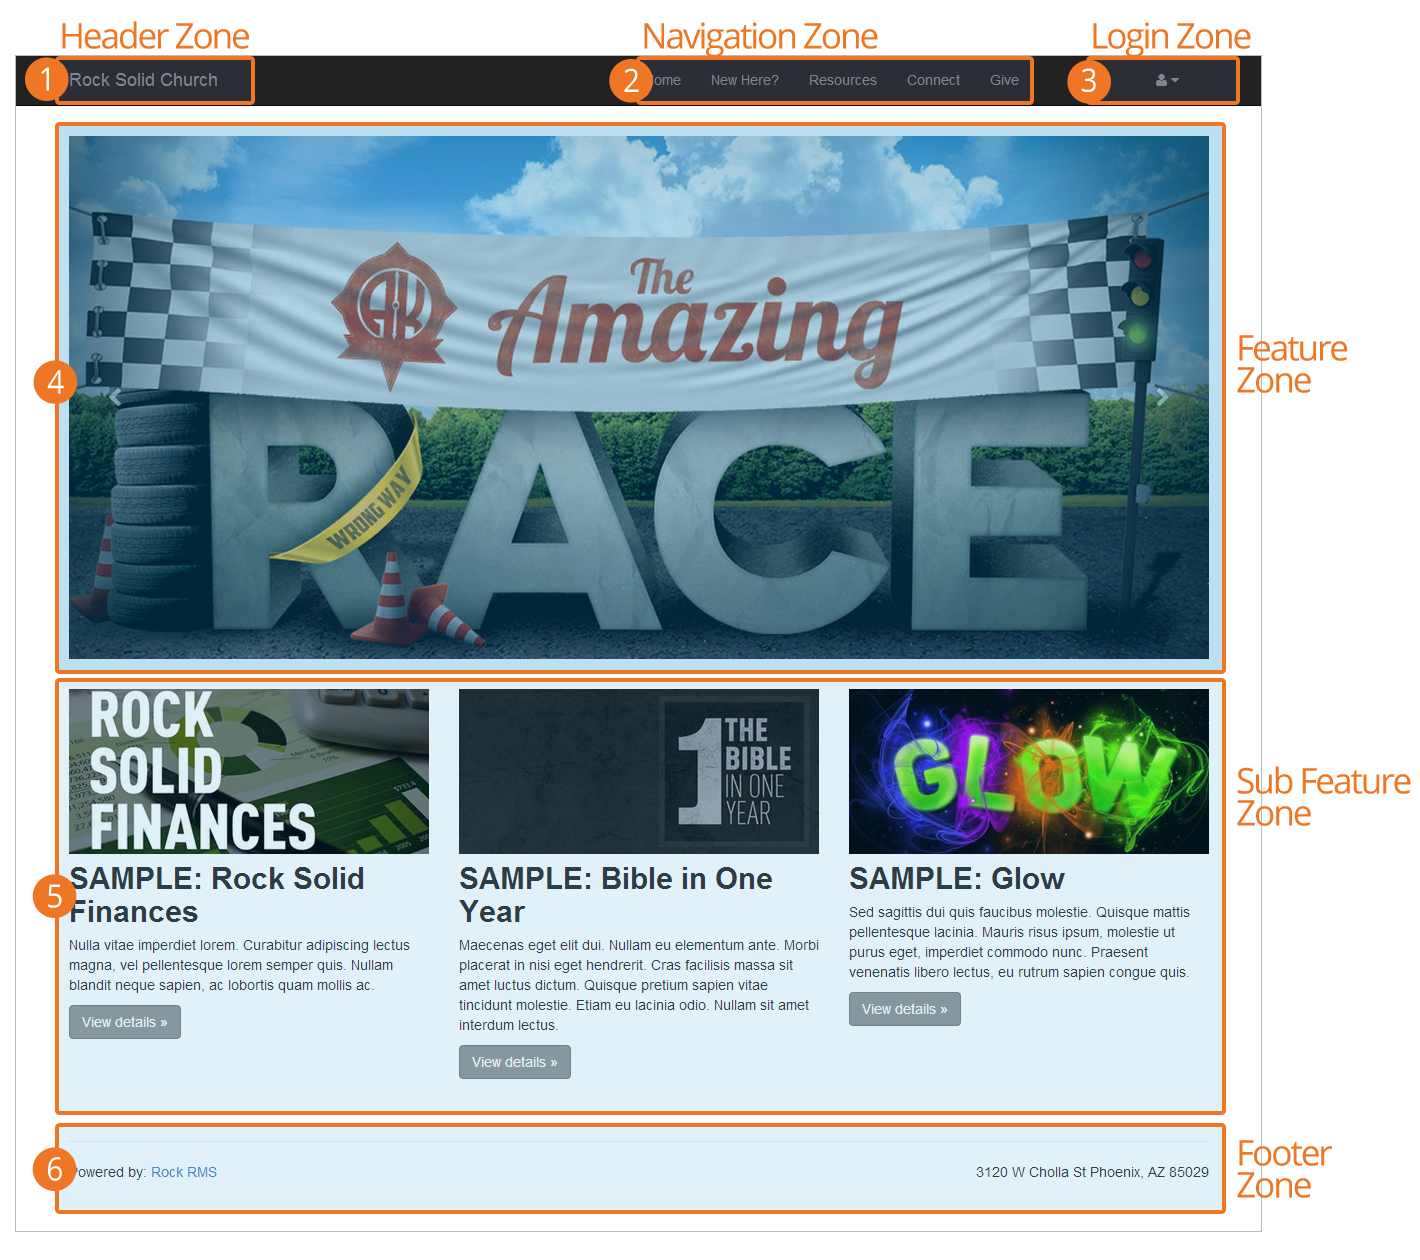
- 1 Header Zone
- The header zone is used for the organization's logo and tagline.
- 2 Navigation Zone
- The navigation zone holds the site's main menu.
- 3 Login Zone
- The login zone allows users with accounts to access protected portions of the site.
- 4 Feature Zone
- The feature zone holds the main content of a homepage which in many cases will be an ad rotator.
- 5 Sub Feature Zone
- The sub feature zone seconary ads or content on the homepage.
- 6 Footer Zone
- The footer zone wraps links and content in the footer.
Managing Content and Pages
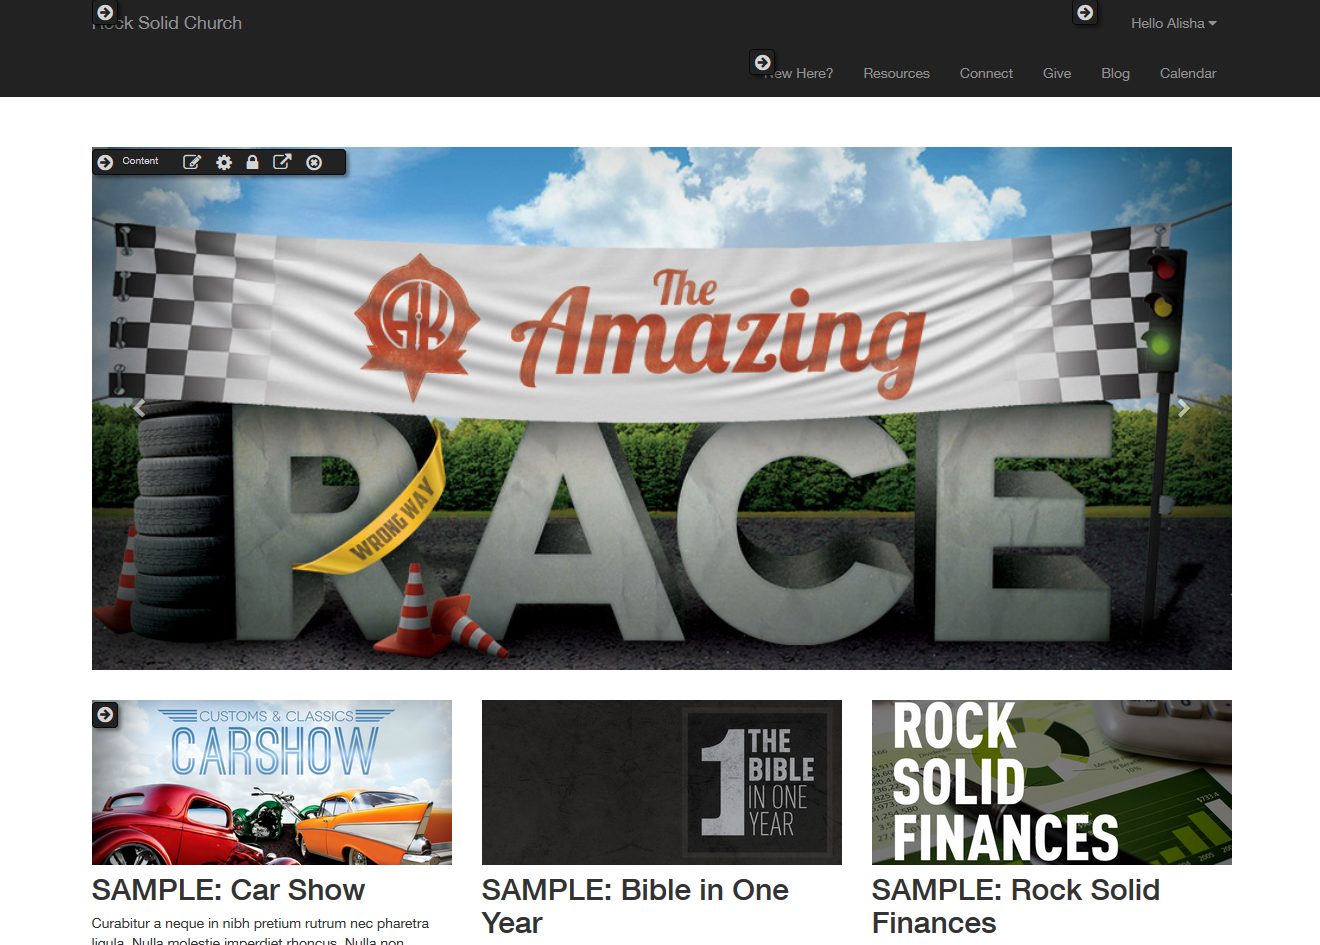
The Admin Toolbar
is the gateway to a majority of Rock's content management features. This bar is
displayed at the bottom of each page that the logged in user has rights to manage.
Just hover over the bottom of the page to pop up the toolbar.
Admin Toolbar

Page Load Time
When we started to plan for Rock, we listed out our high-level goals for the
project. One of these was "Speed as a Feature." For us that was more than
just words, we wanted it to real and measureable. One of the first features
we added was the page load time in the admin bar. From that moment on speed
was put in front of us on every page we loaded. We kept it there, not only as
our contract with you, but also so you could measure your custom modifications.
Block Configuration
Clicking the block configuration button in the admin toolbar will bring up
a fly-out menu over each block on the page. Rolling over these menus will
allow you to:
-
Block Settings: This brings up a dialog that allows you to manage
the block settings for that block.
-
Block Security: This item allows you to edit the security of the
block. This not only allows you to control who can view a block, but
also who can edit and administrate blocks.
-
Move Block: Selecting this item allows you to move the block to a
different zone on a page. You can also move the block from the pages
zone to the layouts zone. This will make the block available to each
page that uses the layout.
-
Delete Block: For everything there is a season; a time to add and
a time to delete. When it’s time to delete, use this option.
Block Flyout
Page Properties
The page properties dialog allows you to edit all of a page's settings.
We'll walk through each in detail.
Basic Settings Tab
Page Settings - Basic Settings
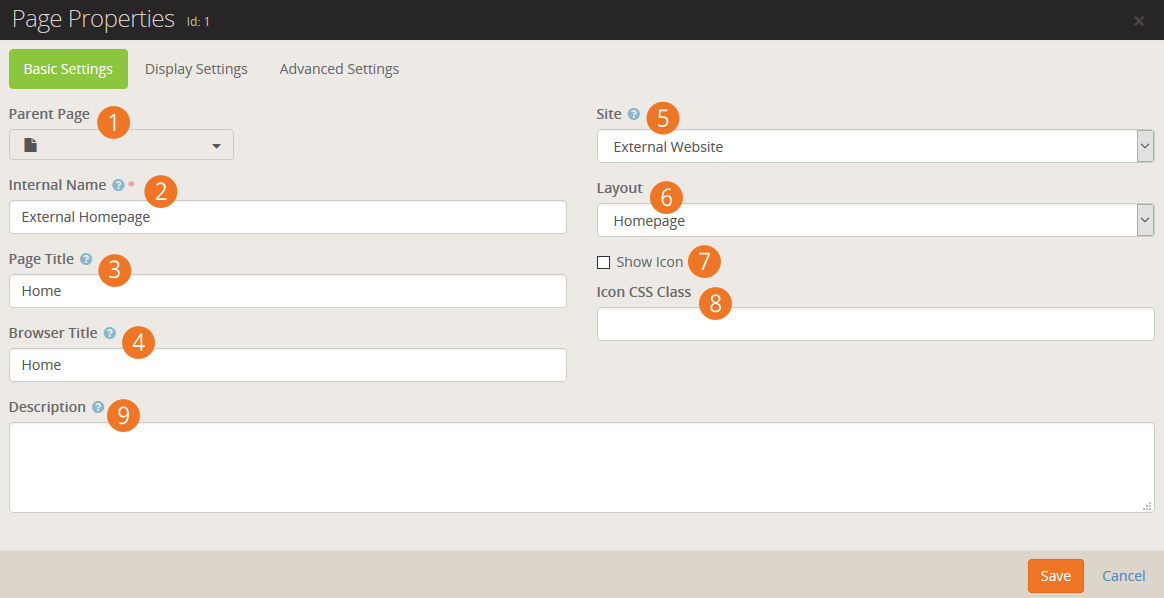
- 1 Parent Page:
-
You can easily change the parent page for your selected page.
This will alter where that page is displayed in the navigation.
- 2 Internal Name:
-
This is the name of the page that is used
in the admin menus and page pickers. Often, in these situations,
you want the page to have a more descriptive name than you might
want to be displayed in a menu on the site. For instance you
might want the homepage of a site to have the internal name of
"Youth Sports Homepage" but when you're on the site the title
should be simply "Home" on the menu.
- 3 Page Title:
-
This is the name that will be used for the page title element
on the page. It will also be used in the navigation menus and
breadcrumbs.
- 4 Browser Title:
-
For Search Engine Optimization it's often
important to have a different name in the browser's title. This
setting allows you to edit this.
- 5 Site:
-
Each page belongs to a site. You can change the site for a
page with this setting. Keep in mind that the page gets its
theme from the site so changing this setting could change how the
page is displayed.
- 6 Layout:
-
This selects the layout that the page should use.
Further discussion of
layouts can be found in the chapter Looking Deeper at Layouts.
- 7 Show Icon:
-
An icon can be used in the page title and breadcrumbs if it
is enabled with this setting.
- 8 Icon CSS Class:
-
This setting allows you to enter the CSS class for the font
icon you wish to use. While Font Awesome is installed, there's
no reason you can't add your own alternate font icon
collection and enter your custom class here. When using Font
Awesome, you should use the syntax
fa fa-.
- 9 Description:
-
The description gives a short summary of the page and its
intent. You can use this as "internal documentation" or,
using Lava, you can use it in your menus and page listings.
Display Settings
Page Settings - Display Settings
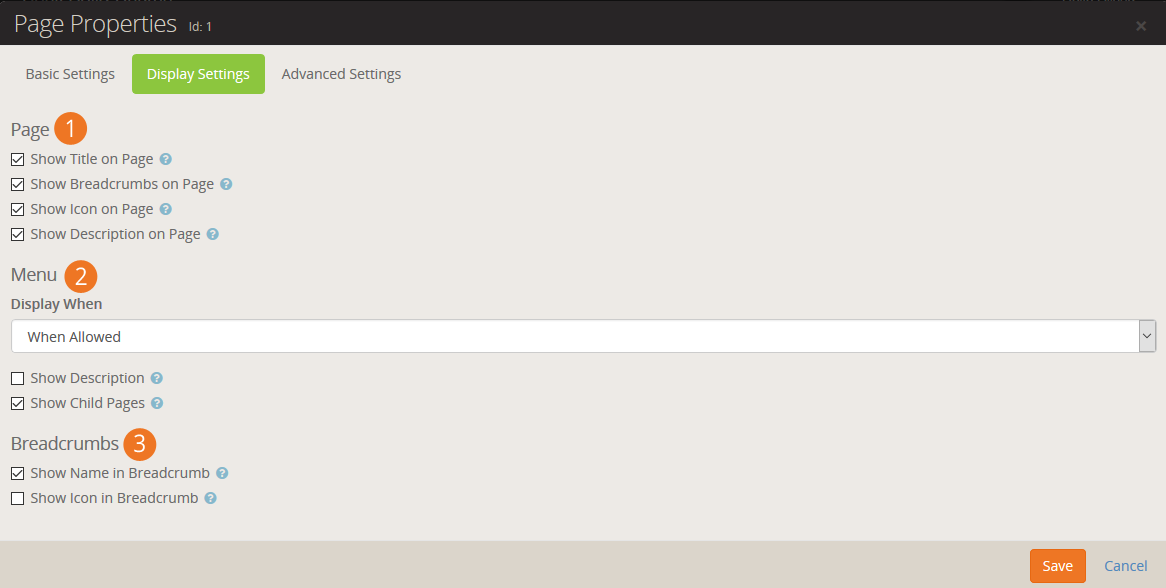
- 1 Page Display Settings:
-
These settings control the view state of various components
of the page (title, breadcrumbs, description, etc.) How
these actually render on the page is somewhat dependent on
the theme you are using.
- 2 Menu Display When:
-
How and when a page is displayed in a menu has several different options.
-
When Allowed:With this default option a page will only be
displayed in the menu when the user has view permissions to the page.
-
Always:You may want some pages that require a login to be
displayed in the menu even when a user isn't logged in. When
the user clicks the link, they will be asked to log in before
proceeding to the page. This is helpful for things like group
toolboxes where you want the user to see the option and then log
in before they can view the contents.
-
Never:Some support pages aren't meant to ever be navigated
to directly. Setting them to never display ensures that a user
never accidentally views them in a menu.
- 3 Breadcrumb Settings:
-
These settings determine whether a page should be displayed in the breadcrumbs
and if so, whether an icon should be included. Some designers set the name to
not display but they do show an icon for homepages.
Advanced Settings
Page Settings - Advanced Settings
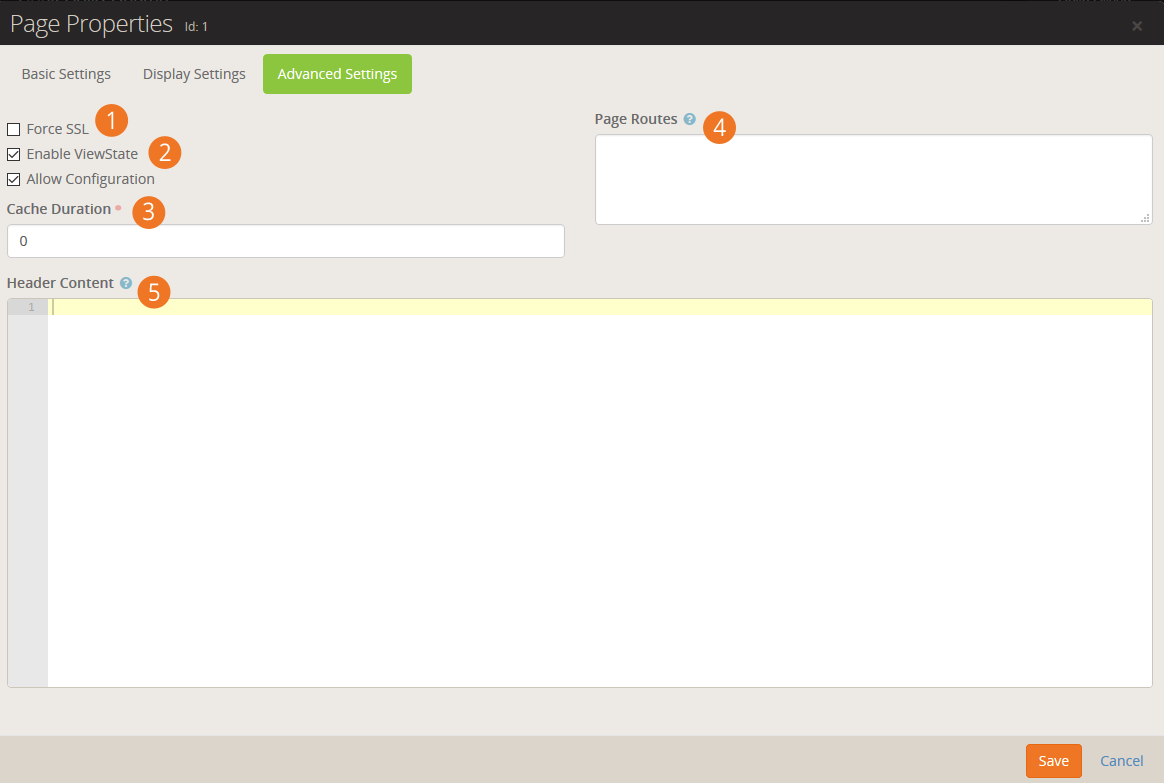
- 1 Force SSL:
-
This ensures that the page will always load using SSL. This is
important for pages like giving or online registration where
credit card information will be used on the page. This does
require that your webserver is configured to support SSL.
- 2 Enable ViewState:
-
ViewState is a .Net technology that allows a page to remember it's
state across postbacks. If this doesn’t make complete sense to you,
you probably should not uncheck the box. In most cases bad things
will happen if you do.
- 3 Cache Duration:
-
This setting sets a page cache header in the page that tells the browser
to cache the page locally for the provided timeframe.
- 4 Page Routes:
-
You can enter page routes for the page here. Several routes can be
configured by delimiting them with commas. For more see the
Routes
chapter below.
- 5 Header Content:
-
As a web designer we know you'll have custom scripts, meta tags, styling
and more that you'll want to add to the page's header. Whatever text you
add to this setting will be placed into the page's header.
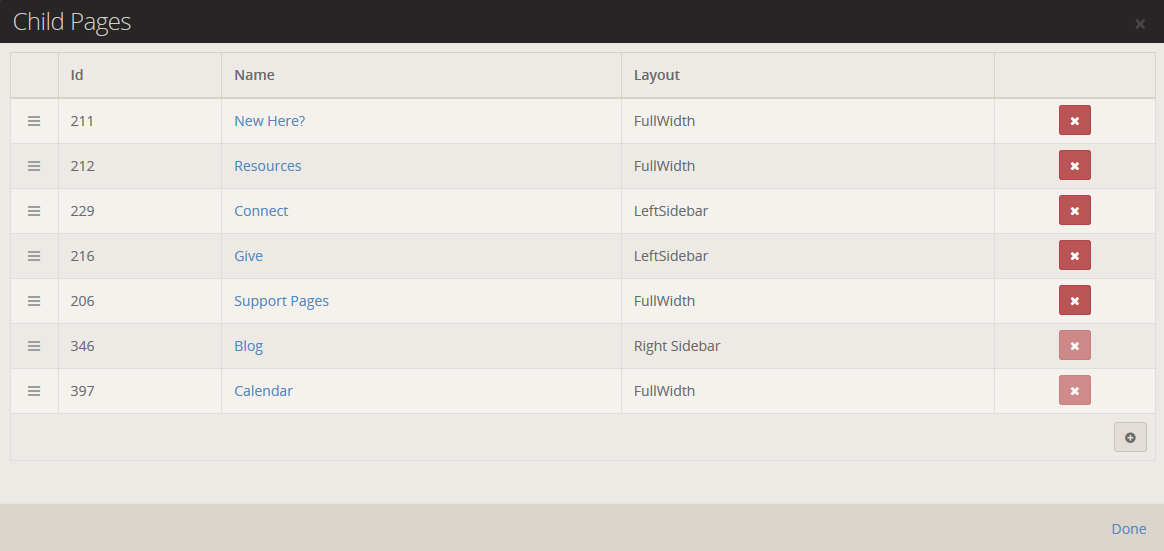
Child Pages
The child pages dialog allows you to see a list of child pages of the current page.
From this list you can reorder the pages, delete a page or add a new page.
You can also use this list to navigate to a page that might not be available in
the menu.
Child Pages Dialog
Page Zone
Clicking the Page Zones will enable the zone fly-out menu for each zone
defined on the page. From this menu you can bring up the zone dialog below.
Page Zone Dialog
From the zone dialog you can add or delete blocks in a zone. The tabs at the top
of the page determine if the blocks will be added to the current page or
the layout. Adding the block to the layout will enable it to be shown on
all pages that use that layout.
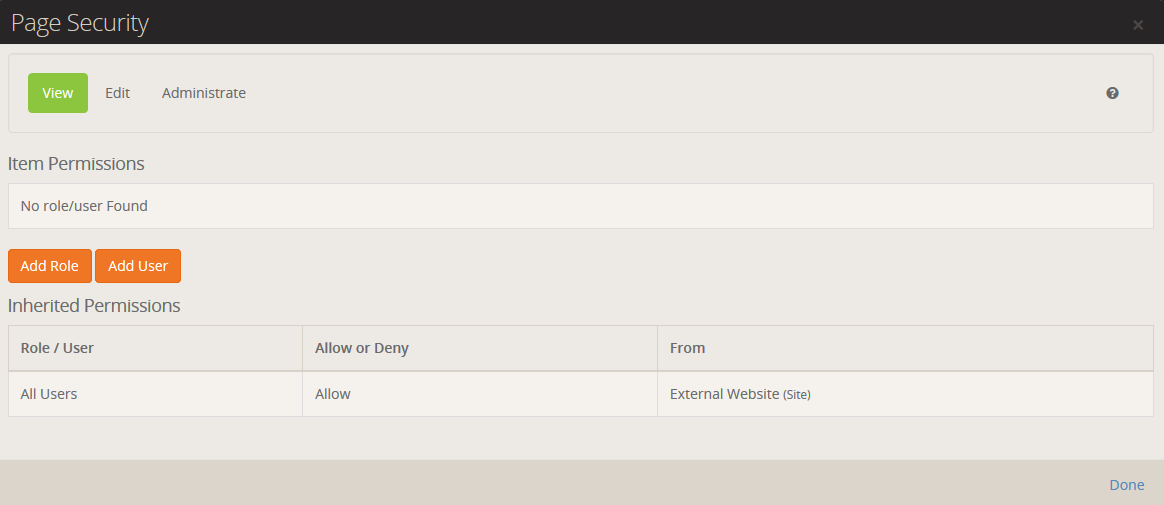
Page Security
This dialog allows you to set security for the page. This allows you to determine who
can view and administrate the current page. Note that page security is hierarchical.
If no specific security rights are defined by a page, it will use the security settings
of its parent and its parent's parent. If no page above it defines any specific
rights it will use the rights defined for the site. This allows for a robust and
flexible security implementation with minimal configuration.
Security Dialog
Rock Information
Version Info
Page Settings Import/Export
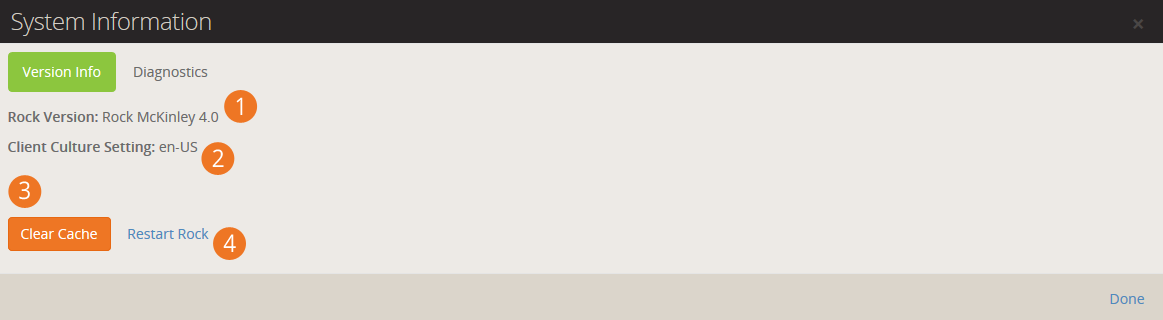
- 1 Rock Version:
-
This shows the current version of Rock that you are running.
- 2 Server Culture Setting:
-
These are the language and culture settings that the webserver is
configured to use. This setting helps Rock determine how some of
the international settings should be configured.
- 3 Clear Cache:
-
As you'll see, Rock's cache is an incredible thing. It drastically speeds
up the performance of the site. It’s also very smart and will clear old or
modified content. At times though, you may need to clear the cache to
remove information that is no longer valid. If you make a change and
don't see it reflected on a page, consider trying to clear the cache
with this option.
- 4 Restart Rock:
-
Rarely you might get into a situation where you need to "reboot" Rock.
This button acts as Rock's reboot switch.
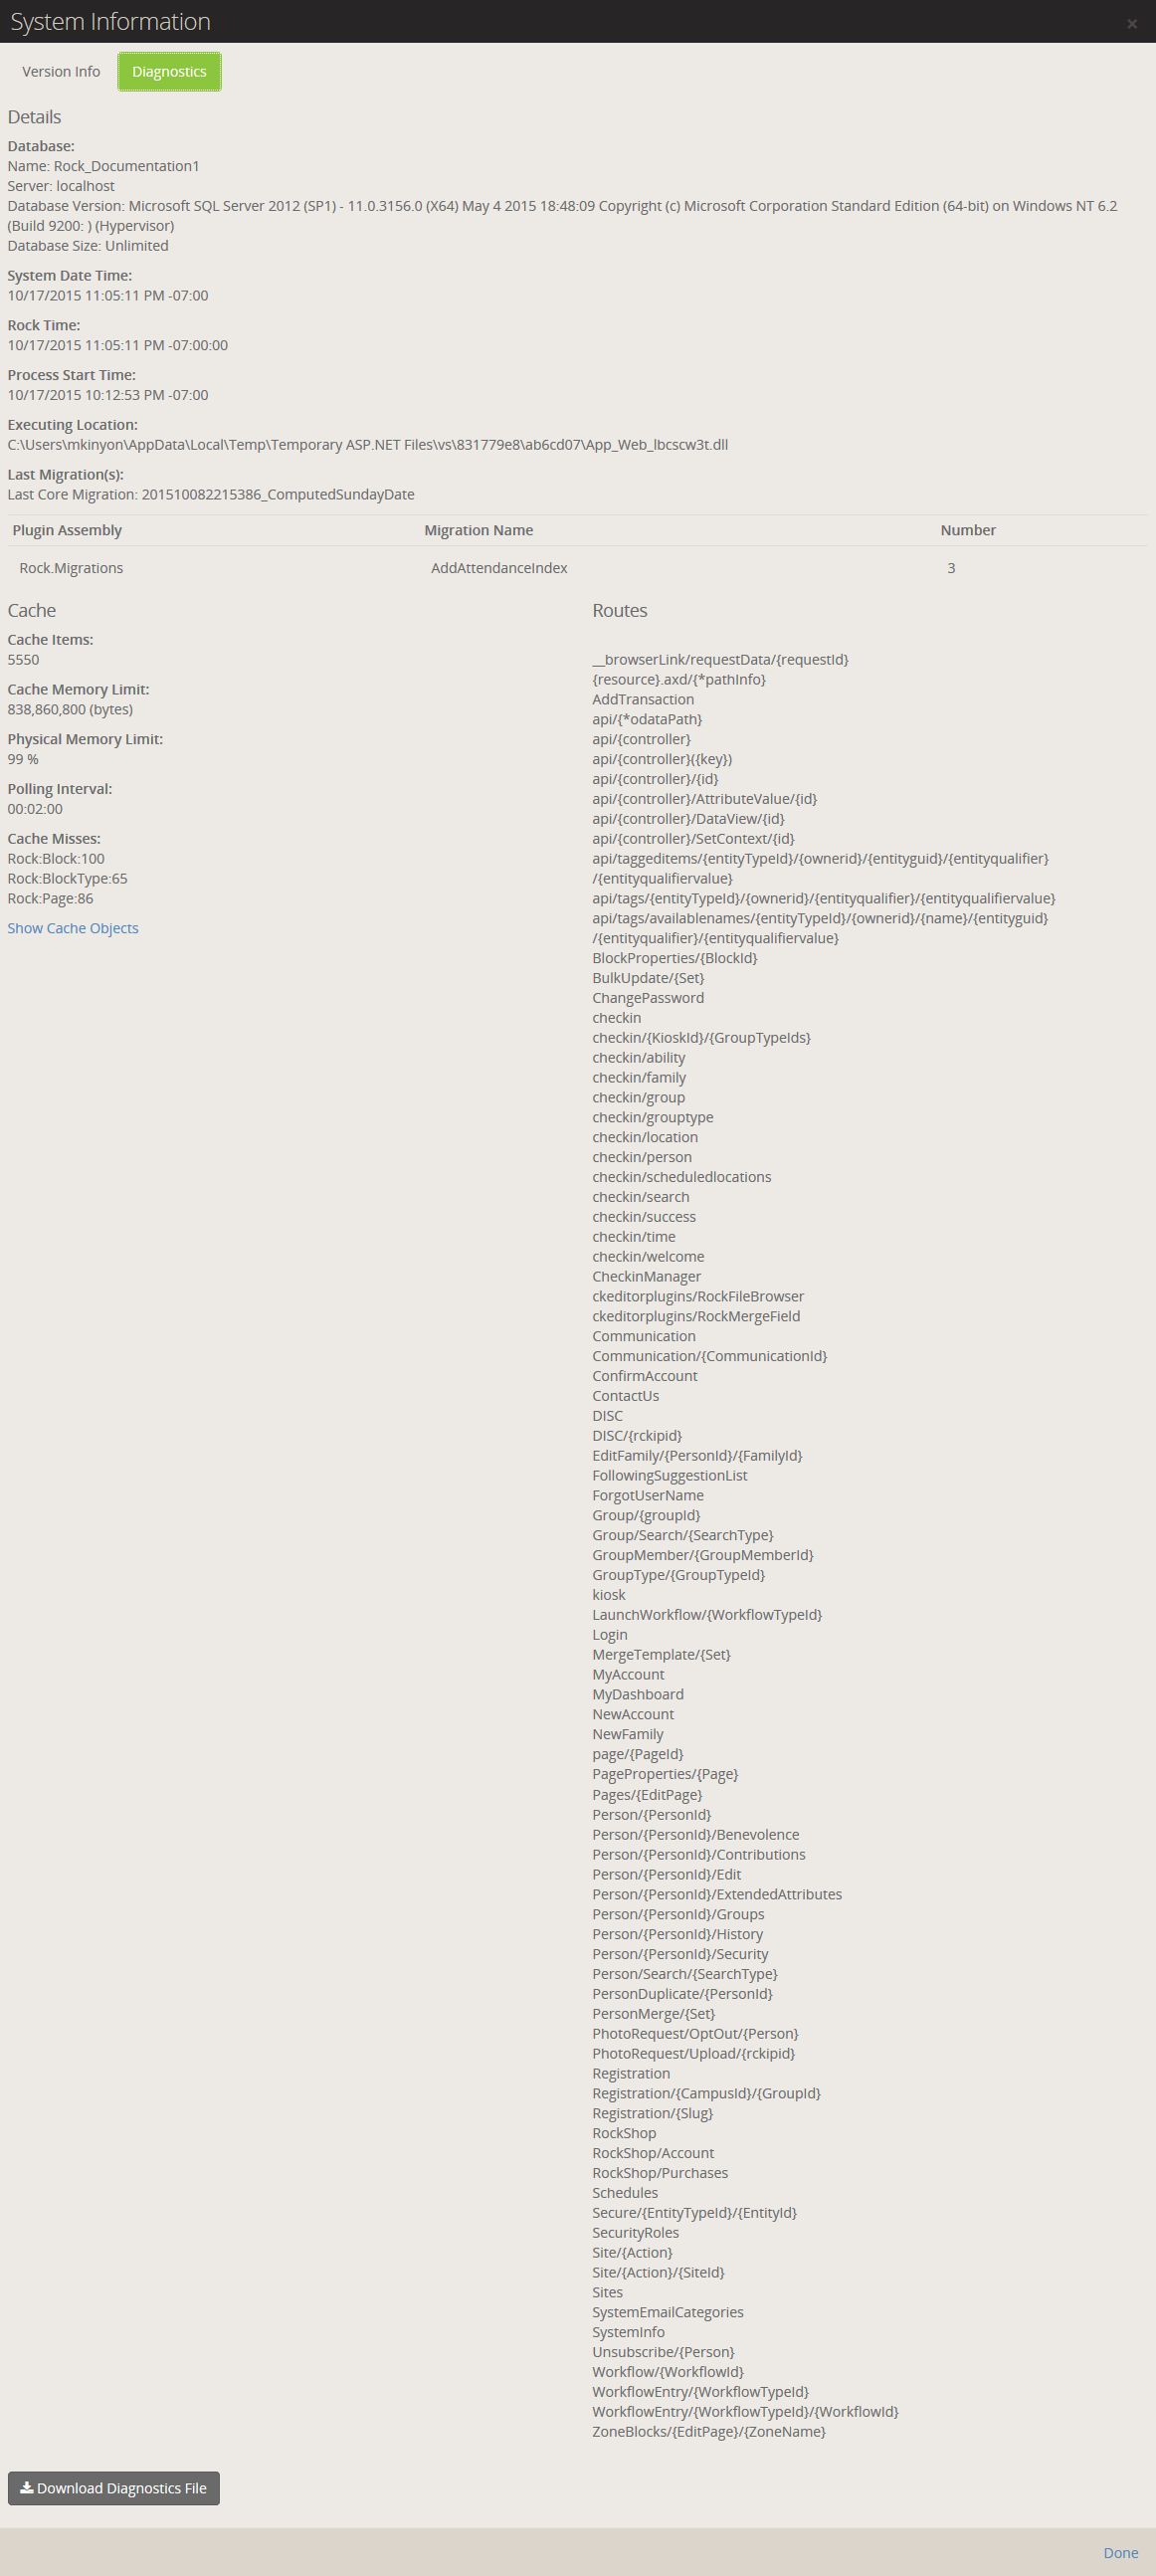
Diagnostics
The diagnostics tab lists the complete configuration of your Rock
environment. It’s useful when working with others to debug an issue.
Diagnostics Dialog
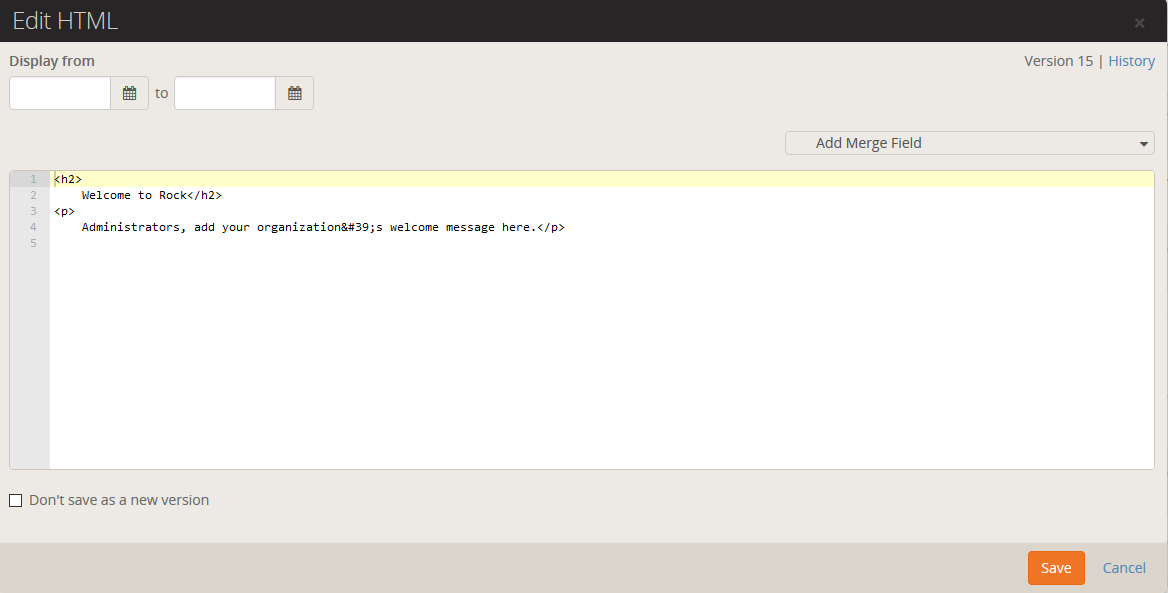
HTML Content Block
The HTML Content block is one of the most powerful blocks provided by Rock. As
someone who creates and maintains websites, you're going to love it. Let's
walk though each of its features in detail.
Basic Usage
To edit the HTML, click the
icon in the Admin Toolbar
at the bottom of the page. Next, place your cursor over the (Block Fly-out)
toolbar and select the
(Edit) button. This will bring up the edit modal (shown below). This modal allows you
to edit the contents of the HTML. You can also set a date range that the
content is valid for. This is great for adding date-sensitive messages.
HTML Editor
HTML Content Block Settings
While the default HTML block settings are great for typical usage, you have a
ton of extra options that you can use to do some really cool things. Like
any block, to get to the settings click the
icon in the Admin Toolbar
at the bottom of the page and then select the
button from the block fly-out menu. This will bring up the block settings dialog.
Let’s look at each setting in detail.
Editor Mode
The HTML editor has two different edit modes: code and WYSIWYG
(What You See Is What You Get). The code editor mode (default) gives
you a very powerful and rich code editor that allows you to modify
your HTML in a highly controlled manner. If you're comfortable writing
HTML you'll love this mode as it will feel like your favorite code
editor. Really, there are so many features. Check-out the
keyboard shortcuts
#mindblown
If you are more comfortable using a rich text editor that creates the
HTML for you, change Use Code Editor to No.
This will change the edit to a WYSIWYG editor. This editor includes a very nice
image and
file uploader that makes it simple to move your files to the server.
There is also a merge field {}
button that lists all of the personalized merge fields you can add to your content.
WYSIWYG Has Its Limitations
While the WYSIWYG editor is very powerful it does have its limits.
The HTML markup it produces may frustrate the advanced web designer.
We recommend using it to allow non-technical staff the ability to
edit small portions of content. It works great for limited non-technical
use. As you start to edit large portions of the page you may want
to have more control of the HTML markup. This is where the code
editor mode excels.
Document and Image Root Folders
The next two settings set the root folder for the image and document
uploaders. This allows you to customize the location per block. This
is helpful when you give a specific department access to edit a
portion of their website. Instead of giving them access to the
default contents folders, you can give them their own sub-directory.
This helps keep things nice and tidy (OCD'ers unite!)
What’s Up With the Tilde
You may notice that many file paths in Rock start with the ~ character.
This is a shortcut character that represents the application's
home directory.
User Specific Folders
In some rare cases, you may want each person using the HTML editor
to have access to their own directory when editing. We do this on
the Rock website for the Q&A. Each person can upload images to
include in their posts. However, we don't want individuals to
see/edit/delete each other's photos on the server. By enabling the
User Specific Folders
option, each person will be given their own folder under the document
and image root folder for placing their images.
Cache Duration
Caching is your friend, but to understand it you have to know what's
going on under the covers. Whenever a user visits a page, Rock has to
dynamically create the page by querying the database for all kinds
of content. Rock must ask for and receive the most recent content
from the database for each HTML block on the page. While this is
relatively quick, it does take time. Caching speeds this up by
keeping a copy of the content in memory so a trip to the database is
not needed. This can dramatically decrease the load time of a page.
You may notice that the first time a page loads it's not as fast as
subsequent visits. That’s caching in action.
The Cache Duration
setting tells Rock how long to store this copy, in seconds, before
going back to the database for a new copy. This value is set to one
hour by default. It's safe to increase this number because when the
content is updated the cache is automatically expired. Setting it
too high, though, could increase the size of the cache.
Don’t Cache Personalized Content
If you have used merge fields in your content (similar to the baptism
example in the introduction) it's important that you disable
caching by placing "0" in this setting. Otherwise, your users
will see the personalized message from the first person who
visits the page. That’s embarrassing...
Context Parameter
Use of context parameters is insanely powerful but a little tricky. Before we discuss
how they can be used in the HTML editor be sure to first read about them in the
Using Context chapter below.
The HTML Editor can dynamically merge in the contents of the context parameter. Say for instance
your page allows the guest to switch the Campus
context. You may wish to have the campus name appear in the content of your page. This is also useful when
you have a page set with a group context.
The merge field format is Context.[ObjectTypeName].[ObjectField]. For example to display the current campus context name,
you'd use a merge field of {{ Context.Campus.Name }}. You do want to make sure that the HTML Content block is not
caching, otherwise the content will not be dynamic.
Note
It is not required to set the "Entity Type" setting under the Context section of the HTML Content block settings for
this to work, however, you may need to do that in some cases so that the page knows to load a particular object type
into context.
Context Name
In many cases you might have content that you would like to be the
same across a wide number of pages. A good example of this might be
a copyright statement in the footer of each page. Adding this to each
and every page would be a painful task not to mention having to
update it every year. Remember that while blocks live in a specific
zone they can be applied to a page or a layout. When assigned to a
layout, the content will appear on every page that uses that layout.
That gets us closer to our desired state, but we still need to update
the content on every layout. Enter Context Names.
When you provide a context name, you are able to link HTML content
across HTML editor blocks. All blocks that use the same name in the Context Name
setting will share the same content. Edit in one place and it will
change in all blocks.
So for our footer example we could put the name "website-footer"
into the Context Name
of each HTML block in every layout. After setting this up we can
easily update it on every page with a single edit. Pow!
Require Approval
There is a leadership principle that says, "Trust, but verify."
That's especially true when you give a non-technical staff member
access to edit your external site. There are times when you'll want
to see their changes before they go live.
By enabling the Require Approval
box, all edits made by users who do not have Approve
rights to the block will not be shown until someone who does have rights
approves them. This approval can be done under Tools > HTML Content Approvals.
Keep Your Eye On This Page
There are currently no notifications that content needs approval
so keep your eye on this page. Notifications are coming soon.
When you enable approvals, versioning is automatically enabled too.
Otherwise, the content would disappear from the page until the
approval takes place. With versioning enabled, the previous content
will show until the new content is approved.
Versioning
When you make an edit, sometimes you may want to keep a
copy of the previous content. Enabling versioning will keep all
previous copies of the content. While this is nice to have for use
as a backup, it's even more powerful when used with date ranges.
When versioning is enabled, Rock will pull the most recently approved
content that meets the date range. This is very powerful when adding
seasonal or temporary messages to a page.
Say for instance you want to add a highlighted message about an
upcoming event. You could add a new version of the content with the
highlighted message and provide a date range of when it should be
shown. Working ahead (with Rock you'll actually have time to), you
might add the content two weeks before it should be shown. Rock will
keep the current content visible until the start date. Then the new
event-specific content will be shown. After the end date, the
previous content will again be what your visitors see. No need to
remember to take it down. See all the time you're going to save?
Pre/Post HTML
You might be thinking, "That’s a lot of features." But wait, there's
more. Switching over to the Advanced Settings
tab you'll find a couple more options. Sometimes you might want to give
your staff access to edit portions of the page, but you don't want
them to mess up parts of the content. For instance, there may be a
start and end paragraph you don’t want them to change or some special
markup that's needed for styling. While you could add a secured HTML
block before and after to hold this content, there's a much simpler
solution. Content you add to the Pre/Post settings will be placed -
you guessed it - before and after the content they can modify. This
saves having to add these additional blocks.
Merge Fields
It's time to change the paradigm of how you write content. With Rock,
content doesn't have to be impersonal any longer. Using merge fields,
you can customize the content for the logged-in user. Not only can you
add their name, but you can look at all of the person attributes and make
the content relevant to their relationship with your organization. Let's
revisit the example from the introduction.
Adding the following on a baptism page allows for a personal and actionable content:
{% if Person %}
    {% if Person.BaptismDate != '' %}
        {{ Person.NickName }}, remember the joy of your baptism? Share that joy
        with a friend who hasn't yet taken the plunge at one of our upcoming
        baptism events!
    {% else %}
        {{ Person.NickName }}, now is the time! Don't put off baptism any longer,
        take the plunge at one of our upcoming events!
    {% endif %}
{% else %}
    Take the plunge at one of our upcoming baptism events!
{% endif %}
Note the use of Lava syntax to add logic to the page. Here's
how the markup above would look:
-
If the user is logged in and has been baptized it shows the message:
"Alisha, remember the joy of your baptism? Share that joy with a
friend who hasn't yet taken the plunge at one of our upcoming baptism events!"
-
If the user hasn't been baptized yet they will see: "Alisha, now is
the time! Don't put off baptism any longer, take the plunge at one
of our upcoming events!"
-
Otherwise, if the user is not logged in they are greeted with:
"Take the plunge at one of our upcoming baptism events!"
Besides information on the current person you also have access to all organization attributes and items in the context of the page.
For more information on Lava syntax see the Lava Basics.
Pages vs Layouts
While it's already been noted before, remember that blocks can be
assigned to either a page or a layout. When a block is assigned to a
layout, it will be displayed on all pages that use that layout. This
is especially useful with the HTML editor block as you'll often want
bits of content to be consistently applied to several pages.
Custom Content
Rock's static content tools are great. We've already seen how we can customize our
messaging using the HTML editor. Sometimes though, you still need the ability to
add structured dynamic content to your site. In the old days that meant firing up
a development tool and writing your own code. While custom coding is certainly an
option in Rock, in many cases it's simply not needed.
Let's take a look at how Rock’s dynamic content tools can having you extending Rock in no time (and without
learning c#). Here are the three main components we'll review.
Dynamic Content Diagram
- 1 Content Channel Types:
- Channel types define the structure for the dynamic content tools. They define
what attributes are available on both the channels and content items. Rock ships with
three different channel types: Website Ads,
Bulletins and
Blogs.
- 2 Content Channels:
- Content channels are implementations of the channel types. For instance, because
there is a channel type of Blogs,
you can make blog channels for the organization's website, a specific person and/or a
specific area of your organization.
- 3 Content Items:
- These are the specific data elements that make up a content channel. For a blog
channel these would be the specific blog posts; for the website ads channel these
would represent the specific promotions.
Channel Types
The first concept we'll discuss is channel types. As you work on your site,
look for repeating data patterns. Items like web promotions are well-structured
having data items like title,
image,
summary text,
intended audience
and content.
While you could edit all of this content with the HTML editor, hopefully you
can already see how that would be very tedious and prone to error. Here's
where content channel types come into play.
Content channel types help define reusable data structures (think of a
container for specific types of data). Rock ships with a couple of these
channels already defined. Let's look at each one to see its role and purpose:
-
Website Ads: This channel type is used to help manage
your website promotions. It allows your staff to enter promotion
information that your website administrator can approve, with the
option to edit, and then publish to the site.
-
Bulletins: This content type is used to help manage
the bulletin creation process.
-
Blogs: The blog content type is useful to build blogs for your organization.
-
Universal Channel Type: This is a unique and powerful tool to help you from having to create
'One-off' channel types. We discuss this channel type in more detail below.
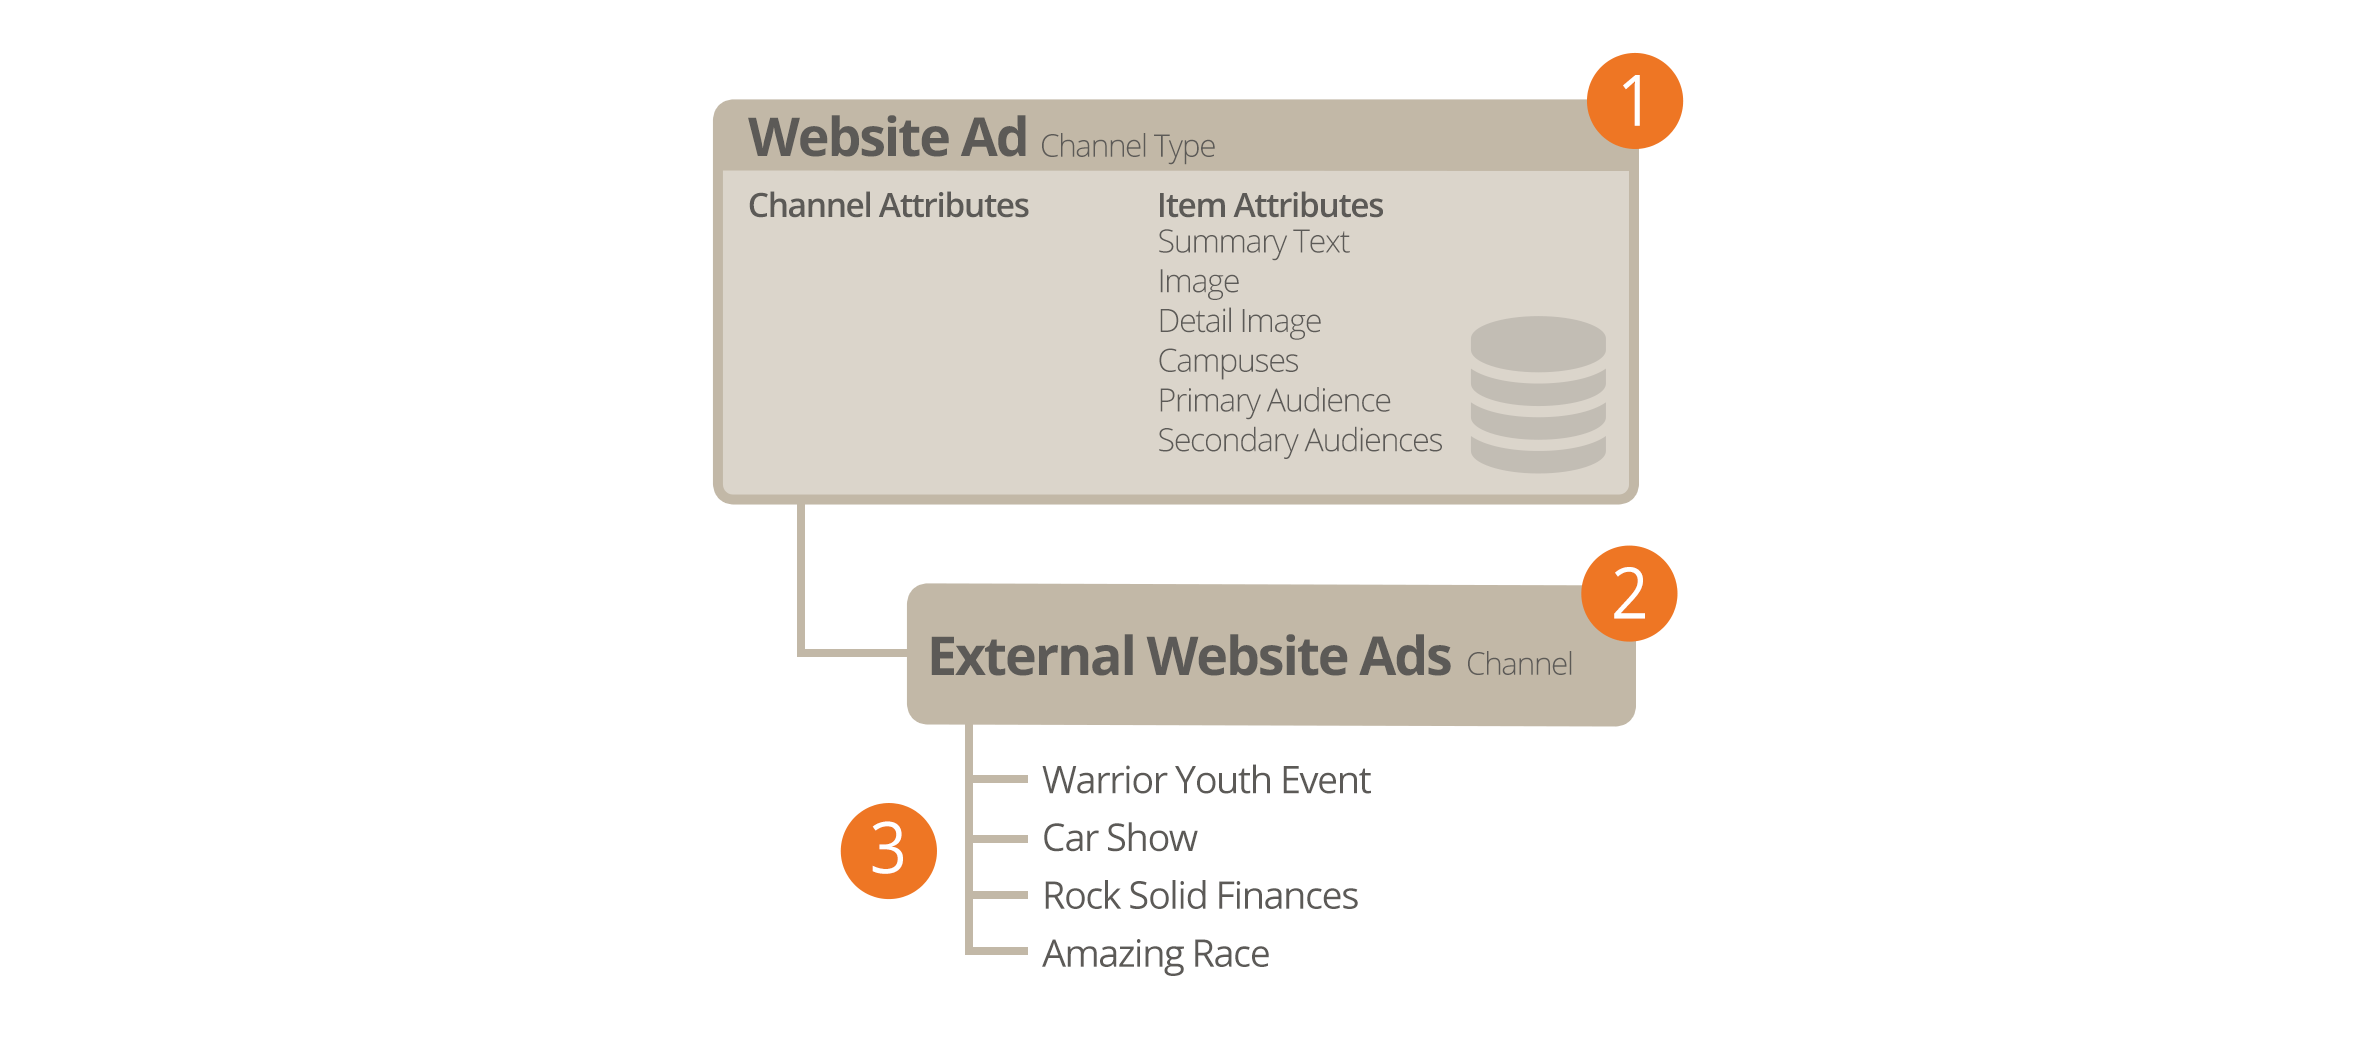
Anatomy of a Content Channel
As we mentioned before, the role of the content channel type is to define
the container and settings for a particular type of content. Let's walk
through the administration screen found under
Admin Tools > CMS Configuration > Content Channel Types.
Content Channel Type
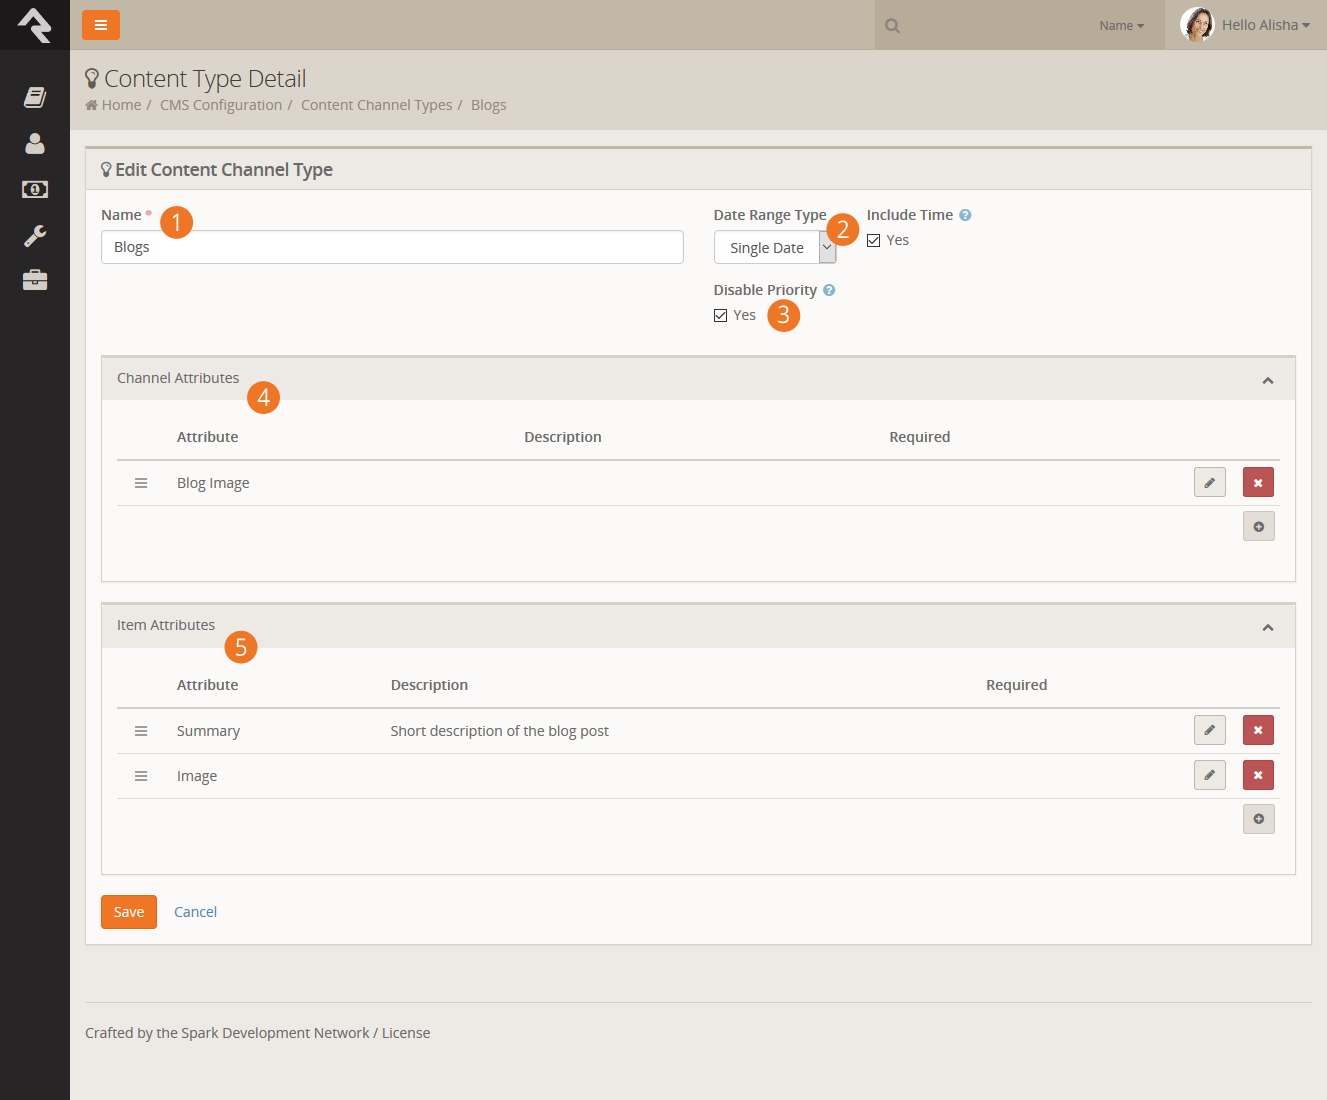
- 1 Name:
- The name of the content channel type.
- 2 Date Range Type:
- The individual content items that are added to the content channels can be
valid for a specific date (for example a blog post would have a
specific publish date) or a date range (a web promotion ad would be
valid for a range of dates).
- 3 Disable Priority:
- Some content items might have the concept of priority, while
others may not. For instance, a web ad might be low priority (which
would limit when and how it's shown), while a blog post would not
need to use the concept of priority. This setting allows you to turn
the need for priority on or off.
- 4 Channel Attributes:
- This section allows you to define attributes that relate to the
channel. For a blog channel this might be something like
blog description,
author,
or image.
Channel attributes aren't as common as item attributes; so don't
worry if you have a hard time coming up with any.
- 5 Item Attributes:
- Item attributes apply to each content item that is added to the
channel. Each content item does get a date (either a single or date
range depending on the Date Range Type
discussed above) and a content field. Any other bit of information
you want to track for the content item will need an attribute to
store it. For example, the website ads channel has the following
item attributes:
- Summary Text
- Image
- Detail Image
- Campuses
- Primary Audience
Secondary Audiences
Content Channels
If content channel types define the structure, content channels
represent the implementation. Here's an example: you might have a channel
type of Blog
and channels Pastor Foster's Blog
and Rock Solid Church's Blog
that implement this type. You might be wondering why channel types are
even needed. The answer is that they help enable reuse. In our blog
example above, if you didn't have channel types you would have to define
the structure every time you wanted to create a new blog - yuck!
When you create a new channel under
Admin Tools > CMS Configuration > Content Channels,
you have the following options:
Add Content Channel
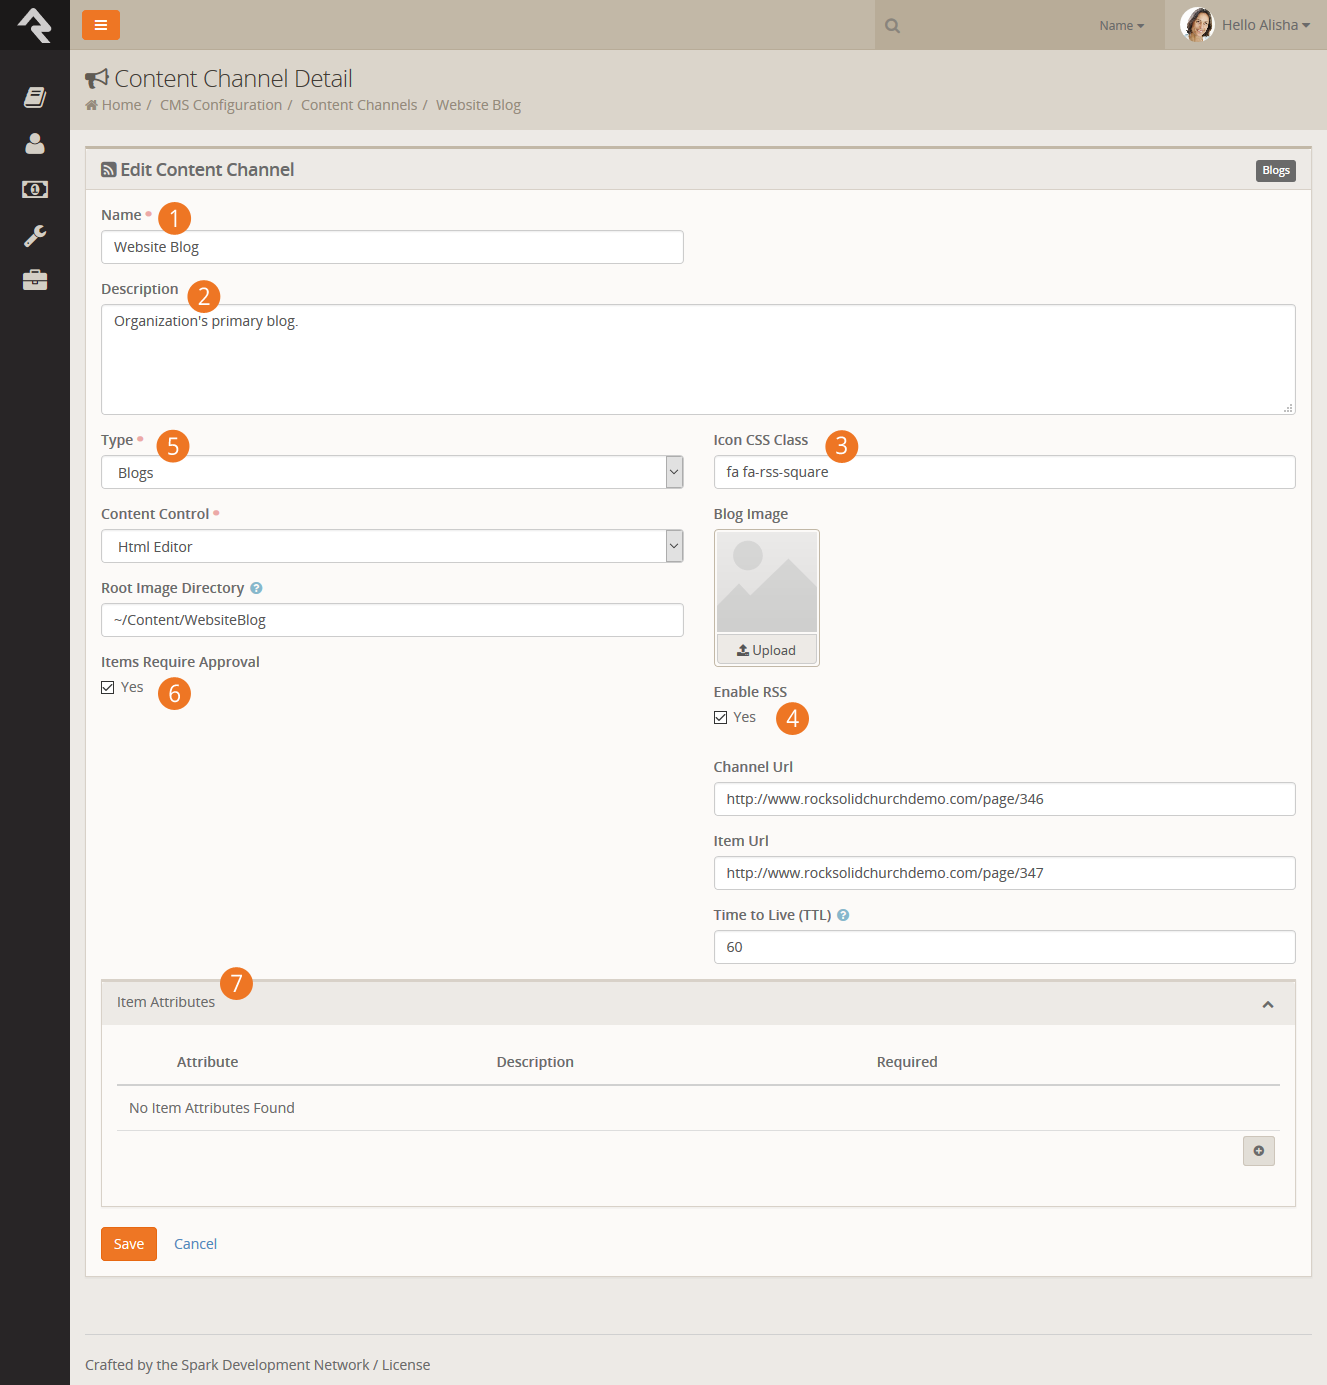
- 1 Name:
- The name of the channel.
- 2 Description:
- A brief description of the channel. This description is available to be displayed on the page.
- 3 Icon CSS Class:
- A CSS icon class to be used on the various internal entry and administration screens.
- 4 Enable RSS:
- This setting enables the channel's RSS features. This allows the
content items to be published to an RSS feed that can be consumed by
an individual's RSS aggregator or another software system that
supports RSS integrations.
- 5 Type:
- The content channel type that this channel is implementing.
- 6 Items Require Approval:
- Depending on your use case, you might want content items to require
approval before they are displayed. This setting allows you to define
this on a per channel basis.
- 7 Item Attributes:
- Content channels inherit all of the item attributes defined by the channel type. There
maybe times when a specific content channel needs to add a new attribute specific to it's implementation.
You can add these new attributes here.
Content Items
Once you have your channels defined, it’s time to add content. You can do this in one of two ways:
-
You can enter content right on the
Admin Tools > Communications Settings > Content Channels
screen under the channel details. This is more of an administrative screen.
-
Specific content entry pages can be found under
Tools > Content.
These are the pages that your staff will use to enter content,
and your communications team will use to approve and mange
entries. These screens are covered in the Communicating with Rock
manual in detail.
The Universal Channel Type
As you start brain-storming ideas for using content channels you'll find yourself needing to create
one-off channel types that will be used by a single content channel. For instance, when we set out to create the
Lava documentation we first needed to create a new channel type called
'Lava Channel Type'. We could then add a new content channel 'Lava Documentation' that implemented that type. Creating the
type for use with a single content channel was wasted effort, especially since content channels can add their own item attributes.
Hence the generic Universal Channel Type
was born. This channel type is a generic type that you can use to build your
one-off content channels from. It has no attributes defined so your channel will define all of the item attributes you
need. No wasted effort.
No Magic Here...
There's nothing special about the Universal Channel Type. We created it to save you time and also provide a
consistent (well known) type that we (and plugin developers) can use to add new content channels from in the
future. Yep... we're always thinking ahead!
Adding Channel Content To Pages
Now that you understand how to create content channels and items, the
next step is presenting this data out to your external website. The main
block you will use to format channel content is the
Content Channel Dynamic
block. Adding this block to a page zone will allow you configure the
following settings:
Content Channel View Configuration
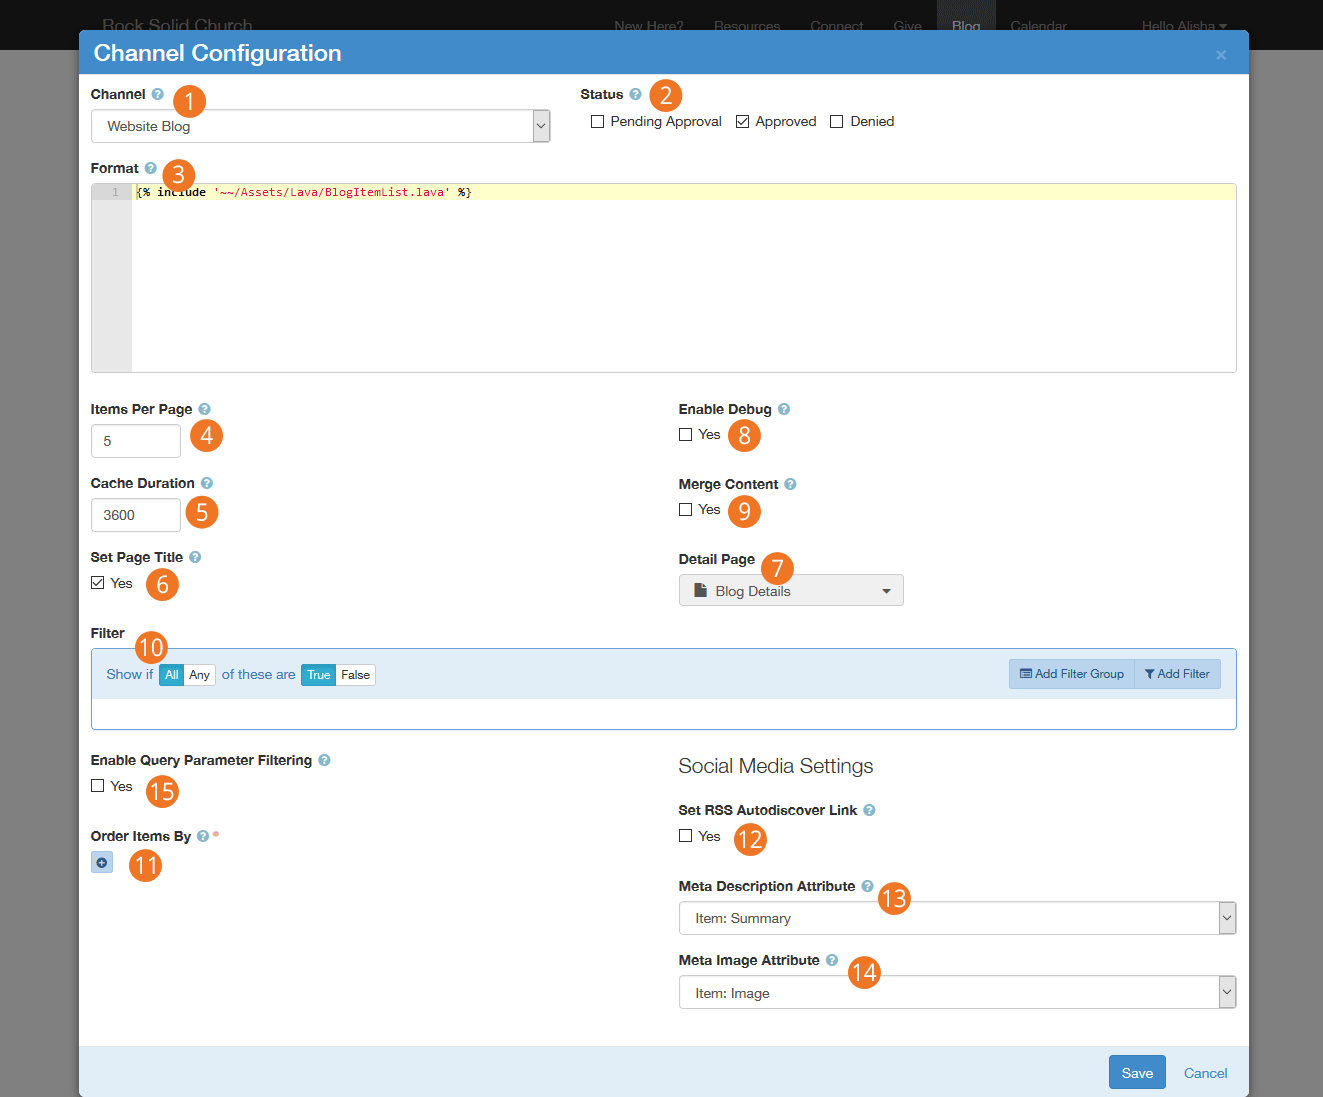
- 1 Channel:
- The content channel you would like to display on the screen.
- 2 Status:
- The content item status to filter on when creating a list of content items.
- 3 Format:
- This is the Lava template selected to iterate through when
displaying content items on the screen. See the Rock Lava
documentation for tips and tricks on using Lava in Rock.
- 4 Items Per Page:
- The number of items to make available for the Lava template.
- 5 Cache Duration:
- Rock can cache the items returned from the database to help improve performance.
- 6 Set Page Title:
- This will set the page's title based on the channel content. By
default, it will display the channel name. If the query string
contains an item id (in the format of Item=1) then that item's title
will be used for the page title.
- 7 Detail Page:
- This setting allows you to define the detail page to add as a
Lava merge field. This allows your Lava template to link to the
detail page.
- 8 Enable Debug:
- This setting will output all of the merge fields available for
use in Lava. This lets you see what data is available to help you
make your Lava template.
- 9 Merge Content:
- When this setting is enabled, the block will look for Lava fields in
your content and attributes. Then, it will compile and render the
Lava. This allows you to put Lava logic in your actual content.
Think of the power of having blog posts that can actually be dynamic
to the user reading them!
- 10 Filter:
- The content filter is very similar to the data view screens. This section
allows you to filter by any attribute or property of the content item.
- 11 Order Items By:
- Allows you to set the display order of the content items.
- 12 Set RSS Audtodiscover Link:
- If your content channel type supports RSS, you can choose to embed an
autodiscover link to the channels RSS feed in the page header. This
allows RSS feed readers to find the RSS feed link and use it.
- 13 Meta Description Attribute:
- This setting allows you to pick an attribute to use for the meta description
tag in the page header. This description is used when people share the page
on social media.
- 14 Meta Image Attribute:
- Allows you to set the page’s meta image tag in the header to the select image
attribute defined on the content channel.
- 15 Enable Query/Route Parameter Filtering:
- When this setting is enabled, the block will try to determine the content item to display based on a query string or route parameter value (other than the default ‘Item’ parameter).
For example if you set this property and then include “?Title=Car Show” in the url, the block will look for an item that has a Title of ‘Car Show’.
SEO Friendly Content Routes
Because content channel query paramater filters also supports route parameters and item attributes, you could use this functionality to support SEO friendly routes for all of your content items.
You would first create a new item attribute for your channel with a key of ‘slug’. Then add a new route to the page that has the Content Channel View block that includes the ''slug' parameter (e.g. ‘content/{slug}’).
Making these configurations would allow you then to navigate to the page, using a url like /content/car-show.
But Wait... There’s More
The settings above provide a ton of capabilities when adding dynamic
data to a page. This block can also respond to specific query string
parameters to alter its behavior. Let’s look at each of them:
-
Item: If you pass in an item’s numeric id, the block
will only load that specific item into the Lava merge fields.
-
Page: You can page between items using the
Page
query parameter. Simply pass in the page number you wish to
display. If you pass in a page number beyond the last page, the
last page will be shown. If the page number is less than 1, the
first page will be displayed.
Tips and Tricks
Below are some tips and tricks to help you maximize your usage of dynamic data:
-
When you enable the ability to use Lava in content items, be
sure that your Lava is set up to display data when the current
user or other merge items are not available. When the content is
made available via RSS, many of the merge fields will not be available.
-
The RSS feed for a channel can be linked to from the address:
http://yourserver/GetChannelRss.ashx?ChannelId=N
where N is the channel id.
Publishing Content Through Feeds
Once you enter your content, you may want to make it available through feed systems like RSS. Rock provides an
endpoint that allows you to push your content in this way. The URL for this end point is:
http://yourserver.com/GetChannelFeed.ashx?ChannelId=X
The only required parameter is the ChannelId of the channel you want to publish.
This channel must be configured to Enable RSS
for the feed to return content.
The structure of the feed is defined by a Lava template. The RSS template is used by default, but you can
create and configure additional templates to suit your needs. These templates are managed under
Admin Tools > General Settings > Defined Types > Lava Templates.
Once you create a new template, you can enable it by placing the
TemplateId= parameter in the query string.
The TemplateId will be the Defined Values Id.
Note that the defined value can also set the MIME type that should be used with the template.
Other query string parameters you can pass into the handler include:
- Count: Limits the number of content items to return. The default value is 10.
- TemplateId: The defined value id of the Lava template you wish to use.
- EnableDebug: If present on the query string (with any value), the feed will output all
available merge fields for you to view.
Strategies for Managing Your Site
As you're working through your content strategy for your site it's
important to think about how you will maintain each page. There are several
tools you can use to reduce the burden of keeping your site up-to-date.
Let Dynamic Content Do the Work
The dynamic content tools discussed above can save you a lot of time by giving you an easy workflow for adding
content to pages. Think of these tools as structured bits of content that can be
schedule to display on your site. On each page think about how dynamic content could
be used to keep the content fresh.
Remove the Bottleneck through Delegation
It sounds scary but allowing your ministry leaders to edit their content
on the website can be safe. The secret is in the configuration. Below are
some tips to make this a success.
-
Give the ministry leaders access to small pieces of content, not the whole page.
-
Use the HTML editor's pre/post text to ensure that the wrapping
markup cannot be changed. Say for instance you give the ministry
access to edit a Bootstrap alert box on the page. Be sure that the
markup for the alert is in the pre/post text so the user can not
remove or edit it.
-
Enable the HTML editor's approval system. This will allow you to
review the changes before they are published to the site.
-
Use security wisely. Don't give a single user access to edit a
specific content block. Instead, consider creating reusable security
roles (e.g. Website Editors – Childrens).
This will allow you to add similar user permissions in the future.
Routes
As we've discussed, webpages in Rock don't exist as files on the server's
file system. Instead, they are dynamically created as they are requested
from the database to be individually tailored to the permissions of the
current user. In the past this meant some really ugly URLs with numerous query
parameters. For instance, some similar systems may have used an address like this:
http://www.mysite.com/index.php?page=152&groupId =12
Not only are these addresses unattractive, they are also not very friendly
for search engines visiting your site (aka SEO friendly). Rock uses the
concept of Routes
to help beautify its addresses. The default route for a page will look
something like:
http://www.rocksolidchurchdemo.com/page/123
But, you can do better. Let's say page 123 in the example above was actually
a promotional page for an upcoming car show. You could add a new route on the
page property dialog ( on the
page's admin bar then look under Advance Settings)
with the value of carshow.
This would enable the link http://www.rocksolidchurchdemo.com/carshow to
also work for this page.
Multiple Routes
In fact, you could create several routes for the same page. This is
especially helpful in tracking the success of each of your marketing pieces.
If the mailers, mass email and invite cards each have a different address, you
can measure which is more successful at getting people to your site.
Advanced Routes
So far we've looked at how to create simple routes. Pages that contain
dynamic content might have one or more required query parameters to be
able to display. Consider a page that displays calendar events. Its
default route might be http://www.rocksolidchurchdemo.com/page/234?EventId=12.
Creating a route with the value of Event/{EventId}
would add the ability to load the page with the address of
http://www.rocksolidchurchdemo.com/Event/12. This new address is not only
visually more appealing but is also SEO friendly.
You can add as many query parameters to your route as you like. For
instance, the route of Event/{EventId}/{TabId}
would enable the address of http://www.rocksolidchurchdemo.com/page/234?EventId=12&TabId=3
to be represented as http://www.rocksolidchurchdemo.com/Event/12/3.
If you would like to manage all routes defined in Rock you can see them listed under
Admin Tools > CMS Configuration > Routes. From
here you can edit or delete any route in the system.
Creating A New Site
Creating a new site in Rock is simple. But, it helps to do things in the
proper order. Following the steps below will lead to a well-configured site
every time.
-
First, navigate to the site list page Admin Tools > CMS Configuration > Sites
-
Click the (add) button at the bottom of the grid of sites.
-
Fill in the site configuration outlined below:
Add Site Page
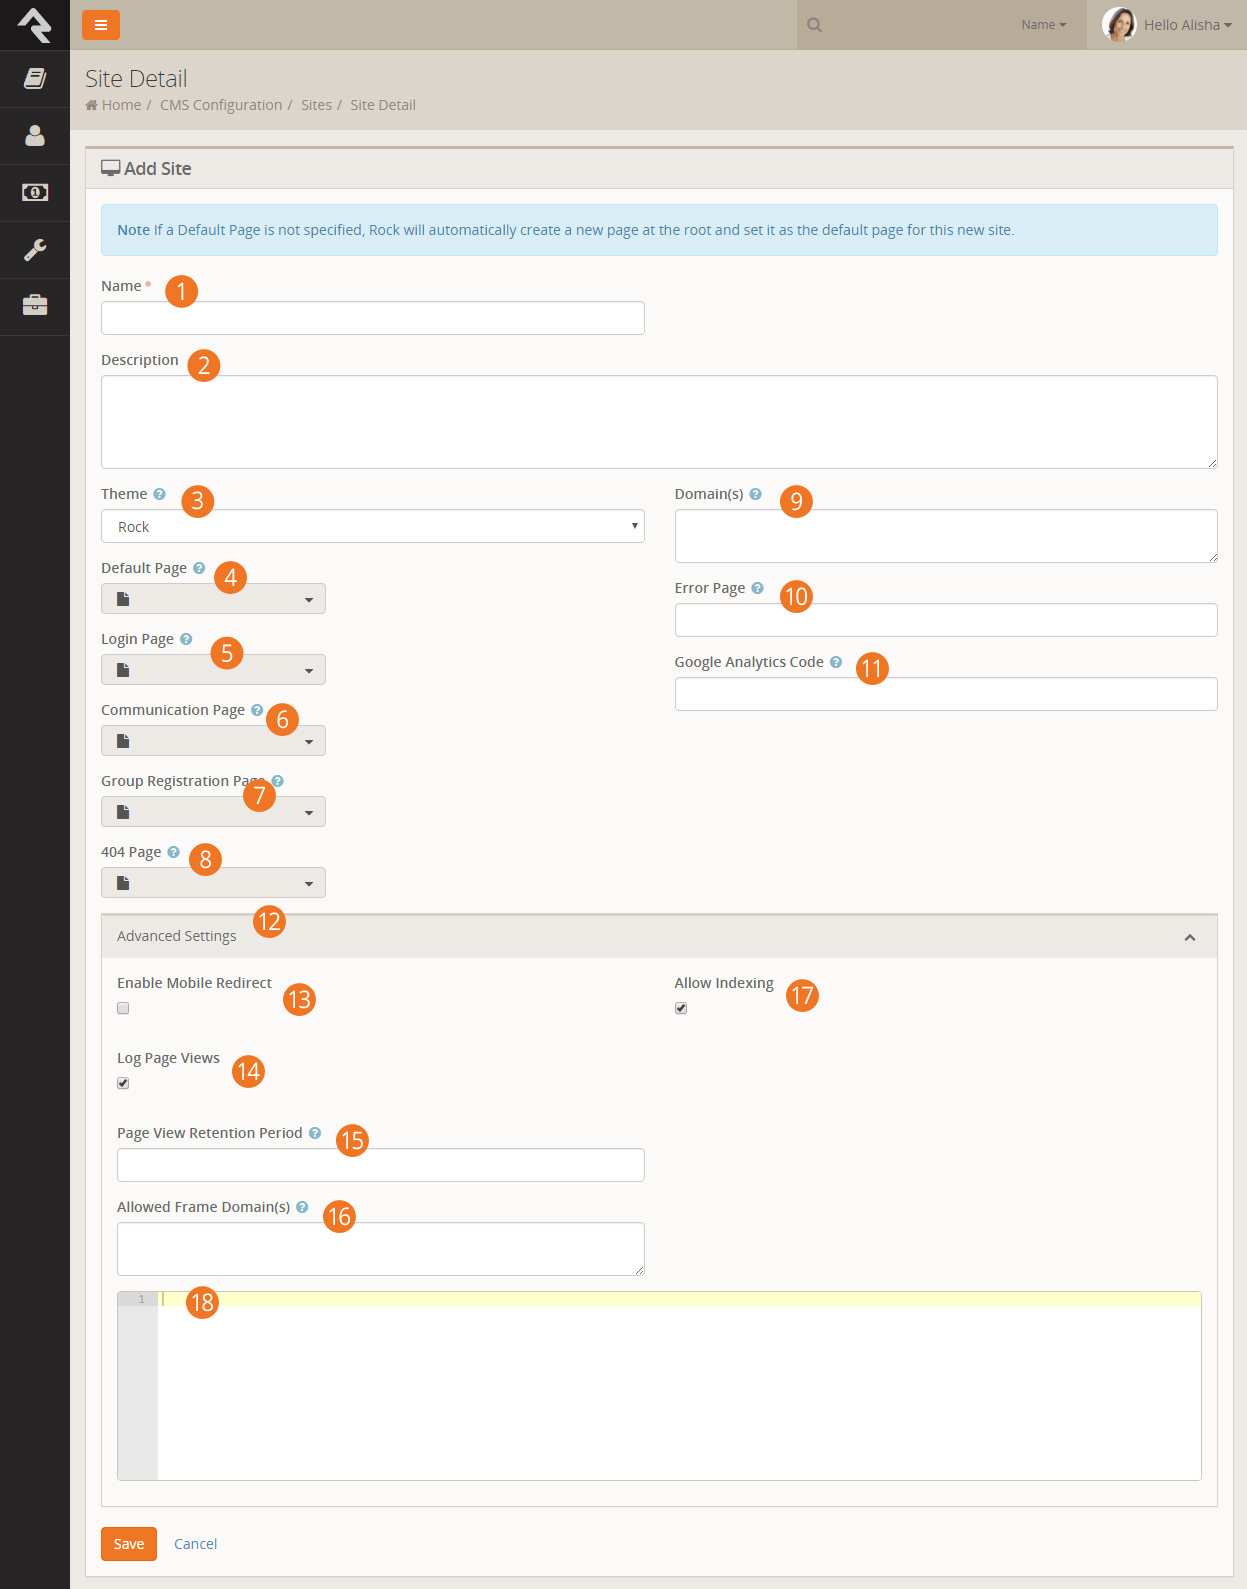
- 1
-
Provide a name for your site. This name will not appear on the
site itself, just the admin screens used to support it.
- 2
-
Provide a description for your site.
- 3
-
Select a theme for your site. If your theme is not yet ready, we
recommend that you pick the Stark
theme basic template.
- 4
-
Important: We highly recommend leaving the default page
blank. If you do not provide a default page, Rock will create it
for you at the root page level with all the right settings.
Creating this page before the site can cause misconfiguration.
- 5
-
Each site defines its own login page. This page will be used when
an unknown user clicks to a page that requires additional security.
You do not have to select one at the time of creation. You may
wish to configure this later.
- 6
-
The Grid uses this setting to determine what page to redirect
the user to when clicking the New Communication
button at the bottom of a grid of people.
- 7
-
The registration page setting is not yet implemented in Rock.
- 8
-
You have the option to provide a custom page not found
(aka 404) page for your site. This too can be set at a later date.
- 9
-
In order for Rock to serve up your site, it needs to know what
domains (e.g. www.rocksolidchurchdemo.com) it represents. You
can provide multiple domains in this field delimited with a comma.
- 10
-
Let's face it, errors happen. Instead of displaying the default
Rock error page you can design and show a custom page for your site.
- 11
-
You might want to integrate your site with Google Analytics. Rock
makes this simple by allowing you to provide your site's Google
Analytics code. We'll do the rest.
- 12
-
This section is for configuring advanced, out of the ordinary, site settings.
You can typically ignore this if you are building a simple site.
- 13
-
This checkbox enables mobile redirects. This allows you to route
your mobile users to a different page or site if they visit any
page on this site.
- 14
-
This setting determines if each page view of this site should be tracked. This
allows you to gain valuable metrics about a page AND more importantly about
your guests' activties and interests.
- 15
-
If page tracking is enabled, you can set how long the page views are stored. You'll
find that for popular sites this data will grow quickly. You may want to limit how much
of it you keep.
- 16
-
If you need to allow an external site/domain to be able to embed your site (such as
in an iframe) just enter each domain as a whitespace delimited list. Rock
will then take care of sending the correct page headers that block all other sites.
- 17
-
The Allow Indexing
property determines if you need a <meta name="robots" content="noindex, nofollow">
tag in the page header to keep web indexes from crawling your site (like Google, Bing, etc.)
- 18
-
Page Header Content. Anything you enter here will be injected into every page header.
-
Once you've provided the above information and clicked Save,
your site is ready for the next step, which is to start creating pages.
The best way to get to your new default page is to use the Page Map
under Admin Tools > CMS Configuration > Page Map.
From here you can click on your default page.
SEO
Many people ask about Rock's SEO features. While we've worked hard to ensure many of the SEO best-practices the requirements in this
area change on a daily basis (just being honest). If there's something you think is missing, or you'd like more information on let
us know.
Below are the topics people ask us most about:
- Google Analytics The analytics token is set on the site. Rock then applies it to each page on that site for you.
- Friendly URLs These are the routes that I mentioned. They are configured on that Page Properties modal
(the gear in the admin toolbar at the bottom of each page) on the ‘Advanced Settings’ tab. You can read more about
this topic in the Routes chapter above.
- Page Description This is also set on the Page Properties screen.
- Keywords This and all other meta tags can be set using the Header Content field on the page properties. Basically whatever
you add to this field will be placed into the HTML HEAD tag. We didn’t add a special field for keywords as
search engines stopped supporting them a while back.
Using Context
Pages are very dynamic. Take for example a page that is a part of a group
toolbox which is used to display a roster for the group. When Ted logs in
and navigates to the roster page it will show the contents of his group,
but when Bill comes to the same page his roster is displayed. This all works
because, while the page is the same, the "context" of the page is specific to
their group. This context can be set through either a parameter in the page
address query string (e.g. page/234?GroupId=12) or by the internal code of a
block (the query string method is most common).
You're probably thinking, "Yeah that all makes sense. The page loads with a
query string of GroupId=12 so the roster block shows the member list of that
group. Simple." And you would be right, but you can also have more fun with
the page. Say you wanted to have a custom message on the page for that
specific group. How could you make that happen? Luckily some blocks,
including our friend the HTML editor, are context aware. This awareness
allows them to look at the context of the page and adjust their content
accordingly. To implement our group specific message we would simply set the
HTML editor's context block setting to GroupId.
The editor will then provide you with a custom value for each group.
As you look at the pages on your site, pay close attention to each page's
query string and route parameters. Realize that you can add context-specific
content based on the value of the context. Another good example of when you
might use this is if your church has multiple campuses. Rock's context aware
features mean that campuses can share many of the same pages while still
providing campus-specific content. Using the Campus Context
block allows you to set the campus context in these scenarios.
Looking Deeper at Layouts
As we discussed earlier, layouts are what give pages their structure. They
define zones that tell where blocks can live on a page. While layouts are
assigned to a page they are defined by the theme. We've standardized the
name of layouts so when you change the theme of a site, the page knows what
layout to use in the new theme. These standard layouts are shown below.
Standard Layouts
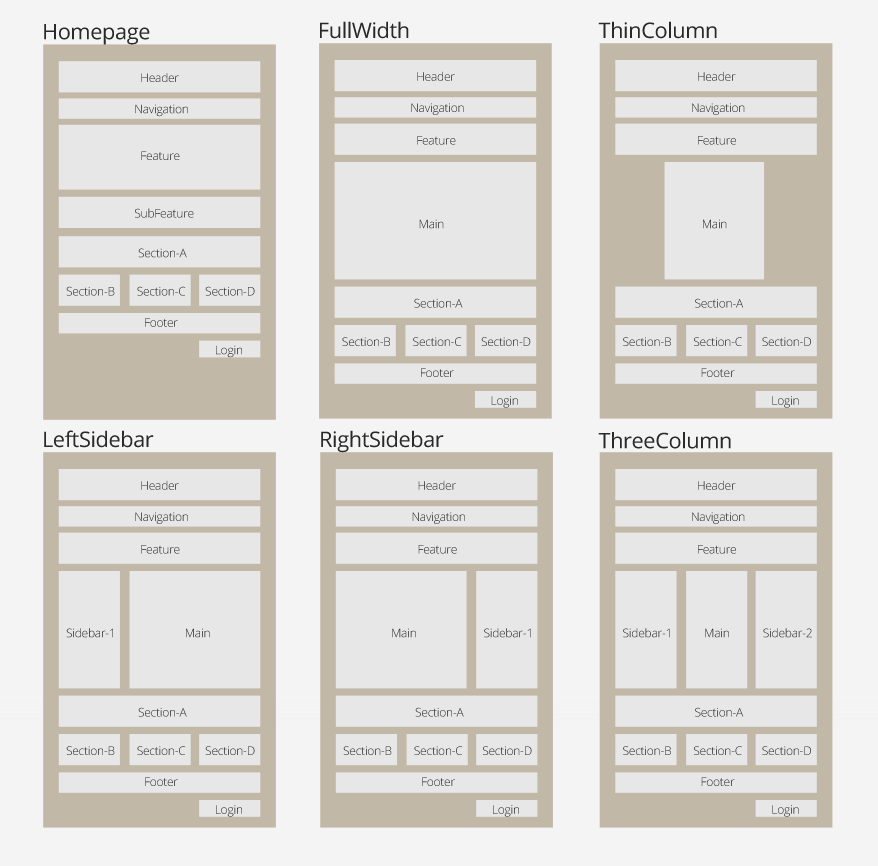
By following this pattern, you can update the entire look of your site simply
by changing the theme for your site.
We know what you're thinking though (because we thought the same way too). You're
thinking that there's no way you could possibly limit yourself to these
predefined layouts. We think, though, once you understand the level of
attention that went into them, you will find that they meet a vast majority
of your needs. Breaking free of these standard layouts is certainly possible.
You can create your own new layout types with their own zone names. You will
be giving up the ability to quickly and easily change the look of your site.
We'd strongly recommend coloring within the lines until you fully understand
the architecture and understand what you’re giving up by breaking free.
Standing On the Shoulders of Giants
Rock leverages several web design frameworks to help provide industry best
practices. Knowing about these frameworks will help you get a jump start on
customizing Rock's user experience for your visitors.
Bootstrap
Bootstrap is a front-end framework that brings consistent styling to Rock.
We are currently using Bootstrap version 3.0.0. Whether you're tweaking
content on a page or writing a custom template, you’ll want to get
familiar with the standard HTML/CSS mark-up that Bootstrap provides.
Reading through their excellent documentation
in its entirety is a great way to get started.
Interested in a Template?
If you're interested in creating a new Rock theme based on an existing
template make sure it uses Bootstrap 3.0. This will save you a lot of
time.
Font Awesome
Rock uses icons in several areas of the application. These fonts all come
from the Font Awesome library.
Since these icons are all font-based vectors, they can be colorized and
resized very easily. To see a listing of all the icons in the collection
visit http://fortawesome.github.io/Font-Awesome/.
jQuery
jQuery is a Javascript framework that's used by a majority of Internet
sites. If you’re only interested in making minor changes it’s likely
you'll never need to work with jQuery, but if you plan to make custom
themes or blocks, you'll want to get familiar with it. Rock currently uses
version 1.10.2. You’re welcome to use a newer version in your theme, but
be sure that your version is backwards compatible to 1.10.2 to ensure
Rock's core jQuery plugins work correctly. You can find out more about
jQuery at jquery.com.
Less
If you're familiar with Cascading Style Sheets (CSS), you've probably
experienced the frustration of repeating selectors and duplicate color
definitions. Less blends a programming language and CSS. It offers
concepts like reusable variables and object-oriented mix-ins. If you're
worried about learning another new technology, don't be. Less is super
simple. Soon you'll be able to brag to your friends about your knowledge
of Less! You can read up on what's available in Less at http://lesscss.org/.
A Hint About Less Files
You'll notice that some Less files are prepended with an underscore
(e.g. _print.less). That underscore helps to identify Less files that
are not directly compiled into related .css files but are instead used
as imports to other Less files. For instance the _print.less file is
never compiled into a _print.css file. Instead its contents are
imported (appended) to the theme.less file which is compiled into
theme.css.
Liquid
Liquid is a templating engine written by Shopify. We've extended and customized Liquid in Rock to form
our own templating engine called Lava (get it... liquid rock...).
You've already been
briefly exposed to the power of Lava in the introduction of this manual.
Lava is used in several places in Rock, so it's worth you time to learn
it well. Below are just a few of the places it's used:
-
HTML Editor: Used for dynamically mixing in personal merge
fields with your content.
-
Menus: Navigation menus and page lists use Lava to assemble
the HTML that is used to display them on the page.
-
Email Content: Emails and SMS communications use Lava to
personalize their content.
Learning Lava will make you feel like a superhero. Definitely take the time to master it. We've provided some
great resources for
you to learn Lava on our website.
Less is More
The chapter title, while cheesy, is very true! Less is a technology that brings scripting
capabilities to CSS. This allows you to do things like create variables and reusable styling
nuggets (for a complete overview of what is possible see the Less website at lesscss.org.) The
power of Less has always come at the price of having to manually compile your Less files to CSS,
that is until Rock came to town. In fact, Rock has several different tools to help you keep your
Less files compiled. Let's crack open the toolbox and see what we can do.
Methods to Compile
Compiling on Start
By default Rock will compile all of the master .less files found in the theme folders. A
master file is one that does not start with an underscore. Each of these masters will be
compiled to ensure that the latest compiled CSS is available after each update and Rock
Shop install.
Performance Is Unaffected
If you care about performance as much as we do you might be concerned about slowing
down the startup time. We've taken that into consideration and perform the Less compile
on a separate thread.
Compiling from the Site Detail Page
You can compile the Less files for a specific site at any time from the Site detail page
found under Admin Tools > CMS Settings > Site > Site Details.
From this page you will notice the Compile Theme
link on the right side. Clicking this link will compile the site's Less files.
Using the Theme Styler
A theme's Less files can also be compiled by the built-in Theme Styler found under
Admin Tools > CMS Settings > Themes.
From this page you will see a grid that lists each theme. Next to each theme is a compile
button. For more information on this page see the Theme Styler section below.
Themes
As we’ve already seen, the Theme Styler provides an easy way to compile our themes. That's just
scratching the service though of what's possible. Let's now do a bit deeper into all of the power
of Rock's theme tools.
Theme List
You can view a list of installed themes under
Admin Tools > CMS Configuration > Themes.
Theme List
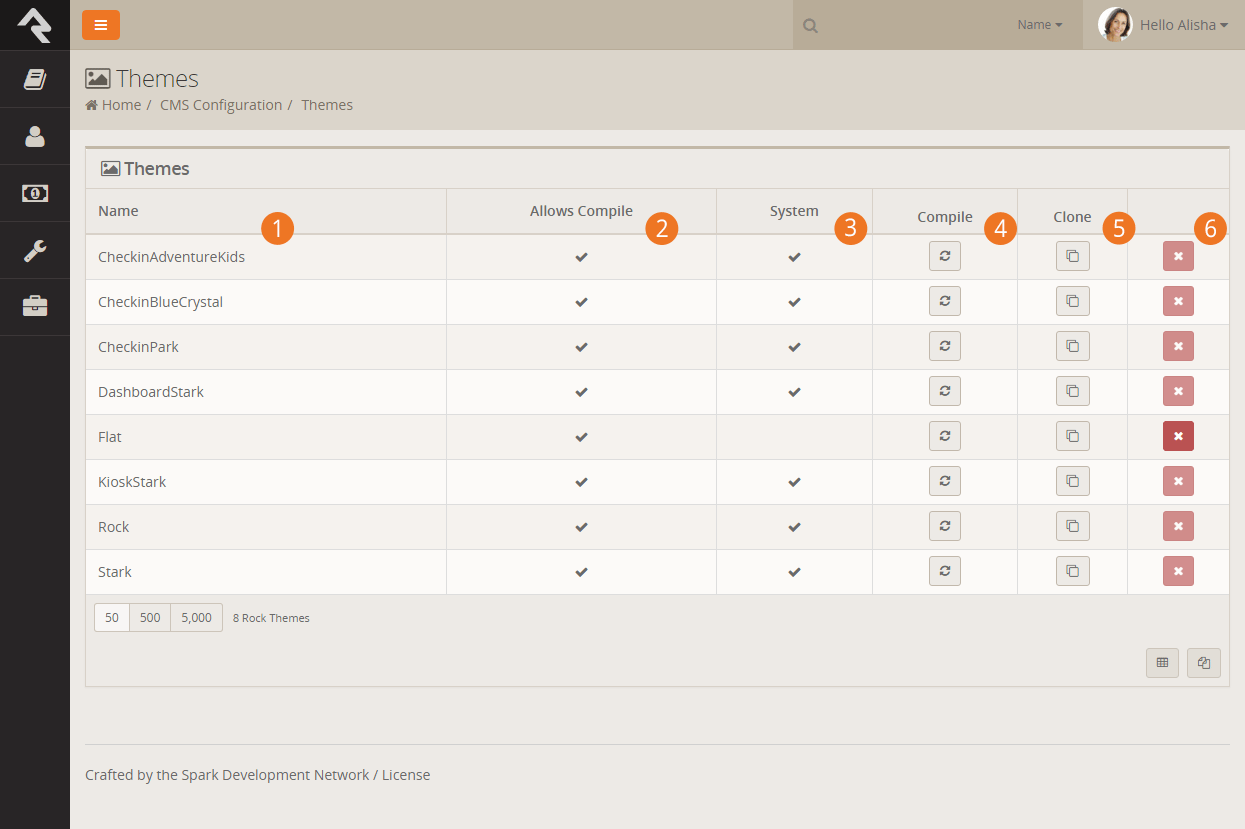
- 1 Theme Name
- Pretty obvious…the name of the theme.
- 2 Allows Compile
- A theme designer can keep a theme from being compiled by Rock. This is rare and is
usually only done for internal themes developed for a specific organization.
- 3 System
- This notes that this theme is a system theme that came with Rock. These themes cannot
be deleted.
- 4 Compile
- This button allows you to manually compile a theme.
- 5 Clone
- This button allows you to copy the theme to a new theme with a name of your
liking. This allows you to change it without worrying about effecting others.
- 6 Delete
- This button allows you to delete the theme.
Theme Styler
Selecting the theme from the list will take you to the Theme Styler. Below is the theme styler
for the default internal Rock theme.
Theme Styler
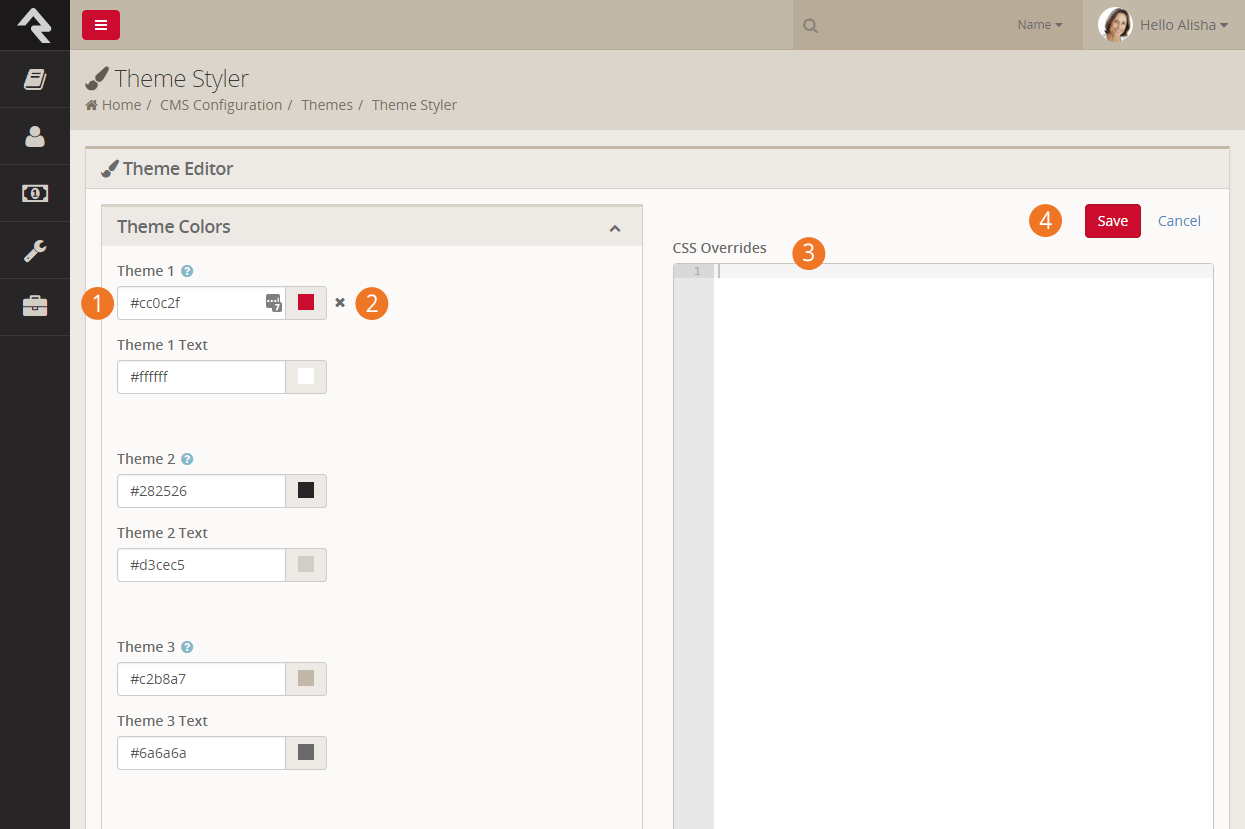
- 1 Theme Variables
- You'll notice that theme designer has provided several variables for you to modify.
These variables allow several different customizations. Some you'll notice allow you to
choose colors. Others modify fonts, images and units of measure.
- 2 Variable Refresh
- After changing a variable you'll notice a small
x next to it next
time you enter the theme styler. Selecting this
x allows you
to return the value back to its original state. Be creative… you can always go back to the
default if you don't like your selection.
- 3 CSS Overrides
- You may find that there is no variable for the change you want to make. Never fear, you
can enter any overriding CSS in this box. It will be placed at the bottom of the compiled CSS
to ensure that it gets the last say on how an element should be styled.
- 4 Save
- Pressing the save button will not only save your changes, but also compile the Less file
to CSS. If you're editing the internal Rock theme you'll notice your changes right away!
Not All Themes Support Variables
It is up to the theme developer to add support for modifying variables. You may encounter
some themes that do not support changing the styling.
Designing Themes
Themes are a beautiful thing. They allow you to quickly and easily change the
look of your site using the latest web best practices. Before we get too far,
let's look at the contents of a theme.
Contents of a Theme
Theme Directory
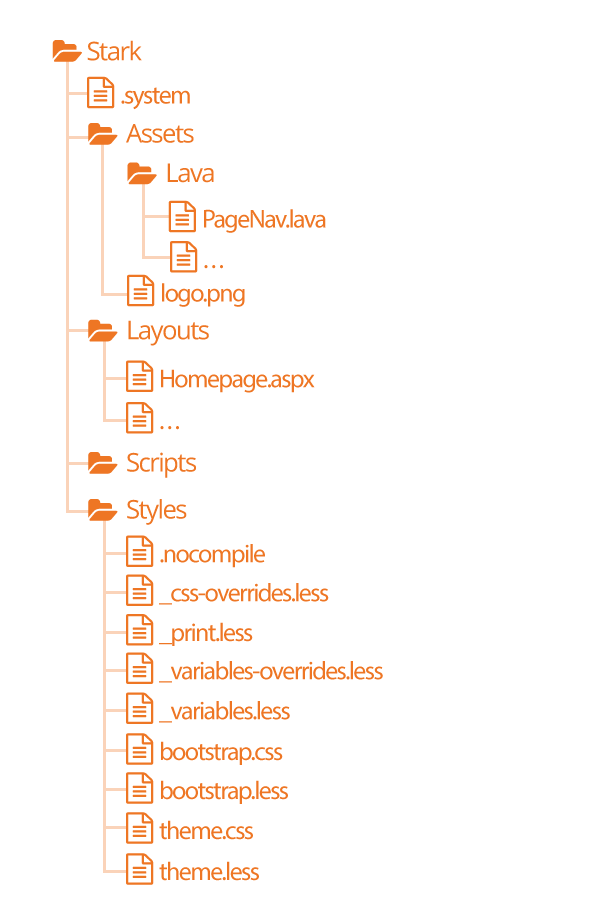
-
The .system file
tells Rock that this theme is a system theme. This prevents it from being deleted in the
Themes list.
-
The Assets
folder is used for all of the images, icons and other support
files needed by your theme. This folder also contains a
Lava
child folder for all of the Lava files needed for your theme.
-
The Layouts
folder contains all of the layouts your theme supports. For external
sites, your theme should define implementations for all of the
standard layouts covered in the
Looking Deeper At Layouts chapter.
-
The Scripts
directory will be used for any custom scripts your theme requires. Be sure to
only place unique scripts here that are not contained in the global scripts folder.
-
Finally, the Styles
folder contains all of the files needed to generate your CSS. Specifics
of these files is discussed in depth below.
Stark
No, this is not our Ironman theme, but this theme will become your go-to
for custom theme development. Stark gets its name from the fact that it is
basic and minimally styled. In fact, it comes with the least amount of styling
possible. We created it as a starting point for you to create new works of
art. Think of it as your blank canvas.
To start a new theme you should start by copy/pasting the Stark theme and
then renaming it. Then start restyling the theme using the .less files.
Warning
Because the Stark theme will be updated with future versions of Rock you won't want to make changes to this theme. Instead copy
and paste the Stark theme to create your own theme.
How Rock Uses Less
There are two sets of .less files. Those in the core Styles
folder and the theme .less files. The purpose of the core styles is to
provide the basic structure and look/feel to the various Rock blocks. The
theme's .less files add the final polish to the blocks and override any
of the CSS attributes you desire. Let's take a quick look at each Less
file that makes up a theme.
-
.nocompile: This file tells Rock's Less compile tools to ignore this theme. This file should only be used in
cases where a custom theme designer wishes to manually compile the theme's Less files (rare).
-
_css-overrides: This file contains the Theme Styler's CSS overrides. It should not be manually edited.
-
_print.less: This Less style file helps set specific print
styles that make Rock pages look better when printed. The contents of
this file are imported (appended) into the theme.less file. For the
most part, you should not need to modify these styles unless there is
a specific print styling you would like to add.
-
_variable-overrides: This file contains the Theme Styler's variable overrides. It should not be manually edited.
-
_variables.less: This is a very powerful file. It contains a
rather large list of style settings that you can change. Simply
changing a couple of colors can make your theme match the brand
colors of your organization. We highly recommend that you make a
copy of the Stark theme and start playing with the variables in this
file. You’ll be surprised how easy it is to make some dramatic changes.
-
bootstrap.less: This is the core Bootstrap Less file. You
should not change this file. If you need to modify a style setting
in Bootstrap you should either identify the variable that Bootstrap
uses to control that style in the _variables.less file or write a
specific override in your theme.less file.
-
theme.less: This is the file that contains all of your theme's
custom styling. If you can’t style it with a variable change in the
_variables.less file it should be added here.
Themes Are More Than Looks
Keep in mind as you develop your theme that you need to be concerned more than than just how your theme looks
in the visitors browser. You should also be testing to ensure your theme works well with Rock's in-page editing
features. Zone and block editor features should work well with your theme to allow web administrators access
to edit the pages.
To help you with this Rock will add classes to the <body> tag when the zone and block editors are enabled. These
classes are 'zone-highlight' and 'block-highlight' respectively. With these classes you can adjust your layouts when
these editors are at work.
Rock will also add the class 'modal-open' to the <body> tag when a modal is open. This allows you to do special styling
when this event occurs.
Lava
Every theme should include some implementations of the standard Lava
files in the theme’s ./Assets/Lava folder. Each of these files is
covered below.
-
AdList.lava: This is used to render HTML for the various lists of ads on pages.
-
AdDetails.lava: This is used to render HTML for the details of a specific ad.
-
AdRotator.lava: This provides the markup for the large ad rotator on the homepage.
-
BlogItemList.lava: Renders markup for a list of content channel blog entries.
-
BlogItemDetail.lava: Renders markup for a content channel blog entry.
-
PageListAsBlocks.lava: This lava is for rendering a list
of pages as blocks like the ones on the various
Admin Tools pages.
-
PageListAsTabs.lava: This renders markup for showing a
list of pages as a Bootstrap tab or pill navigation.
-
PageNav.lava: Used for a page's main navigation.
-
PageSubNav.lava: Renders markup for a page's sub-navigation.
-
RSSFeed.lava: Renders markup for a content channel RSS Feed.
-
RSSFeedItem.lava: Renders markup for an item in a content channel RSS Feed.
Testing Your Theme
As you're working on your theme you might be wondering how you can view
it without everyone seeing what you’re working on. Well prepare to have
your mind blown. Because you're a Rock Genius, you know that when a page
loads it gets the active theme by looking at the site's theme setting.
Pretty simple. You can, however, override this setting by adding the
query parameter theme='themename'. For instance if your page is available at:
http://www.rocksolidchurchdemo.com/page/1
you can have that page display your new theme by typing in:
http://www.rocksolidchurchdemo.com/page/1?theme=MyStarkTheme
The best part is that only you will see it. Everyone else will see the
current theme defined on the site. Pretty James Bond, huh?
Important Note About Rock's Less Compiler
As a theme developer it's your responsibilty to ensure your theme compiles correctly with Rock's Less compiler. Most client based compiler
use the same Javascript based Less compiler provided by the Less reference organization (http://lesscss.org/).
Because Rock needs to compile the Less on the server it uses a C# implementation called dotLess. DotLess
does a good job, but it is a little less forgiving with things like circular variable referencing. Also, since the compiling is done on the server,
it's more difficult present Less errors.
Please take time to ensure that your Less is compiling correctly before moving it to the server or publishing it to the Rock Shop.
As an example to the warning above if you're using certain CSS filter you may find that you need to escape them.
For instance if you add the CSS below:
.item {
    filter: blur(8px) !important;
}
You may find that your compiled CSS is blank. To fix this you'll need to escape the filter using by
appending a ~ and wrapping the filter in quotes like:
.item {
    filter: ~"blur(8px) !important";
}
Theming for the Styler
As you have already seen, Rock's Theme Styler is a powerful tool for allowing others to edit your theme. It's easy for you to
enable others to change your theme by making a few small changes to your _variables.less file. Below is a side-by-side comparison
of the _variables.less file for the internal Rock theme and the UI created from it in the Rock Styler.
_variables.less File for the Rock Theme
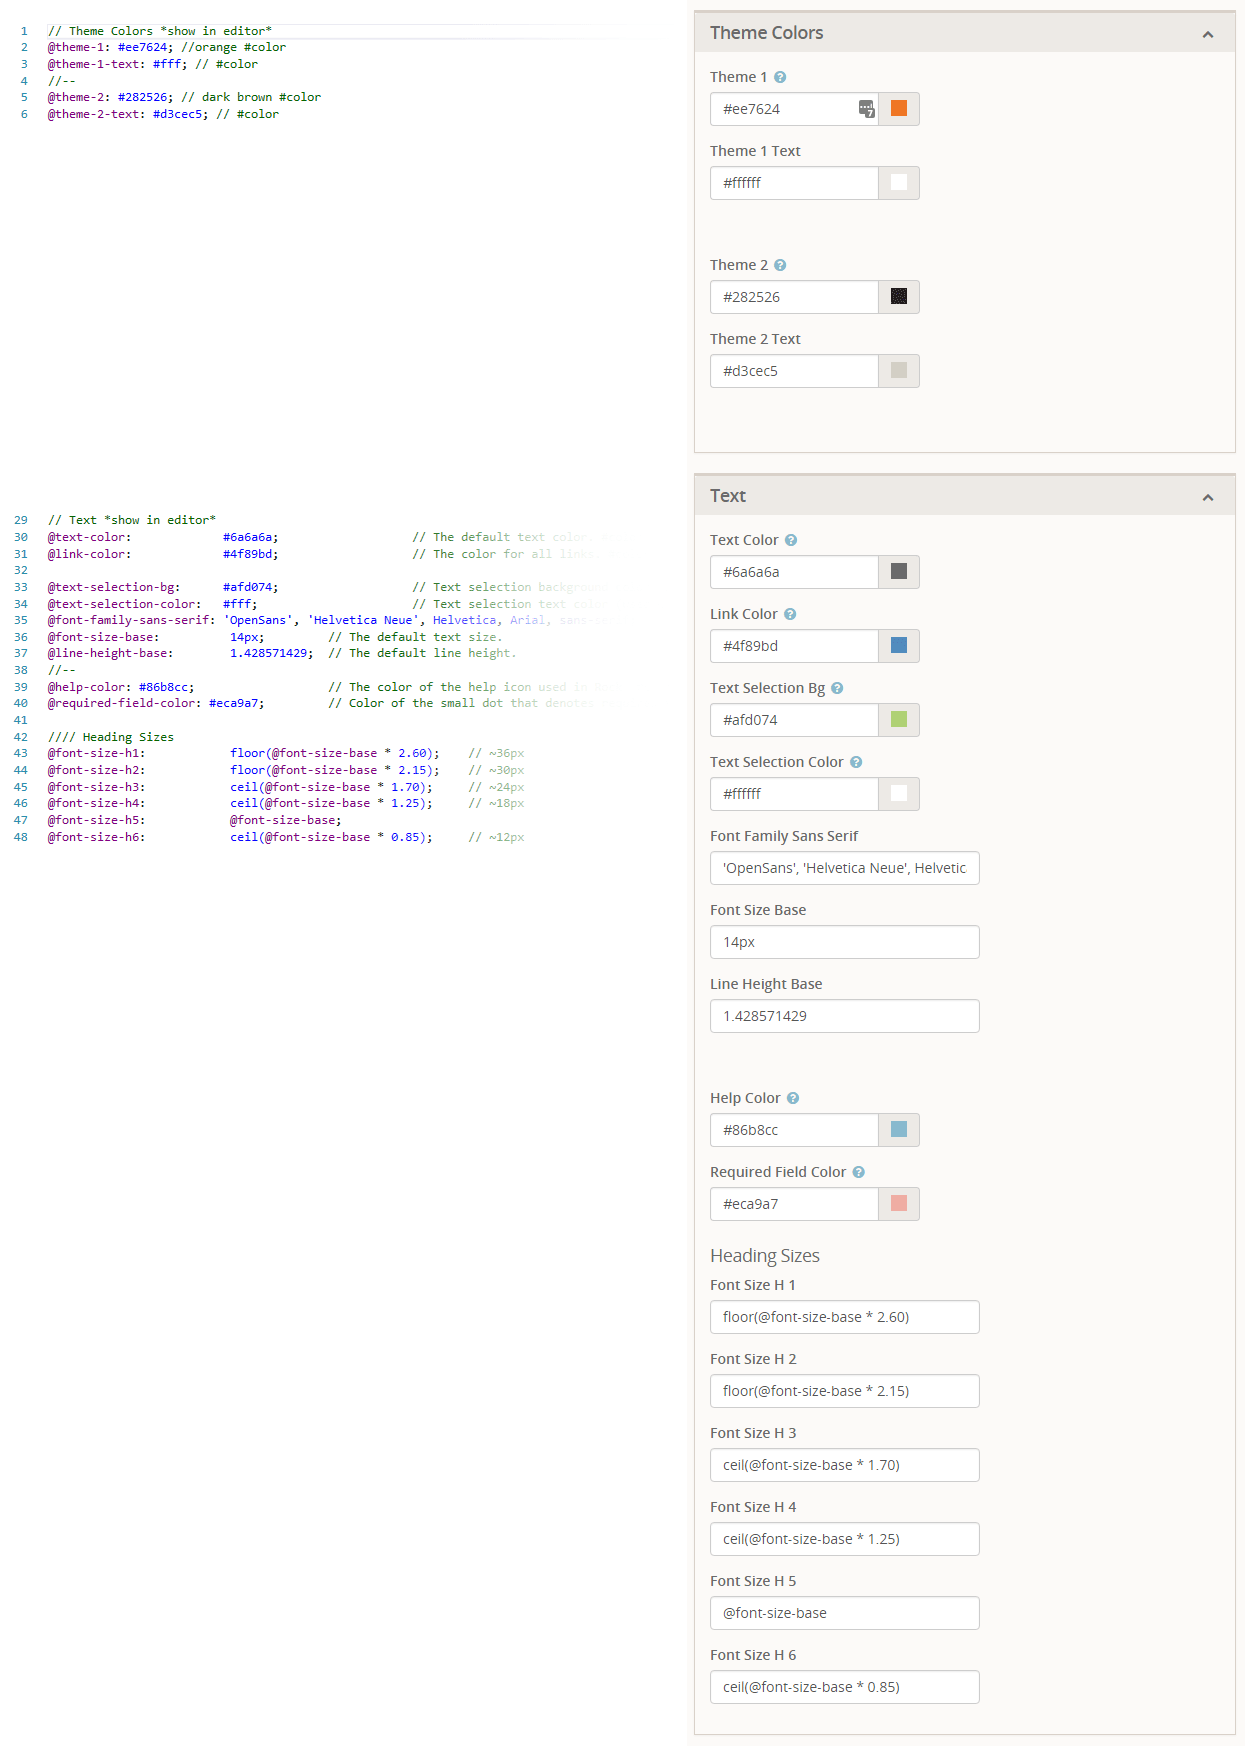
Let's look at a few lines to see how the _variables.less file is magically transformed into this nice editor.
- Line 1: Adding a '//' followed by text will create a new variable grouping. To turn
this grouping into a panel in the styler you'll also need to append *show in editor*. This allows you to
also create groups that are not editable.
- Line 2: Line two and we're already adding our first variable. The label for the variable will be
the variable name (minus the @ character). All dashes in the variable names will become spaces. The values in the comments
will be used for the help text. Finally, if the comment ends with #color, Rock will render it as a color field. The color
field is smart enough to render as a plain 'ol textbox if it contains less functions like darken.
- Line 4: Placing the characters '//--' will insert line breaks in the editor. This allows you to easily sub-group your variables.
- Lines 7-28 These lines were omitted to simplify the illustration.
- Line 29: Note that there is no end marker for variable groupings. When you're done with one, simply start a new one.
Things You Should Not Do
Rock is about freedom and empowerment. There are only a couple of things you
should not do under any circumstances, for your own good.
-
Update Global Styles: You do not want to update any of the .less
files contained in the ~/Styles/ folder. We guarantee that these files
will be overwritten by each update. If you would like to override a
specific styling you will want to do that in the CSS/Less files of your
custom themes.
-
Change the Rock Theme: The Rock theme will also be updated in new
releases. This theme serves the internal site and should not be altered.
-
Change the Stark Theme: The Stark theme will also be updated in new
releases. If you would like to make changes to this theme please copy and paste it
to create a new theme.
-
Create a New Internal Site Theme: If you would like to alter the
look of the internal site, you could create a new internal theme. We
highly recommend that you refrain from doing so. As we add new
functionality we will be extending the internal theme to work specifically
with these new features. It's likely that your custom internal theme will
not have the correct styling to properly display these new pages and blocks.
Remember this theme is only viewed by your internal staff and some
volunteers. We recommend putting all your effort into your external
themes which are viewable by a much wider audience.
-
Add Scripts to the Global Scripts Folder: You should not add
any custom Javascript files to the Scripts
folder located at the root of the file system. Instead use either the
scripts folder under a specific custom theme or add a script folder in the
Plugins folder.
Rock Directory Structure
So now that you know the parts and pieces of Rock, let's learn where each lives.
Rock Folders
Rock Directory Structure
-
App_Browsers: You should not need to worry about this directory.
It's a special directory that allows ASP.Net to identify specific
browsers and determine their capabilities.
-
App_Code: This directory contains un-compiled code for Rock.
You do not want to alter or add files in this directory.
-
App_Data: This directory allows you to store data without
having to worry that a client could browser directly too it. For
instance, Rock writes a log of severe error messages to this
directory (specifically ~/App_Date/Logs/RockExceptions.csv). But,
because the webserver blocks requests to access these files directly,
you do not need to worry about someone being able to access them.
You'll also notice that Rock keeps a cache of binary files in
~App_Data/Cache/. For the most part you don't need to know about this,
but it’s good to know how things work under the hood.
-
Assets: This is the global assets folder where Rock stores
images, icons, fonts, etc. that are a part of the core install. You
should refrain from storing your files in this directory.
-
Bin: ASP.Net keeps its compiled assemblies (aka .dlls) in this
folder. If you have custom plugins with compiled assemblies, you'll
want to add them here. Keep in mind that if you add/modify/delete any
file in this directory Rock will restart which could impact people
using Rock at the time. You should only do this after hours.
-
Blocks: These are the core Rock blocks. As you can see they are
organized by function. You should not modify any of these blocks nor
add your own. This location is reserved for the core blocks.
-
Content: This is where you'll add your custom content for your
various sites. While it's up to you to determine the best file and
folder structure, we recommend that you at least keep the content for
the various sites separate. Over time these folders can get quite
messy so it's best to come up with a good filing structure from the
beginning.
-
Plugins: The plugins folder is where you'll place all of your
custom blocks. The organization of the files in this folder is very
important. To help keep things straight the following pattern should
be used.
Plugin Directory Structure
-
The top-level should start with a reverse domain organization
notation. For instance if your organization uses the domain
rocksolidchurchdemo.org your top-level folder should be
org_rocksolidchurchdemo.
-
Under your root folder you’ll have a child folder for each
plugin that you develop.
-
Under the plugin folder you’ll have folders for things like
Assets, Styles and Scripts. You’ll also put the blocks
themselves in the root folder.
-
Scripts: This is the core scripts folder. You should not add
scripts to this folder. Instead add your scripts to your custom theme
folders.
-
Styles: The styles folder is for Rock's core .less files. You
should not edit these files as they will be overwritten during updates.
If you need to modify the properties of a certain style you should
override them in your custom theme files.
-
Themes: This is the location of all the themes for your Rock
install. See the chapter Working With Themes
for more information on themes.
-
Webhooks: Webhooks are HTTP handlers (Web 2.0 geek-speak for very basic
webpages) that receive requests from Internet services like Mandrill
and Twillio. For instance, Twillio will call a specific webhook every
time someone responds to your SMS message to notify you of the details
of the response. When you write a custom webhook you can place it in
this folder.
Couple of Important Files
While we won't cover every file in the root Rock folder, below are a
couple that you should be aware of.
-
License.aspx: Rock uses several open-source projects in its
core. Attribution for each of these projects is given here. We also
note each of their licenses so as to show that our license (Apache)
is not in conflict to theirs.
-
Web.config: This is the core settings file for any ASP.Net
application. Unless you know exactly what you're doing you should
stay away from editing this file. Keep in mind that any change to
this file will cause Rock to restart.
File Manager
The file manager provides a basic interface to help you to upload and delete files and manage directories without having to setup or share FTP credentials. Its root folder can be configured allowing you to enable a specific user or security role to manage a specific part of a folder heirachy. By default a File Manager block can be found Admin Tools > CMS Configuration > File Manager.
File Manager