Improve
Updates for Rock 5.0
Below is a summary of the updates for this version.
- Added chapter on registration payment reminders.
- Added information on disabling the editing of the information on already saved registrations.
- New chapter on the Registration Placement Group features.
- New information on the new Registration Template field for setting the batch name prefix.
- Documented the new registration instance and following features.
Updates for Rock 4.0
No updates made.Updates for Rock 6.0
Below is a summary of the updates for this version.
- You can now add a workflow to a registration instance and
template that will be fired at the completion of the registration
process.
- New "Show Family Members" option on Registration Template when registrants are in the same family.
- Documented the new digital signatures feature.
- Added Set Group Member Attribute information to Group Placement chapter and updated screenshot.
Updates for Rock 7.0
Below is a summary of the updates for this version.
- Added information on the new wait list feature.
- Updated Event Registration screenshot.
- Updated Event Occurrence screenshot.
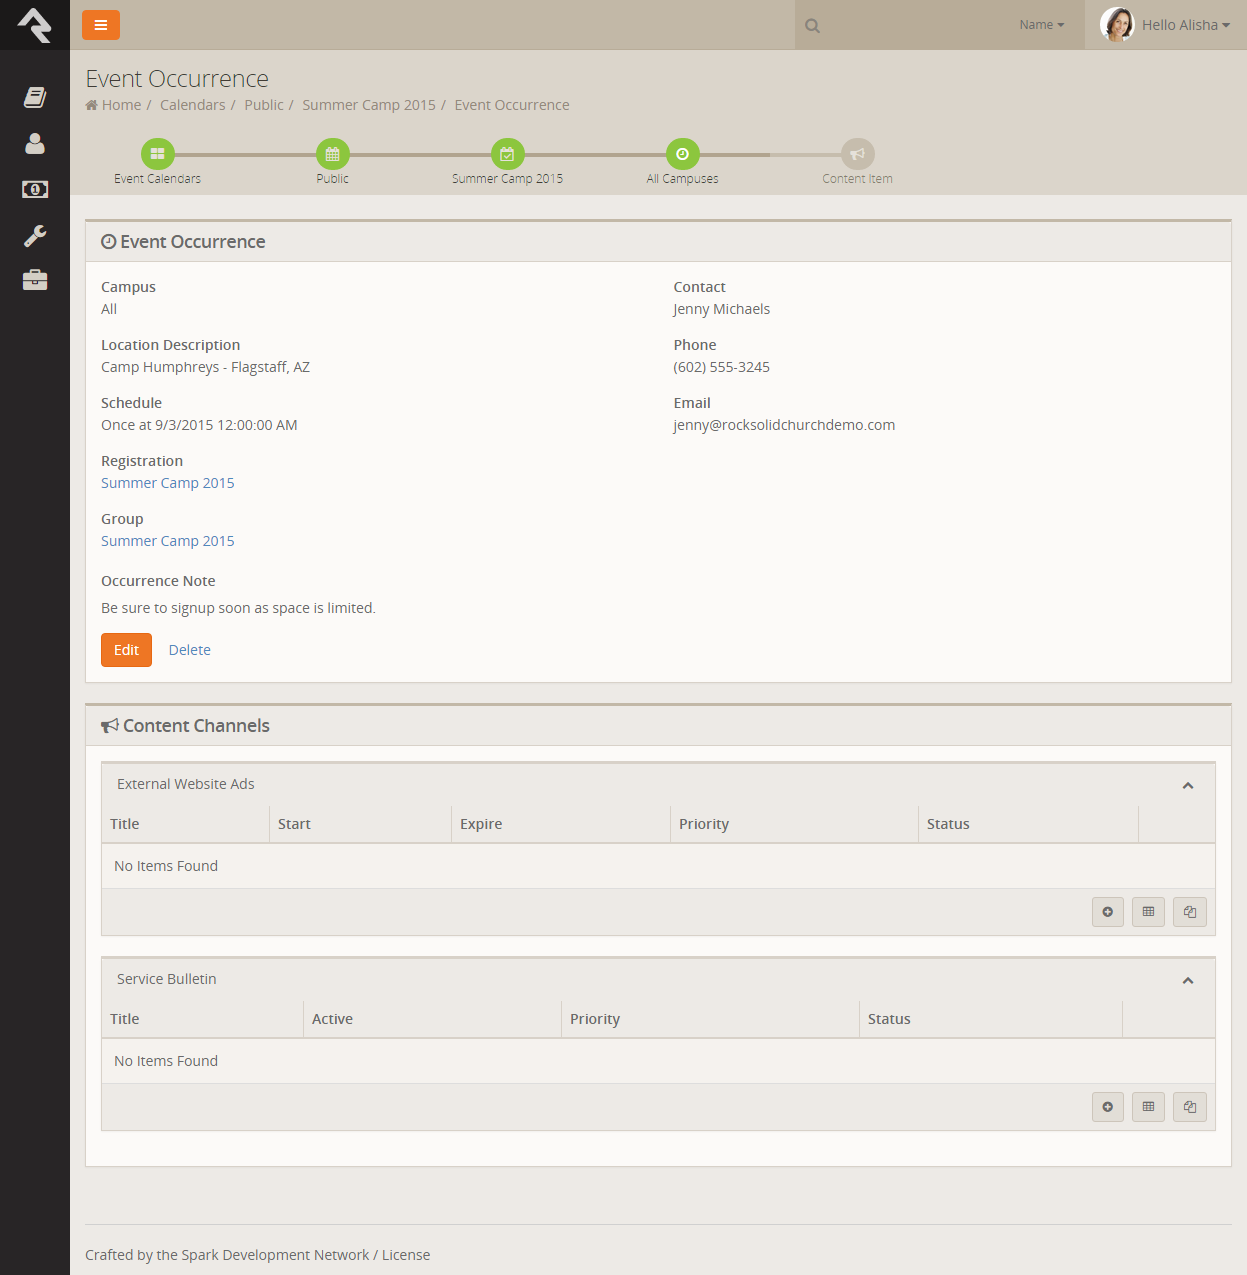
- Added information on linking to existing content channel items in the Event Occurrence detail screen in the Calendars chapter.
- Added Set Group Member Attribute information to Group Placement chapter and updated screenshot.
- Added filtering options and Group Placement Tab information to Managing Event Registrations chapter.
Updates for Rock 8.0
Below is a summary of the updates for this version.
- Updated list of Person Fields available for Event Registrations in the Registration Templates chapter to include "Connection Status".
- Updated Fee Editor screenshot and callouts.
- Added iCalendar Feed chapter.
- Broke Registration Fees out into its own chapter.
- Broke Discounts out into its own chapter.
- Updated the Registration Template General Settings documentation to include the Registrar Options feature.
Updates for Rock 9.0
Below is a summary of the updates for this version.
- Added Default Payment Amount note
- Added "Use Current Person" for registrar
- Updated "Registrant form's" image and "Registrants form fields" image
- Added Registration Attributes
- Added Conditional form fields
- Added Maximum Attendees information in the Instances Image
- Updated Registration Fees Chapter with new fee types
- Added Event Occurrence Attribute in the event details section
- Added Event Item Occurrence Attributes
- Added chapter on Event Wizard
Updates for Rock 10.0
Below is a summary of the updates for this version.
- Added details for using Discount Codes after registration.
- Added new features and configuration for group placement
Updates for Rock 11.0
Below is a summary of the updates for this version.
- Registrants can optionally replace an auto-applied discount code with a different code
Updates for Rock 12.0
Below is a summary of the updates for this version.
-
Updated the process for adding linkages to an Event Occurrence,
including a new "No Registration Required" option that lets a
slug be linked without a registration
Updates for Rock 13.0
Below is a summary of the updates for this version.
-
A new optional setting on the Registration Template allows for launching a workflow for each registrant when a
new registration is completed
Updates for Rock 14.0
Below is a summary of the updates for this version.
- Rock now ships with electronic signature features for use in event registrations
- Registrations now include a Campus linkage
Updates for Rock 15.0
Below is a summary of the updates for this version.
- Information about using the "Tokenized" NMI Gateway
Updates for Rock 16.0
Below is a summary of the updates for this version.
- You can now choose to use an existing group in the Event Wizard
- The Recent Registration block is now Registration List Lava and offers broader options
- Payment Plans can be used to pay registration costs over time
Updates for Rock 17.0
Below is a summary of the updates for this version.
- New family members or guests can be added during the event registration process
Updates for Rock 18.1
Below is a summary of the updates for this version.
- The guide has been updated to include the revamped Registration Group Placement, which simplifies the process of sorting registrants into groups for events like sports teams and camps.
Welcome
The power of Rock's tools is the synergy they bring when they work together. This is certainly
true in the area of event management. So as not to overwhelm though we’ll start by describing each
of the available tools as a stand-alone component. Once we have that complete we'll dive into how
you can use them together for mind-blowing results.
Enable SSL
Be sure to enable SSL on your website before taking registrations with payments.
Event Registration Overview
For many events it's good to know who will be coming. Rock's event registration features provide a
simple tool to not only know who is planning to attend, but also to take care of many of the
mundane tasks like event payments. The first thing that people want to know about event registration
is the feature list. While not inclusive (you'll have to read further for that), below is a list
of the major features contained in event registration:
- Free/Paid Registrations
- Partial Payments
- Additional Fees
- Single or Multiple Registrant Registrations
- Discounts (Percentage and Fixed Amounts)
- Notifications
- Custom Entry Forms
- Confirmation and Reminder Emails
Didn't see a feature you need? Keep reading...it's probably in here.
The Basics of Event Registration
Before getting too deep, let's establish some of the key terms and concepts related to event registration.
Registrar vs. Registrant
There are two parties involved with every registration that occurs. The registrar, the
person who is actually entering the registration, and the registrant, the person who is
registered for the event. In some cases this could be the same person. For instance, Ted
Decker may register himself for an upcoming event. Many times though this will not be the
case. Ted Decker might register his two children for camp. In this latter case, Ted would
be the registrar
while his two children, Noah and Alexis, would be registrants.
While we're often most interested in the registrants
for an event, we also need to be able to store and report on the registrars.
Registration Templates vs. Registration Instances
As you use the event features you'll find that many of your registrations are actually
identical in terms of costs, fees and fields. To simplify the process of creating new
registrations in these cases we've created the concept of a Registration Template. The
template is where you'll configure the majority of the settings for a registration (things
like costs, required entry fields, fees, etc.). Once the template is complete, you can create
instances of them that
configure the settings that would be specific to the event (registration start and end
dates, contact info, etc.). Still a little confused? Let’s look at some examples.
It's likely that you'll create an event registration for events like a new members class.
These classes happen often, but their event registration configurations will all be the
same. You would create a registration template for this class, then create registration
instances from this template with the proper dates and contacts.
On the other hand, an event like summer camp is probably different each year. In this case
you may have a custom template with a single instance each year.
The split between templates and instances has one final benefit. It allows you to separate
security for configuring a registration from the security settings for implementing a new registration.
For instance, you'll' probably want to limit who can adjust costs, fees and discounts,
while delegating who can set up a new registration for a reoccurring event.
The Role of Groups
By this point you've probably seen how important groups are in Rock. Groups also play a
role in event registration. In many cases the end point of the event registration process
is the placement of the registrants into a group that you configure. While you're not
required to have your event registrations add people to groups, in most cases you'll
want to enable things like event check-in.
You can also do other clever things with the relationship between registrations and
groups. Since nothing is keeping you from having more than one registration linked to a
single group, you can handle complex registration scenarios. Say that your summer camp
can only take so many boys vs. girls. In Rock you could setup two different registrations
with separate caps for boys and girls. Both of these registrations can also put their
registrants into the same group, giving you a single list of all children attending camp.
Registration Templates
As you've already read, templates contain a majority of the Event Registration's configuration.
There's a lot to cover, so let's get started. To keep it simple, we'll break the screen down
into bite-sized chunks. You can edit registrations under Tools > Registrations.
General Settings
General Settings
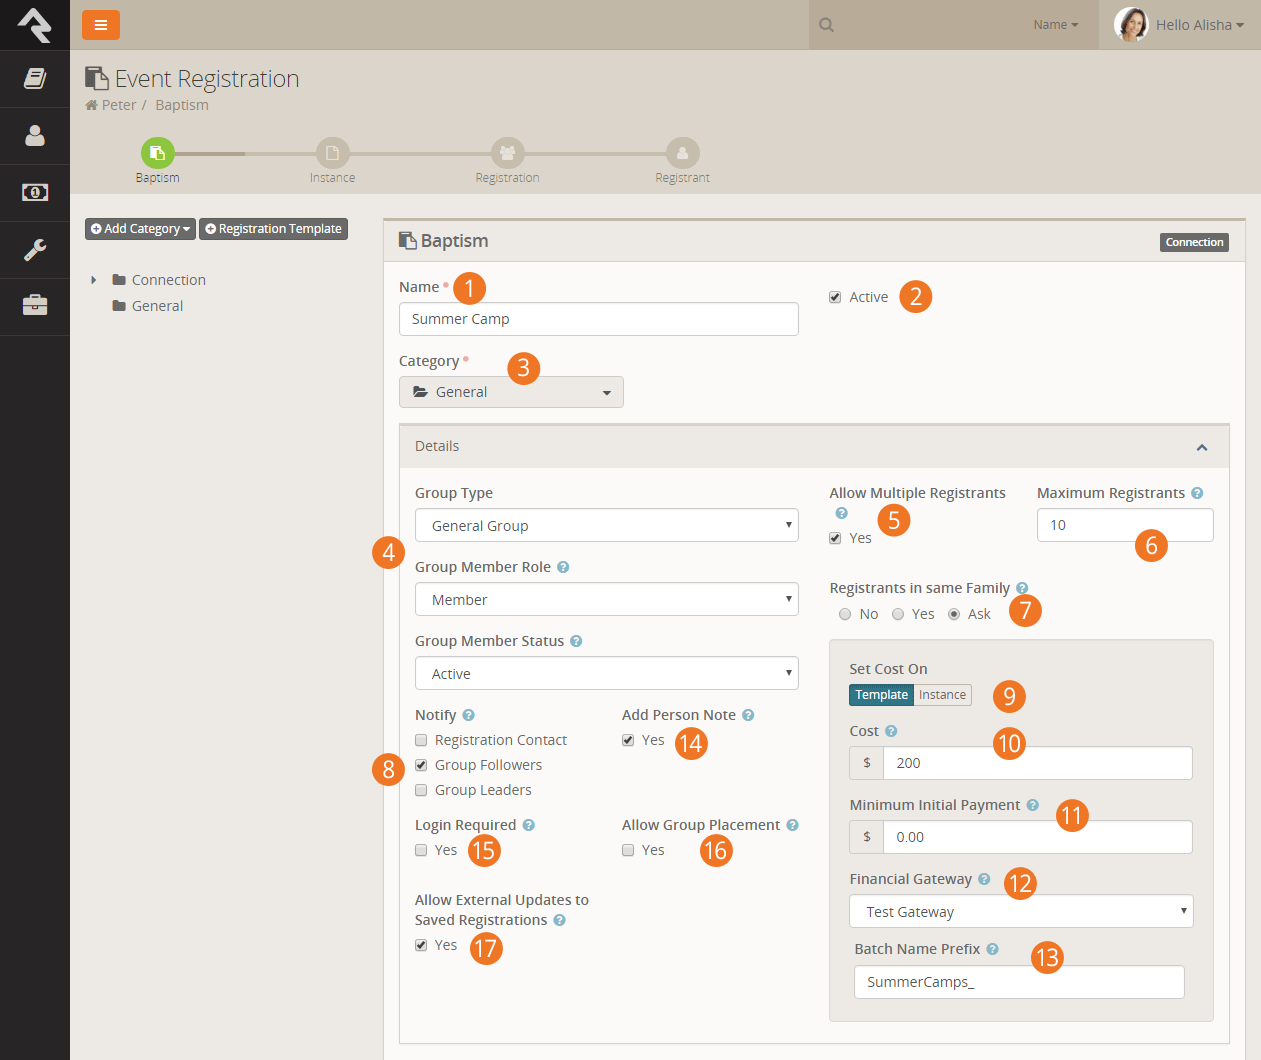
- 1 Template Name
- The name of your template.
- 2 Active
- When a template should not be used anymore you can deactivate it. You could also
delete it, but that would also delete all the registrations that use it.
- 3 Category
- To help organize registrations, you can organize and secure them by category.
- 4 Group Type / Group Member Role / Group Member Status
- These fields help tell Rock what settings to use when it drops the person into a
group. In this case they will be placed into the group with the Role of
Member
and the Status of Active.
- 5 Allow Multiple Registrants
- Fairly straight forward.
- 6 Maximum Registrants
- This limits how many people can register on a single registration.
- 7 Registrants In The Same Family
- Creating the family structures during the registration process can be tricky. This
setting allows you to give Rock hints about the people that are registering for the event.
If you're hosting a pastors' conference, you'll probably want to enter No
since the registrants are most likely not in the same family. Rock will then create new
families for each registrant. Yes
will assume that all the registrants are in the same family. Ask
enables the cool functionality you saw during the walk-thru above. It provides a very
elegant way for the registrar to tell you the family make-up.
- 8 Notify
- When someone registers for an event we often can’t wait to find out. This setting allows you notify several different parties.
- Registration Contact: This is configured on the registration instance.
- Group Followers: The groups that the registration is linked to can be followed by people with view permissions.
- Group Leaders: All of the individuals that have roles that are marked
Is Leader in the group
linked to the registration will receive an email.
- 9 Set Cost On
- This setting determines where the cost will be set, on the template where all registration instances will share it, or on the instance.
- 10 Cost
- The cost of the registration.
- 11 Minimum Initial Payment
- This is the minimum amount that must be paid at the time of registration. Leaving the
field blank will have the effect of requiring full payment.
- 12 Financial Gateway
- The financial gateway you would like the financial transactions to be processed with.
- 13 Batch Name Prefix
- Optional prefix to add the the financial batches. If left blank the prefix from the registration block will be used.
- 14 Add Person Note
- When checked registrars and registrants will have a note added to their timeline that denotes that they
have registered for the event.
- 15 Login Required
- Requiring the guest to login ensures that a duplicate record is not created for the
registrar, but it does come at the cost of requiring the guest to login (and possibly
register for a login) on your site.
- 16 Allow Group Placement
- Rock provides tools to help place your registrants into groups for you. This is helpful when creating teams or when working with camps. See the
Registration Group Placements chapter for more information on this tool.
- 17 Allow External Updates to Saved Registrations
- This setting keeps individuals from editing a registration once it has been saved. It's common that someone may come back to a registration to make
a remaining payment. While there they can change any of the registrant information. Disabling the feature keeps these edits from occurring.
Forms
Now for the fun part - creating the entry form. When you see the power here you'll have
no choice but to smile.
Form Field List
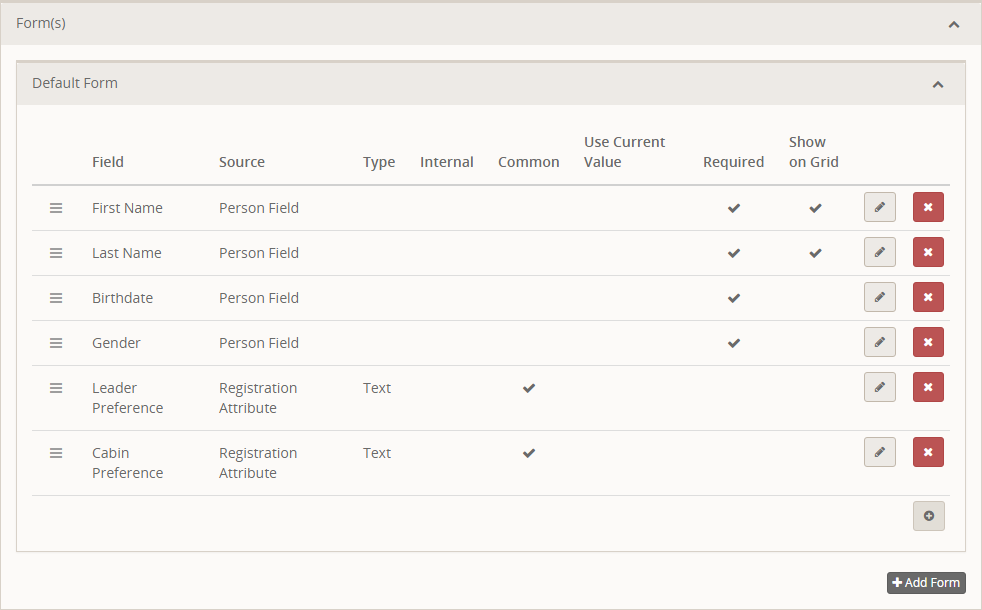 Form Field Editor
At a minimum you must collect the registrant's first and last name. But in most cases
you'll want to add at least a couple more fields.
When adding fields, you have you choice of where and how they're stored. Let's look at
each type.
- Person Field: These fields come right off the person's record. They
include things like:
- Campus
- Address
- Email
- Birthdate
- Gender
- Marital Status
- Phone Numbers
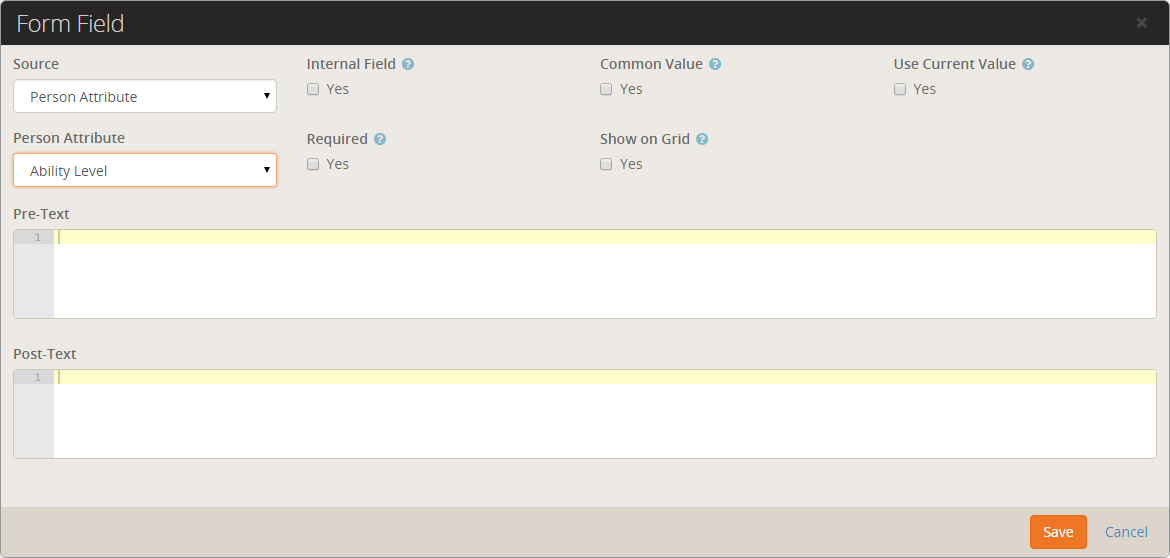
- Person Attribute: This type allows you to take what they've
entered and place it into a person attribute.
- Group Member Attribute: This allows you to store their entered values
into a person attribute of the linked group.
- Registration Attribute: The final type allows you to configure new
attributes that will be stored with the registration.
You'll notice a few other settings on the add screen. These settings allow you to:
- Common Value: Filling out forms can be tedious. This setting allows
you to take the entered value from the first registration and auto-populate the same
field for the subsequent registrants.
- Internal: This setting allows you to define the attribute, but keep it from being displayed on the external registration form. It
will be made available however when editing the form internally. This is used for internal fields that will be entered after the registration takes place.
- Use Current Value: In an effort to reduce the amount of data that must be entered, this setting takes the current value from the registar's record.
This is especially helpful for attributes like 'Address'.
- Show On Grid: This will place this attribute on the grid of
registrants. It can be very helpful as long as you limit the number of items you put on
the grid.
- Pre-Text / Post-Text: Like the workflow entry forms, these fields
allow you to surround your entry fields with custom HTML markup. With some basic web
design knowledge you can use these fields to create richer experiences.
Optional Fees
We get it - events are tricky and often come with odd requirements for additional fees.
We've tried to think of as many combinations as possible when creating the features here
so we have a lot to cover.
Before we look at how to configure fees let's look at the various types of fees that are
available. Below is a chart showing the four different fee types.
Types of Fees
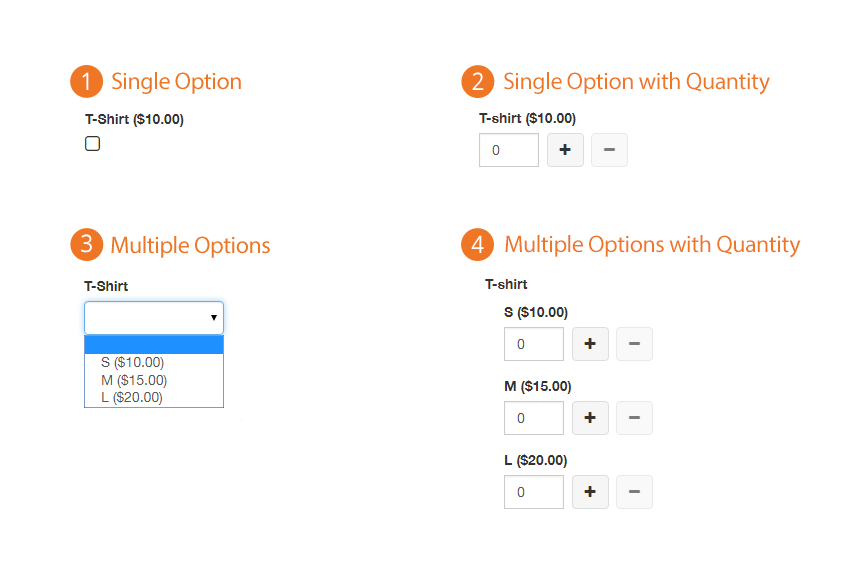
- 1 Single Option Fee
- You either want it or you don't.
- 2 Single Option Fee with Quantity
- You can get as many as you want.
- 3 Multiple Options
- Variety is the spice of life.
- 4 Multiple Options with Quantity
- What's better than a little spice? A whole lot!
Now that we see what's possible, let's learn how to set up these fees.
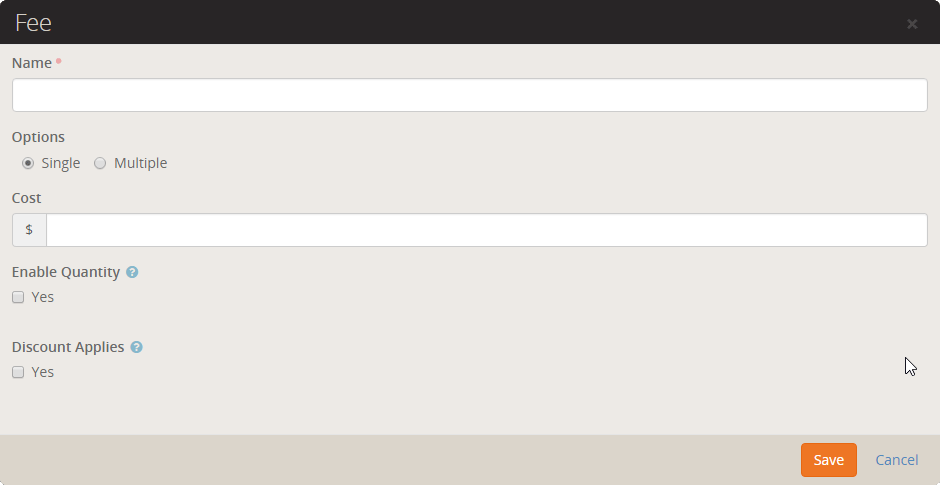
Fee List
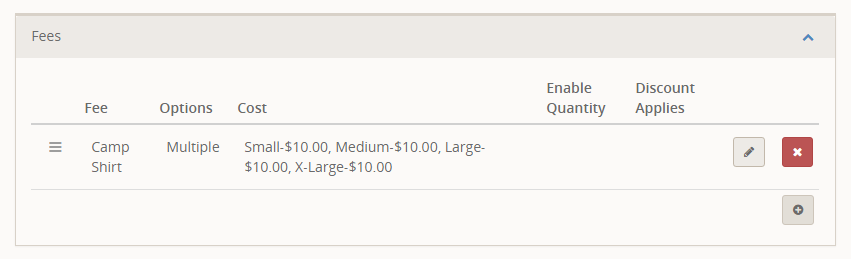 Fee Editor
- 1 Name
- This will be used for the label that goes above the fee selection.
- 2 Options
- Here is where you'll make the determination of whether the fee has multiple
options. When selected, it will display a key/value input that allows you to enter
optional text as well as the cost.
- 3 Enable Quantity
- Pretty obvious what this does (enables the quantity picker).
- 4 Discount Applies
- Sometimes you'll want the discount calculation to apply to fees sometimes not.
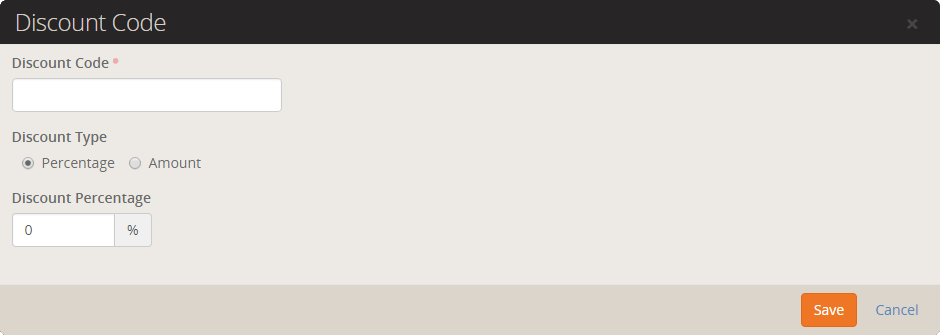
Discounts
Discounts allow you to give individuals a code to reduce the amount of their registration.
This discounts can be in the form of a percentage of costs/fees or a fixed amount.
Discount List
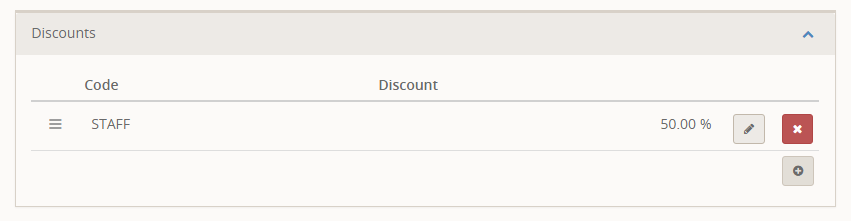 Discount Editor
Confirmation Email
After completing the registration, you can set up a confirmation email. This email also
acts as an emailed receipt.
Confirmation Email Settings
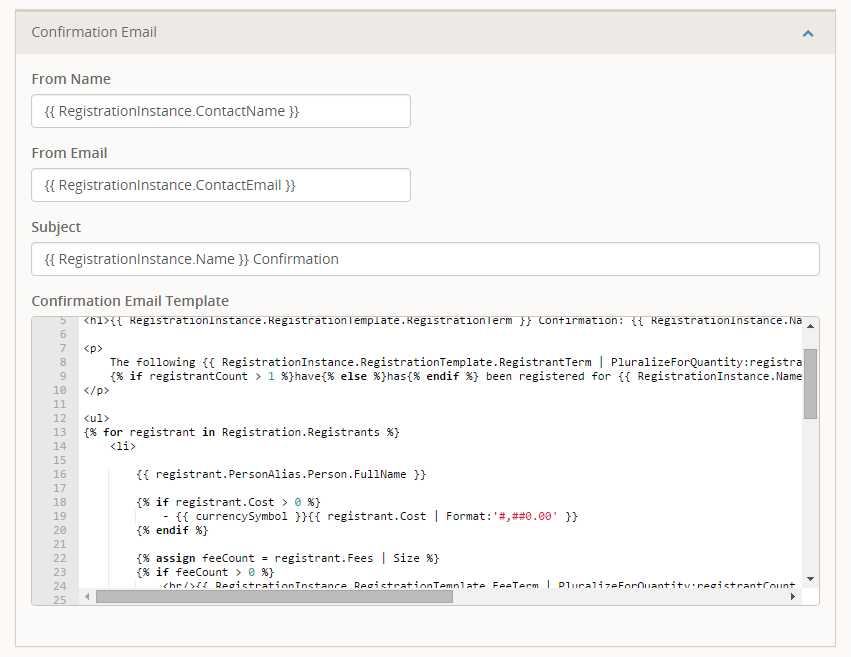
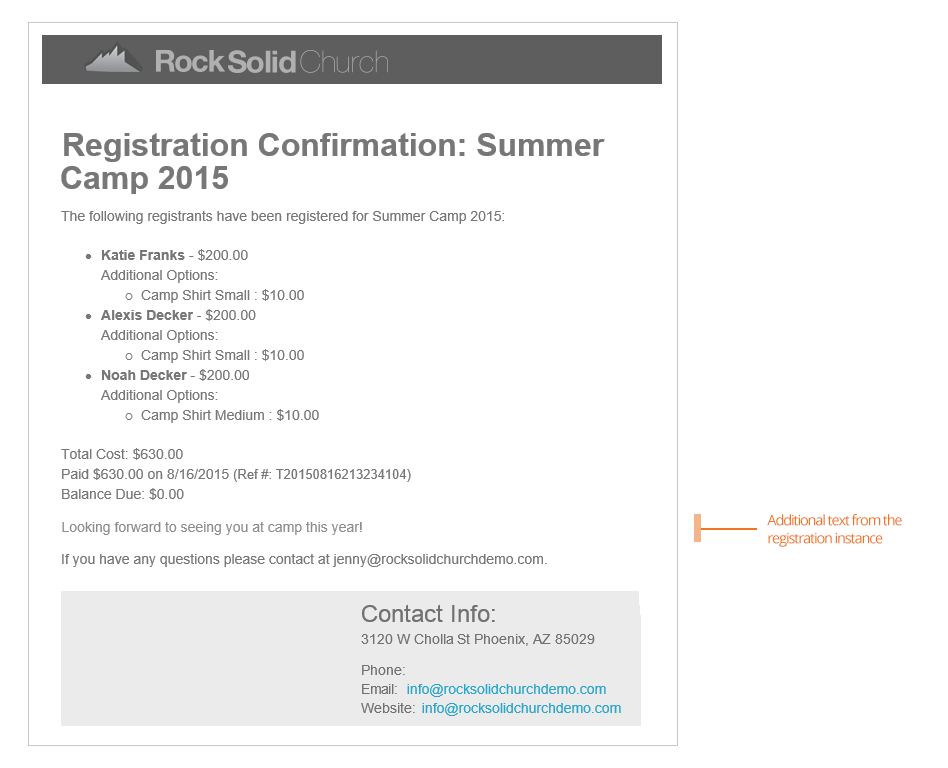
While you're free to modify this email, we've provided a template that should work in most
cases. Below we've shown what this sample email will look like. Note that the highlighted
section comes from the Additional Confirmation Details
field of the registration instance.
Default Confirmation Email
Reminder Email
We all appreciate reminders. Especially for events we may have registered for long ago.
On this screen you can edit the reminder emails. When you create the registration
instance (discussed next), you' will configure when this email will be sent.
Reminder Email Settings

Again, we’ve provided you with a capable template (shown below). One thing of note here
is that the template relies on the registration instance's
Additional Reminder Details
to set when the event will occur. We've highlighted this part in the email below.
Payment Reminder Email
Allowing partial payments is great, but getting the remaining balance has always been difficult. That was
until Rock came around. There's now several tools for getting the remaining balance quickly and easily. The
configuration items in this section help setup the communication tools for these reminders. For the most part
you can leave them as is. You can read more about these tools in the
section below.
Reminder Email Settings

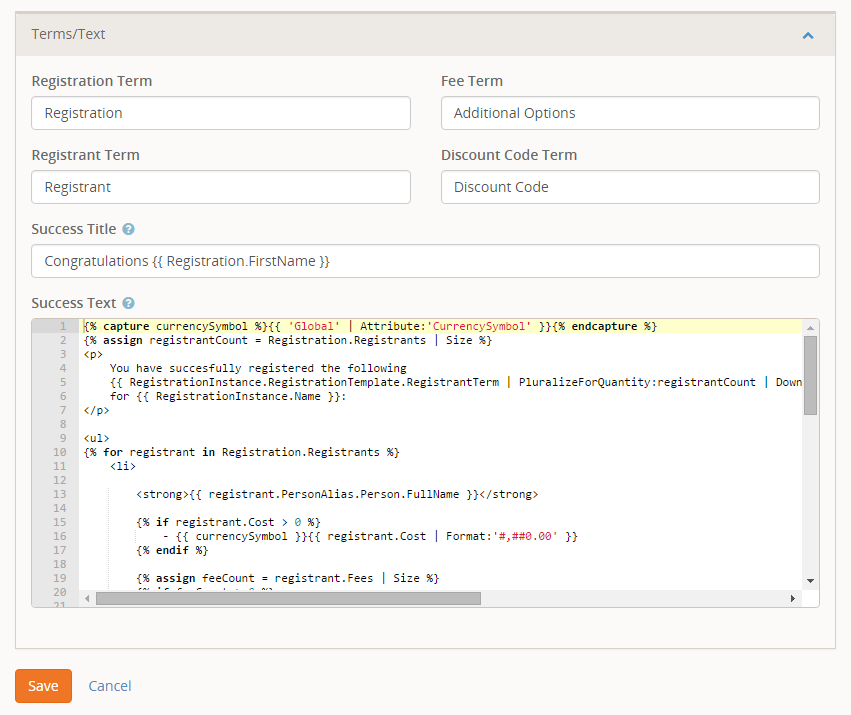
Terms / Text
Event registrations can be used for several different kinds of events. To help fit
different types of events, we allow you to customize many of the terms used during the
registration process. In this section you can also configure the
success
text that displays on the final page of the registration screen.
Terms and Text Settings
Registration Instances
Now that we understand how to make registration templates, we're ready to implement them for
specific events. There are several places where you can create registration instances. Since
we're already familiar with the registration template screen, let's first create a new
instance here.
Instance Settings
Clicking the
from the instance grid will bring up the instance editor show below.
Registration Instance Settings
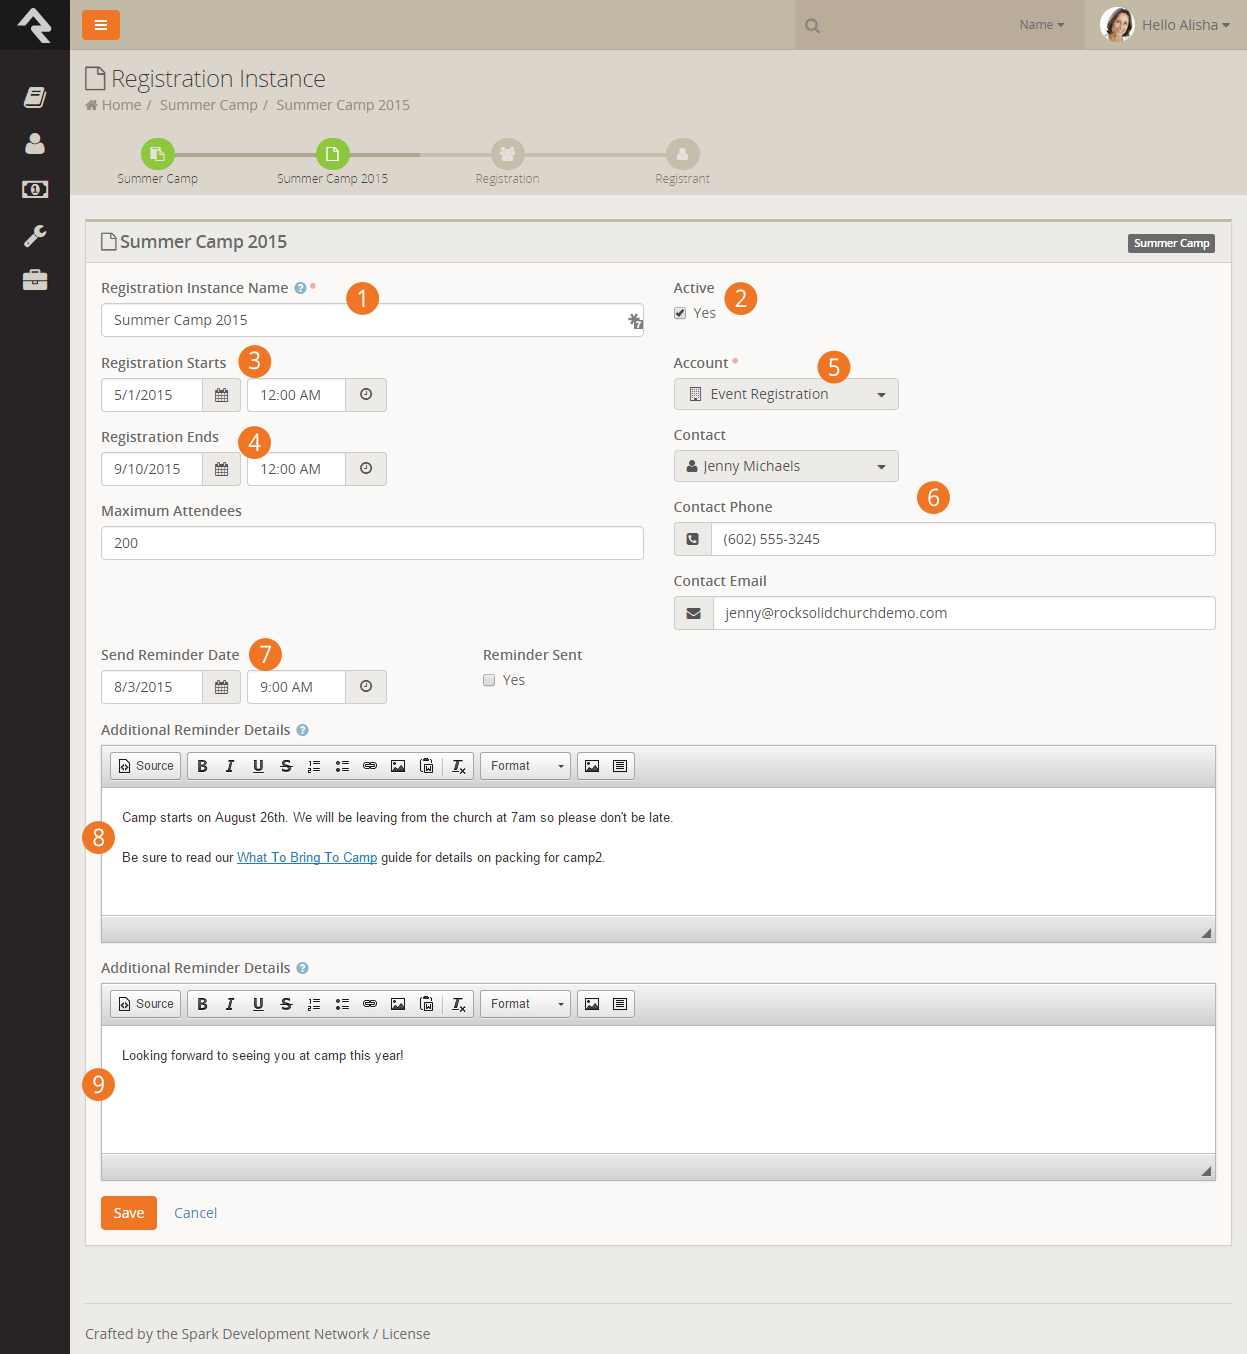
- 1 Registration Instance Name
- This is actually an important field that will be shown during the registration
process. It will be used to describe the event that you are registering for (e.g.
Thank You for Registering for "_______").
- 2 Active
- This determines if the registration instance is currently active.
- 3 Registration Starts
- The date and time that the registration starts.
- 4 Registration Ends
- The date and time that the registration ends.
- 5 Account
- The financial account that the registration costs/fees should be tied to.
- 6 Contact Name / Phone / Email
- The information that should be displayed as the contact for the registration process.
- 7 Send Reminder Date
- The date and time that the reminder should be sent.
- 8 Reminder Sent
- This displays whether the reminder has been sent. This also allows for sending multiple
reminders. Once your first reminders is sent you can change the
Send Reminder Date
and uncheck this box. As far as Rock is concerned, that first reminder never existed and
will send the new one at the appropriate date/time.
- 9 Additional Reminder Details
- This text is used in the reminder email template defined on the registration template. It's
important that you include information on when and where the event will occur. For more
information on the reminder email, see the template section above.
- 10 Additional Confirmation Details
- Like the reminder details, this field is used to provide additional, instance-specific,
information to the template stored on the template.
Setting the Price on the Registration Instance
As we discussed in the chapter on Registration Templates you can optionally
set the cost of an event on the Registration Instance. When configured, the
price options will be shown on the screen above.
Follow A Registration Instance
After saving a registration instance you can choose to follow it by selecting the
icon in the upper right corner of the details block. This will add it to the list of followed instances on
your dashboard.
Now that we've shown you how to make a new registration instance from this page, we should
tell you that you'll rarely ever create an instance from here. More about that later in the
chapter Bringing It All Together.
Managing Event Registrations
Now that you're comfortable creating event registrations, let's see how to manage
them through the registration lifecycle.
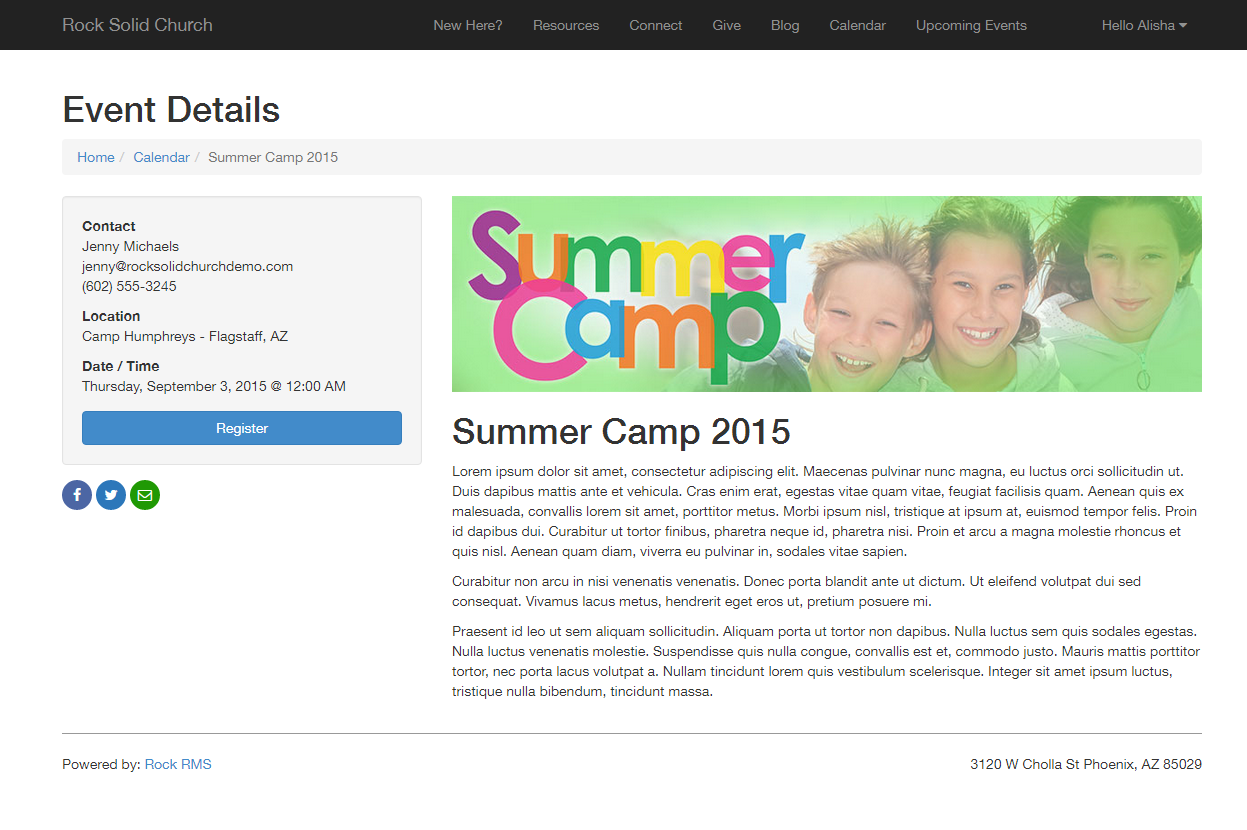
Promoting Your Registration
The easiest way to give your guests access to an event registration is through a calendar
event. The Bringing It All Together
chapter below covers the process of linking calendar events to registrations. Once linked,
the event detail will display the Register
button as show below.
Event Detail Page With Registration Link
You can also link directly to an event registration using a URL. The formats for doing so are:
- http://www.yourexternalsite.com/page/999?RegistrationInstanceId=999 (where the page id
and registration instance id match the appropriate values)
- http://www.yourexternalsite.com/Registration/<slugname> (you can find more on slugs
in the Bringing It All Together
chapter below)
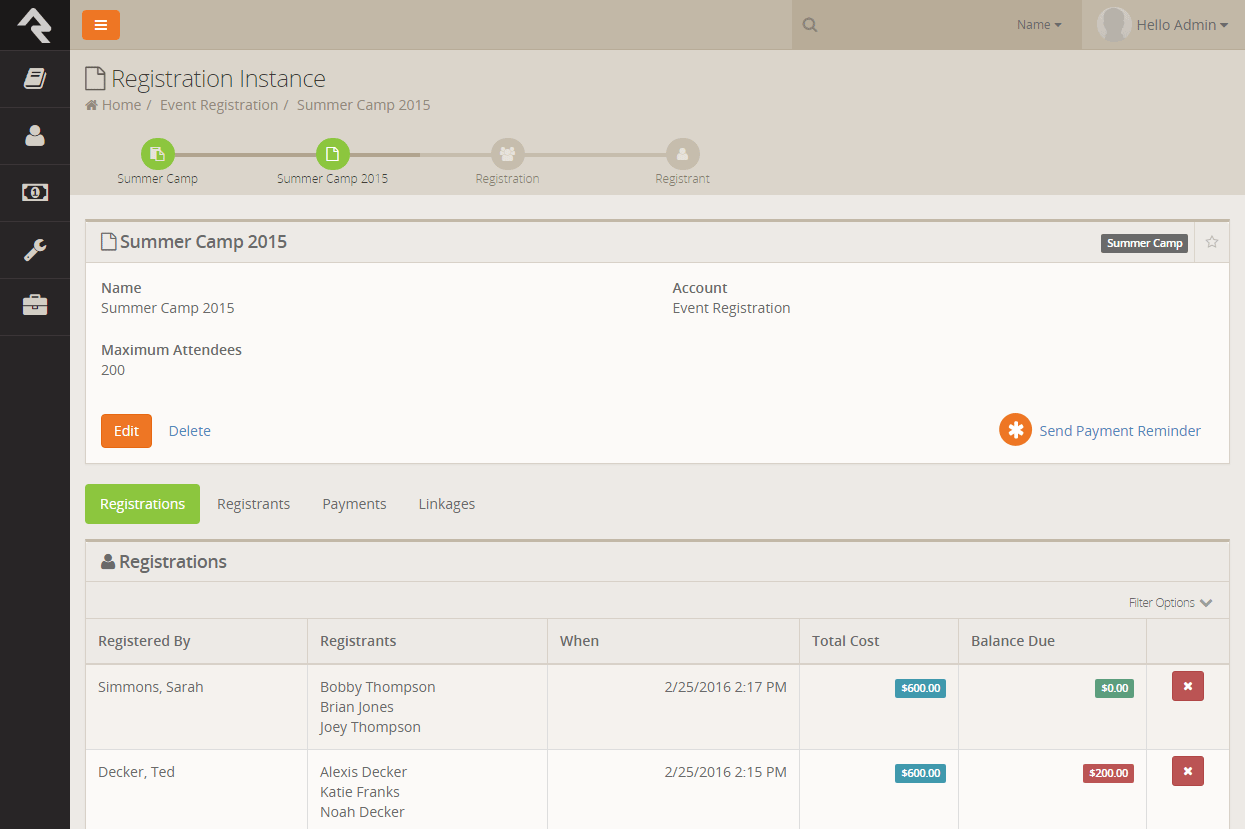
Managing Registrations
You can mange the registrations by going to the Event Instance Detail Page
(Tools > Event Registration > Registration Detail > Registration Instance).
At the top of this page you'll see the details of the registration with an
Edit button to modify its
settings. You'll also notice three tabs.
Registrations Tab
The Registrations Tab
shows all of the registrations that have been entered into the system. Remember these are
registrations that could have multiple registrants.
Registration Instance Detail Page
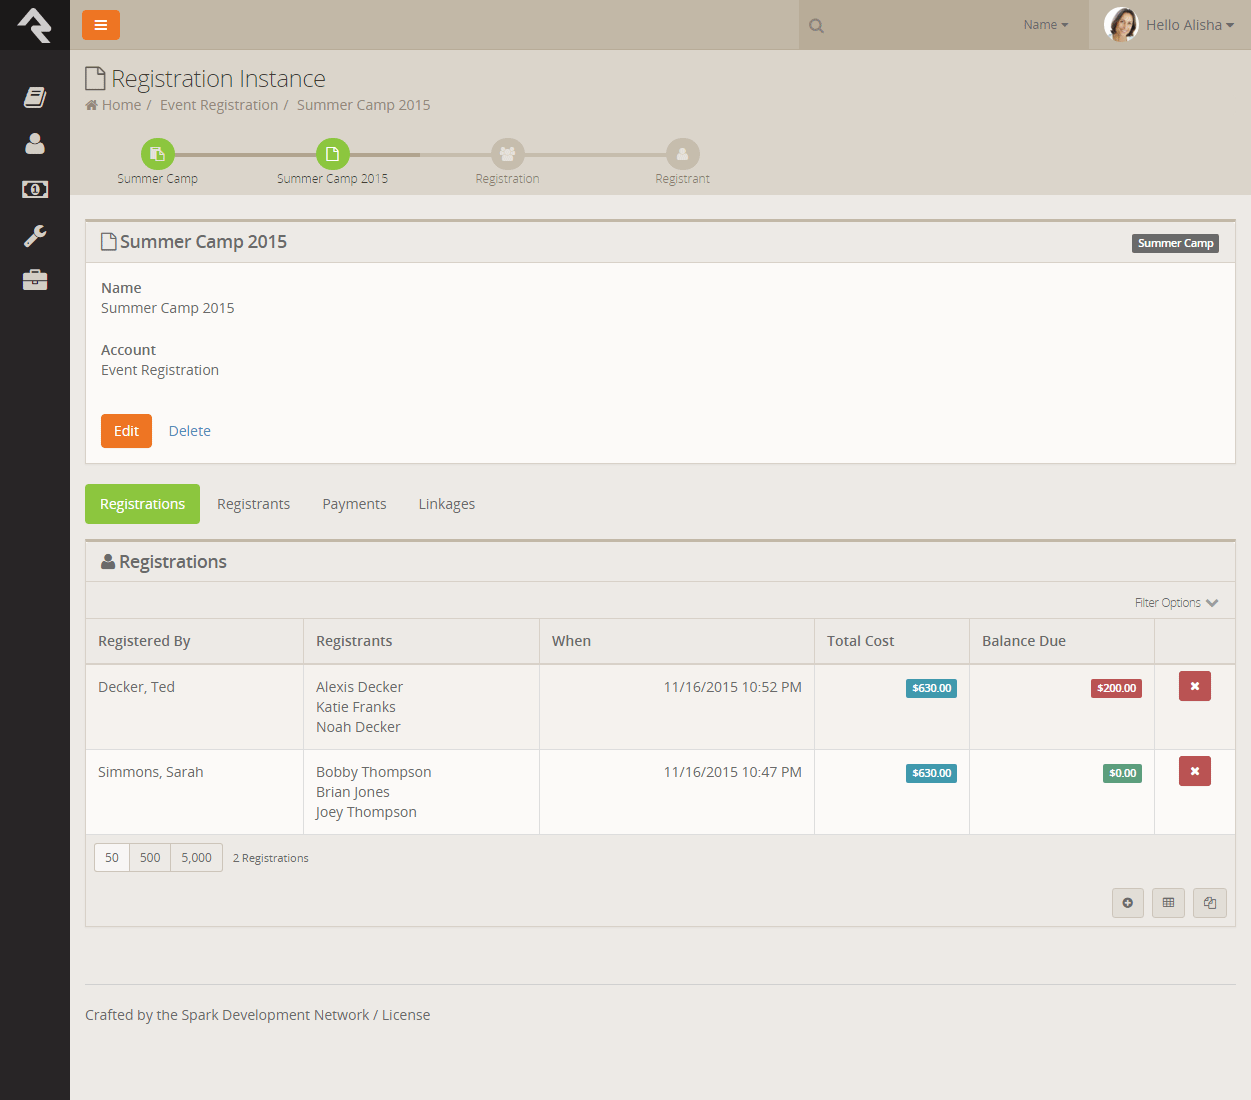
From this tab you can view and edit an existing registration or manually add a registration
yourself (great if you also allow paper registrations).
Registration Edit Screen
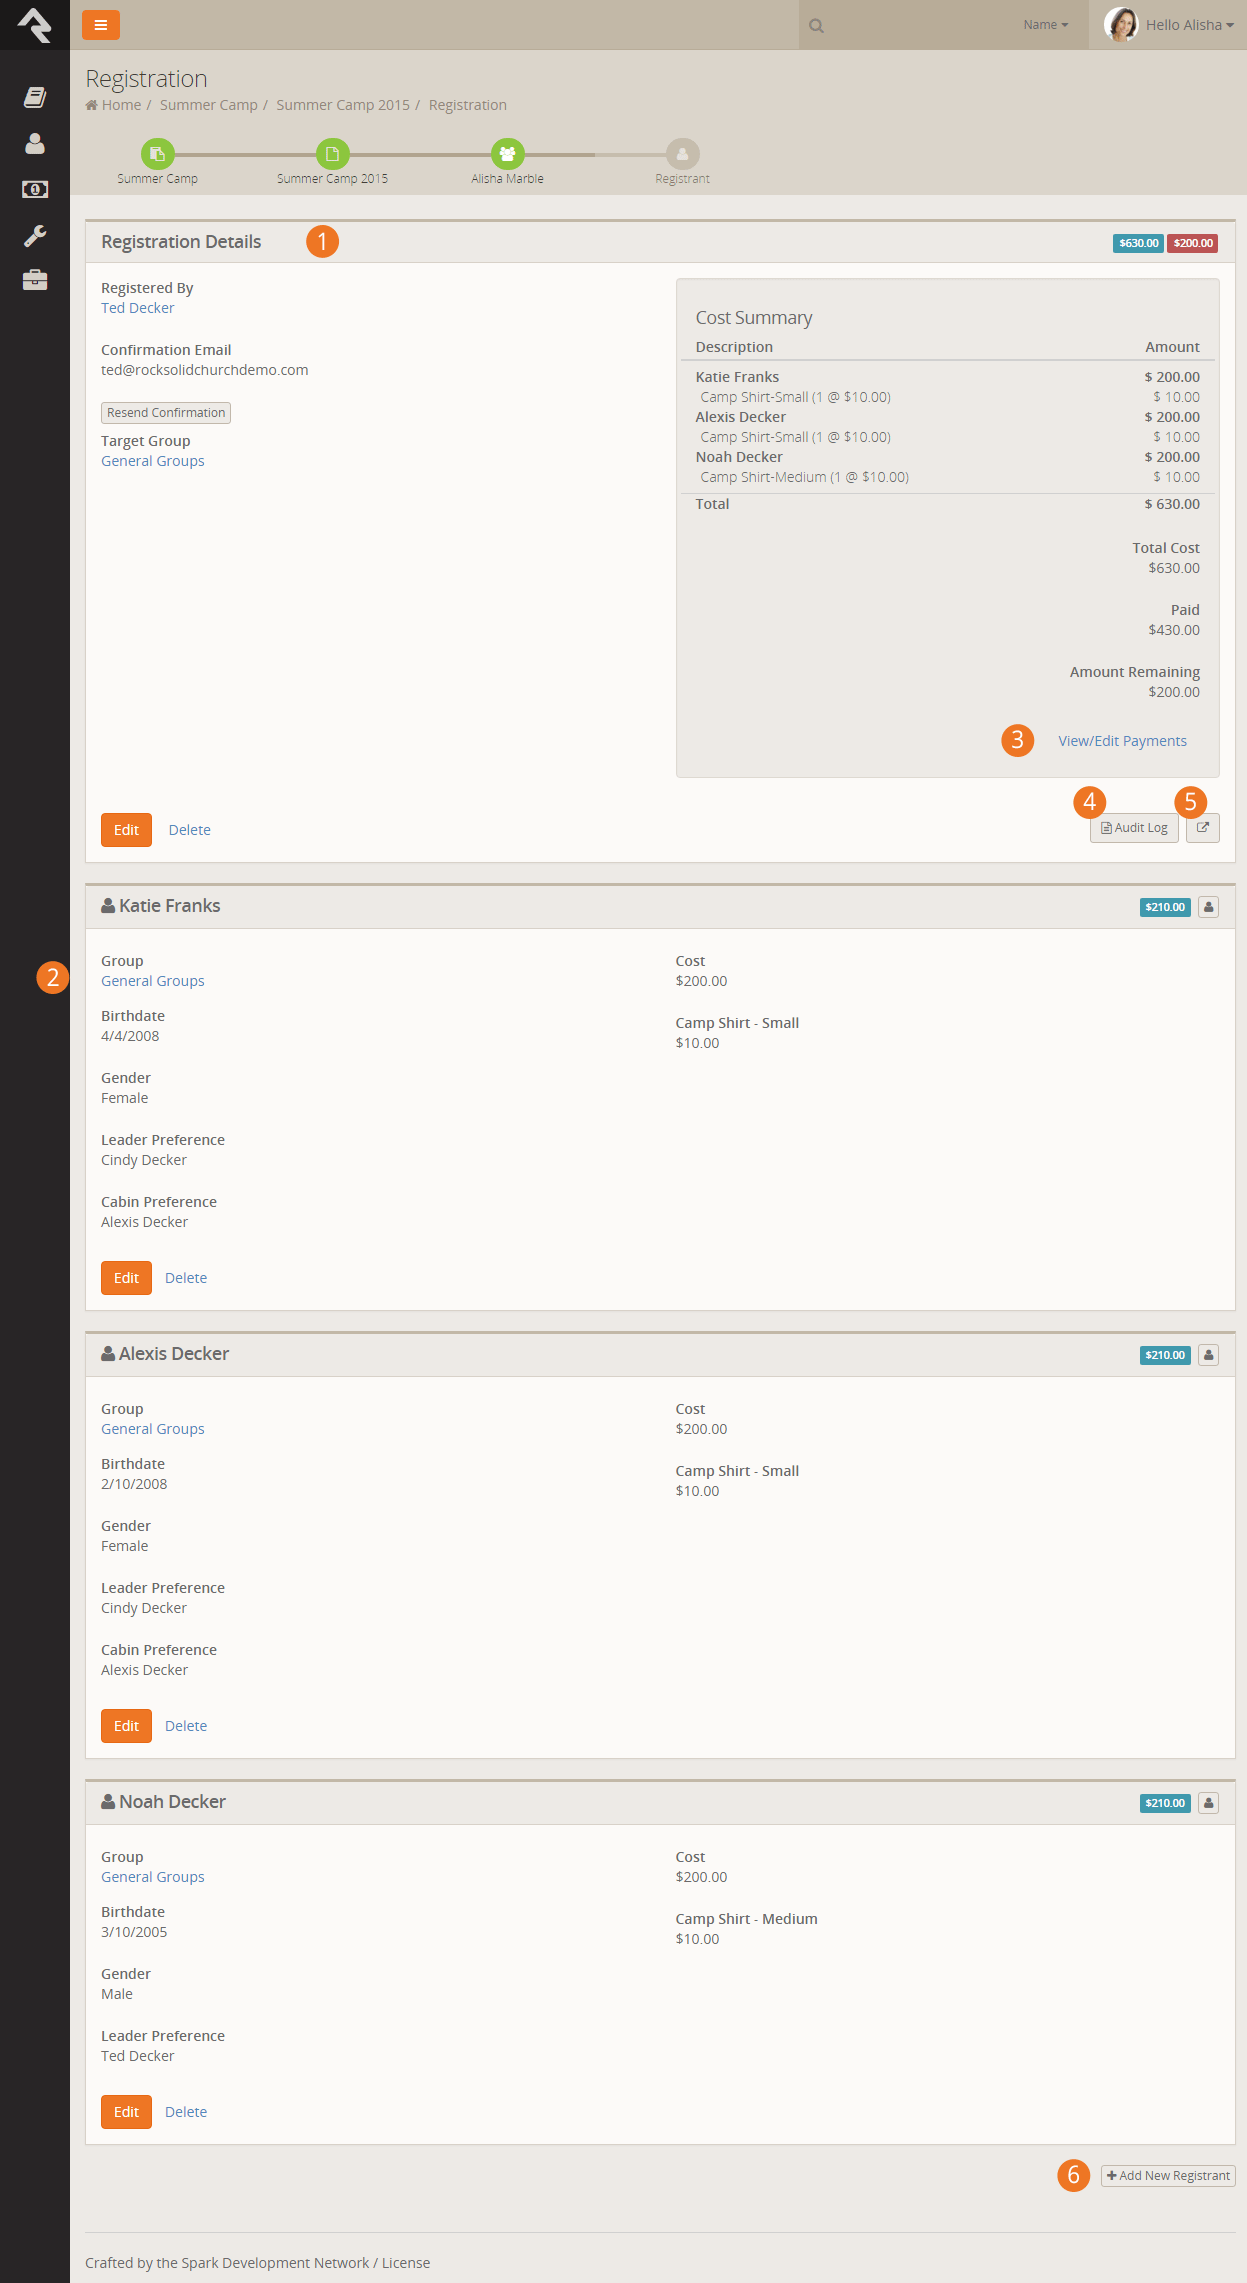
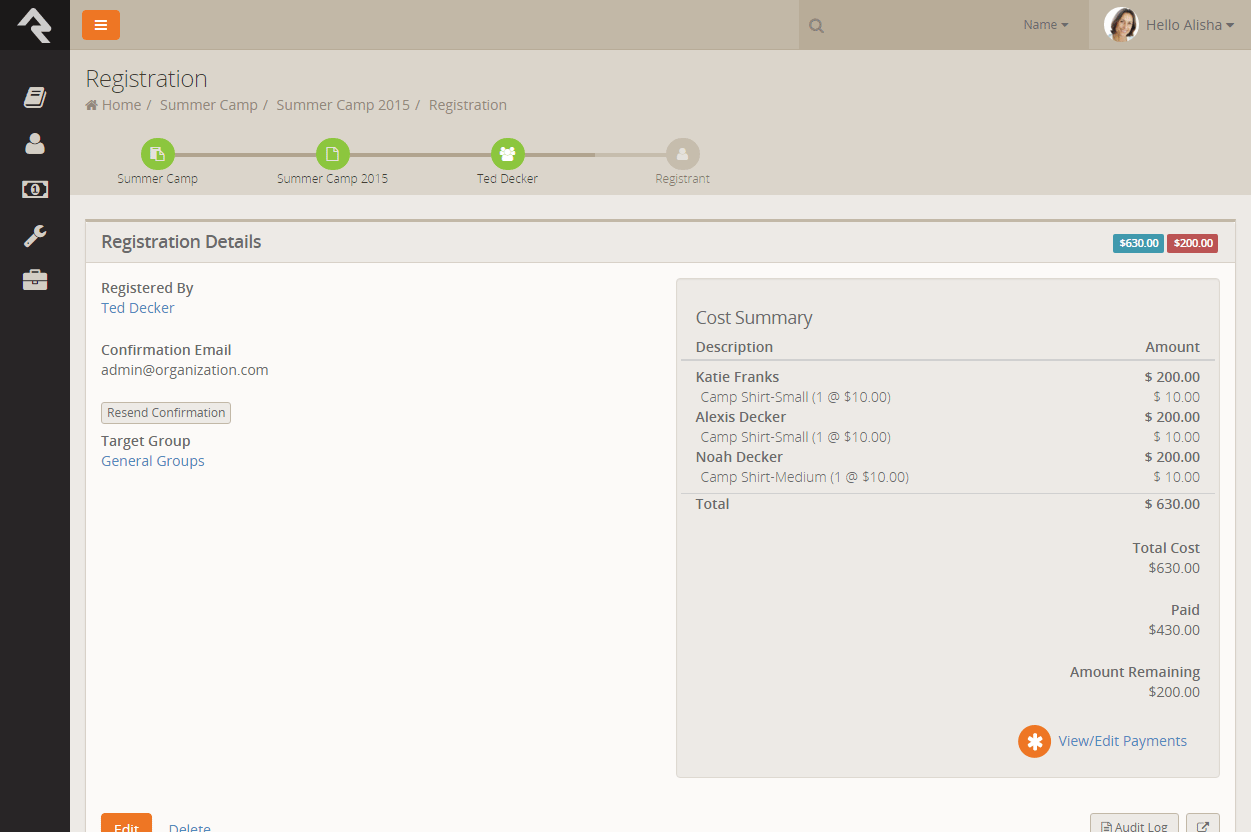
- 1 Registration Details
- This shows the details of the registration including information on the Registrar.
You can easily resend the confirmation email from here.
- 2 Registrant Details
- Next you will see a panel for each registrant on the registration. You can also
edit their registration details from this screen.
- 3 View Edit Payments
- This link allows you to view and edit payments. We'll discuss this further below.
- 4 Audit Log
- This button allows you to view information about how to registration was entered and any
financial changes that were made.
- 5 Move Registration
- Sometimes a registration needs to be moved. Perhaps the person registered for the wrong instance of the event, or maybe they just
just changed their mind. Don't worry, moving a regsitration is easy! You can however only move the event to an instance using the
same registration template (moving them across different templates would be rather difficult as there would be different fields,
costs, fees and discounts.) This button allows you to comlete the move of the registration.
- 6 Add New Registrant
- Notice that at the bottom of the screen you can add more registrants to the
registration if needed.
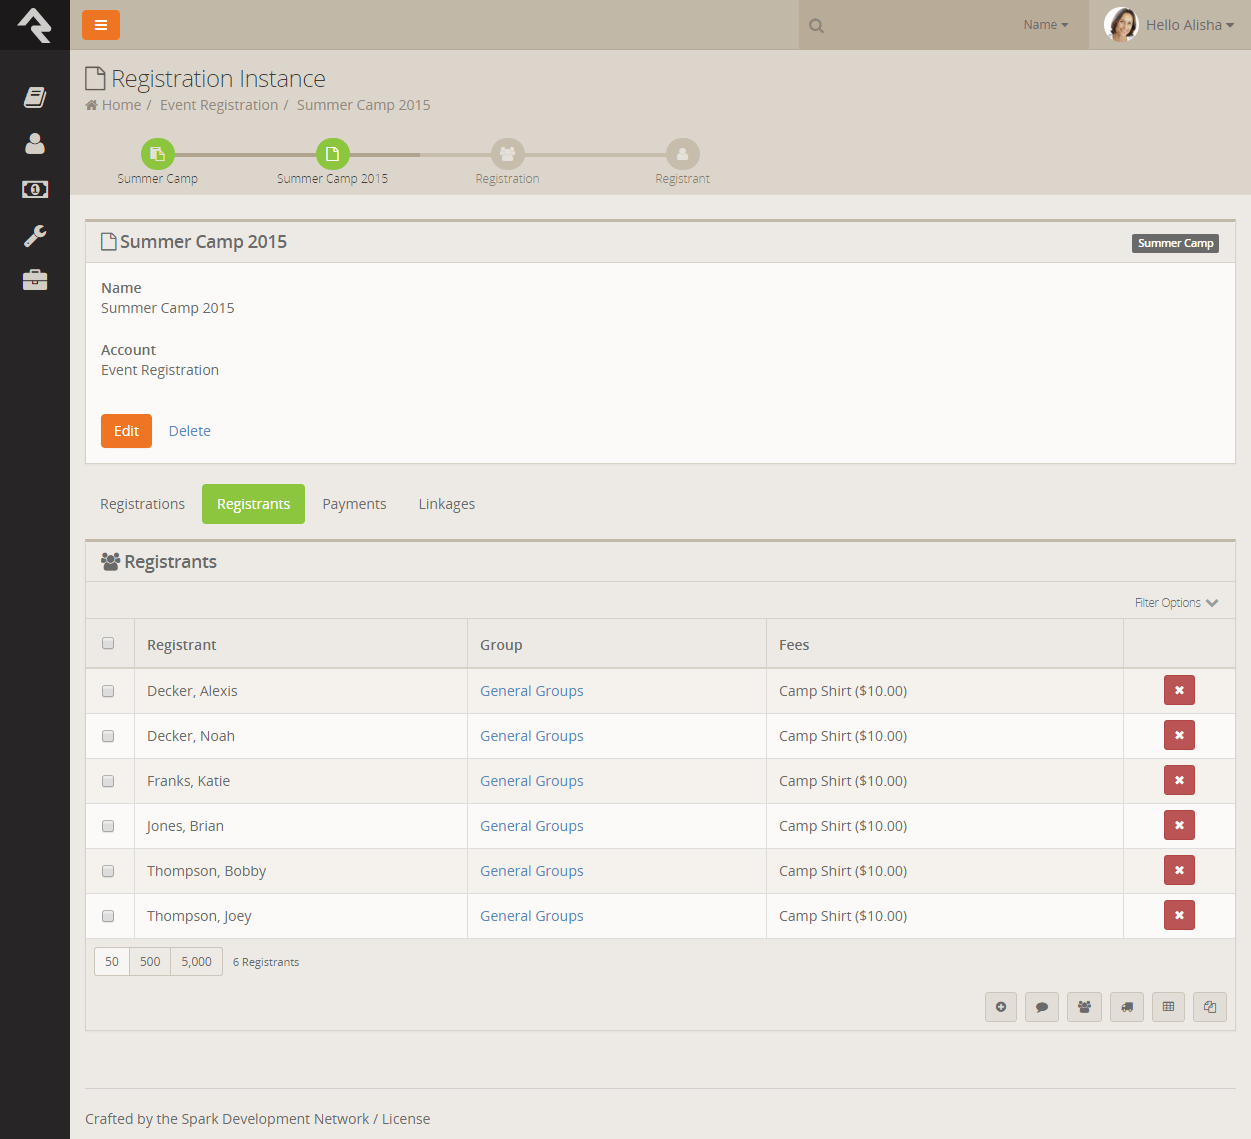
Registrants Tab
The next tab shows a listing of all registrants for the event. Clicking a row will show
you the registrant's details as well as the rest of the related registration information.
If this screen seems familiar, it's because it's the same screen as the one above except that
we scroll down to the selected registrant's information.
Registration Instance Registrants
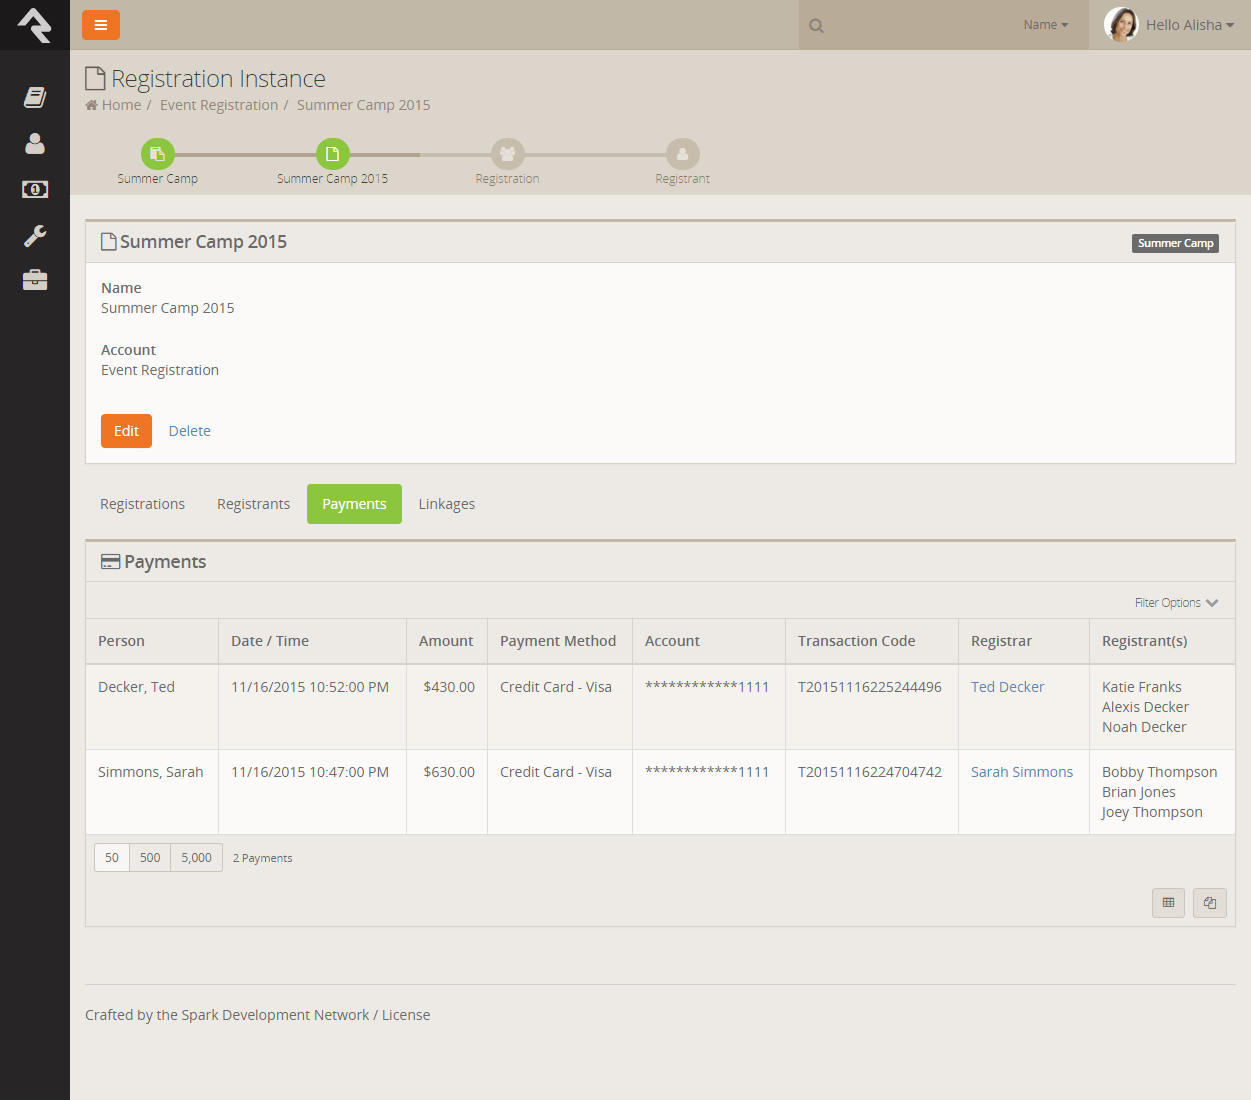
Payments Tab
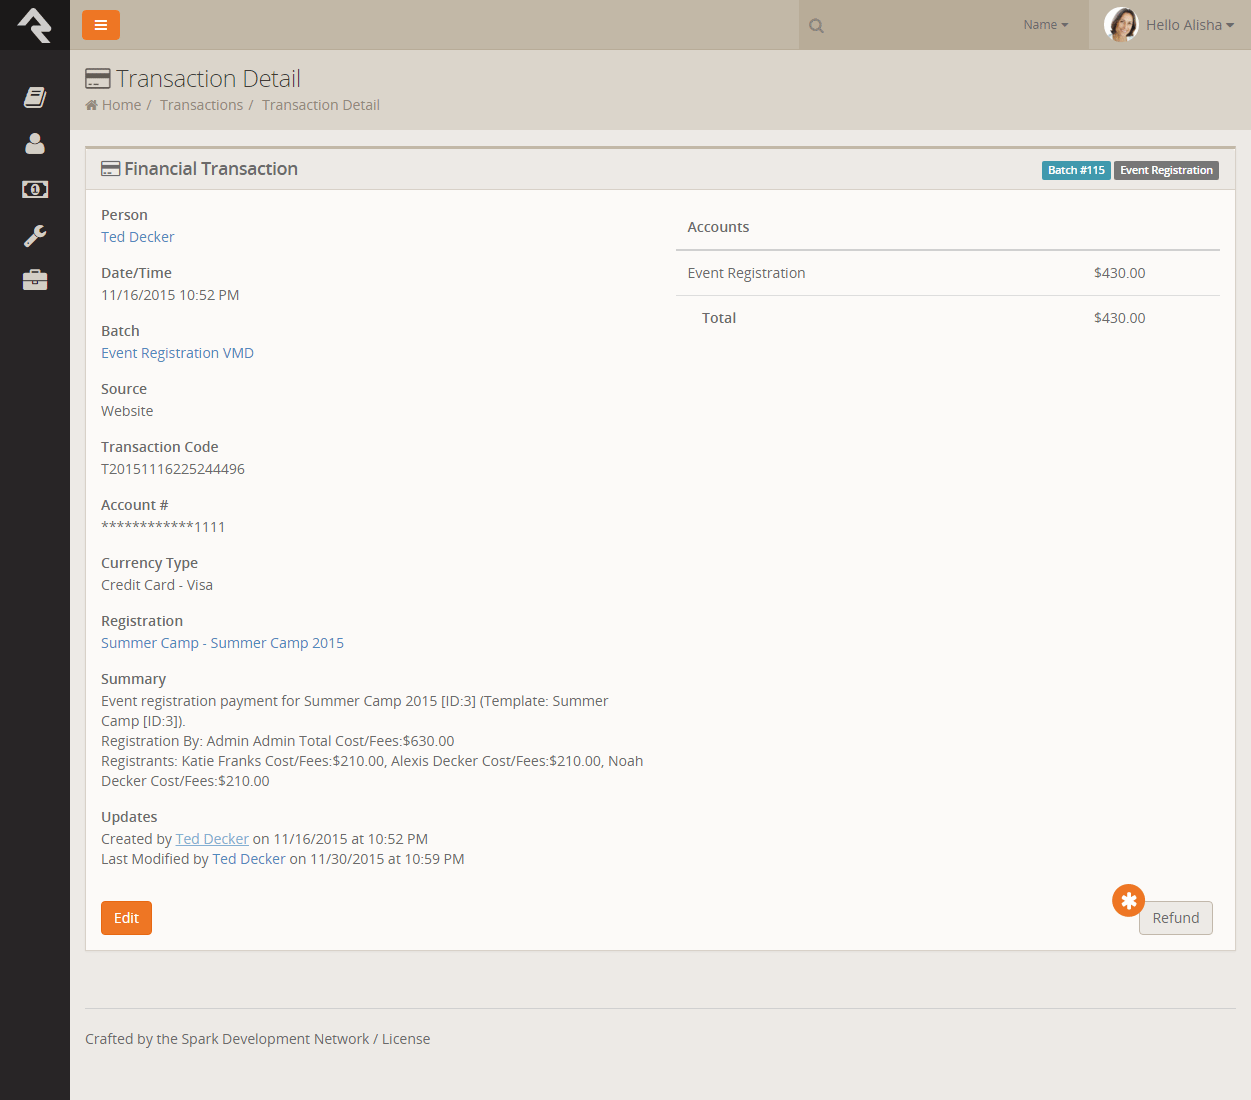
The payments tab allows you to view all the payments that have been made for registrations for this instance. Clicking on one of
these tabs allows you view the financial transaction for the payment. From this transaction detail screen you can process
a refund for the payment.
Registration Payments
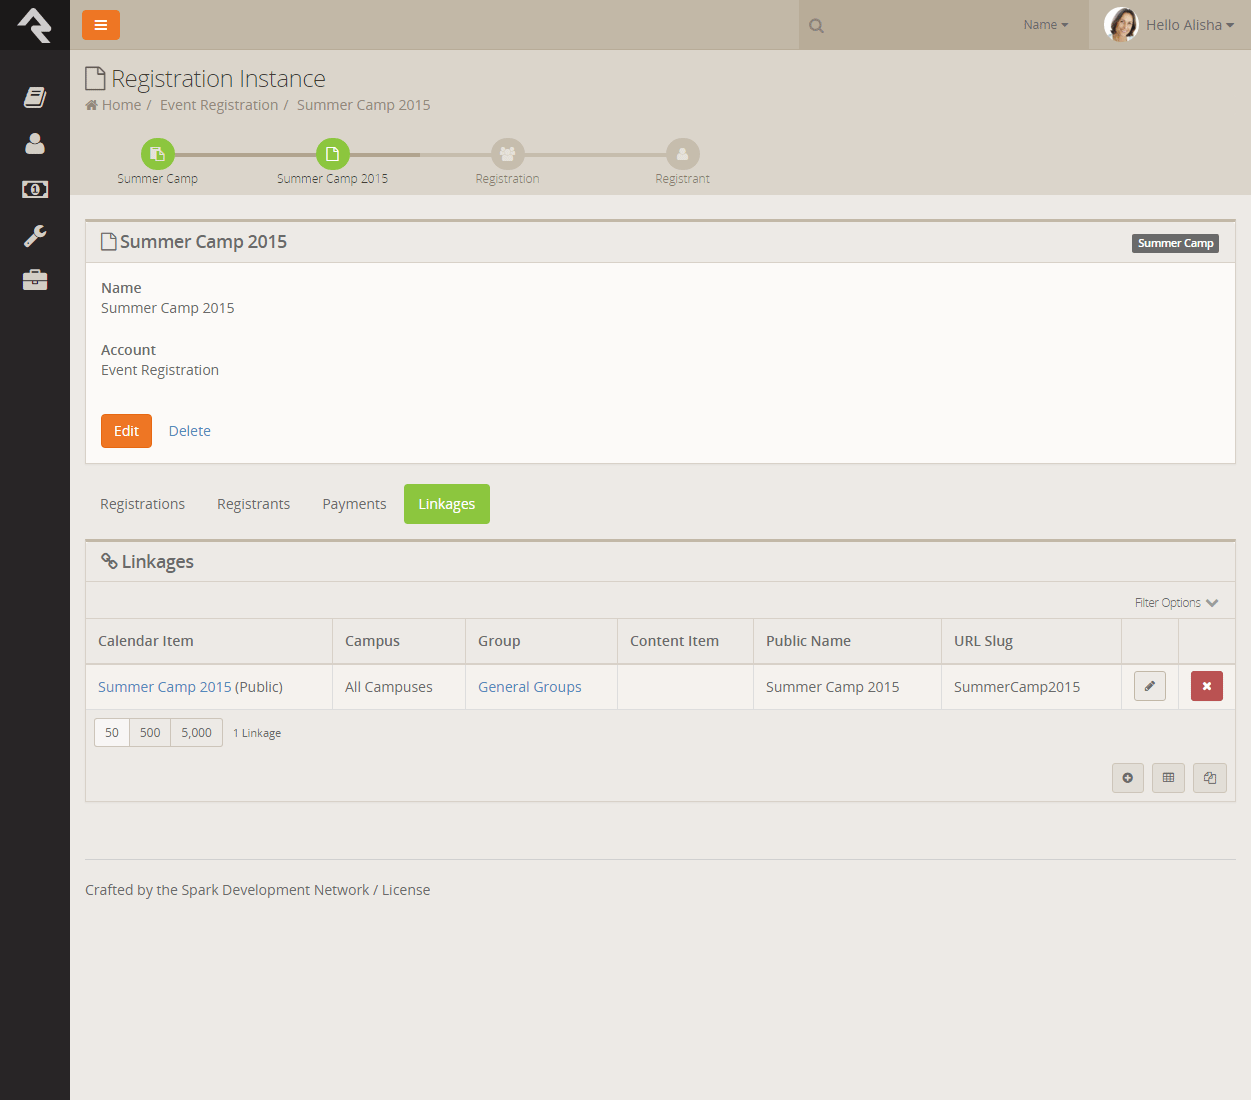
Linkages Tab
This tab will make more sense once you read the Bringing It All Together
section. Basically, it shows all of the related calendar events and groups
that are linked to this registration.
Registration Instance Registrants
Registration Payment Reminders
Allowing partial payments is great, but getting the remaining balance has always been difficult. That was until Rock came around. Now there are several
tools for getting the remaining balance quickly and easily.
Rock provides several tools to allow you to easily receive the amount owed. Let's look at all your options!
Manual Reminders
One way to remind individuals of remaining balances is to manually send them a reminder. You can do this from the
Registration Instance page.
Once you click the Send Payment Reminder link you'll see the page below.
This page allows you to customize the reminder text and who should receive the email.
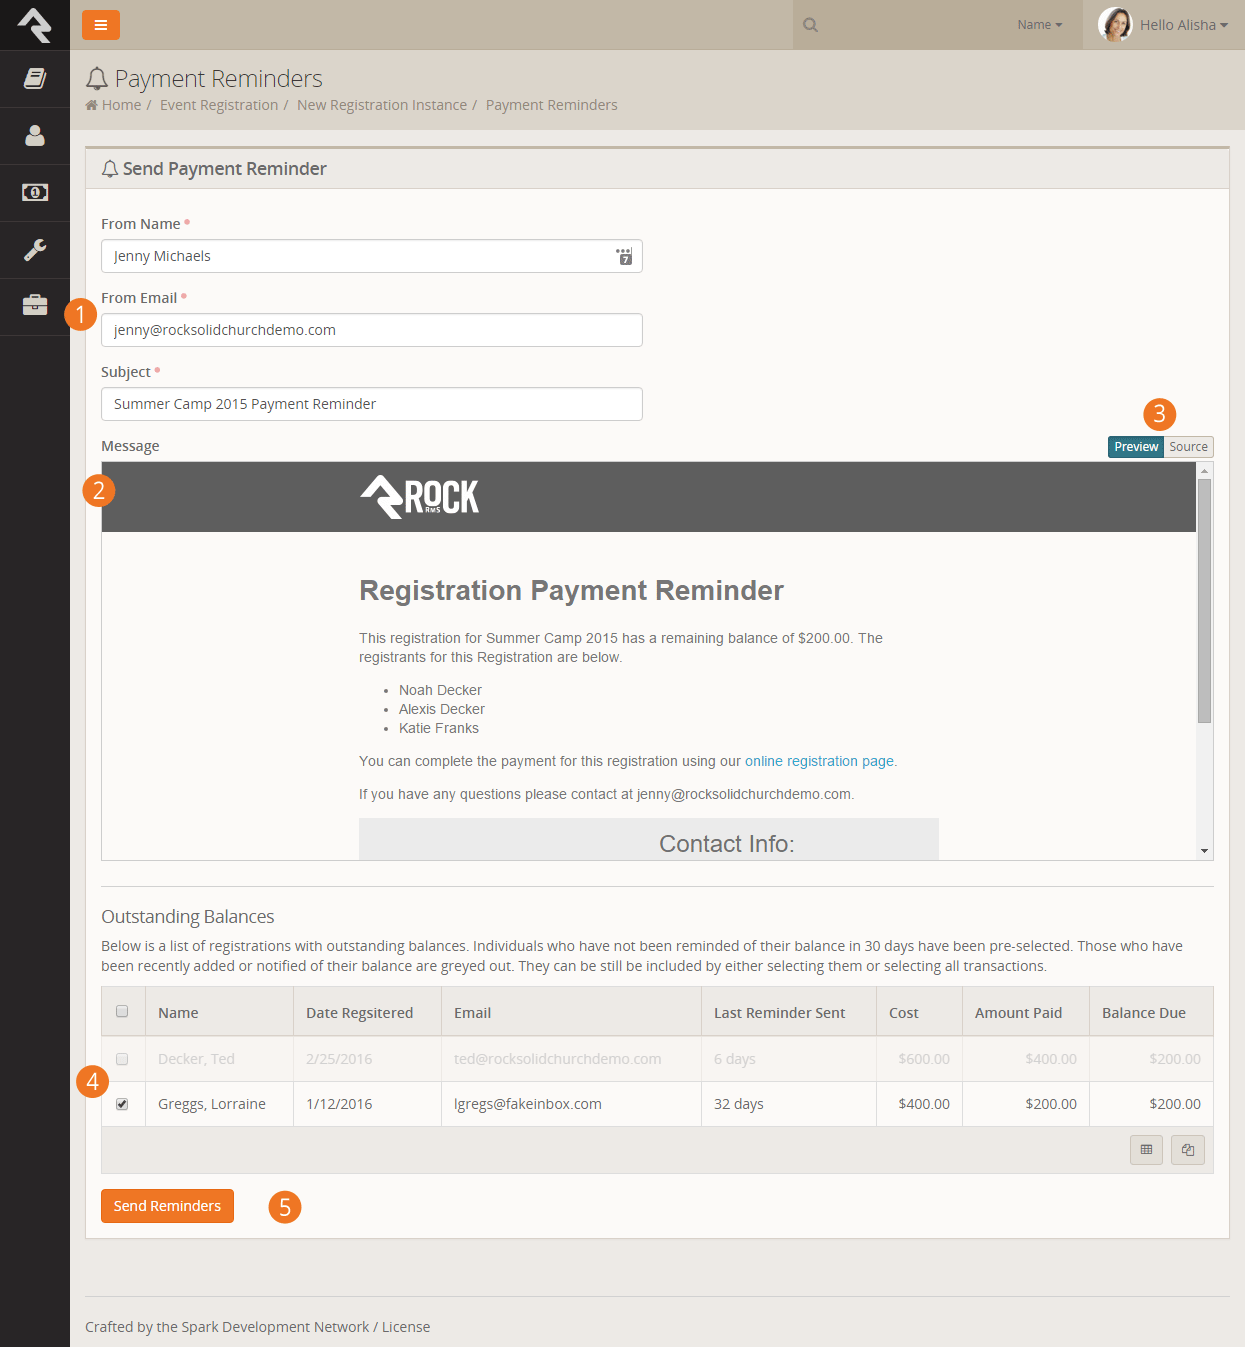
- 1
- The "from" name and email as well as the subject should be filled in for you based on the values supplied from the registration template. You
can edit these values to suit your needs.
- 2
- Next you see a preview of the email the individuals will receive. The preview uses the information for the first person on the grid below
to give you a precise view of what the person will receive in their inbox.
- 3
- You can choose to edit the email template if you wish by clicking the Source
toggle. This will display the Lava template that creates this email.
- 4
- Below the preview you'll see a list of those with a remaining balance. When creating the list, Rock looks at the
Payment Reminder Time Span setting for the registration template.
If the registration has already received a reminder or was created within this timespan, the registration is greyed out and is not
selected (the checkbox is checked). You can, however, override this and select specific registrations or all registrations.
- 5
- Click the Send Reminders button and you're off to the races!
Automatic Reminders
Manual reminders are nice, but automatic ones…well they're even better! If you provide a
Payment Reminder Time Span on the registration template, Rock will send an
automatic reminder to the registrations based on that timeframe. So for example, if you provide the value of 30 for the
Payment Reminder Time Span, they will receive a reminder every 30 days until
their balance is paid.
This sending is done through the Event Payment Reminders job
under System Settings > Jobs Administration. This job does have one
configuration parameter you should be aware of. The job Cut-off Date
is the number of days past the registration close date to send reminders. After this cut-off, reminders will need to be sent manually to
prevent eternal reminders.
Registration Group Placements
Sometimes a registation isn't over once all the information is collected. In fact sometimes that's just the beginning. That's certainly
the case with events like sports teams and camps. After all the registrations are in you still need to form teams and camp groups. That's
where Rock's registration placement features kick in. They allow you to easily add registrants to group heirarchies.
In order for these tools to kick in, you need to first enable them on your registration template. The setting is labeled
Allow Group Placement on the
Details tab of the template. Once that's enabled, you're off to the races.
Placement
Once the placement feature is enabled, you will see an extra tab under your registration instance. From this tab you can quickly place the
registrants into groups of your choosing. Let's see how this works.
Registration Group Placement
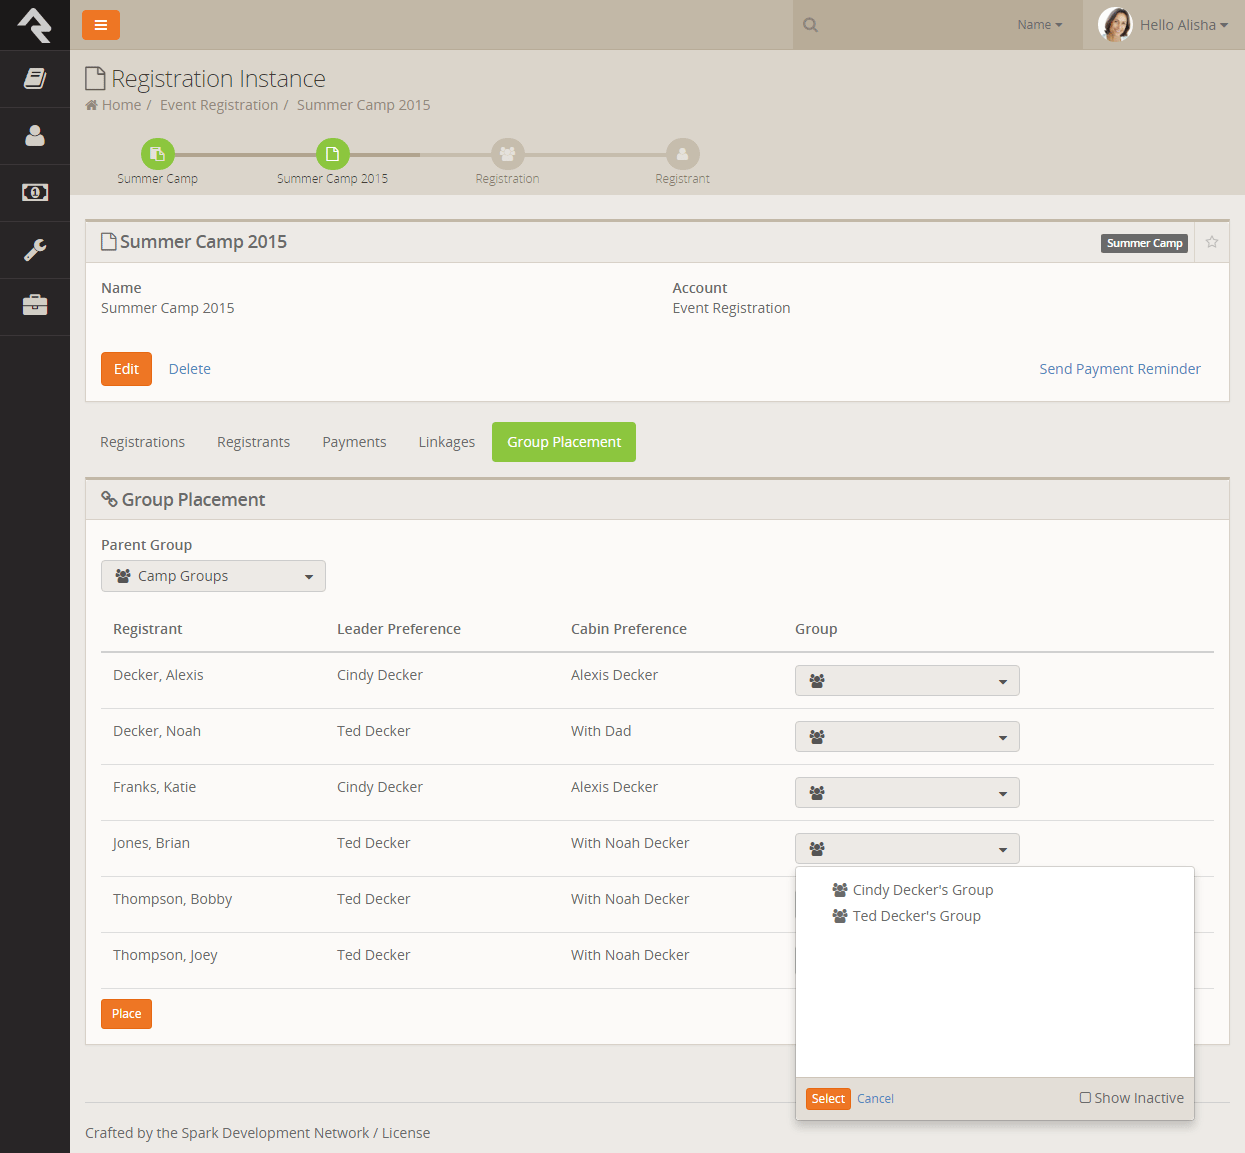
The first thing you'll notice is the parent group drop-down. This setting allows you to pick a group that will become the top level or container group for
all of the placement groups. When you select a parent group, you may notice that some of the registrants disappear. Don't worry, this just indicates that that
registrant is already in a child group under the parent. Hiding them allows you to focus solely on the registrants who have not yet been placed. If you'd like to
change a registrant's placement group, simply remove them from the group and they'll re-appear.
After selecting the parent group it's time to select the placement group for each child. Note that the registrant list shows all the attributes that are
selected as Show On Grid. During the placement process you may wish to adjust which
attributes are shown.
Once you have selected the placement groups, select Place to add the
individuals to the groups.
You Can Place In More Than One Group
Let's say for your camp registration you'd like to place a child in a cabin group and a bus group. No problem! Just ensure that the bus and cabin groups are under
separate parents. You can then run the placement twice.
Registration Finances
Paid registrations come with the additional complexity of having to work with money. Rock
provides serveral tools to make this as simple as possible while also ensuring that there
are good protections in place for proper accountability.
Adding Payments
While most of the time payments for events will be handled by the registrar during the registration
process, you can manually enter payments on their behalf from the registration details page
Tools > Event Registration > Registration Template > Registration Instance > Registration
(ok... that seems complex, but it's really not as bad as it look on paper...)
From the Registration Details page you can manage payments
using the View/Edit Payments Link (highlighted below).
Once you click the link you will see the Payments Edit Panel.
The screenshot below shows you all the options on this screen.
Payments Edit Panel
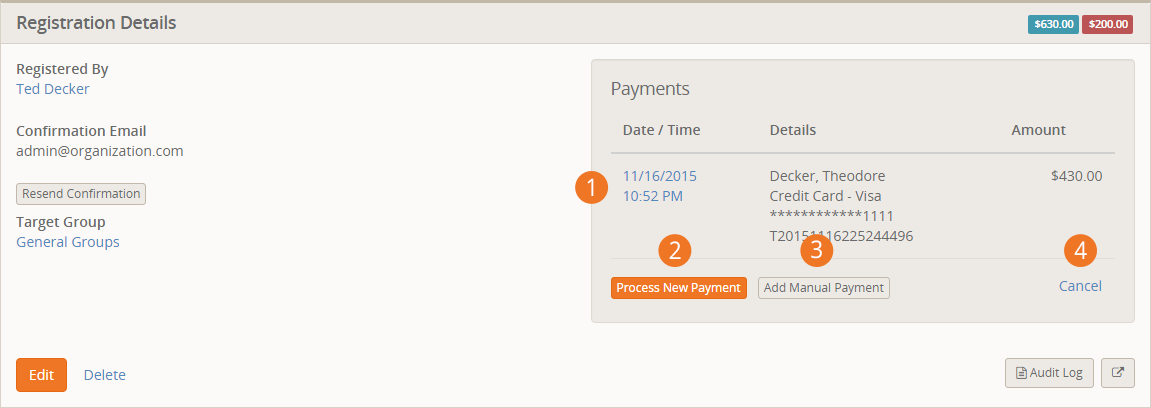
- 1 Payment Detail
- Clicking on the date of the payment will take you to the financial transaction detail page for the payment. From
here you can get more information about the payment and process a full or partial refund.
- 2 Process A New Payment
- Selecting this option allows you to run a new payment through Rock.
- 3 Add Manual Payment
- This optional allows you to enter the details of a manual (off-line) payment.
- 4 Cancel
- To go back to the view mode simply select the cancel button.
Refunds
Processing full or partial refunds through Rock is simple. Simply click the
Payment Detail link
show in call-out #1 above to proceed to the financial transaction detail page for the payment.
From here you will see the screen below. Note the refund button at the bottom of the page.
Clicking the Refund button will
show the refund modal below.
Payments Edit Panel
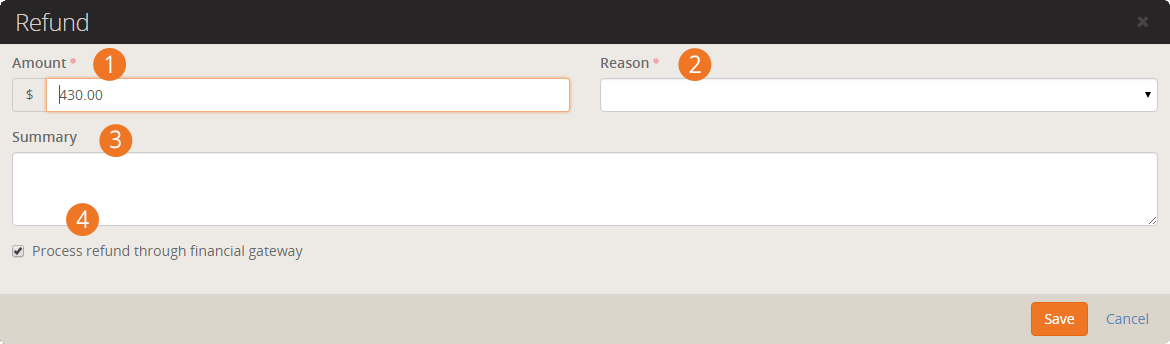
- 1 Amount
- This tells Rock how much the refund should be for. By default the
full amount of the financial transaction is entered into the box.
- 2 Refund Reason
- This dropdown allows you to pick from a standard set of refund reasons. You
can modify this list under Admin Tools >
General Settings > Defined Types > Refund Reasons
- 3 Sumary
- This field allows you to enter specific notes about the refund.
- 4 Process Refund Through Gateway
- This checkbox determines if the refund should be automatically run through the payment gateway
or just entered into Rock (unchecked).
Partial Payments
Partial payments are a popular feature for events with higher costs, like camps. The age ol' problem with
them comes when it's time to complete the payments. May times people want to pay off the balance, but they're
not sure how. Other times... well... they just need a reminder. Let's look at several strategies on how to
make partial payments work for you.
Reminder Emails
The default email template for event reminders will provide a summary of the amount due with a link to
complete the payment. Remember that the reminder emails can be sent out more than once by changing the
send date to the future after the initial reminder goes out.
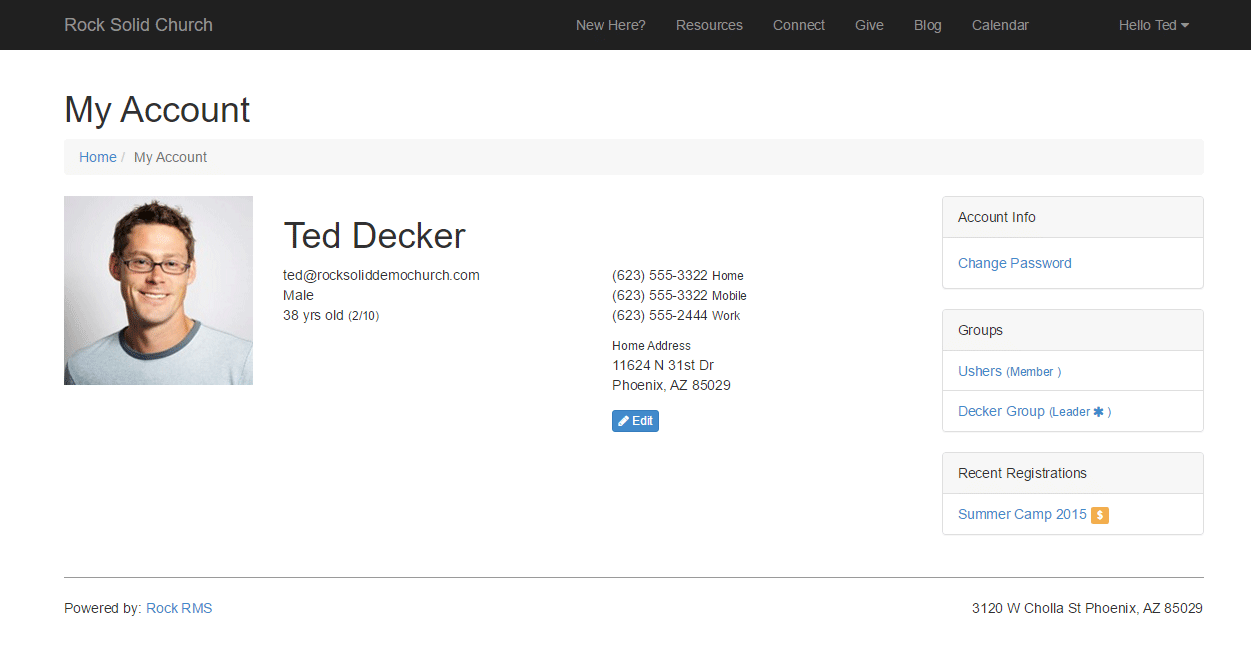
Recent Registration Block
Rock also ships with a Recent Registration
block on the My Account page of the external
website. This block lists any recent registrations and notes if a payment is due. Clicking the link will take
them to a page where they can complete the payment.
Recent Registration Block
Calendars
There are three components that make up Rock's calendar capabilities: Calendars, Events and Event Occurrences.
Calendar Components
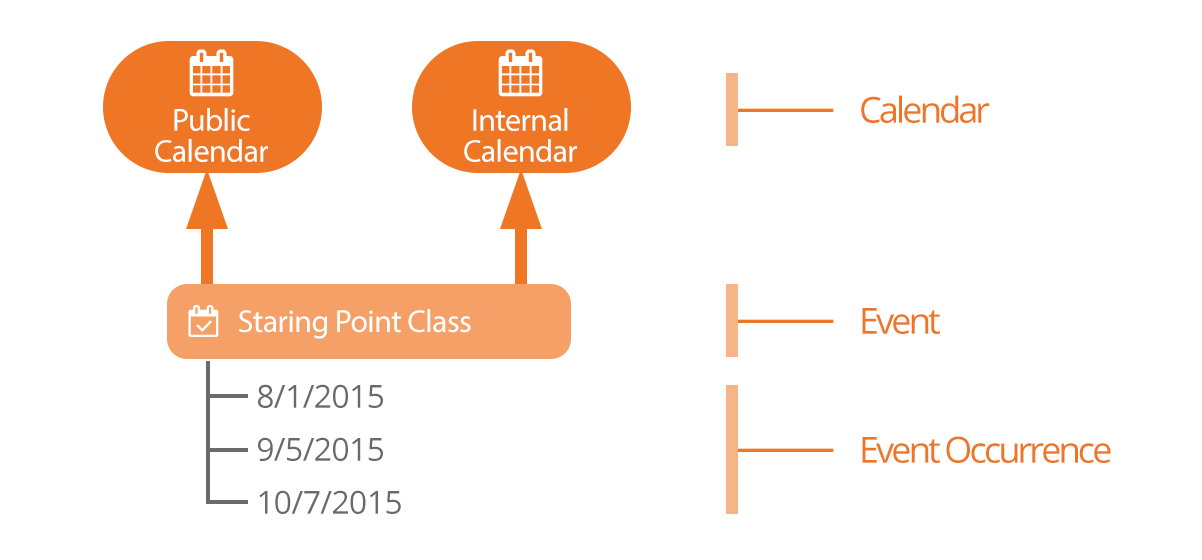
One might wonder why we need separate events and event occurrences. Couldn't we just put the
schedule on the event and be done with it? That would certainly work, but there are cases where
the same type of event, say Baptism, happens repeatedly. Having separate event and event items
allows us to do things like list all the upcoming baptism dates.
Event Calendars
Every organization has the need for multiple calendars. Even a small organization will have
a public and private (internal) calendar. Most will have several more. You can administrate
calendars under Tools > Calendars.
Out of the box Rock ships with two pre-configured calendars:
- Internal: Used for internal events like staff meetings retreats, etc.
- Public: For events targeted towards your members and attendees.
Events Can Be Placed On More Than One Calendar:
Sometimes you'll have an event that should be displayed on more than one calendar. Rock
supports this. An event can be on any number of calendars you'd like.
Calendar List
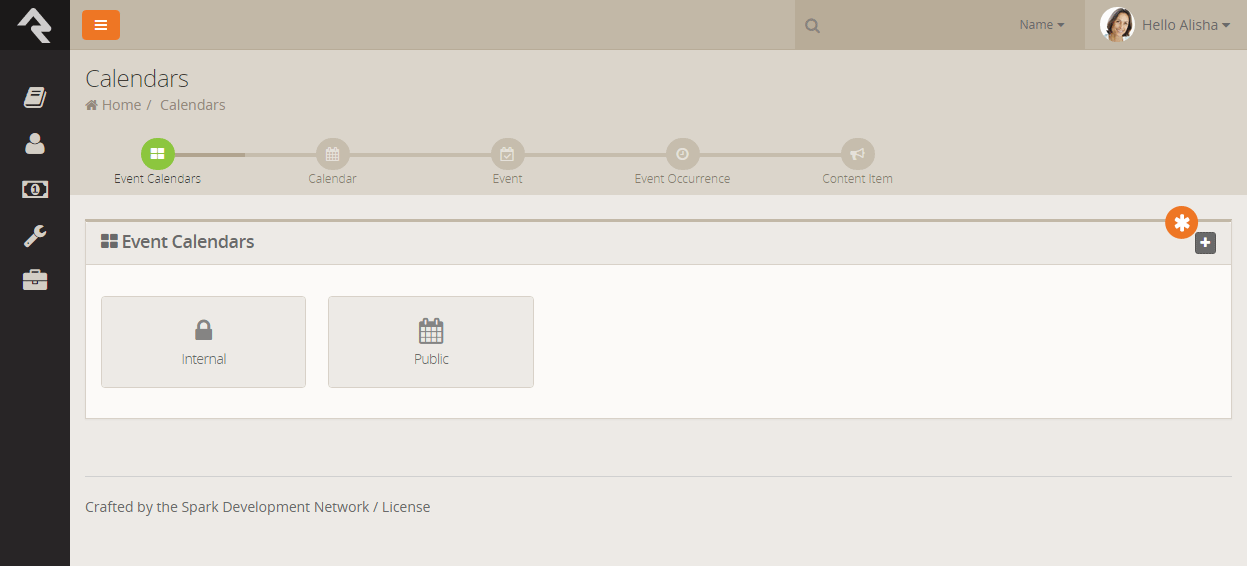
You can add additional calendars by selecting the add button in the upper right of the panel.
When adding or editing a calendar you will see the screen below:
Calendar Details
- 1 Name
- The name of the calendar.
- 2 Active
- Whether the calendar is currently active.
- 3 Description
- A quick reminder of what the calendar is for and how it should be used.
- 4 Icon CSS Class
- The Font Awesome icon class the calendar should use.
- 5 Event Attributes
- Each calendar can define custom attributes available to the events that are on them.
This is where you define these attributes.
- 6 Content Channels
- We'll cover content channels later in the Bringing It All Together
chapter. For now just know that you can link content channels to events to allow you to
easily promote them.
Calendar Security
You can set up security for each calendar you define. This allows you to delegate the
management of these calendars and their events. You set security from the
Calendar Details Page
by pressing the button.
Events
Once you've created your calendar, you're ready to place events on them. The
Calendar Details Page
(Tools > Calendars > Calendar)
shows a list of the current events for a calendar. As you get more and more events you'll
want to start using the filters on this grid to help you manage the events that are displayed.
The event add/edit screen below shows you how to manage the events on the calendar.
Calendar Details
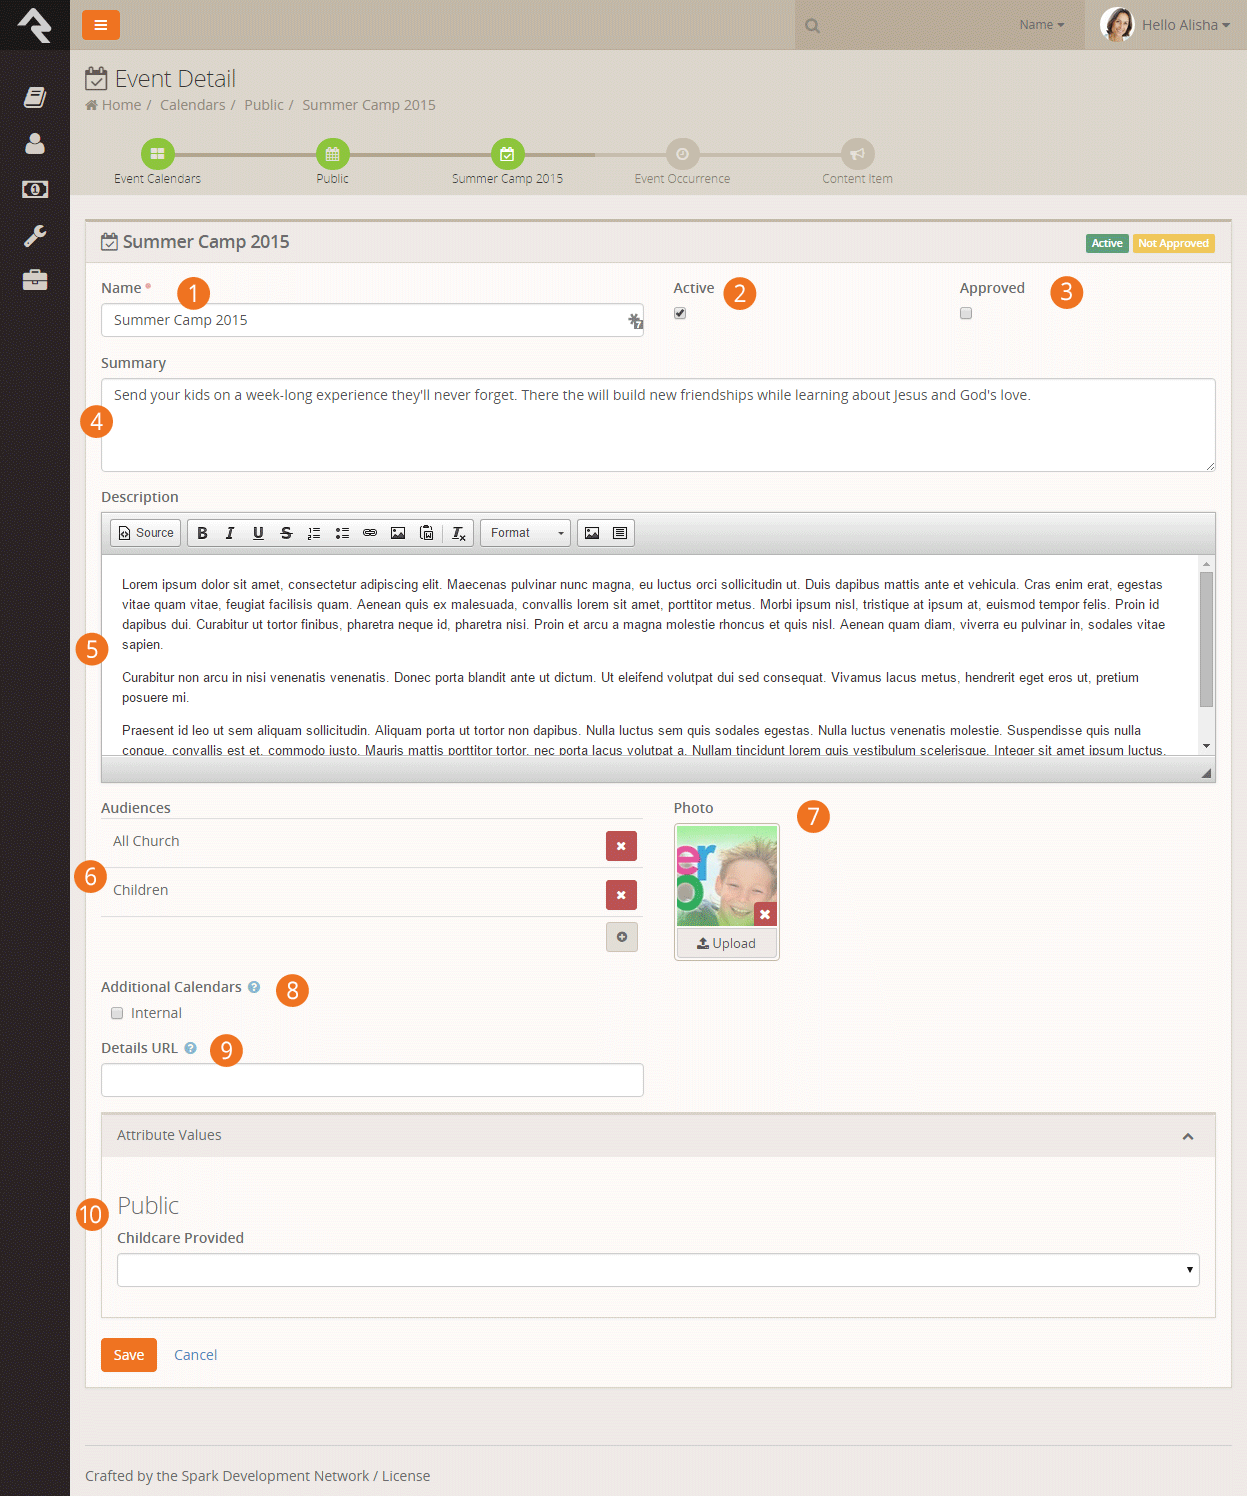
- 1 Name
- The name of the event.
- 2 Active
- Whether the event is currently active.
- 2 Approved
- If you have 'Approval' permission to the calendar you'll be able to approve the event here.
- 4 Summary
- A quick description of the event that will display on the calendar when
listing multiple events.
- 5 Description
- A more complete description of the event that will be displayed on the event detail page.
- 6 Audiences
- This helps to categorize the events by those who would be most interested. These are
the same audience choices that are used for the other web content channels.
- 7 Photo
- A picture is worth a thousand words right? So don’t skimp - include one on your event.
- 8 Additional Calendars
- As we mentioned above, you can place your event on as many calendars as you'd like.
- 9 Details URL
- If you provide a web address here it will be used instead of the Rock event details page when your
guests click 'More Information' from the calendar.
- 10 Attribute Values
- Remember how we could define custom attributes for the events on custom calendars?
This is where you'll add the values for these attributes. The attributes are grouped by
calendar.
Follow An Event
After saving an event you can choose to follow it by selecting tthe
icon in the upper right corner of the details block. This will add it to the list of followed events on
your dashboard.
Event Occurrences
We have our calendar and now, events. All that's left is to add the event occurrences that
determine when these events occur. Some events may only occur once, while other apply often.
Either way, you'll add the occurrences from the Event Details Page.
Event Instance Edit
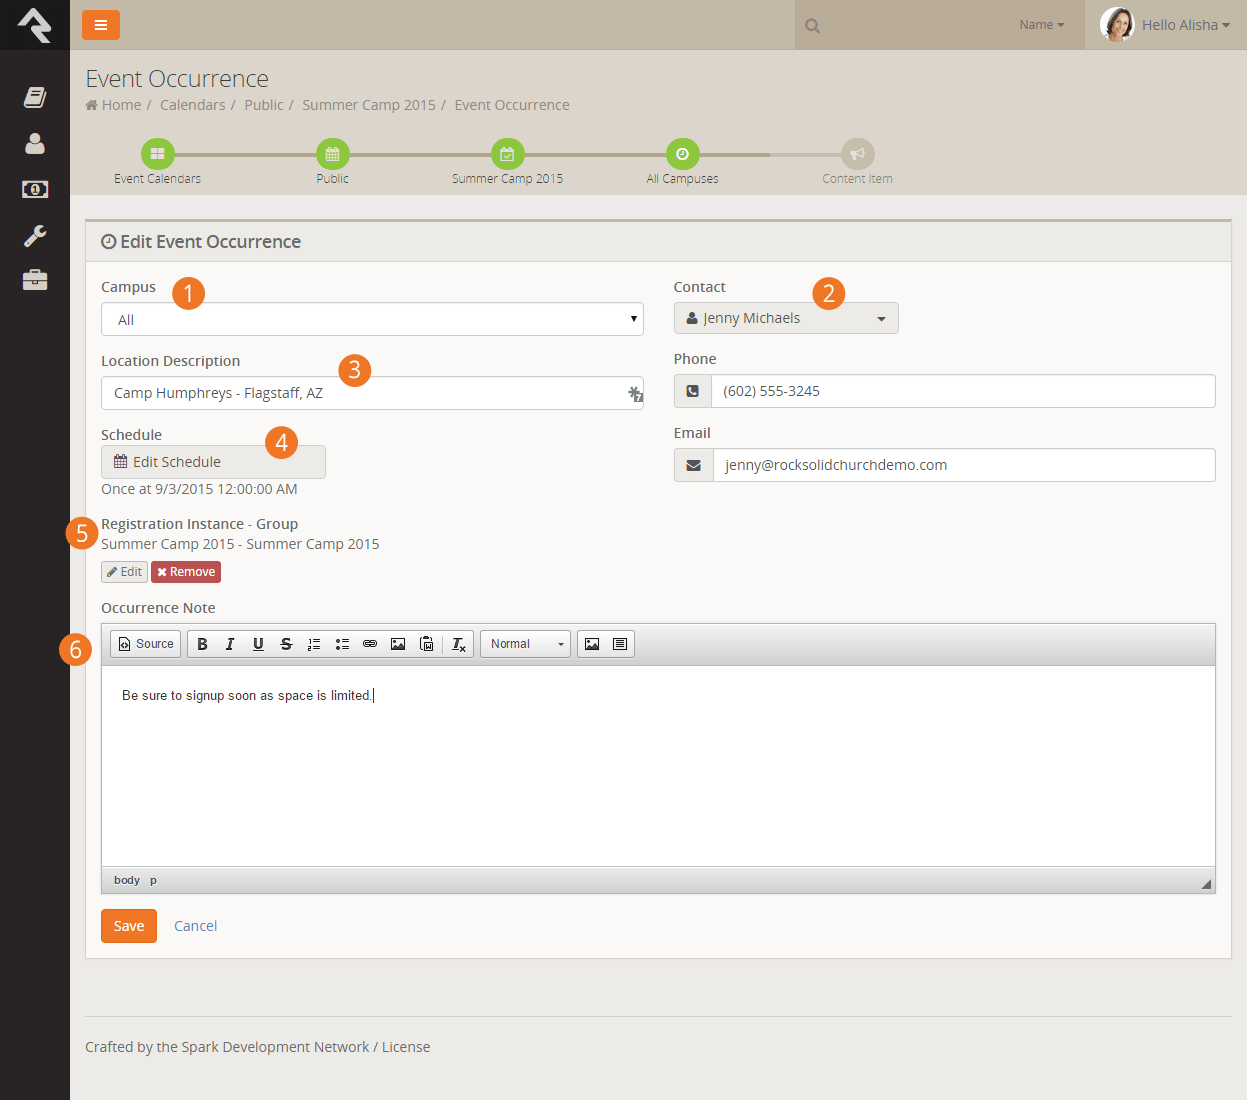
- 1 Campus
- First we must select which campus this event will occur on (single campus organizations
can select either all or the main campus).
- 2 Contact Information
- Next we select who the contact will be and provide their email and phone number.
- 3 Location Description
- Now we can describe the location where the event will be held. Instead of using a
location picker, we decided to allow you to enter a more descriptive text of where the
event is being held.
- 4 Schedule
- Ok, now for the important part. When will the event occur? Hopefully by now you've
had a chance to use the Rock Schedule Builder
tool in other features. It's a powerful tool for defining complex re-occurring schedules.
It also does simple one-time schedules too.
- 5 Registration Instance / Group
- Most often, you'll want to create a registration for your calendar event. Instead of
having to leave the screen to create the registration instance, you can do it right here.
We'll talk more about how to do this in the Bringing It All Together chapter.
- 6 Occurrence Note
- This note will be shown on the calendar detail screen on the pubic website. It's
used to provide custom notes about the specific occurrence.
You might be thinking, "Hey! Reoccurring
schedules? I thought we were supposed to create a new occurrence each time the
event occurred?" Yes... and no... Some occurrences of an event may last two
to three weeks (say a single occurrence of a three-week stewardship class). In this case,
make a single occurrence with a reoccurring schedule.
Once you save your calendar occurrence, you'll be taken to the occurrence detail screen.
From here you'll see that you can add any content channel items that have been configured
for the calendar. This allows you to enter and track promos for your event.
Event Instance Detail
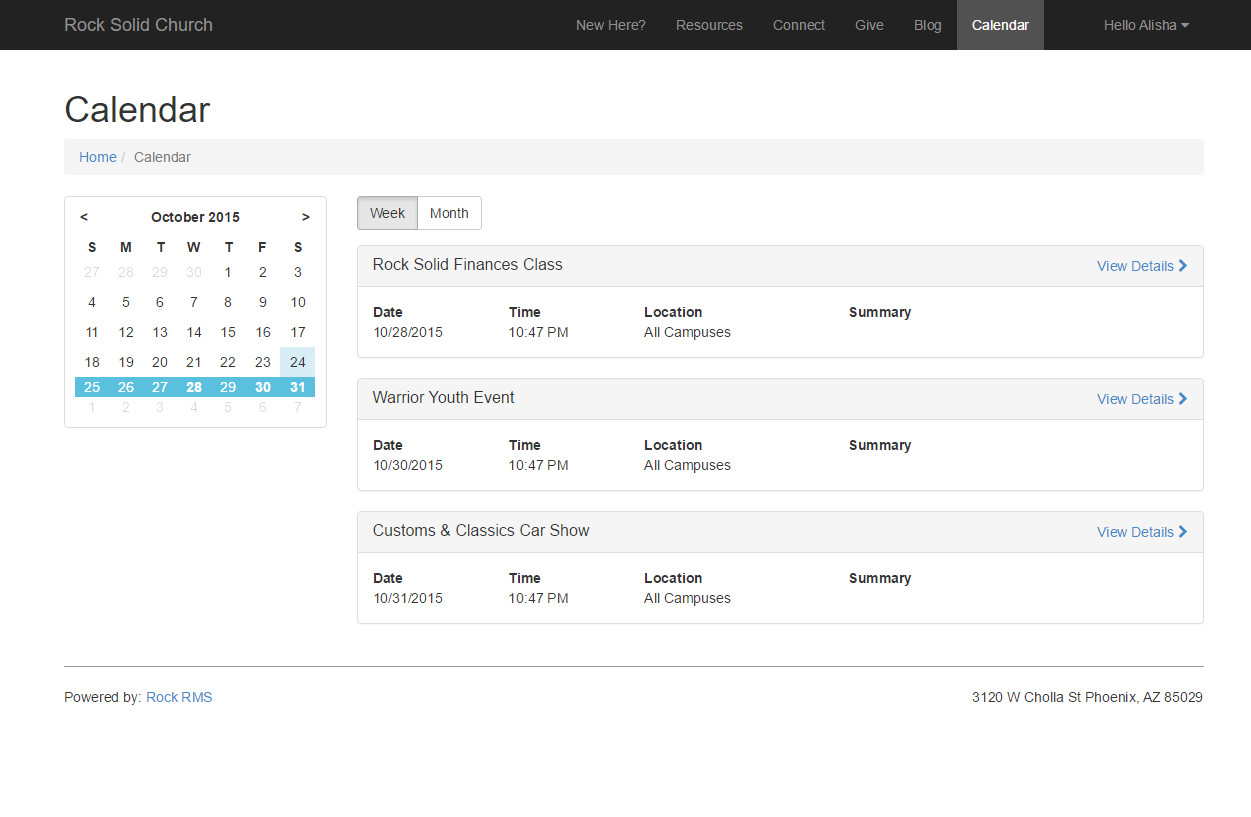
Calendar Blocks
Below is what the calendar looks like on the external website. These blocks have a ton of settings (much of the page is rendered in Lava so
the possibilities are endless).
Calendar Block
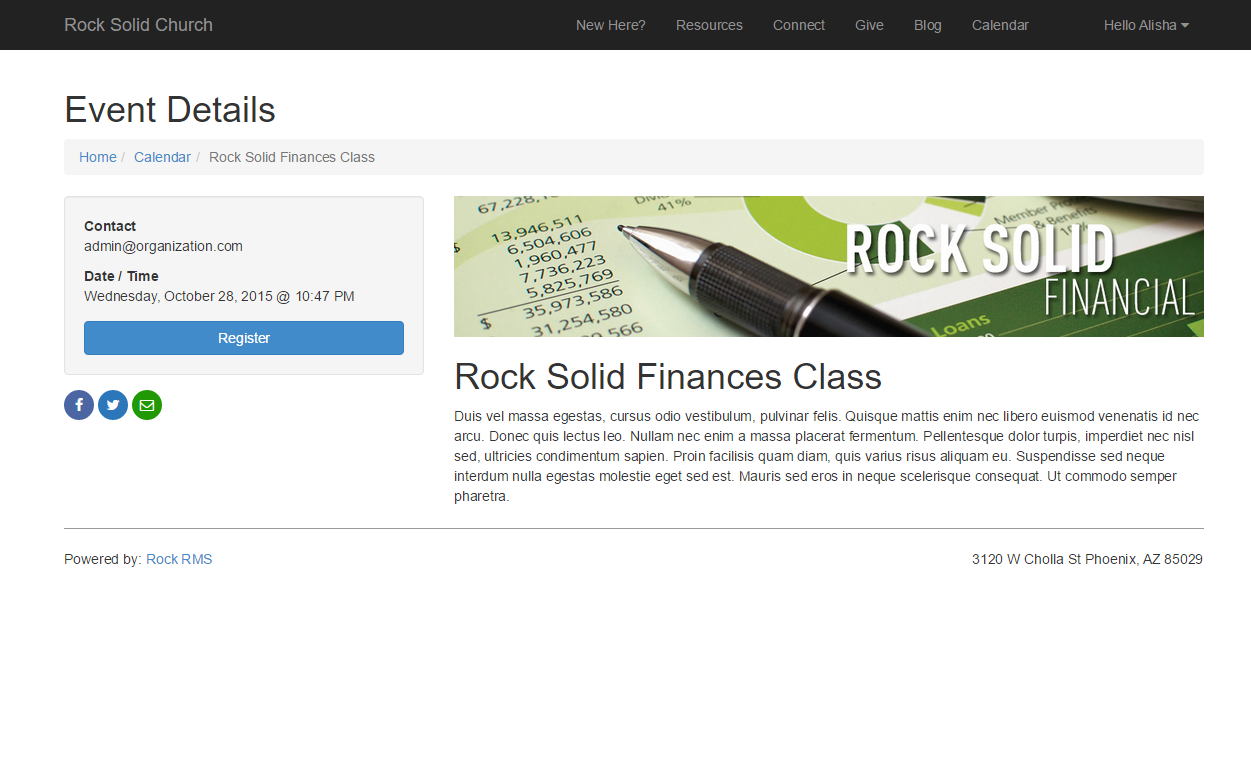
 Event Detail Block
Bringing It All Together
Hopefully you're starting to see the symbiotic relationship between event registrations and
calendar events. The fact that they share the same manual should tell you that they go together
like peas and carrots (or steak and potatoes). We've also seen that groups can be linked to
registrations, and that content channels also have a role with calendar events.
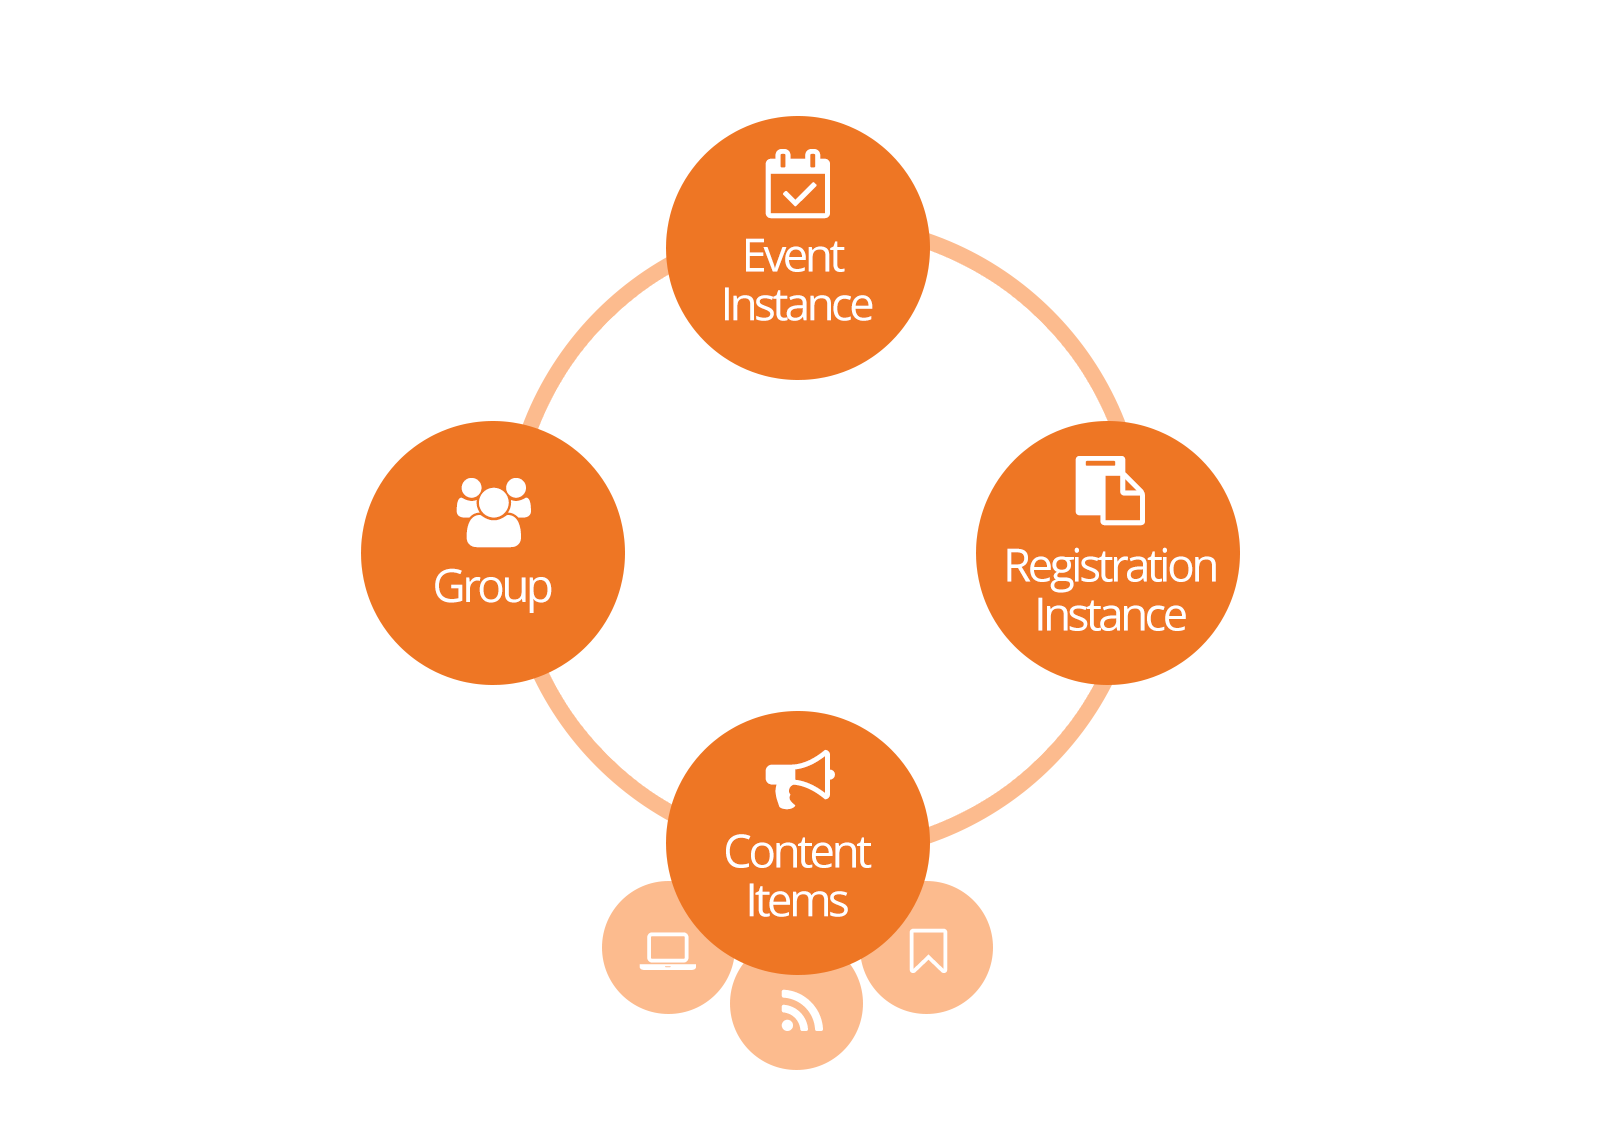
You might be wondering how you're going to manage all these items for a specific event. We did
too, so we worked hard to make it as simple as possible. Here’s how.
While you can link registrations, events, groups and content channel items many different ways
here's the easiest.
- Create your event group that the registration will place registrants into.
- Create your calendar event and occurrence. While editing your occurrence select the
Add New Registration Instance
button. This will allow you to create and link a registration instance right to your event.
You'll notice that this screen is the same one from the registration details, except that it
has a few extra fields.
- Registration Template: We can choose which registration template we
would like to use for the event. Doing this does assume that a registration template is
already available for you to use for your event. If not you'll need to do that first.
- Group: From this screen you'll also be able to link the group you
created in step #1.
- URL Slug: Say what?! A slug
is a common web term that refers to a part of a web address that identifies a page or
component of a page using human-readable keywords. If you're not Noah Webster, that means
instead of saying Registration?RegistrationInstanceId=153,
you can say Registration/SummerCamp2015 instead.
- After saving the occurrence, you can enter any content channel items you need for your event.
Once you create these linkages, you can view and manage them from either the calendar occurrence, group or event instance detail screens.
Securing Calendars and Events
There are two security roles that help secure the management of calendars and events. Let's look at each.
Securing Calendars
While those in the RSR - Staff Workers and
RSR - Staff Like Workers roles can view and
add new events only those in the RSR - Calendar Administration
can approve events and create new calendars.
Securing Event Registrations
Like calendars those in the RSR - Staff Workers and
RSR - Staff Like Workers roles can create
new instances of registrations but only those in the
RSR - Event Registration Administration
can create new registration templates.
From a financial perspective anyone in the staff/staff-like roles can add payments to a registration but out of the box
you will need to be in the RSR - Finance Administration
role to process refunds.
Event Blocks
How you decide to display events to your guests will be very unique. Rock provides several blocks to help
you craft the experience you desire.
Calendar Block Calendar Lava
This block is the basic calendar list block for your external calendar. The screen shot below shows the block
in its default form, however this block comes with a ton of settings to change the way it is displayed. Below is
a list of settings that this block provides.
- Event Calendar: The calendar (public, internal, etc.) to pull events from.
- Default View Option: Which view option (day, week or month) to initially show .
- Details Page: The page to navigate to, to show the event's details.
- Campus Filter Display Mode: Options to show a campus filter (Hidden, Plain, Panel Open, Panel Closed)
- Audience Filter Display Mode: Options to show an audience filter (Hidden, Plain, Panel Open, Panel Closed)
- Filter Audiences: Allows you to filter which audiences you'd like to show as filter options.
- Show Date Range Filter: Determines whether a date range filter should be displayed.
- Show Small Calendar: Determines whether the small calendar in the upper left should be shown.
- Show Day View: Determines whether the day view should be shown as an option.
- Show Week View: Determines whether the week view should be shown as an option.
- Show Month View: Determines whether the month view should be shown as an option.
- Enable Campus Content: Determines whether the campus context should be used to filter the events (assumes that
a campus context is in use on your site.)
- Lava Template: The Lava template that will be used to format the list of filtered events.
- Start of Week Day: Determines what day is the start of a week.
- Set Page Title: Determines if the block should set the page title with the calendar name.
- Enable Debug: This setting helps you create your Lava template by allowing you to view the Lava
objects available.
Event Item Occurence Detail Event Item Occurence Lava
Once you pick an event from the calendar, this is the block that displays the
details for the event occurrence. This page is formatted entirely using Lava, so customize at will.
- Registration Page: The page to navigate to for registration.
- Set Page Title: Determines if the block should set the page title with the event item name.
- Lava Template: The Lava template that will be used to format the list of filtered events.
- Set Page Title: Determines if the block should set the page title with the calendar name.
- Enable Debug: This setting helps you create your Lava template by allowing you to view the Lava
objects available.
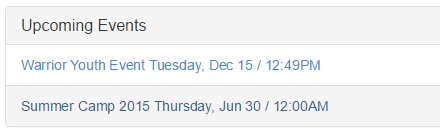
Event Item Occurence List Event Item Occurence List Lava
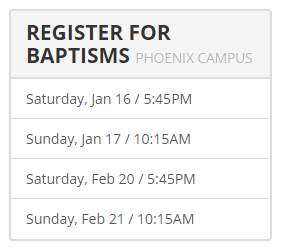
This is more of a specialty block. It lists upcoming occurrences for a specific event item. This is helpful for events
like specific classes (e.g. Starting Point, Stewardship Class) or events that routinely happen (e.g. Baptisms).
- Event Item: The event item to show occurrences for.
- Campuses: Which campuses to show occurrences for.
- Use Campus Content: Determines whether the campus context should be used to filter the events (assumes that
a campus context is in use on your site.)
- Date Range: You can filter the occurence list by a sliding date range (e.g. upcoming two weeks).
- Max Occurrences: The maximum number of occurrences to show.
- Registration Page: The page to navigate to for registration.
- Lava Template: The Lava template that will be used to format the list of filtered events.
- Set Page Title: Determines if the block should set the page title with the calendar name.
- Enable Debug: This setting helps you create your Lava template by allowing you to view the Lava
objects available.
Event Item Occurence List By Audience Event Item Occurence List By Audience Lava
This is another specialty block. It lists upcoming occurrences for a specific audience (All Church, Youth, Children, etc.). This is helpful for
pages devoted to these audiences.
- Audience: The audience to filter on.
- Calendar: Which calendar to use.
- Use Campus Content: Determines whether the campus context should be used to filter the events (assumes that
a campus context is in use on your site.)
- Date Range: You can filter the occurence list by a sliding date range (e.g. upcoming two weeks).
- Max Occurrences: The maximum number of occurrences to show.
- Registration Page: The page to navigate to for registration.
- Lava Template: The Lava template that will be used to format the list of filtered events.
- Set Page Title: Determines if the block should set the page title with the calendar name.
- Enable Debug: This setting helps you create your Lava template by allowing you to view the Lava
objects available.
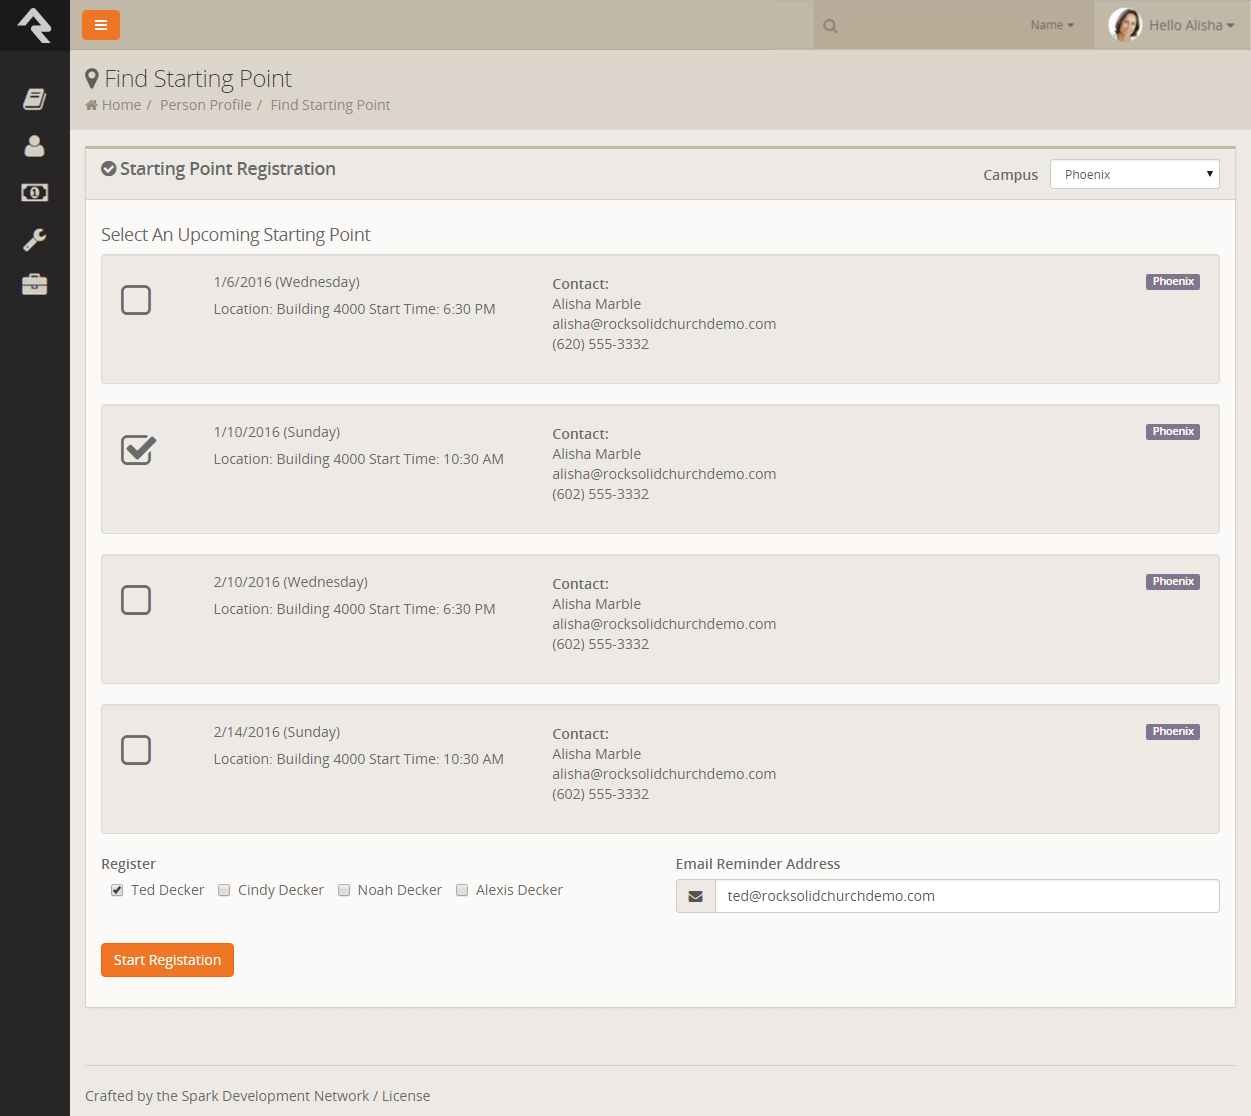
Event Item Personalized RegistrationEvent Item Personalized Registration
This is a quirky, but insanely cool little block. Its main use is to faciliate internal registrations for special classes from
an individual's Person Profile page. Let's dig into a sample to understand
this better.
Say your organization has a special orientation class called Starting Point. Previous attendance in this class is really important
to you so you've create a special badge to show if someone has attended this class. But... you also want to easily be able to register
people for upcoming classes when they call or email you. You can then set the markup of your badge to link to a page with this block if
they have not attended Starting Point. This block takes the person and looks up upcoming class dates based on their campus. Once you
select a date you can select other members of the family and create a registration to add them to the class.
It should be noted that this block creates an online registration and then redirects to the registration block to complete the process. This
allows for the collection of extra fields configured for the registration and also allows for things like confirmation and reminder emails.
- Include Family Members: Determines if a list of family members should be displayed to include in the registration.
- Days In Range: The number of days in the future to filter event occurrences for.
- Max Display Events: The maximum number of occurrences to show.
- Registration Page: The page to redirect to, to complete the registration.
- Start Registration At Beginning: You can optionally choose to redirect to the beginning of the registration process (a good
option if you expect additional custom fields to be needed) or the end (a good option if additional fields are not needed as you can
quickly complete the registration).
The block requires the following inputs through the URL:
- PersonGuid: The Guid of the person to be registered.
- EventItemId: The Id of the event item to process the registration for.